User Manual
Page 2
Contents Product Registration 2 For Your Records 2 Important Product Safety Instructions 3 Antenna Installation Instructions 4 Cleaning the LCD Display 4 Getting Started Package Contents 5 Front View of the Product 6 Rear View of the Product 7 Remote Control 8 Installation 9 OSD Functions Source Input-TV Mode 13 E N Source Input-YPbPr, AV, S-Video Mode 18 G L Other Information I S Specifications 20 H Troubleshooting 21 Customer Support 22 Limited Warranty 23 Appendix Safety Guidelines 24 Compliance Information for U.S.A 25 ViewSonic N2010 1
Contents Product Registration 2 For Your Records 2 Important Product Safety Instructions 3 Antenna Installation Instructions 4 Cleaning the LCD Display 4 Getting Started Package Contents 5 Front View of the Product 6 Rear View of the Product 7 Remote Control 8 Installation 9 OSD Functions Source Input-TV Mode 13 E N Source Input-YPbPr, AV, S-Video Mode 18 G L Other Information I S Specifications 20 H Troubleshooting 21 Customer Support 22 Limited Warranty 23 Appendix Safety Guidelines 24 Compliance Information for U.S.A 25 ViewSonic N2010 1
User Manual
Page 3
... be liable for any additional product information as it becomes available, please register your future needs, and to ViewSonic. No part of our environment. In the interest of ViewSonic Corporation. Copyright © ViewSonic Corporation, 2005. ViewSonic N2010 2 All rights reserved. Information in this document may change product specifications without notice. E N For Your Records G Product Name...
... be liable for any additional product information as it becomes available, please register your future needs, and to ViewSonic. No part of our environment. In the interest of ViewSonic Corporation. Copyright © ViewSonic Corporation, 2005. ViewSonic N2010 2 All rights reserved. Information in this document may change product specifications without notice. E N For Your Records G Product Name...
User Manual
Page 4
... ensure reliable operation of the polarized plug. 2. Your LCD display contains high-voltage parts. Do not block the openings by ViewSonic. S Do not attempt repair yourself. Never remove the rear cover. ViewSonic N2010 3 IMPORTANT PRODUCT SAFETY INSTRUCTIONS ATTENTION: Follow and obey all the safety and operating instructions before you operate this product follow...
... ensure reliable operation of the polarized plug. 2. Your LCD display contains high-voltage parts. Do not block the openings by ViewSonic. S Do not attempt repair yourself. Never remove the rear cover. ViewSonic N2010 3 IMPORTANT PRODUCT SAFETY INSTRUCTIONS ATTENTION: Follow and obey all the safety and operating instructions before you operate this product follow...

User Manual
Page 5
...will not be taken to proper grounding of the mast and supporting structure, grounding of the lead-in the vicinity of the LCD display. ViewSonic will prevent damage to the product due to damage the screen and/or case of overhead power lines or other particles. 2 If still... case. This removes dust and other electric light or power circuits, or where it from the wall outlet and disconnect the antenna or cable system. ViewSonic N2010 4 To clean the screen: E N 1 Wipe the screen with them might be located in wire to an antenna discharge unit, connection to improve. 3. H...
...will not be taken to proper grounding of the mast and supporting structure, grounding of the lead-in the vicinity of the LCD display. ViewSonic will prevent damage to the product due to damage the screen and/or case of overhead power lines or other particles. 2 If still... case. This removes dust and other electric light or power circuits, or where it from the wall outlet and disconnect the antenna or cable system. ViewSonic N2010 4 To clean the screen: E N 1 Wipe the screen with them might be located in wire to an antenna discharge unit, connection to improve. 3. H...
User Manual
Page 6
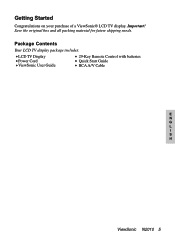
Save the original box and all packing material for future shipping needs. Important! Package Contents Your LCD TV display package includes: LCD TV Display Power Cord ViewSonic User Guide 29-Key Remote Control with batteries Quick Start Guide RCA A/V Cable E N G L I S H ViewSonic N2010 5 Getting Started Congratulations on your purchase of a ViewSonic® LCD TV display.
Save the original box and all packing material for future shipping needs. Important! Package Contents Your LCD TV display package includes: LCD TV Display Power Cord ViewSonic User Guide 29-Key Remote Control with batteries Quick Start Guide RCA A/V Cable E N G L I S H ViewSonic N2010 5 Getting Started Congratulations on your purchase of a ViewSonic® LCD TV display.
User Manual
Page 7
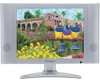
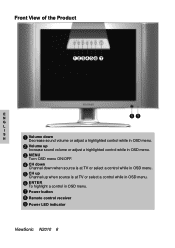
Front View of the Product 123456 7 E N 89 G L I S H 1 Volume down Decrease sound volume or adjust a highlighted control while in OSD menu. 2 Volume up Increase sound volume or adjust a highlighted control while in OSD menu. 3 MENU Turn OSD menu ON/OFF. 4 CH down Channel down when source is at TV or select a control while in OSD menu. 5 CH up Channel up when source is at TV or select a control while in OSD menu. 6 ENTER To highlight a control in OSD menu. 7 Power button 8 Remote control receiver 9 Power LED indicator ViewSonic N2010 6
Front View of the Product 123456 7 E N 89 G L I S H 1 Volume down Decrease sound volume or adjust a highlighted control while in OSD menu. 2 Volume up Increase sound volume or adjust a highlighted control while in OSD menu. 3 MENU Turn OSD menu ON/OFF. 4 CH down Channel down when source is at TV or select a control while in OSD menu. 5 CH up Channel up when source is at TV or select a control while in OSD menu. 6 ENTER To highlight a control in OSD menu. 7 Power button 8 Remote control receiver 9 Power LED indicator ViewSonic N2010 6
User Manual
Page 8
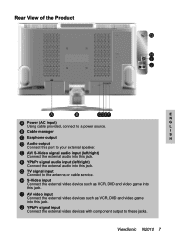
... these jacks. L B Cable manager I S C Earphone output H D Audio output Connect this jack. E AV/ S-Video signal audio input (left /right) Connect the external audio into this jack. ViewSonic N2010 7 Rear View of the Product G H I J A B CDEF E N A Power (AC input) G Using cable provided, connect to your external speaker. H S-Video input Connect the external video device such...
... these jacks. L B Cable manager I S C Earphone output H D Audio output Connect this jack. E AV/ S-Video signal audio input (left /right) Connect the external audio into this jack. ViewSonic N2010 7 Rear View of the Product G H I J A B CDEF E N A Power (AC input) G Using cable provided, connect to your external speaker. H S-Video input Connect the external video device such...
User Manual
Page 9
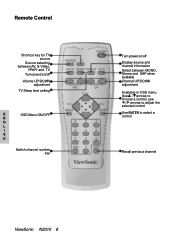
Remote Control Shortcut key for TV source Source selecting between AV, S-Video, YPbPr and TV Turn sound on/off Volume UP/DOWN adjustment TV Sleep time setting E OSD Menu ON/OFF N G L I S H Switch channel number key Turn power on/off Display source and channel information Select between MONO, Stereo and SAP when available Channel UP/DOWN adjustment Available in OSD menu Use / arrows to choose a control, use / arrows to adjust the selected control Use ENTER to select a control Recall previous channel ViewSonic N2010 8
Remote Control Shortcut key for TV source Source selecting between AV, S-Video, YPbPr and TV Turn sound on/off Volume UP/DOWN adjustment TV Sleep time setting E OSD Menu ON/OFF N G L I S H Switch channel number key Turn power on/off Display source and channel information Select between MONO, Stereo and SAP when available Channel UP/DOWN adjustment Available in OSD menu Use / arrows to choose a control, use / arrows to adjust the selected control Use ENTER to select a control Recall previous channel ViewSonic N2010 8
User Manual
Page 10
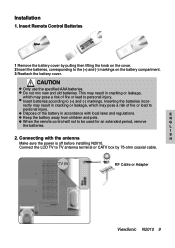
... and pets. This may result in cracking or leakage, which may result in accordance with the antenna H Make sure the power is off before installing N2010. Do not mix new and old batteries. N When the remote control will not to (+) and (-) markings. Installation 1. Insert batteries according to be used for an... regulations. rectly may pose a risk of fire or lead to the (+) and (-) markings on the battery compartment. 3 Reattach the battery cover. L I S 2. RF Cable or Adapter ViewSonic N2010 9
... and pets. This may result in cracking or leakage, which may result in accordance with the antenna H Make sure the power is off before installing N2010. Do not mix new and old batteries. N When the remote control will not to (+) and (-) markings. Installation 1. Insert batteries according to be used for an... regulations. rectly may pose a risk of fire or lead to the (+) and (-) markings on the battery compartment. 3 Reattach the battery cover. L I S 2. RF Cable or Adapter ViewSonic N2010 9
User Manual
Page 11
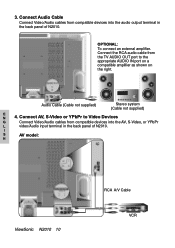
... as shown on the right. Connect Audio Cable Connect Video/Audio cables from compatible devices into the audio output terminal in the back panel of N2010. 3. OPTIONAL: To connect an external amplifier. I S AV model: H ViewSonic N2010 10 RCA A/V Cable VCR Audio Cable (Cable not supplied) Stereo system (Cable not supplied) E N 4.
... as shown on the right. Connect Audio Cable Connect Video/Audio cables from compatible devices into the audio output terminal in the back panel of N2010. 3. OPTIONAL: To connect an external amplifier. I S AV model: H ViewSonic N2010 10 RCA A/V Cable VCR Audio Cable (Cable not supplied) Stereo system (Cable not supplied) E N 4.
User Manual
Page 13
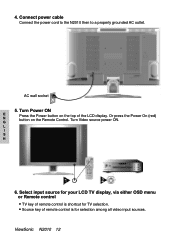
AC wall socket 5. Turn Power ON E N G Press the Power button on the Remote Control. Source key of remote control is for TV selection. ViewSonic N2010 12 Or press the Power On (red) button on the top of the LCD display. 4. Turn Video source power ON. Connect power cable Connect the power cord to the N2010 then to a properly grounded AC outlet. L I S H 6. Select input source for your LCD TV display, via either OSD menu or Remote control TV key of remote control is shortcut for selection among all video input sources.
AC wall socket 5. Turn Power ON E N G Press the Power button on the Remote Control. Source key of remote control is for TV selection. ViewSonic N2010 12 Or press the Power On (red) button on the top of the LCD display. 4. Turn Video source power ON. Connect power cable Connect the power cord to the N2010 then to a properly grounded AC outlet. L I S H 6. Select input source for your LCD TV display, via either OSD menu or Remote control TV key of remote control is shortcut for selection among all video input sources.
User Manual
Page 14
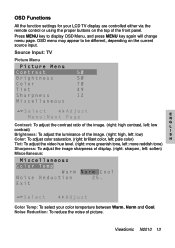
... or using the proper buttons on the current source input. OSD Functions All the function settings for your color temperture between Warm, Norm and Cool. ViewSonic N2010 13 OSD menu may appear to display OSD Menu, and press MENU key again will change menu page. Press MENU key to be different, depending...
... or using the proper buttons on the current source input. OSD Functions All the function settings for your color temperture between Warm, Norm and Cool. ViewSonic N2010 13 OSD menu may appear to display OSD Menu, and press MENU key again will change menu page. Press MENU key to be different, depending...
User Manual
Page 15
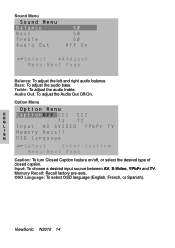
Treble: To adjust the audio treble. Memory Recall: Recall factory pre-sets. ViewSonic N2010 14 Audio Out: To adjust the Audio Out Off/On. Input: To choose a desired input source between AV, S-Video, YPbPr and TV. Option Menu E N G L I S H Caption: To turn Closed Caption feature on/off, or select the desired type of closed caption. Sound Menu Balance: To adjust the left and right audio balance. OSD Language: To select OSD language (English, French, or Spanish). Bass: To adjust the audio bass.
Treble: To adjust the audio treble. Memory Recall: Recall factory pre-sets. ViewSonic N2010 14 Audio Out: To adjust the Audio Out Off/On. Input: To choose a desired input source between AV, S-Video, YPbPr and TV. Option Menu E N G L I S H Caption: To turn Closed Caption feature on/off, or select the desired type of closed caption. Sound Menu Balance: To adjust the left and right audio balance. OSD Language: To select OSD language (English, French, or Spanish). Bass: To adjust the audio bass.
User Manual
Page 16
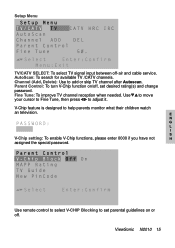
... setting: To enable V-Chip functions, please enter 0000 if you have not H assigned the special password. Fine Tune: To improve TV channel reception when needed. ViewSonic N2010 15 Use to move your cursor to Fine Tune, then press to help parents monitor what their children watch an television. Channel (Add, Delete): Use...
... setting: To enable V-Chip functions, please enter 0000 if you have not H assigned the special password. Fine Tune: To improve TV channel reception when needed. ViewSonic N2010 15 Use to move your cursor to Fine Tune, then press to help parents monitor what their children watch an television. Channel (Add, Delete): Use...
User Manual
Page 17
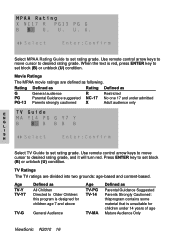
... PG-13 General audience Parental Guidance suggested Parents strongly cautioned R NC-17 X Restricted No one 17 and under 14 years of age Mature Audience Only ViewSonic N2010 16 TV Ratings The TV ratings are defined as Parental Guidance Suggested Parents Strongly Cautioned: thisprogram contains some material that is unsuitable for children age...
... PG-13 General audience Parental Guidance suggested Parents strongly cautioned R NC-17 X Restricted No one 17 and under 14 years of age Mature Audience Only ViewSonic N2010 16 TV Ratings The TV ratings are defined as Parental Guidance Suggested Parents Strongly Cautioned: thisprogram contains some material that is unsuitable for children age...
User Manual
Page 18
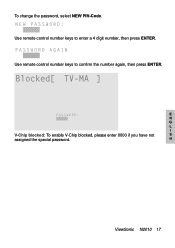
Use remote control number keys to confirm the number again, then press ENTER. Use remote control number keys to enter a 4 digit number, then press ENTER. E N G L I V-Chip blocked: To enable V-Chip blocked, please enter 0000 if you have not S assigned the special password. H ViewSonic N2010 17 To change the password, select NEW PIN-Code.
Use remote control number keys to confirm the number again, then press ENTER. Use remote control number keys to enter a 4 digit number, then press ENTER. E N G L I V-Chip blocked: To enable V-Chip blocked, please enter 0000 if you have not S assigned the special password. H ViewSonic N2010 17 To change the password, select NEW PIN-Code.

User Manual
Page 19
... the contrast ratio of the image level. (right: high contrast, left : soften) L Miscellaneous: I S H Color Temp: To select your color temperture between Warm, Norm and Cool. ViewSonic N2010 18 Noise Reduction: To reduce the noise of the image level. (right: Max, left: low) Color: To adjust color saturation. (right: brilliant color, left: pale...
... the contrast ratio of the image level. (right: high contrast, left : soften) L Miscellaneous: I S H Color Temp: To select your color temperture between Warm, Norm and Cool. ViewSonic N2010 18 Noise Reduction: To reduce the noise of the image level. (right: Max, left: low) Color: To adjust color saturation. (right: brilliant color, left: pale...

User Manual
Page 20
Treble: To adjust the audio treble. Audio Out: To adjust the Audio Out Off/On. Memory Recall: Recall factory pre-sets. Option Menu E N G L I S H Caption: To turn Closed Caption feature on/off, or select the desired type of closed caption. Input: To choose a desired input source among AV, S-Video, YPbPr and TV. OSD Language: To select OSD language (English, French, or Spanish). Sound Menu Balance: To adjust the left and right audio balance. ViewSonic N2010 19 Bass: To adjust the audio bass.
Treble: To adjust the audio treble. Audio Out: To adjust the Audio Out Off/On. Memory Recall: Recall factory pre-sets. Option Menu E N G L I S H Caption: To turn Closed Caption feature on/off, or select the desired type of closed caption. Input: To choose a desired input source among AV, S-Video, YPbPr and TV. OSD Language: To select OSD language (English, French, or Spanish). Sound Menu Balance: To adjust the left and right audio balance. ViewSonic N2010 19 Bass: To adjust the audio bass.
User Manual
Page 21
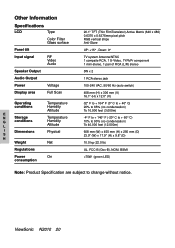
Other Information Specifications LCD Type Color Filter Glass surface Panel tilt Input signal RF Video Audio Speaker Output Audio Output Power Voltage Display area Full Scan Operating conditions E N Storage G conditions L I Dimensions S H Weight Regulations Power consumption Temperature Humidity Altitude Temperature Humidity Altitude Physical Net On 20.1" TFT (Thin FilmTransistor) Active Matrix (640 x 480) 0.6375 x 0.6375mm pixel pitch RGB vertical stripe Anti-Glare UP: +15° , Down: 0° TV system Antenna/NTSC 1 compsite RCA, 1 S-Video, 1YPbPr component 1 ...
Other Information Specifications LCD Type Color Filter Glass surface Panel tilt Input signal RF Video Audio Speaker Output Audio Output Power Voltage Display area Full Scan Operating conditions E N Storage G conditions L I Dimensions S H Weight Regulations Power consumption Temperature Humidity Altitude Temperature Humidity Altitude Physical Net On 20.1" TFT (Thin FilmTransistor) Active Matrix (640 x 480) 0.6375 x 0.6375mm pixel pitch RGB vertical stripe Anti-Glare UP: +15° , Down: 0° TV system Antenna/NTSC 1 compsite RCA, 1 S-Video, 1YPbPr component 1 ...
User Manual
Page 22
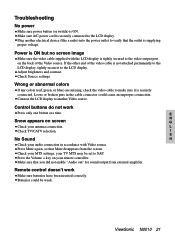
... voltage. Check your MTS settings, your antenna connection. Adjust brightness and contrast. Press the Volume + key on the back of the video cable is ON. ViewSonic N2010 21 Loose or broken pins in accordance with the LCD display is securely connected to the LCD display. Control buttons do not work Make sure...
... voltage. Check your MTS settings, your antenna connection. Adjust brightness and contrast. Press the Volume + key on the back of the video cable is ON. ViewSonic N2010 21 Loose or broken pins in accordance with the LCD display is securely connected to the LCD display. Control buttons do not work Make sure...


