DPG801BK Spec Sheet
Page 2
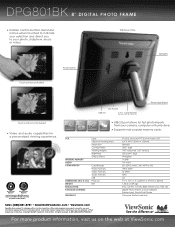
...kg) FCC, CE, ETL, C-TICK, BSMI, GOST, CCC, PSE, CB Digital Photo Frame, power adapter, frame stand, Quick Start Guide One-year limited warranty Sales: (888) 881-8781 • SalesInfo@ViewSonic.com • ViewSonic.com Specifications subject to your photo, slideshow, music or video. Copyright © 2009... ViewSonic Corporation. see your camera, computer or thumb drive. > Supports most popular memory cards. ViewSonic Corporation's QMS & EMS have been registered to ISO 9001 & ISO 14001, respectively, by country; DPG801BK 8" DIGITAL PHOTO FRAME > ...
...kg) FCC, CE, ETL, C-TICK, BSMI, GOST, CCC, PSE, CB Digital Photo Frame, power adapter, frame stand, Quick Start Guide One-year limited warranty Sales: (888) 881-8781 • SalesInfo@ViewSonic.com • ViewSonic.com Specifications subject to your photo, slideshow, music or video. Copyright © 2009... ViewSonic Corporation. see your camera, computer or thumb drive. > Supports most popular memory cards. ViewSonic Corporation's QMS & EMS have been registered to ISO 9001 & ISO 14001, respectively, by country; DPG801BK 8" DIGITAL PHOTO FRAME > ...
DPG801 QSG User Guide
Page 8
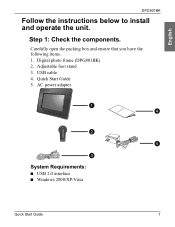
Carefully open the packing box and ensure that you have the following items. 1. Digital photo frame (DPG801BK) 2. Step 1: Check the components. USB cable 4. Quick Start Guide 5. AC power adapter System Requirements: ■ USB 2.0 interface ■ Windows 2000/XP/Vista Quick Start Guide 1 English DPG801BK Follow the instructions below to install and operate the unit. Adjustable foot stand 3.
Carefully open the packing box and ensure that you have the following items. 1. Digital photo frame (DPG801BK) 2. Step 1: Check the components. USB cable 4. Quick Start Guide 5. AC power adapter System Requirements: ■ USB 2.0 interface ■ Windows 2000/XP/Vista Quick Start Guide 1 English DPG801BK Follow the instructions below to install and operate the unit. Adjustable foot stand 3.
DPG801 QSG User Guide
Page 11
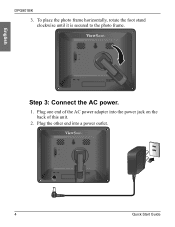
English DPG801BK 3. To place the photo frame horizontally, rotate the foot stand clockwise until it is secured to the photo frame. Plug the other end into the power jack on the back of this unit. 2. Plug one end of the AC power adapter into a power outlet. 4 Quick Start Guide Step 3: Connect the AC power. 1.
English DPG801BK 3. To place the photo frame horizontally, rotate the foot stand clockwise until it is secured to the photo frame. Plug the other end into the power jack on the back of this unit. 2. Plug one end of the AC power adapter into a power outlet. 4 Quick Start Guide Step 3: Connect the AC power. 1.


