English Owners Manual
Page 2
... Installation 5 Wall Installation 5 Direct Wall Mounting 6 Setting Up Your Phone 7 Extending the Antenna 7 Installing the Handset Battery Pack 7 Cleaning the Battery Contacts 7 Charging the Battery Pack 7 Low Battery Indicator 8 Setting the Pulse/Tone Switch 8 Adjusting Ringer Controls 8 Adjusting Handset Receiver Volume 8 Automatic Digital Code Security 8 Using Your Phone 9 Making and Receiving Calls 9 Changing Channels, Flash, and Page/Find . . . 9 Programming Your Phone 10 Storing a Number in Memory 10 Storing a Mixed Number 10 Dialing a Stored Number 10 Chain Dialing...
... Installation 5 Wall Installation 5 Direct Wall Mounting 6 Setting Up Your Phone 7 Extending the Antenna 7 Installing the Handset Battery Pack 7 Cleaning the Battery Contacts 7 Charging the Battery Pack 7 Low Battery Indicator 8 Setting the Pulse/Tone Switch 8 Adjusting Ringer Controls 8 Adjusting Handset Receiver Volume 8 Automatic Digital Code Security 8 Using Your Phone 9 Making and Receiving Calls 9 Changing Channels, Flash, and Page/Find . . . 9 Programming Your Phone 10 Storing a Number in Memory 10 Storing a Mixed Number 10 Dialing a Stored Number 10 Chain Dialing...
English Owners Manual
Page 3
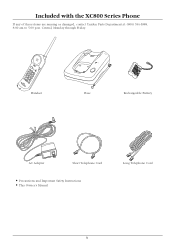
Handset Base Rechargeable Battery AC Adapter Short Telephone Cord • Precautions and Important Safety Instructions • This Owner's Manual Long Telephone Cord 3 Central, Monday through Friday. Included with the XC800 Series Phone If any of these items are missing or damaged, contact Uniden Parts Department at: (800) 554-3988, 8:00 am to 5:00 p.m.
Handset Base Rechargeable Battery AC Adapter Short Telephone Cord • Precautions and Important Safety Instructions • This Owner's Manual Long Telephone Cord 3 Central, Monday through Friday. Included with the XC800 Series Phone If any of these items are missing or damaged, contact Uniden Parts Department at: (800) 554-3988, 8:00 am to 5:00 p.m.
English Owners Manual
Page 4
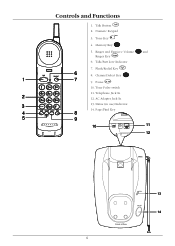
Memory Key M V 5. Tone Pulse switch 11. Page/Find Key 10 11 12 status 13 page/find 14 Extend•A•Phone 4 Controls and Functions 1. Pause P 10. Tone Key 4. Ringer and Earpiece Volume and Ringer Key G 6. Channel Select Key 9. Telephone Jack In 12. AC Adapter Jack In 13. Talk/Batt Low Indicator r 7. Status (in use) Indicator 14. Flash/Redial Key C 8. Talk Button T 2. Numeric Keypad 3.
Memory Key M V 5. Tone Pulse switch 11. Page/Find Key 10 11 12 status 13 page/find 14 Extend•A•Phone 4 Controls and Functions 1. Pause P 10. Tone Key 4. Ringer and Earpiece Volume and Ringer Key G 6. Channel Select Key 9. Telephone Jack In 12. AC Adapter Jack In 13. Talk/Batt Low Indicator r 7. Status (in use) Indicator 14. Flash/Redial Key C 8. Talk Button T 2. Numeric Keypad 3.
English Owners Manual
Page 5
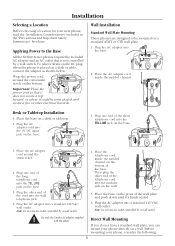
... the short telephone cord into a standard 120 VAC wall outlet. Plug the AC adapter into the base. 2. Use only the Uniden AC adapter supplied with this phone. Direct Wall Mounting If you do not have a standard wall plate, you can mount your phone directly on a desk or tabletop. 2. Place the base on a wall. Plug one end of the telephone cord into the TEL LINE jack on the base. 3. Desk or Tabletop Installation 1. Plug one...
... the short telephone cord into a standard 120 VAC wall outlet. Plug the AC adapter into the base. 2. Use only the Uniden AC adapter supplied with this phone. Direct Wall Mounting If you do not have a standard wall plate, you can mount your phone directly on a desk or tabletop. 2. Place the base on a wall. Plug one end of the telephone cord into the TEL LINE jack on the base. 3. Desk or Tabletop Installation 1. Plug one...
English Owners Manual
Page 6
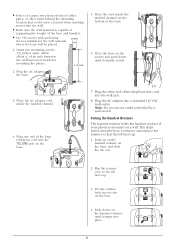
... to remove and replace the retainer so that could cause a hazard when inserting screws into the wall. • Make sure the wall material is mounted on the handset retainer until it snaps into place. 6 Place the AC adapter cord inside the molded channel on the base, and slide the tab out. 2. Setting the Handset Retainer The handset retainer holds the handset in place if your phone...
... to remove and replace the retainer so that could cause a hazard when inserting screws into the wall. • Make sure the wall material is mounted on the handset retainer until it snaps into place. 6 Place the AC adapter cord inside the molded channel on the base, and slide the tab out. 2. Setting the Handset Retainer The handset retainer holds the handset in place if your phone...
English Owners Manual
Page 7
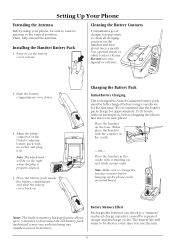
... mount only) . Place the handset in the cradle with its antenna to disconnect the old battery pack and install a new one without interruption, before plugging the phone line into your new phone. The battery life will be fully charged before hanging up to 3 minutes to the vertical position. Do not use the unit. 7 Either place the handset with the earpiece in on the handset and base...
... mount only) . Place the handset in the cradle with its antenna to disconnect the old battery pack and install a new one without interruption, before plugging the phone line into your new phone. The battery life will be fully charged before hanging up to 3 minutes to the vertical position. Do not use the unit. 7 Either place the handset with the earpiece in on the handset and base...
English Owners Manual
Page 8
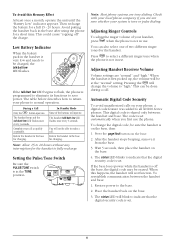
... the handset and base: 1. Low Battery Indicator When the battery pack in use. The table below describes how to return your phone, a digital code feature was added to save power. Setting the Pulse/Tone Switch Be sure the PULSE/TONE switch is first picked up, the volume will blink to the base. 2. The status LED blinks to make a call. Then recharge the battery for charging. In Standby Mode None of two different ringer tones for a short time. Check...
... the handset and base: 1. Low Battery Indicator When the battery pack in use. The table below describes how to return your phone, a digital code feature was added to save power. Setting the Pulse/Tone Switch Be sure the PULSE/TONE switch is first picked up, the volume will blink to the base. 2. The status LED blinks to make a call. Then recharge the battery for charging. In Standby Mode None of two different ringer tones for a short time. Check...
English Owners Manual
Page 9
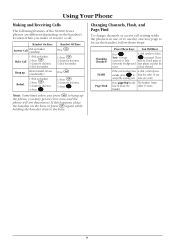
... Series phones are different depending on the handset's location when you make or receive a call waiting while the phone is pressed. Handset Off Base Press T. 1) Press T. 2) Listen for dial tone. 4) Dial the number. Note: Sometimes when you press T to hang up the phone, you accept the waiting call ). If the call waiting tone A click, a short pause, sounds, press F to help may get an error tone and the phone will not disconnect. a clear channel. handset. 9 Make Call 1) Pick up handset...
... Series phones are different depending on the handset's location when you make or receive a call waiting while the phone is pressed. Handset Off Base Press T. 1) Press T. 2) Listen for dial tone. 4) Dial the number. Note: Sometimes when you press T to hang up the phone, you accept the waiting call ). If the call waiting tone A click, a short pause, sounds, press F to help may get an error tone and the phone will not disconnect. a clear channel. handset. 9 Make Call 1) Pick up handset...
English Owners Manual
Page 10
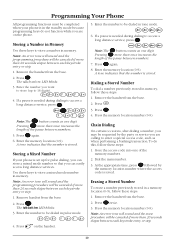
... services. Use these keys to store a number in memory, follow these steps: 1. Dial the main number. 3. Erasing a Stored Number To erase a number previously stored in memory. Press M. 4. Press M. Enter the memory location (0-9). Storing a Number in Memory Use these keys to store a mixed mode number in a memory location (0-9), follow these steps: 1. Note: An error tone will sound and the programming procedure will be canceled if more than 20 seconds elapse between numbers. 7. Remove the handset from the base...
... services. Use these keys to store a number in memory, follow these steps: 1. Dial the main number. 3. Erasing a Stored Number To erase a number previously stored in memory. Press M. 4. Press M. Enter the memory location (0-9). Storing a Number in Memory Use these keys to store a mixed mode number in a memory location (0-9), follow these steps: 1. Note: An error tone will sound and the programming procedure will be canceled if more than 20 seconds elapse between numbers. 7. Remove the handset from the base...
English Owners Manual
Page 11
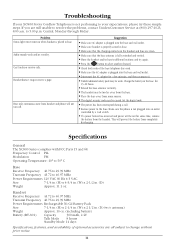
...; The digital security code may be weak. Specifications General The XC800 Series complies with FCC Parts 15 and 68. Can't make or receive calls. Handset Receive Frequency 43.72 to 46.97 MHz Transmit Frequency 48.76 to different locations and try these simple steps. If you are all subject to the base. Charge the battery on when handset is plugged into an outlet controlled by a wall switch...
...; The digital security code may be weak. Specifications General The XC800 Series complies with FCC Parts 15 and 68. Can't make or receive calls. Handset Receive Frequency 43.72 to 46.97 MHz Transmit Frequency 48.76 to different locations and try these simple steps. If you are all subject to the base. Charge the battery on when handset is plugged into an outlet controlled by a wall switch...

English Owners Manual
Page 12
All rights reserved. UDZZ01518ZB Printed in China. patents: 4,511,761 4,523,058 4,595,795 4,797,916 5,426,690 5,650,790 5,660,269 5,661,780 and other patents pending ® ©1998 Uniden America Corporation. Covered under one or more of the following U.S.
All rights reserved. UDZZ01518ZB Printed in China. patents: 4,511,761 4,523,058 4,595,795 4,797,916 5,426,690 5,650,790 5,660,269 5,661,780 and other patents pending ® ©1998 Uniden America Corporation. Covered under one or more of the following U.S.

