English Owners Manual
Page 2
... (DCT7565 Only 15 Installing the Rechargeable Battery 16 Connecting the Base and Charging the Handset 17 Installing the Belt Clip 18 Connecting to the Phone Line 18 Testing the Connection 18 Changing the Dial Mode 19 Basic Setup 19 Selecting...Handset 23 Registering Accessory Handsets 24 Registering DCX750 Handsets 24 Registering DCX640 and DCX700 Handsets ....... 24 Resetting Handsets 25 Setting Up the Phonebook 25 Creating Phonebook Entries 25 Programming Base Speed Dial Numbers (DCT7565 Only 27 Deleting Base Speed Dial Numbers 27 2 Parts of the Handset .......... 7 DCT756...
... (DCT7565 Only 15 Installing the Rechargeable Battery 16 Connecting the Base and Charging the Handset 17 Installing the Belt Clip 18 Connecting to the Phone Line 18 Testing the Connection 18 Changing the Dial Mode 19 Basic Setup 19 Selecting...Handset 23 Registering Accessory Handsets 24 Registering DCX750 Handsets 24 Registering DCX640 and DCX700 Handsets ....... 24 Resetting Handsets 25 Setting Up the Phonebook 25 Creating Phonebook Entries 25 Programming Base Speed Dial Numbers (DCT7565 Only 27 Deleting Base Speed Dial Numbers 27 2 Parts of the Handset .......... 7 DCT756...
English Owners Manual
Page 3
... Deleting All the Phonebook Entries at Once 29 Copying Phonebook Entries to Another Handset 29 Customizing Your Phone 30 Changing the Handset Banner 30 Selecting Ring Tones (Handset Only 31 Activating AutoTalk (Handset only 32 Activating Any Key Answer (Handset only 32 Using Your Phone 33 Making a Call from the Phonebook 34 Making a Call with Speed Dial...
... Deleting All the Phonebook Entries at Once 29 Copying Phonebook Entries to Another Handset 29 Customizing Your Phone 30 Changing the Handset Banner 30 Selecting Ring Tones (Handset Only 31 Activating AutoTalk (Handset only 32 Activating Any Key Answer (Handset only 32 Using Your Phone 33 Making a Call from the Phonebook 34 Making a Call with Speed Dial...

English Owners Manual
Page 4
... Replacement and Handling 46 Battery Contact Maintenance 46 Low Battery Alert 47 Talk Time, Standby Time, and Storing the Handset on the Base 47 Troubleshooting 47 Resetting the Handset 47 Resetting the Handset without the Base 48 Changing the Digital Security Code 49 Traveling Out of Range 49 Common Issues 49 Liquid Damage...
... Replacement and Handling 46 Battery Contact Maintenance 46 Low Battery Alert 47 Talk Time, Standby Time, and Storing the Handset on the Base 47 Troubleshooting 47 Resetting the Handset 47 Resetting the Handset without the Base 48 Changing the Digital Security Code 49 Traveling Out of Range 49 Common Issues 49 Liquid Damage...
English Owners Manual
Page 5
... a customer service hotline for energy efficiency. With this manual are trademarks of the phone that this Manual Base CID CID Deluxe or Call Waiting Deluxe CID/CW or CIDCW The main part of Uniden America. Caller ID on Call Waiting is a U.S. See Using Call Waiting and Call Waiting... are used in this product or product models meets the Energy Star® guidelines for accessibility questions. registered mark. Terminology used for purchasing a Uniden Multi-Handset phone. As an Energy Star® Partner, Uniden has determined that connects to 5:00 pm, CST.
... a customer service hotline for energy efficiency. With this manual are trademarks of the phone that this Manual Base CID CID Deluxe or Call Waiting Deluxe CID/CW or CIDCW The main part of Uniden America. Caller ID on Call Waiting is a U.S. See Using Call Waiting and Call Waiting... are used in this product or product models meets the Energy Star® guidelines for accessibility questions. registered mark. Terminology used for purchasing a Uniden Multi-Handset phone. As an Energy Star® Partner, Uniden has determined that connects to 5:00 pm, CST.
English Owners Manual
Page 6
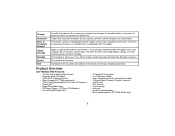
...model. No dial tone is not in standby. Any handset or the base. This phone system is expandable and will support a total of four handsets to registered handsets and the base. Only one base. If you have accessory handsets on the handset or the base, enabling a dial tone. If ...global menu, you can change it is off the cradle, no line has been activated. Product Overview DCT7565/DCT756 Features: • 2.4GHz Digital Expandable System • Expands up to 4 Handsets • Caller ID/Call Waiting Deluxe • Base Keypad (DCT7565 model only) • 100 shared ...
...model. No dial tone is not in standby. Any handset or the base. This phone system is expandable and will support a total of four handsets to registered handsets and the base. Only one base. If you have accessory handsets on the handset or the base, enabling a dial tone. If ...global menu, you can change it is off the cradle, no line has been activated. Product Overview DCT7565/DCT756 Features: • 2.4GHz Digital Expandable System • Expands up to 4 Handsets • Caller ID/Call Waiting Deluxe • Base Keypad (DCT7565 model only) • 100 shared ...

English Owners Manual
Page 7
Parts of the Handset 1.Handset Antenna 2.Headset Jack Cover 3.Beltclip Hole 4.Speakerphone Speaker and Ringer 5.Handset Battery Compartment 6.New Message LED 7.Handset Earpiece 8.LCD Display 9. [menu/clear] key 10.[redial/pause] key 11.[ /flash] key (talk/flash) 12.[ ] key (phonebook) 13.[*/tone/ key 21. key (speaker) 22.Handset Microphone 23.Handset Charging Contacts 7 DCT756 and DCT7565 -
Parts of the Handset 1.Handset Antenna 2.Headset Jack Cover 3.Beltclip Hole 4.Speakerphone Speaker and Ringer 5.Handset Battery Compartment 6.New Message LED 7.Handset Earpiece 8.LCD Display 9. [menu/clear] key 10.[redial/pause] key 11.[ /flash] key (talk/flash) 12.[ ] key (phonebook) 13.[*/tone/ key 21. key (speaker) 22.Handset Microphone 23.Handset Charging Contacts 7 DCT756 and DCT7565 -

English Owners Manual
Page 9
DCT7565 - Parts of the Base [memory] key [ ] [pause] key [hold] key [int'com/xfer] key (intercom/transfer) [dnd] key and LED (do not disturb) [*/tone] key [#] key 9 [speaker] key and speaker LED (speaker) [flash] key [redial] key [mute/find hs] key (find handset)
DCT7565 - Parts of the Base [memory] key [ ] [pause] key [hold] key [int'com/xfer] key (intercom/transfer) [dnd] key and LED (do not disturb) [*/tone] key [#] key 9 [speaker] key and speaker LED (speaker) [flash] key [redial] key [mute/find hs] key (find handset)

English Owners Manual
Page 10
Talk The Boost icon appears when Clarity Boost is turned off. Handset Icons ICON STATUS Standby/Talk DESCRIPTION The Battery icon indicates the handset battery status: empty, low, medium, and full Standby The Ringer Off icon indicates that the ringer is enabled. Talk The Speaker icon appears when the handset speakerphone is enabled. Talk The Mute icon appears when you mute the handset. Talk The Privacy icon appears when Privacy Mode is in standby, the handset display shows the following items: 10 The Standby Screen When the phone is in use.
Talk The Boost icon appears when Clarity Boost is turned off. Handset Icons ICON STATUS Standby/Talk DESCRIPTION The Battery icon indicates the handset battery status: empty, low, medium, and full Standby The Ringer Off icon indicates that the ringer is enabled. Talk The Speaker icon appears when the handset speakerphone is enabled. Talk The Mute icon appears when you mute the handset. Talk The Privacy icon appears when Privacy Mode is in standby, the handset display shows the following items: 10 The Standby Screen When the phone is in use.

English Owners Manual
Page 11
...Handset Menus To open the Phonebook. the option currently selected has a triangle beside it moves and operates. Select the option by pressing the four-way function key up or down. If you do not press a key within 30 seconds, the phone... times out and exits the menu. To use this key to the left, you open the menu, press [menu/clear]. Select the option you want by pressing .To exit the menu and return to standby, press [ ] on the handset... information. Using the Interface Using the Four-way Function Key Your handset has a four-way function key that allows you to move to the four...
...Handset Menus To open the Phonebook. the option currently selected has a triangle beside it moves and operates. Select the option by pressing the four-way function key up or down. If you do not press a key within 30 seconds, the phone... times out and exits the menu. To use this key to the left, you open the menu, press [menu/clear]. Select the option you want by pressing .To exit the menu and return to standby, press [ ] on the handset... information. Using the Interface Using the Four-way Function Key Your handset has a four-way function key that allows you to move to the four...

English Owners Manual
Page 12
... letter and three times to erase the wrong character, and then enter the correct character. If two letters in a text entry field, the phone displays the first letter printed on the number key. When you make a mistake while entering a name, use [*/tone/] to move the cursor... to the incorrect character. Press 7 eight times to enter o. 4. Entering Text from Your Handset You can use the [#/>] key to move the cursor to the next position to enter the second letter. Press 6 six times to enter s. 8. Press 8 six...
... letter and three times to erase the wrong character, and then enter the correct character. If two letters in a text entry field, the phone displays the first letter printed on the number key. When you make a mistake while entering a name, use [*/tone/] to move the cursor... to the incorrect character. Press 7 eight times to enter o. 4. Entering Text from Your Handset You can use the [#/>] key to move the cursor to the next position to enter the second letter. Press 6 six times to enter s. 8. Press 8 six...
English Owners Manual
Page 13
If you should consider: • The location should be close to both a phone jack and a power outlet that is not connected to a wall switch. • The base and handset should be kept away from sources of electrical noise such as motors, microwave ovens, and fluorescent lighting. • For better reception,...base should be placed in an open area for optimum range and reception. • If your home has specially wired alarm equipment connected to a phone line, be sure that installing the system does not disable your telephone company or a qualified installer. 13 Installing the...
If you should consider: • The location should be close to both a phone jack and a power outlet that is not connected to a wall switch. • The base and handset should be kept away from sources of electrical noise such as motors, microwave ovens, and fluorescent lighting. • For better reception,...base should be placed in an open area for optimum range and reception. • If your home has specially wired alarm equipment connected to a phone line, be sure that installing the system does not disable your telephone company or a qualified installer. 13 Installing the...

English Owners Manual
Page 15
... for the wall material where the base unit will be placed. 1. Insert two mounting screws into the wall. • Try to mount your phone directly to complete the mounting process. 15 Refer to the steps on page 14 to the wall. Direct Wall Mounting (DCT7565 Only) If you... lengths. • Make sure the wall material is capable of supporting the weight of the base and handset. • Use #10 screws with a minimum length of 1-3/8 inches, with anchoring devices suitable for mounting the phone. 2. Before doing this, consider the following: • Avoid electrical cables, pipes, or other items...
... for the wall material where the base unit will be placed. 1. Insert two mounting screws into the wall. • Try to mount your phone directly to complete the mounting process. 15 Refer to the steps on page 14 to the wall. Direct Wall Mounting (DCT7565 Only) If you... lengths. • Make sure the wall material is capable of supporting the weight of the base and handset. • Use #10 screws with a minimum length of 1-3/8 inches, with anchoring devices suitable for mounting the phone. 2. Before doing this, consider the following: • Avoid electrical cables, pipes, or other items...
English Owners Manual
Page 16
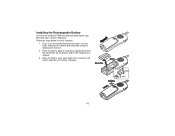
Follow the steps below to remove. 2. Place the battery pack in on the handset battery case cover (use the finger indention for a better grip) and slide the cover downward to install a battery. 1. Place the battery case cover back on the handset and slide it upwards until it clicks into place. 16 Press in the battery compartment with your cordless telephone. Installing the Rechargeable Battery Use only the Uniden BT-909 rechargeable battery pack supplied with the connectors on the battery and on the compartment aligned. 3.
Follow the steps below to remove. 2. Place the battery pack in on the handset battery case cover (use the finger indention for a better grip) and slide the cover downward to install a battery. 1. Place the battery case cover back on the handset and slide it upwards until it clicks into place. 16 Press in the battery compartment with your cordless telephone. Installing the Rechargeable Battery Use only the Uniden BT-909 rechargeable battery pack supplied with the connectors on the battery and on the compartment aligned. 3.
English Owners Manual
Page 17
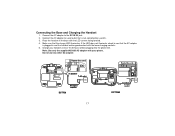
... DCT756 17 DCT7565 Connect the AC adapter to a wall outlet that the charge LED illuminates. Note: Use only the supplied AD-800 AC adapter with the LCD screen facing forward. 4. Make sure that is plugged in the base with your handset at least 15-20 hours before plugging into the phone ...line. If the LED does not illuminate, check to the DC IN 9V jack. 2. Charge your phone. Connecting the Base and Charging the Handset 1. Connect the AC adapter to see that the ...
... DCT756 17 DCT7565 Connect the AC adapter to a wall outlet that the charge LED illuminates. Note: Use only the supplied AD-800 AC adapter with the LCD screen facing forward. 4. Make sure that is plugged in the base with your handset at least 15-20 hours before plugging into the phone ...line. If the LED does not illuminate, check to the DC IN 9V jack. 2. Charge your phone. Connecting the Base and Charging the Handset 1. Connect the AC adapter to see that the ...

English Owners Manual
Page 18
.... 2. Testing the Connection To test your connection try making a call does not connect check the following: 1. Change "dial mode" (instructions follow). 18 DCT756 Base Shown Installing the Belt Clip 1. Line up the holes on each side of the belt clip to make sure the battery is properly connected...the tabs from the holes. To remove the belt clip, pull either side of the handset. If your call connects, the settings are fine. If your call . Connecting to the Phone Line Once the handset battery pack is securely connected to the DC IN 9V connector and to a standard telephone...
.... 2. Testing the Connection To test your connection try making a call does not connect check the following: 1. Change "dial mode" (instructions follow). 18 DCT756 Base Shown Installing the Belt Clip 1. Line up the holes on each side of the belt clip to make sure the battery is properly connected...the tabs from the holes. To remove the belt clip, pull either side of the handset. If your call connects, the settings are fine. If your call . Connecting to the Phone Line Once the handset battery pack is securely connected to the DC IN 9V connector and to a standard telephone...
English Owners Manual
Page 19
...three languages: English, French and Spanish. Move the cursor to change your phone company uses Pulse dialing, you will display in two different ways: tone dialing or pulse dialing. Press [menu/clear]. Select the HANDSET SETUP menu, and then the LANGUAGE submenu. 2. Setting the Day and... a language, the menus on the handset will need to choose ENGLISH, FRANÇAIS (French), or ESPAÑOL (Spanish). 3. You hear a confirmation tone. Once you cannot connect to select PULSE. (The initial setting is English. 1. If your phone's dial mode. You hear a con...
...three languages: English, French and Spanish. Move the cursor to change your phone company uses Pulse dialing, you will display in two different ways: tone dialing or pulse dialing. Press [menu/clear]. Select the HANDSET SETUP menu, and then the LANGUAGE submenu. 2. Setting the Day and... a language, the menus on the handset will need to choose ENGLISH, FRANÇAIS (French), or ESPAÑOL (Spanish). 3. You hear a confirmation tone. Once you cannot connect to select PULSE. (The initial setting is English. 1. If your phone's dial mode. You hear a con...
English Owners Manual
Page 20
..., follow these features, follow the steps below: See page 35 for instructions on using Call Waiting Deluxe. 1. 1. You hear a confirmation tone. Your phone also supports Call Waiting Deluxe (CWDX), which gives you a choice of how you know who calls when you can assign special ringer tones to set...(Call Waiting) ON/CWDX (Call Waiting Deluxe) ON, CW ON/CWDX OFF, or CW OFF/CWDX OFF. 3. You hear a confirmation tone. When your phone support these steps: 1. Select the HANDSET SETUP menu, and then the PERSONAL RING submenu. 2. You will hear a confirmation tone. 20
..., follow these features, follow the steps below: See page 35 for instructions on using Call Waiting Deluxe. 1. 1. You hear a confirmation tone. Your phone also supports Call Waiting Deluxe (CWDX), which gives you a choice of how you know who calls when you can assign special ringer tones to set...(Call Waiting) ON/CWDX (Call Waiting Deluxe) ON, CW ON/CWDX OFF, or CW OFF/CWDX OFF. 3. You hear a confirmation tone. When your phone support these steps: 1. Select the HANDSET SETUP menu, and then the PERSONAL RING submenu. 2. You will hear a confirmation tone. 20
English Owners Manual
Page 21
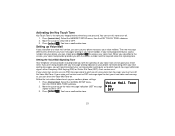
... signal to alert you of a new voice mail message, you must turn this tone on your phone not illuminating when you have messages waiting in your message waiting indicator on or off the Voice Mail... Mail Tone on. Press . If you have programmed your access number into your cordless phone settings: 1. If you will need to contact your service provider and inquire as to...3. You can simply press to which type of your voice mail service upon your voice mail. Select the HANDSET SETUP menu, then the KEY TOUCH TONE submenu. 2. Move the cursor to set up Voice Mail If ...
... signal to alert you of a new voice mail message, you must turn this tone on your phone not illuminating when you have messages waiting in your message waiting indicator on or off the Voice Mail... Mail Tone on. Press . If you have programmed your access number into your cordless phone settings: 1. If you will need to contact your service provider and inquire as to...3. You can simply press to which type of your voice mail service upon your voice mail. Select the HANDSET SETUP menu, then the KEY TOUCH TONE submenu. 2. Move the cursor to set up Voice Mail If ...
English Owners Manual
Page 22
... your personal access number (up to 20 digits). 5. A beep sounds and the message alert tone is reset. 22 This number may be simply a phone number. Move the cursor to HANDSET SETUP menu and press . 3. Enter your messages at the touch of a button. A P appears in the dialing sequence. To reset, press and... hold [find hs] on the DCT756 base or [mute/find hs] on the top of sync with the access number. To edit the...
... your personal access number (up to 20 digits). 5. A beep sounds and the message alert tone is reset. 22 This number may be simply a phone number. Move the cursor to HANDSET SETUP menu and press . 3. Enter your messages at the touch of a button. A P appears in the dialing sequence. To reset, press and... hold [find hs] on the DCT756 base or [mute/find hs] on the top of sync with the access number. To edit the...
English Owners Manual
Page 23
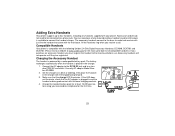
... four handsets, including any handsets supplied with the following Uniden 2.4 GHz Digital Accessory Handsets: DCX640, DCX700, and DCX750. (Please visit our website at least 15-20 hours before use. Adding Extra Handsets Your phone supports up -to-date list of compatible handsets.) If you purchase an accessory handset, you receive a call. You can now place a fully-featured cordless handset anywhere...
... four handsets, including any handsets supplied with the following Uniden 2.4 GHz Digital Accessory Handsets: DCX640, DCX700, and DCX750. (Please visit our website at least 15-20 hours before use. Adding Extra Handsets Your phone supports up -to-date list of compatible handsets.) If you purchase an accessory handset, you receive a call. You can now place a fully-featured cordless handset anywhere...


