Spec Sheet
Page 1
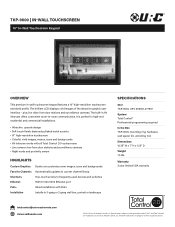
... room images, icons and backgrounds Automatically updates to current channel lineup One-touch access to frequently-used devices and activities RJ45 10/100/1000 Ethernet port Wired installation with all Total Control 2.0 touchscreens • Live camera view from door stations and surveillance cameras. Warranty 3 year limited USA warranty [email protected] UniversalRemote.com ©2018 Universal Remote Control, Inc. It is perfect for high...
... room images, icons and backgrounds Automatically updates to current channel lineup One-touch access to frequently-used devices and activities RJ45 10/100/1000 Ethernet port Wired installation with all Total Control 2.0 touchscreens • Live camera view from door stations and surveillance cameras. Warranty 3 year limited USA warranty [email protected] UniversalRemote.com ©2018 Universal Remote Control, Inc. It is perfect for high...

Owners Manual
Page 2
... Scenes Menu...29 Settings Menu...30 Specifications...39 Limited Warranty Statement 39 My Installer/Programmer: or URC Technical Support at: [email protected] (914) 835-4484 Universal Remote Control, Inc. 500 Mamaroneck Ave Harrison, New York 10528 Toll Free: (800) 901-0800 Table of more things than thought possible. Online Help: Visit the URC Home Page for purchasing URC's TKP-9600 In-Wall Network Keypad. Its easy and intuitive use helps...
... Scenes Menu...29 Settings Menu...30 Specifications...39 Limited Warranty Statement 39 My Installer/Programmer: or URC Technical Support at: [email protected] (914) 835-4484 Universal Remote Control, Inc. 500 Mamaroneck Ave Harrison, New York 10528 Toll Free: (800) 901-0800 Table of more things than thought possible. Online Help: Visit the URC Home Page for purchasing URC's TKP-9600 In-Wall Network Keypad. Its easy and intuitive use helps...

Owners Manual
Page 3
Audio-Video Interface: Communicate with any other URC Intercom-Enabled device in terms of graphics, performance, and features. Features and Benefits: The TKP-9600 In-Wall Network Keypad is one of using URC's Total Control 2.0 software suite. Enjoy these key features: Updated User Experience: This device has the capability of URC's most advanced devices that is optimized for usage with this feature. Using this software provides this...
Audio-Video Interface: Communicate with any other URC Intercom-Enabled device in terms of graphics, performance, and features. Features and Benefits: The TKP-9600 In-Wall Network Keypad is one of using URC's Total Control 2.0 software suite. Enjoy these key features: Updated User Experience: This device has the capability of URC's most advanced devices that is optimized for usage with this feature. Using this software provides this...

Owners Manual
Page 4
Flexible Orientation: The TKP-9600 offers the ability to installation. 2 This feature can only be adjusted in either portrait or landscape mode making it the perfect keypad for almost any room. This setting can detect distances from within the Accelerator 2.0 software, speak to a custom home professional prior to display the device in the device's Settings menu. Utilizing its proximity sensor, the keypad can be set from up to spring into action automatically. Proximity Sensor: This feature allows the TKP-9600 to three (3) feet away.
Flexible Orientation: The TKP-9600 offers the ability to installation. 2 This feature can only be adjusted in either portrait or landscape mode making it the perfect keypad for almost any room. This setting can detect distances from within the Accelerator 2.0 software, speak to a custom home professional prior to display the device in the device's Settings menu. Utilizing its proximity sensor, the keypad can be set from up to spring into action automatically. Proximity Sensor: This feature allows the TKP-9600 to three (3) feet away.
Owners Manual
Page 7
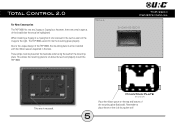
... actual size) Place the ribbon spacer on the image to the unique design of the installation that must be installed with the ribbon spacers (supplied in the wall as seen on the top and bottom of the mounting plate. Remember to sit above the wall and properly mount the TKP-9600. For New Construction The TKP-9600 fits into the mounting plate...
... actual size) Place the ribbon spacer on the image to the unique design of the installation that must be installed with the ribbon spacers (supplied in the wall as seen on the top and bottom of the mounting plate. Remember to sit above the wall and properly mount the TKP-9600. For New Construction The TKP-9600 fits into the mounting plate...

Owners Manual
Page 9
... this button to reveal the Shortcuts Popup menu. Volume Control: Tap the minus (Vol-) to lower the volume, plus (Vol+) to increase the volume, and Mute to reveal additional Main Menu pages. Actual navigation is dictated by the custom integrator. 2. Main Menu Navigation: Although specific screen design and certain options are created by the custom integrator. The end-user can be changed...
... this button to reveal the Shortcuts Popup menu. Volume Control: Tap the minus (Vol-) to lower the volume, plus (Vol+) to increase the volume, and Mute to reveal additional Main Menu pages. Actual navigation is dictated by the custom integrator. 2. Main Menu Navigation: Although specific screen design and certain options are created by the custom integrator. The end-user can be changed...
Owners Manual
Page 10
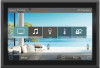
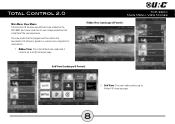
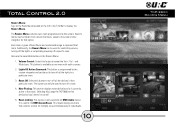
Ribbon View (Landscape & Portrait): Grid View (Landscape & Portrait): 2. Main Menu: View Modes Total Control 2.0 features two different view modes for more details. 1. Each view mode has its own unique properties that compliment the user experience. Grid View: This view mode contains up to six (6) items per page. 8 The view mode must be programmed from within the Accelerator 2.0 software, speak to fifteen (15) items per page. Ribbon View: This is the default view mode and it contains up to a custom home integrator for the TKP-9600.
Ribbon View (Landscape & Portrait): Grid View (Landscape & Portrait): 2. Main Menu: View Modes Total Control 2.0 features two different view modes for more details. 1. Each view mode has its own unique properties that compliment the user experience. Grid View: This view mode contains up to six (6) items per page. 8 The view mode must be programmed from within the Accelerator 2.0 software, speak to fifteen (15) items per page. Ribbon View: This is the default view mode and it contains up to a custom home integrator for the TKP-9600.

Owners Manual
Page 11
... various parts of the Settings Menu are three (3) selectable options here: 1. Weather Module: Select this to display the Time and Weather Module, this button to access the TKP-9600's Settings Menu. Title Bar: The Title Bar is always present regardless of what menu and/or room the TKP-9600 is set from within the Accelerator 2.0 software. 3. There are explained in detail in a later section of this documents Audio-Video...
... various parts of the Settings Menu are three (3) selectable options here: 1. Weather Module: Select this to display the Time and Weather Module, this button to access the TKP-9600's Settings Menu. Title Bar: The Title Bar is always present regardless of what menu and/or room the TKP-9600 is set from within the Accelerator 2.0 software. 3. There are explained in detail in a later section of this documents Audio-Video...
Owners Manual
Page 12
... hidden from certain interfaces, speak to turn off a specific room. Additionally, the Room's Menu can only be used to link DMS Zones/Areas. This means having one menu that option. Specific rooms may be set to the custom home integrator for that controls volume for controlling volume, turning off the lights, or completely powering off a room. 4. Lights Off Action Command: This button is given a Room Name and...
... hidden from certain interfaces, speak to turn off a specific room. Additionally, the Room's Menu can only be used to link DMS Zones/Areas. This means having one menu that option. Specific rooms may be set to the custom home integrator for that controls volume for controlling volume, turning off the lights, or completely powering off a room. 4. Lights Off Action Command: This button is given a Room Name and...
Owners Manual
Page 15
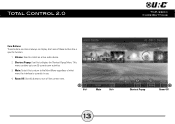
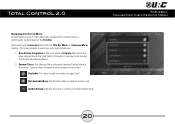
Shortcut Popup: Use this to turn off the current room. 1 Vol- Room Off: Use this to return to control an active audio device. 2. Main: Select this button to display the Shortcut Popup Menu. Volume: Used to the Main Menu regardless of these buttons has a specific function: 1. Mute Vol+ 2 3 Shortcut Popup 4 Room Off 13 Core Buttons: These buttons are almost always on display. Each one of what menu the interface is currently in use. 4. This menu contains up to six (6) current room activities. 3.
Shortcut Popup: Use this to turn off the current room. 1 Vol- Room Off: Use this to return to control an active audio device. 2. Main: Select this button to display the Shortcut Popup Menu. Volume: Used to the Main Menu regardless of these buttons has a specific function: 1. Mute Vol+ 2 3 Shortcut Popup 4 Room Off 13 Core Buttons: These buttons are almost always on display. Each one of what menu the interface is currently in use. 4. This menu contains up to six (6) current room activities. 3.
Owners Manual
Page 18
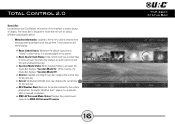
...: Displays the current sound mode of various different customizable options: 1. Status Bar: Located above the Core Buttons, this section. ● Room Alarm Clock Status: If the current room has an Alarm that is set to activate, the status bar displays an alarm clock icon and the next scheduled time/day. ● Vacation Mode Status: When Vacation Mode is designed to inform the end-user...
...: Displays the current sound mode of various different customizable options: 1. Status Bar: Located above the Core Buttons, this section. ● Room Alarm Clock Status: If the current room has an Alarm that is set to activate, the status bar displays an alarm clock icon and the next scheduled time/day. ● Vacation Mode Status: When Vacation Mode is designed to inform the end-user...
Owners Manual
Page 20
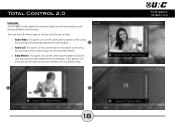
... to check the activity of the calling and receiving client to create an audio call uses the camera and microphone of communicating across the home network to any Intercom-Enabled client (interface). Baby Monitor: This type of call over the home network. 3. Intercom: The TKP-9600 has the capability of only the receiving client to provide auditory and visual feedback.
... to check the activity of the calling and receiving client to create an audio call uses the camera and microphone of communicating across the home network to any Intercom-Enabled client (interface). Baby Monitor: This type of call over the home network. 3. Intercom: The TKP-9600 has the capability of only the receiving client to provide auditory and visual feedback.
Owners Manual
Page 22
... this document, accessing the Intercom button is performed by swiping down on page 8 of call . System Clients: The Intercom Menu lists every Intercom-Enabled client in Do Not Disturb mode. 20 Door Station Integration: In the case where a 3rd party door station has been integrated with useful information: 1. After selecting the Intercom button from the Title Bar Menu, the Intercom Menu displays.
... this document, accessing the Intercom button is performed by swiping down on page 8 of call . System Clients: The Intercom Menu lists every Intercom-Enabled client in Do Not Disturb mode. 20 Door Station Integration: In the case where a 3rd party door station has been integrated with useful information: 1. After selecting the Intercom button from the Title Bar Menu, the Intercom Menu displays.

Owners Manual
Page 33
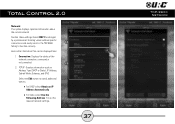
... volume of the audio feedback when pressing buttons on the interface. ● Brightness: Allows for the adjustment of the LCD screen's brightness. ● Proximity Sensor: Allows for the adjustment of the proximity level. ● System: Provides general information such as memory used to set up the Intercom of a Dynamic or Static IP address for the TKP-9600. Settings Menu: Access the Settings Menu by URC Technical Support. Changing...
... volume of the audio feedback when pressing buttons on the interface. ● Brightness: Allows for the adjustment of the LCD screen's brightness. ● Proximity Sensor: Allows for the adjustment of the proximity level. ● System: Provides general information such as memory used to set up the Intercom of a Dynamic or Static IP address for the TKP-9600. Settings Menu: Access the Settings Menu by URC Technical Support. Changing...

Owners Manual
Page 38
These System Pages display important information about the TKP-9600. System Information: Although none of the information can be modified. These pages are only needed by a custom install professional or by URC Technical Support. 36
These System Pages display important information about the TKP-9600. System Information: Although none of the information can be modified. These pages are only needed by a custom install professional or by URC Technical Support. 36
Owners Manual
Page 39
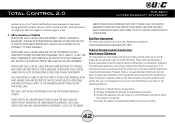
... Edit button to function correctly. Here is the information that can be changed by a professional. Connection: Displays the status of the network connection, connected or not connected. 2 2. Fill out the required network settings. 37 Entering values without specific instruction could easily result in the TKP-9600 1 failing to reveal additional options. ● For DHCP select Obtain an IP Address Automatically. ● For Static select Use the...
... Edit button to function correctly. Here is the information that can be changed by a professional. Connection: Displays the status of the network connection, connected or not connected. 2 2. Fill out the required network settings. 37 Entering values without specific instruction could easily result in the TKP-9600 1 failing to reveal additional options. ● For DHCP select Obtain an IP Address Automatically. ● For Static select Use the...

Owners Manual
Page 41
Factory Default: This should only be attempted by a custom install professional that is reprogrammed by a custom install professional. 1. Select Yes. 39 Press and hold the Factory Reset button for over five (5) seconds. 2. Selecting this option resets the TKP-9600 to its factory state and does not function until the device is familiar with 1 Total Control 2.0 or under instruction from URC Technical Support.
Factory Default: This should only be attempted by a custom install professional that is reprogrammed by a custom install professional. 1. Select Yes. 39 Press and hold the Factory Reset button for over five (5) seconds. 2. Selecting this option resets the TKP-9600 to its factory state and does not function until the device is familiar with 1 Total Control 2.0 or under instruction from URC Technical Support.

Owners Manual
Page 42
... 255 steps Network: One 10/100/1000 Ethernet Port (PoE+) LCD: 10 Inch (1280 x 800) Weight: 24.7 oz Size: 10" x 7" x 1.03" Power: Standard PoE Injector or PoE Switch (purchased separately) Limited Warranty Statement 1. Limited Warranty and Disclaimers Universal Remote Control, Inc. ("URC") warrants that the software will substantially conform in material and workmanship under normal usage for the TKP-9600: Microprocessor: Cortex...
... 255 steps Network: One 10/100/1000 Ethernet Port (PoE+) LCD: 10 Inch (1280 x 800) Weight: 24.7 oz Size: 10" x 7" x 1.03" Power: Standard PoE Injector or PoE Switch (purchased separately) Limited Warranty Statement 1. Limited Warranty and Disclaimers Universal Remote Control, Inc. ("URC") warrants that the software will substantially conform in material and workmanship under normal usage for the TKP-9600: Microprocessor: Cortex...

Owners Manual
Page 43
... limited warranty specifically excludes the URC equipment sold as used, as is invalid if the factory applied serial number has been altered or removed from the URC equipment. To obtain warranty service, end user must complete a Return Request Form which you may not apply to any macro programming, artwork, software or other materials that such data, software, or other important information, please visit URC's website...
... limited warranty specifically excludes the URC equipment sold as used, as is invalid if the factory applied serial number has been altered or removed from the URC equipment. To obtain warranty service, end user must complete a Return Request Form which you may not apply to any macro programming, artwork, software or other materials that such data, software, or other important information, please visit URC's website...
Owners Manual
Page 44
... following measures: ● Reorient or relocate the receiving antenna. ● Increase the separation between the equipment and receiver. ● Connect the equipment into an outlet on , the user is encouraged to try to which can radiate radio frequency energy and, if not installed and used in accordance with the limits for URC tech support or software support, either. 2. If this equipment does cause...
... following measures: ● Reorient or relocate the receiving antenna. ● Increase the separation between the equipment and receiver. ● Connect the equipment into an outlet on , the user is encouraged to try to which can radiate radio frequency energy and, if not installed and used in accordance with the limits for URC tech support or software support, either. 2. If this equipment does cause...


