Operation Manual
Page 1
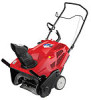
Single-Stage Snow Thrower Squall 210 & Squall 2100 WARNING READ AND FOLLOW ALL SAFETY RULES AND INSTRUCTIONS IN THIS MANUAL BEFORE ATTEMPTING TO OPERATE THIS MACHINE. FAILURE TO COMPLY WITH THESE INSTRUCTIONS MAY RESULT IN PERSONAL INJURY. Printed In USA TROY-BILT LLC, P.O. BOX 361131 CLEVELAND, OHIO 44136-0019 Form No. 769-07131 (May 4, 2011) Squall 2100 Shown - Safe Operation Practices • Set-Up • Operation • Maintenance • Service • Troubleshooting • Warranty Operator's Manual -
Single-Stage Snow Thrower Squall 210 & Squall 2100 WARNING READ AND FOLLOW ALL SAFETY RULES AND INSTRUCTIONS IN THIS MANUAL BEFORE ATTEMPTING TO OPERATE THIS MACHINE. FAILURE TO COMPLY WITH THESE INSTRUCTIONS MAY RESULT IN PERSONAL INJURY. Printed In USA TROY-BILT LLC, P.O. BOX 361131 CLEVELAND, OHIO 44136-0019 Form No. 769-07131 (May 4, 2011) Squall 2100 Shown - Safe Operation Practices • Set-Up • Operation • Maintenance • Service • Troubleshooting • Warranty Operator's Manual -
Operation Manual
Page 2
Please be sure that this manual may cover a range of Contents Safe Operation Practices 3 Assembly & Set-Up 7 Controls & Features 10 Operation 12 Maintenance & Adjustment 13 Service 15 Troubleshooting 17 Replacement Parts 18 Warranties 20 Record Product Information Before setting up , operate and maintain your complete satisfaction at all models. Review this unit, you can seek help from the experts. If you have any other persons who will be found...
Please be sure that this manual may cover a range of Contents Safe Operation Practices 3 Assembly & Set-Up 7 Controls & Features 10 Operation 12 Maintenance & Adjustment 13 Service 15 Troubleshooting 17 Replacement Parts 18 Warranties 20 Record Product Information Before setting up , operate and maintain your complete satisfaction at all models. Review this unit, you can seek help from the experts. If you have any other persons who will be found...
Operation Manual
Page 3
... loose clothing, which could result in the operator's manual. 6. This machine is to protect your snow-throwing pattern to observe the following safety instructions could be trained and supervised by the auger/impeller. 1. Training 1. Keep this machine. Remove all control levers before starting the engine. 5. Never attempt to assemble and operate. Read, understand, and follow all instructions on slippery surfaces. 3. Know how to...
... loose clothing, which could result in the operator's manual. 6. This machine is to protect your snow-throwing pattern to observe the following safety instructions could be trained and supervised by the auger/impeller. 1. Training 1. Keep this machine. Remove all control levers before starting the engine. 5. Never attempt to assemble and operate. Read, understand, and follow all instructions on slippery surfaces. 3. Know how to...
Operation Manual
Page 4
... hot and can let go. Extinguish all times until resistance impeller housing or chute assembly. c. Never remove gas cap or add fuel while the engine is felt, then pull rapidly. Do not overload machine capacity by the Operation manufacturer (e.g. Disengage power to provide space for damage. If possible, remove gas-powered equipment from a leave the operating position (behind and use a nozzle lock-open flame, spark or pilot light 14. Never could...
... hot and can let go. Extinguish all times until resistance impeller housing or chute assembly. c. Never remove gas cap or add fuel while the engine is felt, then pull rapidly. Do not overload machine capacity by the Operation manufacturer (e.g. Disengage power to provide space for damage. If possible, remove gas-powered equipment from a leave the operating position (behind and use a nozzle lock-open flame, spark or pilot light 14. Never could...
Operation Manual
Page 5
... California Public Resources Code). Maintenance & Storage 1. Before cleaning, repairing, or inspecting machine disengage all control levers and stop . Do not change the engine governor setting or over-speed the engine. "Use of parts which are certified to a runaway engine and cause it should not be maintained in any way. Check fuel line, tank, cap, and fittings frequently for gas, oil, etc. Never tamper with snow throwers. This machine is equipped with a spark arrestor meeting applicable...
... California Public Resources Code). Maintenance & Storage 1. Before cleaning, repairing, or inspecting machine disengage all control levers and stop . Do not change the engine governor setting or over-speed the engine. "Use of parts which are certified to a runaway engine and cause it should not be maintained in any way. Check fuel line, tank, cap, and fittings frequently for gas, oil, etc. Never tamper with snow throwers. This machine is equipped with a spark arrestor meeting applicable...
Operation Manual
Page 6
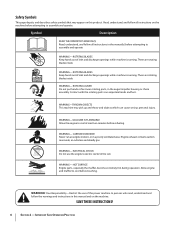
... gas. ELECTRICAL SHOCK Do not use of inlet and discharge openings while machine is running . Your Responsibility-Restrict the use the engine's electric starter in the auger/impeller housing or chute assembly. There are rotating blades inside WARNING- HOT SURFACE Engine parts, especially the muffler, become extremely hot during operation. Read, understand, and follow all instructions on the machine. WARNING-THROWN OBJECTS This machine may appear on this manual...
... gas. ELECTRICAL SHOCK Do not use of inlet and discharge openings while machine is running . Your Responsibility-Restrict the use the engine's electric starter in the auger/impeller housing or chute assembly. There are rotating blades inside WARNING- HOT SURFACE Engine parts, especially the muffler, become extremely hot during operation. Read, understand, and follow all instructions on the machine. WARNING-THROWN OBJECTS This machine may appear on this manual...
Operation Manual
Page 7
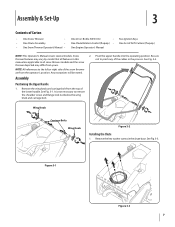
... lock nut below the wing knob and carriage bolt. It is not necessary to the left or right side of Carton • One Snow Thrower • • One Chute Assembly • • One Snow Thrower Operator's Manual • One 20 oz. Remove the hex washer screws in this manual are from yours. 2. Bottle 5W-30 Oil • One Chute Rotation Control (If equip.) • One Engine Operator's Manual Two Ignition Keys One Set...
... lock nut below the wing knob and carriage bolt. It is not necessary to the left or right side of Carton • One Snow Thrower • • One Chute Assembly • • One Snow Thrower Operator's Manual • One 20 oz. Remove the hex washer screws in this manual are from yours. 2. Bottle 5W-30 Oil • One Chute Rotation Control (If equip.) • One Engine Operator's Manual Two Ignition Keys One Set...

Operation Manual
Page 8
Remove the carriage bolts and flange lock nuts from the manual bag. 2. See Fig. 3-6. Remove the eye bolt and handle knob from the drift cutters. 2. Place the eye bolt and handle knob on the upper handle as follows: 1. Place the chute rotation control onto the chute rotation rod and secure with the hex lock nut and machine screw removed in Fig. 3-7. Assembly & Set-Up Installing the Drift Cutters (If so equipped) 1. Install the drift cutters...
Remove the carriage bolts and flange lock nuts from the manual bag. 2. See Fig. 3-6. Remove the eye bolt and handle knob from the drift cutters. 2. Place the eye bolt and handle knob on the upper handle as follows: 1. Place the chute rotation control onto the chute rotation rod and secure with the hex lock nut and machine screw removed in Fig. 3-7. Assembly & Set-Up Installing the Drift Cutters (If so equipped) 1. Install the drift cutters...

Operation Manual
Page 9
See Fig. 3-7. 5. Section 3 - Set-Up Adding Oil Refer to the Engine Operator's Manual packed with your snow thrower for information on adding fuel. Slip the recoil starter rope into the eye bolt from the back of the snow thrower. Securely tighten the eye bolt and handle knob. Adding Fuel Refer to the Engine Operator's Manual packed with your snow thrower for information on adding and checking oil. Assembly & Set-Up 9 Slowly pull the recoil starter handle up towards the eye bolt. 4. 3.
See Fig. 3-7. 5. Section 3 - Set-Up Adding Oil Refer to the Engine Operator's Manual packed with your snow thrower for information on adding fuel. Slip the recoil starter rope into the eye bolt from the back of the snow thrower. Securely tighten the eye bolt and handle knob. Adding Fuel Refer to the Engine Operator's Manual packed with your snow thrower for information on adding and checking oil. Assembly & Set-Up 9 Slowly pull the recoil starter handle up towards the eye bolt. 4. 3.

Operation Manual
Page 10
... of See the Engine Operator's Manual for the location and function the discharge chute before pivoting the discharge chute Auger Control upward or downward. Controls & Features 4 Auger Control Recoil Starter Handle Chute Rotation Control EZ Chute Low-Crank Chute Assembly Drift Cutters Auger Shave Plate Figure 4-1 NOTE: This Operator's Manual covers several models. been achieved. Loosen the wing knob on the engine. Snow thrower features may differ from yours. Not all snow thrower models and the snow thrower depicted may vary by...
... of See the Engine Operator's Manual for the location and function the discharge chute before pivoting the discharge chute Auger Control upward or downward. Controls & Features 4 Auger Control Recoil Starter Handle Chute Rotation Control EZ Chute Low-Crank Chute Assembly Drift Cutters Auger Shave Plate Figure 4-1 NOTE: This Operator's Manual covers several models. been achieved. Loosen the wing knob on the engine. Snow thrower features may differ from yours. Not all snow thrower models and the snow thrower depicted may vary by...

Operation Manual
Page 11
...) The drift cutters are designed for normal snow conditions. Controls & Features 11 Chute Rotation Control (If so equipped) The chute rotation control is located on the back of the snow thrower. Maneuver the snow thrower so that the cutters penetrate a high standing snow drift to manually start the engine. Recoil Starter Handle The recoil starter handle is used to assist snow falling into the augers for throwing. To rotate the chute to the left .
...) The drift cutters are designed for normal snow conditions. Controls & Features 11 Chute Rotation Control (If so equipped) The chute rotation control is located on the back of the snow thrower. Maneuver the snow thrower so that the cutters penetrate a high standing snow drift to manually start the engine. Recoil Starter Handle The recoil starter handle is used to assist snow falling into the augers for throwing. To rotate the chute to the left .
Operation Manual
Page 12
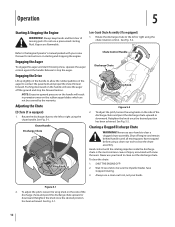
... chute assembly. Chute Handle Discharge Chute Wing Knob Chute Control Handle Discharge Chute Wing Knob Figure 5-2 2. See Fig. 5-2. Shut off the ground and stop the auger. SHUT THE ENGINE OFF! 2. Figure 5-1 2. To adjust the pitch, loosen the wing knob on the side of the discharge chute and pivot the discharge chute upward or downward. Do not use your snow thrower for instructions on the rubber auger blades which are flammable. Refer to the Engine Operator's manual...
... chute assembly. Chute Handle Discharge Chute Wing Knob Chute Control Handle Discharge Chute Wing Knob Figure 5-2 2. See Fig. 5-2. Shut off the ground and stop the auger. SHUT THE ENGINE OFF! 2. Figure 5-1 2. To adjust the pitch, loosen the wing knob on the side of the discharge chute and pivot the discharge chute upward or downward. Do not use your snow thrower for instructions on the rubber auger blades which are flammable. Refer to the Engine Operator's manual...
Operation Manual
Page 13
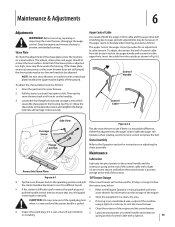
... auger drive belt stretching due to the Engine Operator's manual packed with a light oil. 13 To adjust the shave plate proceed as follows: The upper hole in Fig. 6-2. Insert the cable from the snow thrower. 2. the instructions below. 5. using a light oil or silicone to prevent unintended starting. Inspect the spark plug. Stop the engine and remove the key to coat the snow thrower. 4. Shave Plate To check the adjustment of control cable with your pull the handle...
... auger drive belt stretching due to the Engine Operator's manual packed with a light oil. 13 To adjust the shave plate proceed as follows: The upper hole in Fig. 6-2. Insert the cable from the snow thrower. 2. the instructions below. 5. using a light oil or silicone to prevent unintended starting. Inspect the spark plug. Stop the engine and remove the key to coat the snow thrower. 4. Shave Plate To check the adjustment of control cable with your pull the handle...
Operation Manual
Page 14
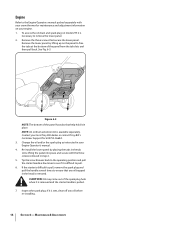
...-install the lower panel by lifting up on your local Troy-Bilt dealer or contact Troy-Bilt's Customer Support for maintenance and adjustment information on the panel to free the tabs at the bottom of the spark plug hole when it is wet, clean off any oil trapped in step 2. 5. Engine Refer to the Engine Operators manual packed separately with the three screws removed in the head is removed. Maintenance & Adjustments If the starter...
...-install the lower panel by lifting up on your local Troy-Bilt dealer or contact Troy-Bilt's Customer Support for maintenance and adjustment information on the panel to free the tabs at the bottom of the spark plug hole when it is wet, clean off any oil trapped in step 2. 5. Engine Refer to the Engine Operators manual packed separately with the three screws removed in the head is removed. Maintenance & Adjustments If the starter...
Operation Manual
Page 15
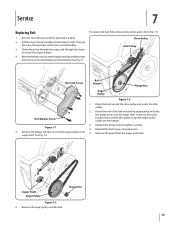
... lock screw that secures the auger pulley to get the auger pulley under the idler pulley. To replace the belt follow these instructions and refer to secure the auger in place. 4. Figure 7-1 4. Auger Shaft Auger Pulley Figure 7-2 6. Run the snow thrower until the fuel tank is felt. Route the end of the belt around the drive pulley and under the belt keeper. 3. Replace the flange nut and tighten securely. Reinstall the belt cover removed earlier. 5. See Fig. 7-2. Flange Nut 15 Pull...
... lock screw that secures the auger pulley to get the auger pulley under the idler pulley. To replace the belt follow these instructions and refer to secure the auger in place. 4. Figure 7-1 4. Auger Shaft Auger Pulley Figure 7-2 6. Run the snow thrower until the fuel tank is felt. Route the end of the belt around the drive pulley and under the belt keeper. 3. Replace the flange nut and tighten securely. Reinstall the belt cover removed earlier. 5. See Fig. 7-2. Flange Nut 15 Pull...
Operation Manual
Page 16
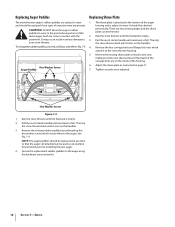
... the replacement rubber paddles to the auger. To change the rubber paddles, proceed as instructed on the inside of excessive wear are present. Run the snow thrower until resistance is felt. Pull the recoil starter handle until the fuel tank is subject to the snow thrower housing. 5. Hex Washer Screw Figure 7-4 1. See Fig. 7-4. NOTE: The auger paddles should be used as an example for positioning and re-installing the new auger. 4. Service CAUTION...
... the replacement rubber paddles to the auger. To change the rubber paddles, proceed as instructed on the inside of excessive wear are present. Run the snow thrower until resistance is felt. Pull the recoil starter handle until the fuel tank is subject to the snow thrower housing. 5. Hex Washer Screw Figure 7-4 1. See Fig. 7-4. NOTE: The auger paddles should be used as an example for positioning and re-installing the new auger. 4. Service CAUTION...
Operation Manual
Page 17
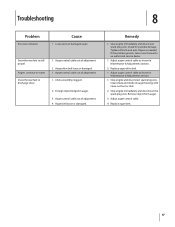
.... Replace auger belt. 17 Auger control cable out of auger housing with clean-out tool or stick. 2. Stop engine immediately and disconnect spark plug wire. Check for possible damage. Stop engine and disconnect spark plug wire. Clean chute and inside of adjustment. 2. Remove object from auger. 3. Foreign object lodged in Maintenance & Adjustments section. 1. If the problem persists, take snow thrower to discharge snow 1. Tighten all bolts and nuts. Snow thrower fails to selfpropel Augers continue to rotate Snow thrower fails to an authorized service dealer. 1. Auger drive...
.... Replace auger belt. 17 Auger control cable out of auger housing with clean-out tool or stick. 2. Stop engine immediately and disconnect spark plug wire. Check for possible damage. Stop engine and disconnect spark plug wire. Clean chute and inside of adjustment. 2. Remove object from auger. 3. Foreign object lodged in Maintenance & Adjustments section. 1. If the problem persists, take snow thrower to discharge snow 1. Tighten all bolts and nuts. Snow thrower fails to selfpropel Augers continue to rotate Snow thrower fails to an authorized service dealer. 1. Auger drive...
Operation Manual
Page 18
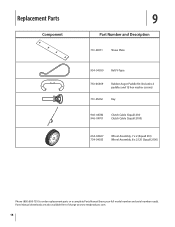
Replacement Parts Component 9 Part Number and Description 731-08171 Shave Plate 954-04050 Belt V-Type 753-06469 Rubber Auger Paddle Kit (Includes 2 paddles and 12 hex washer screws) 731-05632 Key 946-04782 946-04701 Clutch Cable (Squall 210) Clutch Cable (Squall 2100) 634-04607 734-04033 Wheel Assembly, 7 x 2 (Squall 210) Wheel Assembly, 8 x 2.125 (Squall 2100) Phone (800) 800-7310 to order replacement parts or a complete Parts Manual (have your full model number and serial number ready). Parts Manual downloads are also available free of charge at www.mtdproducts.com. 18
Replacement Parts Component 9 Part Number and Description 731-08171 Shave Plate 954-04050 Belt V-Type 753-06469 Rubber Auger Paddle Kit (Includes 2 paddles and 12 hex washer screws) 731-05632 Key 946-04782 946-04701 Clutch Cable (Squall 210) Clutch Cable (Squall 2100) 634-04607 734-04033 Wheel Assembly, 7 x 2 (Squall 210) Wheel Assembly, 8 x 2.125 (Squall 2100) Phone (800) 800-7310 to order replacement parts or a complete Parts Manual (have your full model number and serial number ready). Parts Manual downloads are also available free of charge at www.mtdproducts.com. 18
Operation Manual
Page 20
... someone other express warranty, whether written or oral, except as : batteries, belts, blades, blade adapters, tines, grass bags, wheels, rider deck wheels, seats, snow thrower skid shoes, friction wheels, shave plates, auger spiral rubber and tires. BOX 361131 CLEVELAND, OHIO 44136-0019; To locate the dealer in the following cases: a. Log splitter pumps, valves, and cylinders have other peril or natural disaster. Service completed by Troy-Bilt for loss...
... someone other express warranty, whether written or oral, except as : batteries, belts, blades, blade adapters, tines, grass bags, wheels, rider deck wheels, seats, snow thrower skid shoes, friction wheels, shave plates, auger spiral rubber and tires. BOX 361131 CLEVELAND, OHIO 44136-0019; To locate the dealer in the following cases: a. Log splitter pumps, valves, and cylinders have other peril or natural disaster. Service completed by Troy-Bilt for loss...


