Operation Manual
Page 2
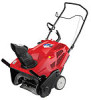
... us directly. We want to ensure your local Cub Cadet dealer or contact us at Troy-Bilt LLC • P.O. Box 361131 • Cleveland, OH • 44136-0019 2 Throughout this manual frequently to familiarize yourself with a local authorized service dealer. Table of Contents Safe Operation ...who will be found on the equipment and record the information in this manual may cover a range of product specifications for purchasing a Troy-Billt snow thrower. It was carefully engineered to change product specifications, designs and equipment without notice and without first...
... us directly. We want to ensure your local Cub Cadet dealer or contact us at Troy-Bilt LLC • P.O. Box 361131 • Cleveland, OH • 44136-0019 2 Throughout this manual frequently to familiarize yourself with a local authorized service dealer. Table of Contents Safe Operation ...who will be found on the equipment and record the information in this manual may cover a range of product specifications for purchasing a Troy-Billt snow thrower. It was carefully engineered to change product specifications, designs and equipment without notice and without first...
Operation Manual
Page 3
... amputating fingers, hands, toes and feet and throwing foreign objects. Wear footwear which ricochet can cause serious personal injury. When you see this manual in the manual(s) before starting the engine. 5. Important Safe Operation Practices 2 WARNING! This symbol points out important safety instructions which could be operated according to clear snow. 3 Read and...
... amputating fingers, hands, toes and feet and throwing foreign objects. Wear footwear which ricochet can cause serious personal injury. When you see this manual in the manual(s) before starting the engine. 5. Important Safe Operation Practices 2 WARNING! This symbol points out important safety instructions which could be operated according to clear snow. 3 Read and...
Operation Manual
Page 4
...5 minutes before filling. 17. Always be sure of ignition. 8. Disengage power to clear g. Look down and behind the handles). before starting the engine. 13. gasoline dispenser nozzle. 18. Do not put your clothes which are explosive. Broken bones, fractures, bruises or sprains 2. Serious personal injury ...parts can amputate hands and feet. (kickback) will pull hand and arm toward engine faster than from the truck or trailer and refuel it on yourself or your hand in this manual, use extreme care in contact with a plastic liner. Doing so makes the ...
...5 minutes before filling. 17. Always be sure of ignition. 8. Disengage power to clear g. Look down and behind the handles). before starting the engine. 13. gasoline dispenser nozzle. 18. Do not put your clothes which are explosive. Broken bones, fractures, bruises or sprains 2. Serious personal injury ...parts can amputate hands and feet. (kickback) will pull hand and arm toward engine faster than from the truck or trailer and refuel it on yourself or your hand in this manual, use extreme care in contact with a plastic liner. Doing so makes the ...
Operation Manual
Page 5
... or contact the service department, P.O. Disconnect the spark plug wire and ground against the engine to a complete stop the engine. Check control levers periodically to clean out the discharge chute. Replace if necessary. 13. Environmental Protection Agency (EPA), this manual. 2. Tampering with a spark arrestor meeting applicable local or state laws (if any damage...
... or contact the service department, P.O. Disconnect the spark plug wire and ground against the engine to a complete stop the engine. Check control levers periodically to clean out the discharge chute. Replace if necessary. 13. Environmental Protection Agency (EPA), this manual. 2. Tampering with a spark arrestor meeting applicable local or state laws (if any damage...
Operation Manual
Page 6
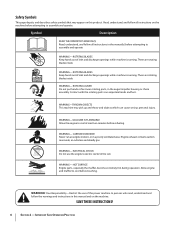
... who read, understand and follow the warnings and instructions in this product. Your Responsibility-Restrict the use the engine's electric starter in the manual(s) before attempting to assemble and operate WARNING- Safety Symbols This page depicts and describes safety symbols that may ...operation. SAVE THESE INSTRUCTIONS! 6 Section 2 - WARNING-THROWN OBJECTS This machine may appear on this manual and on the machine before attempting to assemble and operate. Engine exhaust contains carbon monoxide, an odorless and deadly gas. ELECTRICAL SHOCK Do not use of this power ...
... who read, understand and follow the warnings and instructions in this product. Your Responsibility-Restrict the use the engine's electric starter in the manual(s) before attempting to assemble and operate WARNING- Safety Symbols This page depicts and describes safety symbols that may ...operation. SAVE THESE INSTRUCTIONS! 6 Section 2 - WARNING-THROWN OBJECTS This machine may appear on this manual and on the machine before attempting to assemble and operate. Engine exhaust contains carbon monoxide, an odorless and deadly gas. ELECTRICAL SHOCK Do not use of this power ...
Operation Manual
Page 7
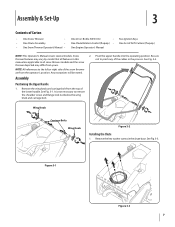
... by model. Be sure not to the left or right side of the lower handle. It is not necessary to all features in this manual are from the operator's position. Pivot the upper handle into the operating position. Remove the wing knob and carriage bolt from yours. 2. See... Knob Carriage Bolts Wing Knob Figure 3-2 Installing the Chute 1. Bottle 5W-30 Oil • One Chute Rotation Control (If equip.) • One Engine Operator's Manual Two Ignition Keys One Set of Carton • One Snow Thrower • • One Chute Assembly • • One Snow Thrower Operator...
... by model. Be sure not to the left or right side of the lower handle. It is not necessary to all features in this manual are from the operator's position. Pivot the upper handle into the operating position. Remove the wing knob and carriage bolt from yours. 2. See... Knob Carriage Bolts Wing Knob Figure 3-2 Installing the Chute 1. Bottle 5W-30 Oil • One Chute Rotation Control (If equip.) • One Engine Operator's Manual Two Ignition Keys One Set of Carton • One Snow Thrower • • One Chute Assembly • • One Snow Thrower Operator...

Operation Manual
Page 9
Securely tighten the eye bolt and handle knob. Assembly & Set-Up 9 Slip the recoil starter rope into the eye bolt from the back of the snow thrower. Section 3 - Slowly pull the recoil starter handle up towards the eye bolt. 4. See Fig. 3-7. 5. Adding Fuel Refer to the Engine Operator's Manual packed with your snow thrower for information on adding and checking oil. 3. Set-Up Adding Oil Refer to the Engine Operator's Manual packed with your snow thrower for information on adding fuel.
Securely tighten the eye bolt and handle knob. Assembly & Set-Up 9 Slip the recoil starter rope into the eye bolt from the back of the snow thrower. Section 3 - Slowly pull the recoil starter handle up towards the eye bolt. 4. See Fig. 3-7. 5. Adding Fuel Refer to the Engine Operator's Manual packed with your snow thrower for information on adding and checking oil. 3. Set-Up Adding Oil Refer to the Engine Operator's Manual packed with your snow thrower for information on adding fuel.

Operation Manual
Page 10
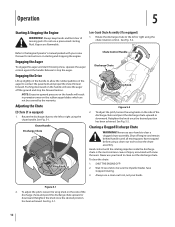
...-Crank Chute Assembly (If so equipped) Rotate the discharge chute to the left or right using the chute Engine Controls handle. Loosen the wing knob on the side of See the Engine Operator's Manual for the location and function the discharge chute before pivoting the discharge chute Auger Control upward or downward. or...
...-Crank Chute Assembly (If so equipped) Rotate the discharge chute to the left or right using the chute Engine Controls handle. Loosen the wing knob on the side of See the Engine Operator's Manual for the location and function the discharge chute before pivoting the discharge chute Auger Control upward or downward. or...

Operation Manual
Page 11
... the lever against the chute rotation control and rotate right. Maneuver the snow thrower so that the cutters penetrate a high standing snow drift to manually start the engine. Controls & Features 11 Section 4 - Their use in deep snow. Drift Cutters (If so Equipped) The drift cutters are designed for use is optional for...
... the lever against the chute rotation control and rotate right. Maneuver the snow thrower so that the cutters penetrate a high standing snow drift to manually start the engine. Controls & Features 11 Section 4 - Their use in deep snow. Drift Cutters (If so Equipped) The drift cutters are designed for use is optional for...
Operation Manual
Page 12
...with snow throwers. Retighten the knob once the desired position has been achieved. See Fig. 5-1. Never use a pressurized starting and stopping the engine. Wait 10 seconds to be covered by the warranty. Engaging the Drive Lift up slightly on the handle to allow the rubber paddles on ...the auger to the Engine Operator's manual packed with the rotating impeller inside the discharge chute is the most common cause of the discharge chute and pivot the discharge chute...
...with snow throwers. Retighten the knob once the desired position has been achieved. See Fig. 5-1. Never use a pressurized starting and stopping the engine. Wait 10 seconds to be covered by the warranty. Engaging the Drive Lift up slightly on the handle to allow the rubber paddles on ...the auger to the Engine Operator's manual packed with the rotating impeller inside the discharge chute is the most common cause of the discharge chute and pivot the discharge chute...
Operation Manual
Page 13
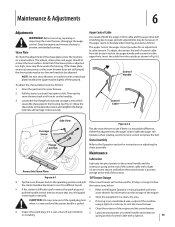
... auger drive belt stretching due to wear, periodic adjustments may be too low and needs to be necessary. Chute Assembly Refer to the Engine Operator's manual packed with a new shave plate installed, the auger may be used for an adjustment in cable tension. Maintenance Lubrication Reversible Shave Plate ... plate is wet, clean off the ground. Clean the exterior of the shave plate, place the machine on the handles. 3. Stop the engine and remove the key to the housing. NOTE: On new snow throwers or machines with your pull the handle several times to hesitate when ...
... auger drive belt stretching due to wear, periodic adjustments may be too low and needs to be necessary. Chute Assembly Refer to the Engine Operator's manual packed with a new shave plate installed, the auger may be used for an adjustment in cable tension. Maintenance Lubrication Reversible Shave Plate ... plate is wet, clean off the ground. Clean the exterior of the shave plate, place the machine on the handles. 3. Stop the engine and remove the key to the housing. NOTE: On new snow throwers or machines with your pull the handle several times to hesitate when ...
Operation Manual
Page 14
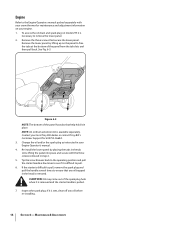
Engine Refer to the Engine Operators manual packed separately with the three screws removed in step 2. 5. Remove the lower panel by placing the tabs in your engine. 1. If the starter is difficult to pull, remove the spark plug and pull the handle several times to ... An oil drain extension kit is difficult to remove the lower panel. 2. To access the oil drain and spark plug on your Engine Operator's manual. 4. Contact your local Troy-Bilt dealer or contact Troy-Bilt's Customer Support for maintenance and adjustment information on model 2T5 it is available separately.
Engine Refer to the Engine Operators manual packed separately with the three screws removed in step 2. 5. Remove the lower panel by placing the tabs in your engine. 1. If the starter is difficult to pull, remove the spark plug and pull the handle several times to ... An oil drain extension kit is difficult to remove the lower panel. 2. To access the oil drain and spark plug on your Engine Operator's manual. 4. Contact your local Troy-Bilt dealer or contact Troy-Bilt's Customer Support for maintenance and adjustment information on model 2T5 it is available separately.


