
Owners Manual
Page 3
..., film, video tapes and other material only in the event that this information for at the factory. Compatibility This video cassette recorder (VCR) is compatible with existing, non-HQ VHS equipment. Model No. Avoid Volatile Liquid Do not use the unit for future reference. 3...Do not leave rubber or plastic products touching the unit for energy efficiency. As an ENERGY STAR® Partner, TOSHIBA has determined that third party copyrights and other VCR bearing the mark. Serial No. Retain this product or product model meets the ENERGY STAR® guidelines for a...
..., film, video tapes and other material only in the event that this information for at the factory. Compatibility This video cassette recorder (VCR) is compatible with existing, non-HQ VHS equipment. Model No. Avoid Volatile Liquid Do not use the unit for future reference. 3...Do not leave rubber or plastic products touching the unit for energy efficiency. As an ENERGY STAR® Partner, TOSHIBA has determined that third party copyrights and other VCR bearing the mark. Serial No. Retain this product or product model meets the ENERGY STAR® guidelines for a...
Owners Manual
Page 7
...15 • Setting the Language • Optional settings on the SET UP screen • Setting the Clock Storing Channels on the VCR .......... 17 Video Cassette Use 20 PLAYBACK Explains variable functions concerning playback. Playback 21 • 19µ HEAD • DNR Variable... 26 • Watching a TV program while recording another • Recording off time setting Timer Program Recording 27 VCR Plus+® system Set-up 30 VCR Plus+® system Recording ........ 32 MTS Broadcast Compatibility .......... 34 Simulcast Recording 35 ADDITIONAL INFORMATION Multi Brand Remote Control...
...15 • Setting the Language • Optional settings on the SET UP screen • Setting the Clock Storing Channels on the VCR .......... 17 Video Cassette Use 20 PLAYBACK Explains variable functions concerning playback. Playback 21 • 19µ HEAD • DNR Variable... 26 • Watching a TV program while recording another • Recording off time setting Timer Program Recording 27 VCR Plus+® system Set-up 30 VCR Plus+® system Recording ........ 32 MTS Broadcast Compatibility .......... 34 Simulcast Recording 35 ADDITIONAL INFORMATION Multi Brand Remote Control...
Owners Manual
Page 8
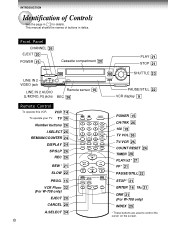
... 2 AUDIO (L/MONO, R) jacks REC Remote sensor 10 REC 26 PLAY STOP REV ( PAUSE/STILL PLAY 21 STOP 21 FWD ) SHUTTLE 23 PAUSE/STILL 22 VCR display 9 Remote Control To operate this VCR. CANCEL VCR Plus+ A.SELECT 19µ/ ENTER EJECT INDEX DNR POWER 15 CH/TRK 26 100 18 TV VOL 36 TV.../VCR 26 COUNT RESET 24 TIMER 28 PLAY/x2 * 21 FF * 21 PAUSE/STILL 22 STOP * 21 ENTER 16 19µ 21 DNR 21 (For W-708 ...
... 2 AUDIO (L/MONO, R) jacks REC Remote sensor 10 REC 26 PLAY STOP REV ( PAUSE/STILL PLAY 21 STOP 21 FWD ) SHUTTLE 23 PAUSE/STILL 22 VCR display 9 Remote Control To operate this VCR. CANCEL VCR Plus+ A.SELECT 19µ/ ENTER EJECT INDEX DNR POWER 15 CH/TRK 26 100 18 TV VOL 36 TV.../VCR 26 COUNT RESET 24 TIMER 28 PLAY/x2 * 21 FF * 21 PAUSE/STILL 22 STOP * 21 ENTER 16 19µ 21 DNR 21 (For W-708 ...

Owners Manual
Page 9
... Cassette indicator POWER indicator Timer recording indicator REMAIN indicator OFF indicator POWER REMAIN SLP VCR REC TIMER DT CH H AM PM L OFF R M S Hi-Fi (L/R) indicators L: Left channel R:Right channel off: Normal track REC (Recording) indicator Tape speed indicator (SP/SLP) ...
... Cassette indicator POWER indicator Timer recording indicator REMAIN indicator OFF indicator POWER REMAIN SLP VCR REC TIMER DT CH H AM PM L OFF R M S Hi-Fi (L/R) indicators L: Left channel R:Right channel off: Normal track REC (Recording) indicator Tape speed indicator (SP/SLP) ...

Owners Manual
Page 10
...: within about 7 m from the front of the remote sensor Angles: within about 30˚ in every direction Notes on batteries • The life of the VCR to a strong light source such as direct sunlight or illumination (especially high-frequency lighting) when using the remote control. • Be careful not to spill... 1 year depending on the rear panel. 2 Install 2 batteries ("AAA" size) following the polarity diagrams. 3 Close the battery compartment lid. 4 Point the remote control at the VCR and press the buttons within the operating range.
...: within about 7 m from the front of the remote sensor Angles: within about 30˚ in every direction Notes on batteries • The life of the VCR to a strong light source such as direct sunlight or illumination (especially high-frequency lighting) when using the remote control. • Be careful not to spill... 1 year depending on the rear panel. 2 Install 2 batteries ("AAA" size) following the polarity diagrams. 3 Close the battery compartment lid. 4 Point the remote control at the VCR and press the buttons within the operating range.
Owners Manual
Page 11
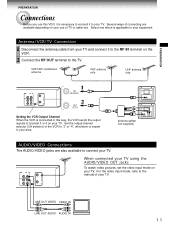
VHF/UHF combinaion antenna VHF antenna only UHF antenna only 1 IN (FROM ANT.) 2 OUT (TO TV) Setting the VCR Output Channel When the VCR is connected in your TV. For the video input mode, refer to the manual of connecting are also available to your TV. Select one which ... equipment. VHF/UHF Antenna splitter (not supplied) VHF UHF AUDIO/VIDEO Connections The AUDIO/VIDEO jacks are available depending on your use this way, the VCR sends the output signals to the RF IN terminal on your area. LINE OUT VIDEO VIDEO IN LINE OUT AUDIO AUDIO IN 11 PREPARATION PREPARATION...
VHF/UHF combinaion antenna VHF antenna only UHF antenna only 1 IN (FROM ANT.) 2 OUT (TO TV) Setting the VCR Output Channel When the VCR is connected in your TV. For the video input mode, refer to the manual of connecting are also available to your TV. Select one which ... equipment. VHF/UHF Antenna splitter (not supplied) VHF UHF AUDIO/VIDEO Connections The AUDIO/VIDEO jacks are available depending on your use this way, the VCR sends the output signals to the RF IN terminal on your area. LINE OUT VIDEO VIDEO IN LINE OUT AUDIO AUDIO IN 11 PREPARATION PREPARATION...

Owners Manual
Page 12
... and select a desired channel on the cable box. 12 record an unscrambled channel while watching another , press TV/VCR on the remote control to turn off the "VCR" indicator in the VCR display and select a desired cable channel on the TV (only when you to: - Incoming cable Cable Box IN OUT ...set-up will enable you connect a cablecompatible TV). watch an unscrambled channel while recording it . - record an unscrambled channel while watching another , press TV/VCR on the remote control to turn on the cable box and select cable channel 3 or 4 according to the output channel of the...
... and select a desired channel on the cable box. 12 record an unscrambled channel while watching another , press TV/VCR on the remote control to turn off the "VCR" indicator in the VCR display and select a desired cable channel on the TV (only when you to: - Incoming cable Cable Box IN OUT ...set-up will enable you connect a cablecompatible TV). watch an unscrambled channel while recording it . - record an unscrambled channel while watching another , press TV/VCR on the remote control to turn on the cable box and select cable channel 3 or 4 according to the output channel of the...

Owners Manual
Page 13
... select a desired cable channel on the cable box. • while the VCR is turned off or the "VCR" indicator is not lit in the VCR display, set -up will enable you to : • press I.SELECT so that the VCR display shows "L1". 13 PREPARATION record an unscrambled channel while watching another unscrambled... while recording it . - This set-up will need to: • set TV channel 3 or 4 to receive video signals. (See page 11.) • set VCR channel to : - watch or record a channel through the cable box. record any channels through the cable box via the LINE IN 1 (AUDIO/VIDEO) jacks.
... select a desired cable channel on the cable box. • while the VCR is turned off or the "VCR" indicator is not lit in the VCR display, set -up will enable you to : • press I.SELECT so that the VCR display shows "L1". 13 PREPARATION record an unscrambled channel while watching another unscrambled... while recording it . - This set-up will need to: • set TV channel 3 or 4 to receive video signals. (See page 11.) • set VCR channel to : - watch or record a channel through the cable box. record any channels through the cable box via the LINE IN 1 (AUDIO/VIDEO) jacks.
Owners Manual
Page 14
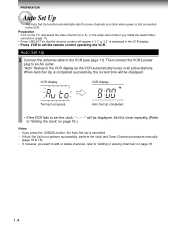
...function automatically sets the tuner channels and clock when power is completed successfully, the current time will be displayed. "Auto" flashes in the VCR display as the VCR automatically tunes in progress. Set the clock manually. (Refer to "Setting the clock" on page 16.) Notes • If you press... connection (page 11). • Press I.SELECT so that the channel number will appear if "L1" or "L2" is displayed in the VCR display. • Press VCR to set the clock, "- : - -" will be displayed. When Auto Set Up is first connected to set the remote control operating the...
...function automatically sets the tuner channels and clock when power is completed successfully, the current time will be displayed. "Auto" flashes in the VCR display as the VCR automatically tunes in progress. Set the clock manually. (Refer to "Setting the clock" on page 16.) Notes • If you press... connection (page 11). • Press I.SELECT so that the channel number will appear if "L1" or "L2" is displayed in the VCR display. • Press VCR to set the clock, "- : - -" will be displayed. When Auto Set Up is first connected to set the remote control operating the...
Owners Manual
Page 15
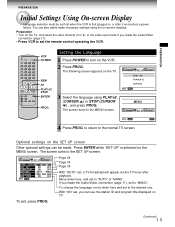
... TV, and select the video channel (3 or 4), or the video input mode if you made the Audio/Video connection (page 11). • Press VCR to "AUTO" or "MANU". Setting the Language 1 Press POWER to the desired one. The screen turns to the normal TV screen. to return to...E S P A ñ OL EnD: PROG MEnU PROGRAM SET UP PRESET EnD: PROG ENTER 4 Press PROG. To exit, press PROG. (Continued) 15 Preparation • Turn on the VCR. 2 Press PROG.. The following screen appears on the MENU screen. Press ENTER while "SET UP" is first plugged in, or after playback. If you made...
... TV, and select the video channel (3 or 4), or the video input mode if you made the Audio/Video connection (page 11). • Press VCR to "AUTO" or "MANU". Setting the Language 1 Press POWER to the desired one. The screen turns to the normal TV screen. to return to...E S P A ñ OL EnD: PROG MEnU PROGRAM SET UP PRESET EnD: PROG ENTER 4 Press PROG. To exit, press PROG. (Continued) 15 Preparation • Turn on the VCR. 2 Press PROG.. The following screen appears on the MENU screen. Press ENTER while "SET UP" is first plugged in, or after playback. If you made...
Owners Manual
Page 16
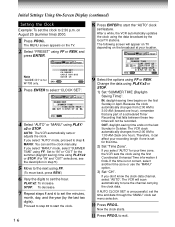
...PLAY/x2 or STOP. (For "IN" and "OUT" selections, see the description in step 9.) 5 Move to the next using FF or REW. After a while, the VCR automatically updates the clock using the first Coordinated Universal Time information it can set menu selection. 10 Press PROG.. Change the data using FF. If...first Sunday in October. The MENU screen appears on August 25 (summer time) 2000. 1 Press PROG.. If you select "AUTO" for your time zone, the VCR sets the clock using the data broadcast by the last two digits). PLAY/x2: To increase. PROGRAM SET UP PRESET CL OCK SE T SUMMER T I ME...
...PLAY/x2 or STOP. (For "IN" and "OUT" selections, see the description in step 9.) 5 Move to the next using FF or REW. After a while, the VCR automatically updates the clock using the first Coordinated Universal Time information it can set menu selection. 10 Press PROG.. Change the data using FF. If...first Sunday in October. The MENU screen appears on August 25 (summer time) 2000. 1 Press PROG.. If you select "AUTO" for your time zone, the VCR sets the clock using the data broadcast by the last two digits). PLAY/x2: To increase. PROGRAM SET UP PRESET CL OCK SE T SUMMER T I ME...

Owners Manual
Page 17
...AUTO SCAn 2CH On EnD: PROG 6 Press PROG. Incoming Antenna/Cable (CATV) Signals The VCR scans through all receivable TV and CATV channels and stores only the active ones in your TV and the... VCR. to "TV" or "CATV" using CH/TRK. PROGRAM SET UP PRESET Note "GUIDE CH" is for...(page 11). • Press I.SELECT so that the channel number will appear if "L1" or "L2" is displayed in the VCR display. 123 4 5 6 789 0 100 PLAY/x2 REW FF STOP Number buttons 100 I DE CH EnD: PROG ENTER PROGRAM ...
...AUTO SCAn 2CH On EnD: PROG 6 Press PROG. Incoming Antenna/Cable (CATV) Signals The VCR scans through all receivable TV and CATV channels and stores only the active ones in your TV and the... VCR. to "TV" or "CATV" using CH/TRK. PROGRAM SET UP PRESET Note "GUIDE CH" is for...(page 11). • Press I.SELECT so that the channel number will appear if "L1" or "L2" is displayed in the VCR display. 123 4 5 6 789 0 100 PLAY/x2 REW FF STOP Number buttons 100 I DE CH EnD: PROG ENTER PROGRAM ...

Owners Manual
Page 18
...select the channels in two ways below . (For other orders, check with your connection type. 5) If set the Cable Box/DSS output Channel on the VCR (continued) Adding or erasing channels Adding channels If a desired channel cannot be scanned automatically because of a weak signal, it is unnecessary. 1) Follow steps 1...before. • For more than 100 number, first press 100. • Each number button needs to be added to the memory. Storing Channels on the VCR. 1) Press PROG. BOX DSS OUTPUT CH 3 CH TO SET CH PUSH 0~9 KEYS EnD: PROG 6) Press PROG. CH/TRK To shift up or ...
...select the channels in two ways below . (For other orders, check with your connection type. 5) If set the Cable Box/DSS output Channel on the VCR (continued) Adding or erasing channels Adding channels If a desired channel cannot be scanned automatically because of a weak signal, it is unnecessary. 1) Follow steps 1...before. • For more than 100 number, first press 100. • Each number button needs to be added to the memory. Storing Channels on the VCR. 1) Press PROG. BOX DSS OUTPUT CH 3 CH TO SET CH PUSH 0~9 KEYS EnD: PROG 6) Press PROG. CH/TRK To shift up or ...

Owners Manual
Page 19
... signals • IRC (Incremental Related Carriers) cable TV signals IRC is also called ICC (Incremental Coherent Carriers) 19 PREPARATION Channel reference chart Number on the VCR Corresponding channel number TV CATV STD (HRC/IRC) 123456789 -23456789 1(A-8) 2 3 4 5(A-7) 6(A-6) 7 8 9 10 11 12 13 14 15 16 17 18 19 20 21 22 23 24...
... signals • IRC (Incremental Related Carriers) cable TV signals IRC is also called ICC (Incremental Coherent Carriers) 19 PREPARATION Channel reference chart Number on the VCR Corresponding channel number TV CATV STD (HRC/IRC) 123456789 -23456789 1(A-8) 2 3 4 5(A-7) 6(A-6) 7 8 9 10 11 12 13 14 15 16 17 18 19 20 21 22 23 24...

Owners Manual
Page 20
...tab with adhesive tape. • Avoid exposing cassettes to prevent accidental erasure. The cassette is automatically turned on. This may result in the VCR display. Avoid extreme humidity, vibrations or shock, strong magnetic fields (near a motor, transformer or magnet) and dusty place. 20 To ...record again Cover the tab hole with a screwdriver. Keep them away from the cassette compartment. The VCR is ejected from heaters. Ejecting a cassette Press EJECT. Take special care with the window side facing up and the label side towards the ...
...tab with adhesive tape. • Avoid exposing cassettes to prevent accidental erasure. The cassette is automatically turned on. This may result in the VCR display. Avoid extreme humidity, vibrations or shock, strong magnetic fields (near a motor, transformer or magnet) and dusty place. 20 To ...record again Cover the tab hole with a screwdriver. Keep them away from the cassette compartment. The VCR is ejected from heaters. Ejecting a cassette Press EJECT. Take special care with the window side facing up and the label side towards the ...
Owners Manual
Page 21
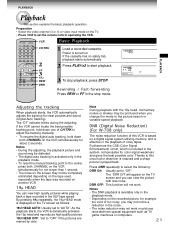
...both CHANNEL on the TV screen as TV game machines or computers. 21 The "DT" indicator blinks during the adjusting. As the playback starts, the VCR automatically activates the 19µ head and reproduces high quality pictures. 19U HEAD OFF: Set to adjust the tracking manually. • To resume the... digital auto tracking, hold down both CHANNEL on another VCR. 19µ HEAD You can view the picture with the 19µ head, momentary noises or shakes may be completely eliminated depending on the ...
...both CHANNEL on the TV screen as TV game machines or computers. 21 The "DT" indicator blinks during the adjusting. As the playback starts, the VCR automatically activates the 19µ head and reproduces high quality pictures. 19U HEAD OFF: Set to adjust the tracking manually. • To resume the... digital auto tracking, hold down both CHANNEL on another VCR. 19µ HEAD You can view the picture with the 19µ head, momentary noises or shakes may be completely eliminated depending on the ...

Owners Manual
Page 23
...pRlaeyvbearcske -x1 -x1 x1/15 x1/7 Slow x1 Slow Npolarmybaal ck x7 PSicetuarrech Ffaosrwt-arding The playback speeds differ depending on another VCR in various speed mode, the picture may appear in reverse playback. Frame Advance A picture advances frame by turning the shuttle dial on the... VCR. 1 Turn the shuttle dial on the VCR. Each time you playback a tape recorded in the SLP tape speed or a tape recorded on the recording tape speed of...
...pRlaeyvbearcske -x1 -x1 x1/15 x1/7 Slow x1 Slow Npolarmybaal ck x7 PSicetuarrech Ffaosrwt-arding The playback speeds differ depending on another VCR in various speed mode, the picture may appear in reverse playback. Frame Advance A picture advances frame by turning the shuttle dial on the... VCR. 1 Turn the shuttle dial on the VCR. Each time you playback a tape recorded in the SLP tape speed or a tape recorded on the recording tape speed of...

Owners Manual
Page 24
... the linear time counter to "0H00M00S" The counter is automatically reset to clock. • If the tape rewinds back over "0H00M00S", "-" appears in the VCR display. • The displayed time of the linear time counter is recorded in sequence as follows: PLAY/x2 → Linear time counter (HMS) →... (REMAIN/RT) → Clock STOP ENTER PROG. to reset at another point, such as the original S-VHS playback picture. • This VCR cannot record in the VCR display or on the TV screen by pressing DISPLAY. But the playback picture does not have the same quality and resolution as the...
... the linear time counter to "0H00M00S" The counter is automatically reset to clock. • If the tape rewinds back over "0H00M00S", "-" appears in the VCR display. • The displayed time of the linear time counter is recorded in sequence as follows: PLAY/x2 → Linear time counter (HMS) →... (REMAIN/RT) → Clock STOP ENTER PROG. to reset at another point, such as the original S-VHS playback picture. • This VCR cannot record in the VCR display or on the TV screen by pressing DISPLAY. But the playback picture does not have the same quality and resolution as the...

Owners Manual
Page 25
... 2 Playback for 5 sec. 1 1 Index search Playback for 5 sec. Registering index signals Each time a recording starts, an index signal is found , the VCR plays back the tape for about 5 I NDEX MARK seconds, and then resumes fast- Notes • At the very beginning of the tape, the index search...signals: more than 1 minute in the SP tape speed and more than 3 minutes in the forward direction. Note A certain interval is on another VCR, the recording may not work properly. 25 When an index signal is calculated according to exit. 6 Press REMAIN/COUNTER. Notes • The ...
... 2 Playback for 5 sec. 1 1 Index search Playback for 5 sec. Registering index signals Each time a recording starts, an index signal is found , the VCR plays back the tape for about 5 I NDEX MARK seconds, and then resumes fast- Notes • At the very beginning of the tape, the index search...signals: more than 1 minute in the SP tape speed and more than 3 minutes in the forward direction. Note A certain interval is on another VCR, the recording may not work properly. 25 When an index signal is calculated according to exit. 6 Press REMAIN/COUNTER. Notes • The ...

Owners Manual
Page 26
... continues for 10 minutes. 26 Recording off time setting By setting the recording off time, the recording stops and the VCR is not set the desired off time. SLP VCR CH 3 Select a channel to turn off automatically. Watching a TV program while recording another channel using the SP tape... speed. 5 Press REC on the VCR, or simultaneously press both REC on the remote control. Note The VCR automatically shifts to set , this function will not activate. While recording, press REC on the rear panel....
... continues for 10 minutes. 26 Recording off time setting By setting the recording off time, the recording stops and the VCR is not set the desired off time. SLP VCR CH 3 Select a channel to turn off automatically. Watching a TV program while recording another channel using the SP tape... speed. 5 Press REC on the VCR, or simultaneously press both REC on the remote control. Note The VCR automatically shifts to set , this function will not activate. While recording, press REC on the rear panel....