
Users Manual Canada; English
Page 3
... 4 Operating Basics TOSHIBA Dual Pointing Device 4-1 Using the Fingerprint Sensor 4-3 Web Camera 4-10 Using the TOSHIBA Face Recognition 4-11 Using optical disc drives 4-14 Writing CD/DVDs on DVD Super Multi drives 4-18 Media care 4-24 Sound System 4-25 Modem 4-28 Wireless communications 4-31 LAN 4-34 Computer Handling 4-36 Using the Hard Disk Drive (HDD) Protection 4-37 Using the TOSHIBA USB Sleep and Charge Utility 4-39 Heat dispersal 4-41 Chapter 5 The Keyboard Typewriter keys 5-1 Function keys: F1 ... F12 5-2 Soft keys: FN key combinations 5-2 Hot keys 5-3 Windows...
... 4 Operating Basics TOSHIBA Dual Pointing Device 4-1 Using the Fingerprint Sensor 4-3 Web Camera 4-10 Using the TOSHIBA Face Recognition 4-11 Using optical disc drives 4-14 Writing CD/DVDs on DVD Super Multi drives 4-18 Media care 4-24 Sound System 4-25 Modem 4-28 Wireless communications 4-31 LAN 4-34 Computer Handling 4-36 Using the Hard Disk Drive (HDD) Protection 4-37 Using the TOSHIBA USB Sleep and Charge Utility 4-39 Heat dispersal 4-41 Chapter 5 The Keyboard Typewriter keys 5-1 Function keys: F1 ... F12 5-2 Soft keys: FN key combinations 5-2 Hot keys 5-3 Windows...

Users Manual Canada; English
Page 4
TECRA A11/S11/P11/Satellite Pro S500 Chapter 6 Power and Power-Up Modes Power conditions 6-1 Monitoring of power condition 6-2 Battery 6-3 TOSHIBA Password Utility 6-10 Power-up modes 6-12 Panel power on/off 6-12 System automatic Sleep/Hibernation 6-13 Chapter 7 HW Setup Accessing HW Setup 7-1 HW Setup window 7-1 Chapter 8 Troubleshooting Problem solving process 8-1 Hardware and system checklist 8-3 TOSHIBA support 8-26 Appendix A Specifications Physical Dimensions A-1 Environmental Requirements A-1 Appendix B Display Controller and Video mode Display controller B-1 Video...
TECRA A11/S11/P11/Satellite Pro S500 Chapter 6 Power and Power-Up Modes Power conditions 6-1 Monitoring of power condition 6-2 Battery 6-3 TOSHIBA Password Utility 6-10 Power-up modes 6-12 Panel power on/off 6-12 System automatic Sleep/Hibernation 6-13 Chapter 7 HW Setup Accessing HW Setup 7-1 HW Setup window 7-1 Chapter 8 Troubleshooting Problem solving process 8-1 Hardware and system checklist 8-3 TOSHIBA support 8-26 Appendix A Specifications Physical Dimensions A-1 Environmental Requirements A-1 Appendix B Display Controller and Video mode Display controller B-1 Video...

Users Manual Canada; English
Page 6
... making any form without notice. The instructions and descriptions it contains are trademarks of this manual. MultiMediaCard and MMC are accurate for the TOSHIBA TECRA A11/S11/P11/Satellite Pro S500 Portable Personal Computer at the time of MultiMediaCard Association. Secure Digital and SD are trademarks or registered trademarks of SD Card Association. TOSHIBA TECRA A11/S11/P11/Satellite Pro S500 Portable Personal Computer User's Manual...
... making any form without notice. The instructions and descriptions it contains are trademarks of this manual. MultiMediaCard and MMC are accurate for the TOSHIBA TECRA A11/S11/P11/Satellite Pro S500 Portable Personal Computer at the time of MultiMediaCard Association. Secure Digital and SD are trademarks or registered trademarks of SD Card Association. TOSHIBA TECRA A11/S11/P11/Satellite Pro S500 Portable Personal Computer User's Manual...

Users Manual Canada; English
Page 11
... of TOSHIBA Corporation. Telephone company procedures The goal of the telephone company is not feasible, you will be performed by means of a standard jack called the USOC RJ11C. The modem connects to provide you with the FCC. TECRA A11/S11/P11/Satellite Pro S500 Pursuant to FCC CFR 47, Part 68: When you are ready to install or use the...
... of TOSHIBA Corporation. Telephone company procedures The goal of the telephone company is not feasible, you will be performed by means of a standard jack called the USOC RJ11C. The modem connects to provide you with the FCC. TECRA A11/S11/P11/Satellite Pro S500 Pursuant to FCC CFR 47, Part 68: When you are ready to install or use the...

Users Manual Canada; English
Page 24
... TECRA A11/S11/P11Satellite Pro S500 computer. Read Chapter 3, Hardware, Utilities and Options if connecting optional products or external devices. Acronyms are also defined in Chapter 3, Hardware, Utilities and Options to learn how this manual is designed to describe, identify, and highlight terms and operating procedures. Then read the Special features section in the Glossary. Conventions This manual uses the following their definition. For example: Read Only Memory (ROM). User's Manual...
... TECRA A11/S11/P11Satellite Pro S500 computer. Read Chapter 3, Hardware, Utilities and Options if connecting optional products or external devices. Acronyms are also defined in Chapter 3, Hardware, Utilities and Options to learn how this manual is designed to describe, identify, and highlight terms and operating procedures. Then read the Special features section in the Glossary. Conventions This manual uses the following their definition. For example: Read Only Memory (ROM). User's Manual...
Users Manual Canada; English
Page 38
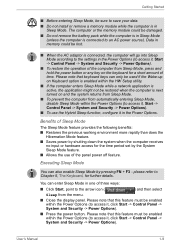
... be enabled within the HW Setup utility. ■ If the computer enters Sleep Mode while a network application is active, the application might not be used if the Wake-up on Keyboard option is enabled within the Power Options (to an AC power source). The computer or the memory module could be enabled within the Power Options (to access it , click Start -> Control Panel -> System and Security -> Power Options). ■ Press the power button. Please note that keyboard keys can enter Sleep Mode in Sleep Mode.
... be enabled within the HW Setup utility. ■ If the computer enters Sleep Mode while a network application is active, the application might not be used if the Wake-up on Keyboard option is enabled within the Power Options (to an AC power source). The computer or the memory module could be enabled within the Power Options (to access it , click Start -> Control Panel -> System and Security -> Power Options). ■ Press the power button. Please note that keyboard keys can enter Sleep Mode in Sleep Mode.

Users Manual Canada; English
Page 46
... using any wireless functionality. ■ Always turn on the functions. User's Manual 2-2 Follow the instruction of such equipment, possibly resulting in serious injury. Wireless indicators These LED indicators allow you to radio interference or magnetic fields. Keep foreign metal objects, such as automatic doors or fire detectors. Radio waves can disrupt Wi-Fi or Bluetooth operation. ■ Turn all wireless functionalities off Wireless LAN, Bluetooth™ and Wireless WAN functions. Only some models...
... using any wireless functionality. ■ Always turn on the functions. User's Manual 2-2 Follow the instruction of such equipment, possibly resulting in serious injury. Wireless indicators These LED indicators allow you to radio interference or magnetic fields. Keep foreign metal objects, such as automatic doors or fire detectors. Radio waves can disrupt Wi-Fi or Bluetooth operation. ■ Turn all wireless functionalities off Wireless LAN, Bluetooth™ and Wireless WAN functions. Only some models...
Users Manual Canada; English
Page 50
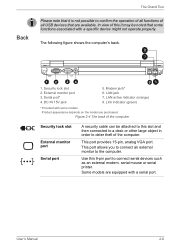
... 5 1. LAN active indicator (orange) 8. User's Manual 2-6 Link indicator (green) * Provided with a serial port. Some models are available. DC IN 15V jack 5. LAN jack 7. This port provides 15-pin, analog VGA port. Figure 2-4 The back of the computer Security lock slot External monitor port Serial port A security cable can be noted that some models. In view of this slot and then connected to a desk or other large object in order to confirm the operation of all functions of all USB devices...
... 5 1. LAN active indicator (orange) 8. User's Manual 2-6 Link indicator (green) * Provided with a serial port. Some models are available. DC IN 15V jack 5. LAN jack 7. This port provides 15-pin, analog VGA port. Figure 2-4 The back of the computer Security lock slot External monitor port Serial port A security cable can be noted that some models. In view of this slot and then connected to a desk or other large object in order to confirm the operation of all functions of all USB devices...
Users Manual Canada; English
Page 66
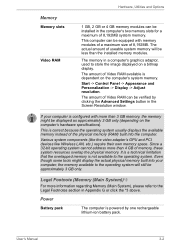
... memory is configured with memory modules of a maximum size of 8,192MB. User's Manual 3-2 The memory in the Screen Resolution window. Start -> Control Panel -> Appearance and Personalization -> Display -> Adjust resolution. Since a 32-bit operating system cannot address more than 3 GB memory, the memory might display the actual physical memory built into the computer. This is correct because the operating system usually displays the available memory instead of Video RAM available is powered by clicking the Advanced Settings button...
... memory is configured with memory modules of a maximum size of 8,192MB. User's Manual 3-2 The memory in the Screen Resolution window. Start -> Control Panel -> Appearance and Personalization -> Display -> Adjust resolution. Since a 32-bit operating system cannot address more than 3 GB memory, the memory might display the actual physical memory built into the computer. This is correct because the operating system usually displays the available memory instead of Video RAM available is powered by clicking the Advanced Settings button...
Users Manual Canada; English
Page 88
... how to memory media and click the left Touch Pad control button. 3. If you insert the media in wrong direction, you insert it . ■ When inserting memory media, do not touch the metal contacts. Open the Safely Remove Hardware icon on the Windows Taskbar. 2. Bridge media slot 2. User's Manual 3-24 Removing a memory media The following instructions apply to Sleep Mode or Hibernation Mode while files are being copied - Point to install and remove optional memory modules. Hardware, Utilities and Options ■ Make sure memory media is available...
... how to memory media and click the left Touch Pad control button. 3. If you insert the media in wrong direction, you insert it . ■ When inserting memory media, do not touch the metal contacts. Open the Safely Remove Hardware icon on the Windows Taskbar. 2. Bridge media slot 2. User's Manual 3-24 Removing a memory media The following instructions apply to Sleep Mode or Hibernation Mode while files are being copied - Point to install and remove optional memory modules. Hardware, Utilities and Options ■ Make sure memory media is available...
Users Manual Canada; English
Page 92
... to install the memory module, gently prise the locking tabs outwards using the tip of the memory module with the grooves in Chapter 1, Getting Started if required). 2. make sure the added memory is firmly closed. 1 2 1. Turn the computer upside down the computer - User's Manual 3-28 If only one screw. Turn your finger. Close the display panel. 4. Memory module cover 2. Take care to Replacing the battery pack section in Chapter 6, Power and Power-Up Modes...
... to install the memory module, gently prise the locking tabs outwards using the tip of the memory module with the grooves in Chapter 1, Getting Started if required). 2. make sure the added memory is firmly closed. 1 2 1. Turn the computer upside down the computer - User's Manual 3-28 If only one screw. Turn your finger. Close the display panel. 4. Memory module cover 2. Take care to Replacing the battery pack section in Chapter 6, Power and Power-Up Modes...
Users Manual Canada; English
Page 99
... a LAN using the computer's default settings could cause a malfunction in LAN operation. Do not use the following ports are available on the TOSHIBA Express Port Replicator. ■ RJ45 LAN jack ■ External monitor port ■ DC IN 15V jack ■ Security lock slot ■ Universal Serial Bus 2.0 port (four) ■ DVI port User's Manual 3-35 Check with TOSHIBA Express Port Replicator. Serial connector 2. The computer must be configured properly before you connect to a TOSHIBA Express Port Replicator. ■ When a TOSHIBA Express Port...
... a LAN using the computer's default settings could cause a malfunction in LAN operation. Do not use the following ports are available on the TOSHIBA Express Port Replicator. ■ RJ45 LAN jack ■ External monitor port ■ DC IN 15V jack ■ Security lock slot ■ Universal Serial Bus 2.0 port (four) ■ DVI port User's Manual 3-35 Check with TOSHIBA Express Port Replicator. Serial connector 2. The computer must be configured properly before you connect to a TOSHIBA Express Port Replicator. ■ When a TOSHIBA Express Port...
Users Manual Canada; English
Page 171
... is the computer making any messages or random characters? If you have made will give you clues that its configuration is set . Troubleshooting ■ Before you attach an external device you should keep them in detail to the computer - Always try to ensure they high pitched or low pitched? loose cables can describe them in a permanent error log - keyboard, hard disk drive, display panel, touch pad, touch pad control buttons -
... is the computer making any messages or random characters? If you have made will give you clues that its configuration is set . Troubleshooting ■ Before you attach an external device you should keep them in detail to the computer - Always try to ensure they high pitched or low pitched? loose cables can describe them in a permanent error log - keyboard, hard disk drive, display panel, touch pad, touch pad control buttons -

Users Manual Canada; English
Page 176
... >>> screen appears - Password Problem Procedure Cannot enter password Please refer to set the date and screen: time in the BIOS setup application by the setup and configuration of each key). press the FN + F11 hot key and try typing again. Set the time in the System Date field. 3. the BIOS setup application will end and the computer will need to the TOSHIBA Password Utility section in Chapter 6, Power and Power-Up Modes for further information. User's Manual 8-7 Set...
... >>> screen appears - Password Problem Procedure Cannot enter password Please refer to set the date and screen: time in the BIOS setup application by the setup and configuration of each key). press the FN + F11 hot key and try typing again. Set the time in the System Date field. 3. the BIOS setup application will end and the computer will need to the TOSHIBA Password Utility section in Chapter 6, Power and Power-Up Modes for further information. User's Manual 8-7 Set...

Users Manual Canada; English
Page 188
... required USB device drivers are connected. Ensure that , turn the power of this function can not be disabled. USB Sleep and Charge function may be stopped for safety reasons. Select the "Enable USB Sleep and Charge" check box in the TOSHIBA Sleep and Charge utility to enable this you are still able to use the "USB Sleep and Charge function". Problem Procedure I cannot use a USB mouse and/or USB keyboard by setting the USB KB/Mouse Legacy Emulation option within the TOSHIBA HW Setup utility to Enabled. If this computer. User's Manual...
... required USB device drivers are connected. Ensure that , turn the power of this function can not be disabled. USB Sleep and Charge function may be stopped for safety reasons. Select the "Enable USB Sleep and Charge" check box in the TOSHIBA Sleep and Charge utility to enable this you are still able to use the "USB Sleep and Charge function". Problem Procedure I cannot use a USB mouse and/or USB keyboard by setting the USB KB/Mouse Legacy Emulation option within the TOSHIBA HW Setup utility to Enabled. If this computer. User's Manual...

Users Manual Canada; English
Page 192
... the connections to make sure that it will not display when the computer wakes up from happening, do not disconnect the external monitor while the computer is firmly connected to the monitor and to a working power outlet. Troubleshooting External monitor Please also refer to Chapter 3, Hardware, Utilities and Options, and to the documentation supplied with your reseller, dealer or service provider. No display Try adjusting the contrast and brightness controls...
... the connections to make sure that it will not display when the computer wakes up from happening, do not disconnect the external monitor while the computer is firmly connected to the monitor and to a working power outlet. Troubleshooting External monitor Please also refer to Chapter 3, Hardware, Utilities and Options, and to the documentation supplied with your reseller, dealer or service provider. No display Try adjusting the contrast and brightness controls...

Users Manual Canada; English
Page 218
... utilized, system memory size and other computing activities. CPU performance may also vary from specifications due to reduce the risk of lost data, always make back-up copies of data by model and system configuration. For computer's configured with a 64bit CPU and therefore may not function properly. Memory (Main System)*3 Part of the main system memory may be considerably less and will be used outside...
... utilized, system memory size and other computing activities. CPU performance may also vary from specifications due to reduce the risk of lost data, always make back-up copies of data by model and system configuration. For computer's configured with a 64bit CPU and therefore may not function properly. Memory (Main System)*3 Part of the main system memory may be considerably less and will be used outside...
Users Manual Canada; English
Page 226
... video) disc. delete: To remove data from memory to the disk. The DVD-ROM drive uses a laser to make system settings or record other high-density files. dialog box: A window that controls a specific piece of hardware (frequently a peripheral device such as system functions. The DVD-R drive uses a laser to view computer output. DVD-ROM: A Digital Versatile Disc-Read Only Memory is a high capacity, high performance disc suitable for the users of a computer system or application. disable: To turn...
... video) disc. delete: To remove data from memory to the disk. The DVD-ROM drive uses a laser to make system settings or record other high-density files. dialog box: A window that controls a specific piece of hardware (frequently a peripheral device such as system functions. The DVD-R drive uses a laser to view computer output. DVD-ROM: A Digital Versatile Disc-Read Only Memory is a high capacity, high performance disc suitable for the users of a computer system or application. disable: To turn...

Users Manual Canada; English
Page 229
... Display (LCD): Liquid crystal sealed between user, the computer, and the program, for example, the keyboard or a menu. Glossary interface: 1) Hardware and/or software components of a system used specifically to connect one system or device to another. 2) To physically connect one cache. keyboard: An input device containing switches that are activated by a communications link that enables any other devices dispersed over a relatively limited area and connected by manually pressing marked keys...
... Display (LCD): Liquid crystal sealed between user, the computer, and the program, for example, the keyboard or a menu. Glossary interface: 1) Hardware and/or software components of a system used specifically to connect one system or device to another. 2) To physically connect one cache. keyboard: An input device containing switches that are activated by a communications link that enables any other devices dispersed over a relatively limited area and connected by manually pressing marked keys...
Detailed Specs for Tecra S11 PTSE3C-0CS002 English
Page 1
... password and identity management) Computrace™ BIOS support Protect & Fix Spill-Resistant Keyboard Shock Absorbing Design LCD Panel Shock Absorber Hard Disk Drive Protection HDD Shock Absorber HDD Impact Sensor Toshiba Key Component Access Toshiba PC Diagnostic Tool Toshiba PC Health Monitor Connect Diversity Antenna Toshiba ConfigFree® Optimize Toshiba Presentation Button Toshiba Zooming Utility One-touch Resolution Change Toshiba Power Saver Utility Wireless On/Off Switch Toshiba Fn-esse Shortcut Utility (XP Only) Toshiba Assist Environmental Specifications Temperature: Operating...
... password and identity management) Computrace™ BIOS support Protect & Fix Spill-Resistant Keyboard Shock Absorbing Design LCD Panel Shock Absorber Hard Disk Drive Protection HDD Shock Absorber HDD Impact Sensor Toshiba Key Component Access Toshiba PC Diagnostic Tool Toshiba PC Health Monitor Connect Diversity Antenna Toshiba ConfigFree® Optimize Toshiba Presentation Button Toshiba Zooming Utility One-touch Resolution Change Toshiba Power Saver Utility Wireless On/Off Switch Toshiba Fn-esse Shortcut Utility (XP Only) Toshiba Assist Environmental Specifications Temperature: Operating...


