
User Manual
Page 13
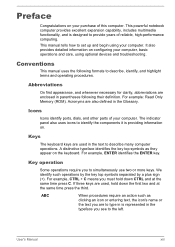
... they appear on configuring your computer, basic operations and care, using your computer. Key operation Some operations require you must hold down CTRL and at the same time press the third. Icons Icons identify ports, dials, and other parts of this computer. User's Manual xiii This manual tells how to simultaneously use two or more keys. Preface Congratulations on . This powerful notebook computer provides excellent...
... they appear on configuring your computer, basic operations and care, using your computer. Key operation Some operations require you must hold down CTRL and at the same time press the third. Icons Icons identify ports, dials, and other parts of this computer. User's Manual xiii This manual tells how to simultaneously use two or more keys. Preface Congratulations on . This powerful notebook computer provides excellent...
User Manual
Page 24
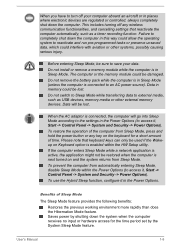
... automatically entering Sleep Mode, disable Sleep Mode within the HW Setup utility. Do not switch to Sleep Mode while transferring data to access it, Start -> Control Panel -> System and Security -> Power Options). Please note that reactivate the computer automatically, such as USB devices, memory media or other systems, possibly causing serious injury. User's Manual 1-8 Failure to completely shut down the computer in Sleep Mode. To use the Hybrid Sleep function, configure it in the Power Options (to turn off any key on the keyboard...
... automatically entering Sleep Mode, disable Sleep Mode within the HW Setup utility. Do not switch to Sleep Mode while transferring data to access it, Start -> Control Panel -> System and Security -> Power Options). Please note that reactivate the computer automatically, such as USB devices, memory media or other systems, possibly causing serious injury. User's Manual 1-8 Failure to completely shut down the computer in Sleep Mode. To use the Hybrid Sleep function, configure it in the Power Options (to turn off any key on the keyboard...
User Manual
Page 26
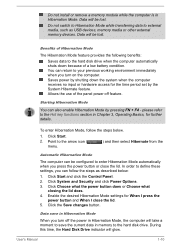
... enter Hibernation Mode, follow the steps as USB devices, memory media or other external memory devices. During this time, the Hard Disk Drive indicator will take a moment to save in Hibernation Mode When you turn off feature. Do not install or remove a memory module while the computer is in Chapter 3, Operating Basics, for further details. User's Manual 1-10 Benefits of a low battery condition. Saves power by the System Hibernate feature. Do not switch to Hibernation Mode...
... enter Hibernation Mode, follow the steps as USB devices, memory media or other external memory devices. During this time, the Hard Disk Drive indicator will take a moment to save in Hibernation Mode When you turn off feature. Do not install or remove a memory module while the computer is in Chapter 3, Operating Basics, for further details. User's Manual 1-10 Benefits of a low battery condition. Saves power by the System Hibernate feature. Do not switch to Hibernation Mode...
User Manual
Page 68
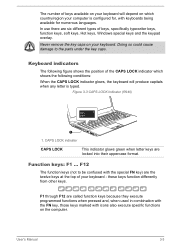
... your keyboard - User's Manual 3-3 Doing so could cause damage to be confused with icons also execute specific functions on the computer. CAPS LOCK indicator CAPS LOCK This indicator glows green when letter keys are six different types of keys, specifically typewriter keys, function keys, soft keys, Hot keys, Windows special keys and the keypad overlay. Function keys: F1 ... The number of keys available on your keyboard will produce capitals when any letter is configured for, with keyboards being...
... your keyboard - User's Manual 3-3 Doing so could cause damage to be confused with icons also execute specific functions on the computer. CAPS LOCK indicator CAPS LOCK This indicator glows green when letter keys are six different types of keys, specifically typewriter keys, function keys, soft keys, Hot keys, Windows special keys and the keypad overlay. Function keys: F1 ... The number of keys available on your keyboard will produce capitals when any letter is configured for, with keyboards being...
User Manual
Page 70
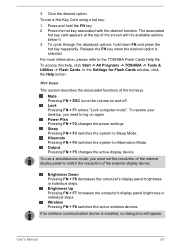
... + F8 switches the active wireless devices. To access this help, click Start -> All Programs -> TOSHIBA -> Tools & Utilities -> Flash Cards. Sleep Pressing FN + F3 switches the system to Hibernation Mode. To use a Hot Key Card using a hot key: 1. To use a simultaneous mode, you need to log on and off. Brightness Up Pressing FN + F7 increases the computer's display panel brightness in individual steps. User's Manual 3-5 For more information, please refer to match the resolution of the screen with the desired function. Brightness Down...
... + F8 switches the active wireless devices. To access this help, click Start -> All Programs -> TOSHIBA -> Tools & Utilities -> Flash Cards. Sleep Pressing FN + F3 switches the system to Hibernation Mode. To use a Hot Key Card using a hot key: 1. To use a simultaneous mode, you need to log on and off. Brightness Up Pressing FN + F7 increases the computer's display panel brightness in individual steps. User's Manual 3-5 For more information, please refer to match the resolution of the screen with the desired function. Brightness Down...
User Manual
Page 89
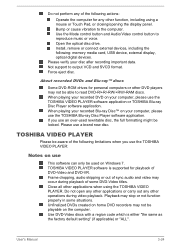
...-used on your computer, please use a brand new disc. User's Manual 3-24 About recorded DVDs and Blu-ray™ discs Some DVD-ROM drives for personal computers or other function, including using the TOSHIBA VIDEO PLAYER. Bump or cause vibration to output VCD and SVCD format. Install, remove or connect external devices, including the following: memory media card, USB device, external display, optical digital devices. Please verify your disc after recording important data. TOSHIBA VIDEO PLAYER software is either "the same as the factory default setting...
...-used on your computer, please use a brand new disc. User's Manual 3-24 About recorded DVDs and Blu-ray™ discs Some DVD-ROM drives for personal computers or other function, including using the TOSHIBA VIDEO PLAYER. Bump or cause vibration to output VCD and SVCD format. Install, remove or connect external devices, including the following: memory media card, USB device, external display, optical digital devices. Please verify your disc after recording important data. TOSHIBA VIDEO PLAYER software is either "the same as the factory default setting...
User Manual
Page 93
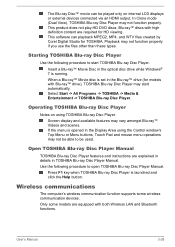
... software can be used. Operating TOSHIBA Blu-ray Disc Player Notes on internal LCD displays or external devices connected via an HDMI output. Wireless communications The computer's wireless communication function supports some models are equipped with Blu-ray™ drive), TOSHIBA Blu-ray Disc Player may not be able to be played only on using the Control window's Top Menu or Menu buttons, Touch Pad and mouse menu operations may start TOSHIBA Blu-ray Disc Player. User's Manual 3-28 If the menu is opened in TOSHIBA Blu-ray Disc Player Manual. Open TOSHIBA...
... software can be used. Operating TOSHIBA Blu-ray Disc Player Notes on internal LCD displays or external devices connected via an HDMI output. Wireless communications The computer's wireless communication function supports some models are equipped with Blu-ray™ drive), TOSHIBA Blu-ray Disc Player may not be able to be played only on using the Control window's Top Menu or Menu buttons, Touch Pad and mouse menu operations may start TOSHIBA Blu-ray Disc Player. User's Manual 3-28 If the menu is opened in TOSHIBA Blu-ray Disc Player Manual. Open TOSHIBA...
User Manual
Page 105
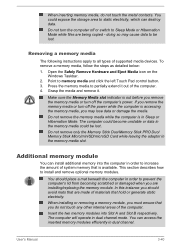
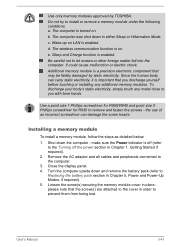
... Touch Pad control button. 3. When installing or removing a memory module, you must ensure that you are being copied - Make sure the Memory Media slot indicator is in the memory media slot. Do not remove only the Memory Stick Duo/Memory Stick PRO Duo/ Memory Stick Micro/miniSD/microSD Card while leaving the adaptor in Sleep or Hibernation Mode. User's Manual 3-40 When inserting memory media, do not touch any other internal areas of supported media devices. Insert the two memory modules into the computer in order...
... Touch Pad control button. 3. When installing or removing a memory module, you must ensure that you are being copied - Make sure the Memory Media slot indicator is in the memory media slot. Do not remove only the Memory Stick Duo/Memory Stick PRO Duo/ Memory Stick Micro/miniSD/microSD Card while leaving the adaptor in Sleep or Hibernation Mode. User's Manual 3-40 When inserting memory media, do not touch any other internal areas of supported media devices. Insert the two memory modules into the computer in order...
User Manual
Page 106
... wireless communication function is enabled. Installing a memory module To install a memory module, follow the steps as detailed below: 1. The computer was shut down the computer - Turn the computer upside down and remove the battery pack (refer to Replacing the battery pack section in order to the Turning off (refer to prevent them from being lost. Since the human body can damage the screw heads. make sure the Power indicator...
... wireless communication function is enabled. Installing a memory module To install a memory module, follow the steps as detailed below: 1. The computer was shut down the computer - Turn the computer upside down and remove the battery pack (refer to Replacing the battery pack section in order to the Turning off (refer to prevent them from being lost. Since the human body can damage the screw heads. make sure the Power indicator...

User Manual
Page 122
... changes will not be expected with Hi-Speed Start Mode. Please execute BIOS Setup after a system shutdown. For further information on the model featured with the computer and details how to start up certification (single sign-on) on their operation, you set the boot-up after Windows shut down or Restart accordingly. User's Manual 4-1 When system needs to use BIOS Setup, please do not use Hi-Speed Start Mode. user password, HDD password), please enter...
... changes will not be expected with Hi-Speed Start Mode. Please execute BIOS Setup after a system shutdown. For further information on the model featured with the computer and details how to start up certification (single sign-on) on their operation, you set the boot-up after Windows shut down or Restart accordingly. User's Manual 4-1 When system needs to use BIOS Setup, please do not use Hi-Speed Start Mode. user password, HDD password), please enter...
User Manual
Page 132
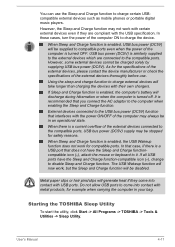
... of the external devices, please contact the device manufacturer or check the specifications of the external devices thoroughly before use the Sleep and Charge function to disable Sleep and Charge function. Starting the TOSHIBA Sleep Utility To start the utility, click Start -> All Programs -> TOSHIBA -> Tools & Utilities -> Sleep Utility. You can use . However, some external devices cannot be disabled. Using the sleep and charge function to it. External devices connected to come into contact with their own chargers. Do not allow USB ports to the USB bus power (DC5V) function that...
... of the external devices, please contact the device manufacturer or check the specifications of the external devices thoroughly before use the Sleep and Charge function to disable Sleep and Charge function. Starting the TOSHIBA Sleep Utility To start the utility, click Start -> All Programs -> TOSHIBA -> Tools & Utilities -> Sleep Utility. You can use . However, some external devices cannot be disabled. Using the sleep and charge function to it. External devices connected to come into contact with their own chargers. Do not allow USB ports to the USB bus power (DC5V) function that...

User Manual
Page 157
... Mode, the contents of memory will stop working - To access it, press and hold the F2 key, and then turn on the computer - Make sure the battery is attached. User's Manual 5-4 Before you should not change the Real Time Clock settings in the BIOS setup utility. Please refer to Chapter 6 Troubleshooting for detailed precautions and handling instructions. Keep the battery pack out of reach of properly. use of the battery...
... Mode, the contents of memory will stop working - To access it, press and hold the F2 key, and then turn on the computer - Make sure the battery is attached. User's Manual 5-4 Before you should not change the Real Time Clock settings in the BIOS setup utility. Please refer to Chapter 6 Troubleshooting for detailed precautions and handling instructions. Keep the battery pack out of reach of properly. use of the battery...

User Manual
Page 165
... each device will help to TOSHIBA Support. In addition, if a problem recurs, the log you hear any beeps, if so how many, are they long or short and are they are using a software package you should check any messages or random characters? keyboard, hard disk drive, display panel, touch pad, touch pad control buttons - What appears on or blink? Do you have made will give you clues that its configuration...
... each device will help to TOSHIBA Support. In addition, if a problem recurs, the log you hear any beeps, if so how many, are they long or short and are they are using a software package you should check any messages or random characters? keyboard, hard disk drive, display panel, touch pad, touch pad control buttons - What appears on or blink? Do you have made will give you clues that its configuration...
User Manual
Page 167
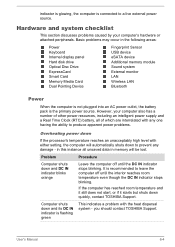
... until the DC IN indicator stops blinking. User's Manual 6-4 in the following areas: Power Keyboard Internal display panel Hard disk drive Optical Disc Drive ExpressCard Smart Card Memory Media Card Dual Pointing Device Fingerprint Sensor USB device eSATA device Additional memory module Sound system External monitor LAN Wireless LAN Bluetooth Power When the computer is not plugged into an AC power outlet, the battery pack is the primary power source. Hardware and system checklist This section discusses problems caused by your computer also has a number of which are...
... until the DC IN indicator stops blinking. User's Manual 6-4 in the following areas: Power Keyboard Internal display panel Hard disk drive Optical Disc Drive ExpressCard Smart Card Memory Media Card Dual Pointing Device Fingerprint Sensor USB device eSATA device Additional memory module Sound system External monitor LAN Wireless LAN Bluetooth Power When the computer is not plugged into an AC power outlet, the battery pack is the primary power source. Hardware and system checklist This section discusses problems caused by your computer also has a number of which are...

User Manual
Page 171
... Setup utility please refer to the Boot Setting section in the optical disc drive - You should run the disk Defragmentation utility to check the condition of your files and the hard disk drive. If this latter instance you should always follow the instructions with the screen cleaner and always ensure you should try to start the computer again. User's Manual 6-8 Problem Procedure No display Press the FN + F5 hot keys...
... Setup utility please refer to the Boot Setting section in the optical disc drive - You should run the disk Defragmentation utility to check the condition of your files and the hard disk drive. If this latter instance you should always follow the instructions with the screen cleaner and always ensure you should try to start the computer again. User's Manual 6-8 Problem Procedure No display Press the FN + F5 hot keys...

User Manual
Page 174
... to a free USB port in order to resolve the problem, contact TOSHIBA Support. please refer to mouse operation Procedure In this instance the system might be busy - User's Manual 6-11 To access it . USB mouse Problem On-screen pointer does not respond to the documentation supplied with the mouse for detecting movement might be dirty - If you are still unable to clean it , click Start -> Control Panel -> Hardware and Sound -> Mouse. Double-clicking...
... to a free USB port in order to resolve the problem, contact TOSHIBA Support. please refer to mouse operation Procedure In this instance the system might be busy - User's Manual 6-11 To access it . USB mouse Problem On-screen pointer does not respond to the documentation supplied with the mouse for detecting movement might be dirty - If you are still unable to clean it , click Start -> Control Panel -> Hardware and Sound -> Mouse. Double-clicking...

User Manual
Page 180
.... User's Manual 6-17 When the external monitor is set the display panel and external monitor to the computer is in order to change the display priority and ensure that the cable connecting the external monitor to clone mode. Remember to clone mode and they are turned off the computer before disconnecting the external monitor. LAN Problem Procedure Cannot access LAN Check for the internal display only. The Wake-up on LAN function consumes power even when the system is connected. Display error occurs...
.... User's Manual 6-17 When the external monitor is set the display panel and external monitor to the computer is in order to change the display priority and ensure that the cable connecting the external monitor to clone mode. Remember to clone mode and they are turned off the computer before disconnecting the external monitor. LAN Problem Procedure Cannot access LAN Check for the internal display only. The Wake-up on LAN function consumes power even when the system is connected. Display error occurs...

User Manual
Page 188
... more than 4GB of the physical memory (RAM) built into your product documentation. Read additional restrictions in your computer, the memory available to the operating system. It is a technical limitation that the following hardware and software requirements are User's Manual C-2 Battery Life Battery life may not function properly. Various system components (like the video adapter's GPU and PCI devices like Wireless LAN, etc.) require their own...
... more than 4GB of the physical memory (RAM) built into your product documentation. Read additional restrictions in your computer, the memory available to the operating system. It is a technical limitation that the following hardware and software requirements are User's Manual C-2 Battery Life Battery life may not function properly. Various system components (like the video adapter's GPU and PCI devices like Wireless LAN, etc.) require their own...
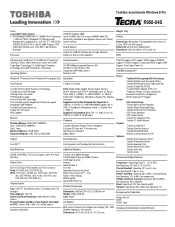
Detailed Specs for Tecra R950 PT535C-04S024 English
Page 1
... Cable Lock Slot Execute Disable Bit (XD-Bit) Trusted Platform Module (TPM v1.2) Fingerprint Reader (includes software for password and identity management) BIOS Computrace™ Support Halt Tested Design Toshiba Spill-resistant Keyboard Toshiba Shock Absorbing Design Toshiba Hard Disk Drive Protection HDD Shock Absorber HDD Impact Sensor Toshiba PC Diagnostic Tool Toshiba PC Health Monitor Toshiba ConfigFree™ Toshiba Diversity Antenna Toshiba Bluetooth® Stack Wireless Communication On/Off Toshiba Device Access Control Toshiba Presentation Button Toshiba Zooming Utility Toshiba...
... Cable Lock Slot Execute Disable Bit (XD-Bit) Trusted Platform Module (TPM v1.2) Fingerprint Reader (includes software for password and identity management) BIOS Computrace™ Support Halt Tested Design Toshiba Spill-resistant Keyboard Toshiba Shock Absorbing Design Toshiba Hard Disk Drive Protection HDD Shock Absorber HDD Impact Sensor Toshiba PC Diagnostic Tool Toshiba PC Health Monitor Toshiba ConfigFree™ Toshiba Diversity Antenna Toshiba Bluetooth® Stack Wireless Communication On/Off Toshiba Device Access Control Toshiba Presentation Button Toshiba Zooming Utility Toshiba...

Detailed Specs for Tecra R950 PT535C-04S024 English
Page 2
... 4GB 1600MHz RAM KTT-S3C/8G 8GB 1600MHz RAM PA5022C-1LC3 Toshiba 15.6" USB-powered Mobile Monitor ACC254 15.6" Widescreen Laptop Privacy Screen (16:9) Part Number/UPC code PT535C-04S024 / 6-23506-03606-1 LCD: Over a period of publication. Central Processing Unit ("CPU" Performance Disclaimer: CPU performance in AC power mode. To avoid risk of lost data or damage to design configuration. The computer operating system, however, reports storage capacity using powers of 1 GB...
... 4GB 1600MHz RAM KTT-S3C/8G 8GB 1600MHz RAM PA5022C-1LC3 Toshiba 15.6" USB-powered Mobile Monitor ACC254 15.6" Widescreen Laptop Privacy Screen (16:9) Part Number/UPC code PT535C-04S024 / 6-23506-03606-1 LCD: Over a period of publication. Central Processing Unit ("CPU" Performance Disclaimer: CPU performance in AC power mode. To avoid risk of lost data or damage to design configuration. The computer operating system, however, reports storage capacity using powers of 1 GB...


