

User Guide
Page 29
... 66 Connecting a local printer 67 Connecting a USB printer 67 Connecting a parallel printer 67 Connecting an optional external diskette drive........68 Connecting external speakers or headphones.........69 Connecting an external microphone 70 Using an expansion device 70 Adding memory 71 Installing memory modules 71 Hard Drive Recovery Utilities 77 Creating Recovery CDs/DVDs 78
... 66 Connecting a local printer 67 Connecting a USB printer 67 Connecting a parallel printer 67 Connecting an optional external diskette drive........68 Connecting external speakers or headphones.........69 Connecting an external microphone 70 Using an expansion device 70 Adding memory 71 Installing memory modules 71 Hard Drive Recovery Utilities 77 Creating Recovery CDs/DVDs 78
User Guide
Page 30
... Using Slim SelectBay® modules 87 Removing a module from the Slim SelectBay® .88 Inserting a module into the Slim SelectBay®.....89 Inserting and removing hard drives 89 Inserting and removing PC Cards 93 Setting up a PC Card for your computer ...........93 Inserting a PC Card 93 Removing a PC Card 94 Hot swapping... keyboard emulate a full-size keyboard 103 Ctrl, Fn, and Alt keys 104 Function keys 104 Windows® special keys 105 Overlay keys 105 Using the Toshiba Dual Pointing Device 107 Using the TouchPad 108
... Using Slim SelectBay® modules 87 Removing a module from the Slim SelectBay® .88 Inserting a module into the Slim SelectBay®.....89 Inserting and removing hard drives 89 Inserting and removing PC Cards 93 Setting up a PC Card for your computer ...........93 Inserting a PC Card 93 Removing a PC Card 94 Hot swapping... keyboard emulate a full-size keyboard 103 Ctrl, Fn, and Alt keys 104 Function keys 104 Windows® special keys 105 Overlay keys 105 Using the Toshiba Dual Pointing Device 107 Using the TouchPad 108

User Guide
Page 77
... on the front of the tasks in this section. When you to recover your data externally before using a writable drive. ❖ Recover your hard disk drive to secure latches. 19 Install the battery pack. 20 Turn the computer over and restart it automatically recognizes the additional...recovery CDs/ DVDs before performing any other partitions you can: ❖ Create Hard Drive Recovery CDs or DVDs using your C: drive, leaving any of the keyboard into corresponding notches on page 78. Hard Drive Recovery Utilities Your computer has been configured with the two screws. 18 Seat the...
... on the front of the tasks in this section. When you to recover your data externally before using a writable drive. ❖ Recover your hard disk drive to secure latches. 19 Install the battery pack. 20 Turn the computer over and restart it automatically recognizes the additional...recovery CDs/ DVDs before performing any other partitions you can: ❖ Create Hard Drive Recovery CDs or DVDs using your C: drive, leaving any of the keyboard into corresponding notches on page 78. Hard Drive Recovery Utilities Your computer has been configured with the two screws. 18 Seat the...
User Guide
Page 78
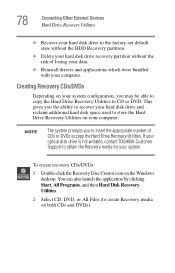
If your optical disk drive is not writable, contact TOSHIBA Customer Support to create Recovery media on both CDs and DVDs). You can also launch the application by clicking Start, All Programs, and then Hard Disk Recovery Utilities. 2 Select CD, DVD, or All Files (to obtain the Recovery... media for your system. This gives you may be able to copy the Hard Drive...
If your optical disk drive is not writable, contact TOSHIBA Customer Support to create Recovery media on both CDs and DVDs). You can also launch the application by clicking Start, All Programs, and then Hard Disk Recovery Utilities. 2 Select CD, DVD, or All Files (to obtain the Recovery... media for your system. This gives you may be able to copy the Hard Drive...
User Guide
Page 79
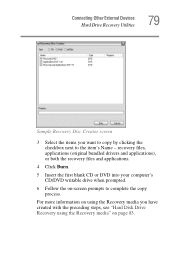
...CD or DVD into your computer's CD/DVD writable drive when prompted. 6 Follow the on page 83. For more information on using the Recovery media" on -screen prompts to the item's Name - Connecting Other External Devices Hard Drive Recovery Utilities 79 Sample Recovery Disc Creator screen 3 ...Select the items you have created with the preceding steps, see "Hard Disk Drive Recovery using the Recovery media you want to copy by clicking the checkbox...
...CD or DVD into your computer's CD/DVD writable drive when prompted. 6 Follow the on page 83. For more information on using the Recovery media" on -screen prompts to the item's Name - Connecting Other External Devices Hard Drive Recovery Utilities 79 Sample Recovery Disc Creator screen 3 ...Select the items you have created with the preceding steps, see "Hard Disk Drive Recovery using the Recovery media you want to copy by clicking the checkbox...
User Guide
Page 80
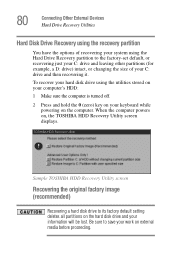
... stored on your computer's HDD: 1 Make sure the computer is turned off. 2 Press and hold the 0 (zero) key on your keyboard while powering on , the TOSHIBA HDD Recovery Utility screen displays. 80 Connecting Other External Devices Hard Drive Recovery Utilities Hard Disk Drive Recovery using the recovery partition You have the options of your...
... stored on your computer's HDD: 1 Make sure the computer is turned off. 2 Press and hold the 0 (zero) key on your keyboard while powering on , the TOSHIBA HDD Recovery Utility screen displays. 80 Connecting Other External Devices Hard Drive Recovery Utilities Hard Disk Drive Recovery using the recovery partition You have the options of your...
User Guide
Page 81
...your keyboard to begin the recovery. If you have created other partitions (for example, a D: drive), those partitions and any information on the keyboard when the TOSHIBA HDD Recovery Utility screen displays. A confirmation message displays reminding you that all information on external ... factory default setting reformats your drive and your information on the recovered drive will be lost during the recovery process. A confirmation message appears, reminding you that all data will be lost . Connecting Other External Devices Hard Drive Recovery Utilities 81 1 Press...
...your keyboard to begin the recovery. If you have created other partitions (for example, a D: drive), those partitions and any information on the keyboard when the TOSHIBA HDD Recovery Utility screen displays. A confirmation message displays reminding you that all information on external ... factory default setting reformats your drive and your information on the recovered drive will be lost during the recovery process. A confirmation message appears, reminding you that all data will be lost . Connecting Other External Devices Hard Drive Recovery Utilities 81 1 Press...

User Guide
Page 82
...Hard Drive Recovery Utilities Recovering the C: partition with a user specified size Resizing and recovering your C: drive to its factory default setting reformats all information will be deleted during the recovery process. NOTE The size of the C: drive. ❖ Press the Left/Right Arrow keys to increase/decrease the C: drive...(for example, if you that the HDD has been recovered. 4 Press any key on your C: drive: 1 Press 3 on the keyboard when the TOSHIBA HDD Recovery Utility screen displays. To resize and recover your keyboard to begin the restoration. A confirmation message...
...Hard Drive Recovery Utilities Recovering the C: partition with a user specified size Resizing and recovering your C: drive to its factory default setting reformats all information will be deleted during the recovery process. NOTE The size of the C: drive. ❖ Press the Left/Right Arrow keys to increase/decrease the C: drive...(for example, if you that the HDD has been recovered. 4 Press any key on your C: drive: 1 Press 3 on the keyboard when the TOSHIBA HDD Recovery Utility screen displays. To resize and recover your keyboard to begin the restoration. A confirmation message...
User Guide
Page 83
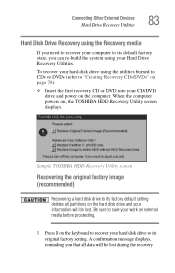
...1 Press 1 on the keyboard to recover your hard disk drive to its factory default setting deletes all data will be lost . When the computer powers on, the TOSHIBA HDD Recovery Utility screen displays. A confirmation message ...Hard Drive Recovery Utilities. Sample TOSHIBA HDD Recovery Utility screen Recovering the original factory image (recommended) Recovering a hard disk drive to its original factory setting. To recover your hard disk drive using your CD/DVD drive and power on the computer. Connecting Other External Devices Hard Drive Recovery Utilities 83 Hard Disk Drive...
...1 Press 1 on the keyboard to recover your hard disk drive to its factory default setting deletes all data will be lost . When the computer powers on, the TOSHIBA HDD Recovery Utility screen displays. A confirmation message ...Hard Drive Recovery Utilities. Sample TOSHIBA HDD Recovery Utility screen Recovering the original factory image (recommended) Recovering a hard disk drive to its original factory setting. To recover your hard disk drive using your CD/DVD drive and power on the computer. Connecting Other External Devices Hard Drive Recovery Utilities 83 Hard Disk Drive...
User Guide
Page 84
...work on external media before proceeding. If you have saved your information on the keyboard to restart the computer. 84 Connecting Other External Devices Hard Drive Recovery Utilities process. Be sure you have saved your keyboard to restart the computer. Be sure you that the HDD has been recovered. 3.... Once complete, a message displays that the HDD has been recovered. 3 Press any key on your work on the keyboard when the TOSHIBA HDD Recovery Utility screen displays. To recover only your work on external media before proceeding. 2 Click Yes to save your...
...work on external media before proceeding. If you have saved your information on the keyboard to restart the computer. 84 Connecting Other External Devices Hard Drive Recovery Utilities process. Be sure you have saved your keyboard to restart the computer. Be sure you that the HDD has been recovered. 3.... Once complete, a message displays that the HDD has been recovered. 3 Press any key on your work on the keyboard when the TOSHIBA HDD Recovery Utility screen displays. To recover only your work on external media before proceeding. 2 Click Yes to save your...

User Guide
Page 85
... HDD operating status After restoring your C: drive. Connecting Other External Devices Hard Drive Recovery Utilities 85 Recovering the entire HDD without the HDD Recovery Area This option recovers your C: drive without the recovery partition: 1 Press 3 on the keyboard when the TOSHIBA HDD Recovery Utility screen displays. Recovering your C: drive to display its status in the lower...
... HDD operating status After restoring your C: drive. Connecting Other External Devices Hard Drive Recovery Utilities 85 Recovering the entire HDD without the HDD Recovery Area This option recovers your C: drive without the recovery partition: 1 Press 3 on the keyboard when the TOSHIBA HDD Recovery Utility screen displays. Recovering your C: drive to display its status in the lower...

User Guide
Page 86
... the extra space and formats the drive. 86 Connecting Other External Devices Hard Drive Recovery Utilities Deleting the Hard Disk Recovery Utility You can delete the HDD recovery partition without losing your data. 1 Click Start, All Programs, Hard Disk Recovery Utilities, and then Delete Hard Disk Recovery Partition. The Delete Hard Disk Recovery Utility warning screen displays...
... the extra space and formats the drive. 86 Connecting Other External Devices Hard Drive Recovery Utilities Deleting the Hard Disk Recovery Utility You can delete the HDD recovery partition without losing your data. 1 Click Start, All Programs, Hard Disk Recovery Utilities, and then Delete Hard Disk Recovery Partition. The Delete Hard Disk Recovery Utility warning screen displays...

User Guide
Page 89
... is installed in your computer completely using the Shut down your computer, you may wish to increase storage capacity by changing the internal drive, or you can use hard drives with various capacities. Inserting a module into the Slim SelectBay® To install a module into the Slim SelectBay, simply slide the module all the...
... is installed in your computer completely using the Shut down your computer, you may wish to increase storage capacity by changing the internal drive, or you can use hard drives with various capacities. Inserting a module into the Slim SelectBay® To install a module into the Slim SelectBay, simply slide the module all the...
User Guide
Page 90
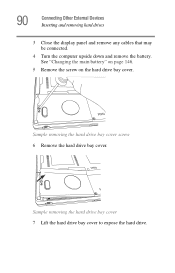
Sample removing the hard drive bay cover 7 Lift the hard drive bay cover to expose the hard drive. Sample removing the hard drive bay cover screw 6 Remove the hard drive bay cover. See "Changing the main battery" on page 146. 5 Remove the screw on the hard drive bay cover. 90 Connecting Other External Devices Inserting and removing hard drives 3 Close the display panel and remove any cables that may be connected. 4 Turn the computer upside down and remove the battery.
Sample removing the hard drive bay cover 7 Lift the hard drive bay cover to expose the hard drive. Sample removing the hard drive bay cover screw 6 Remove the hard drive bay cover. See "Changing the main battery" on page 146. 5 Remove the screw on the hard drive bay cover. 90 Connecting Other External Devices Inserting and removing hard drives 3 Close the display panel and remove any cables that may be connected. 4 Turn the computer upside down and remove the battery.

User Guide
Page 91
Sample lifting the hard drive out of the hard drive bay. Sample sliding the hard drive away from the hard drive connector by grasping the plastic tab on the exposed edge of the hard drive sliding it to the left side of the computer until it is fully disconnected. Connecting Other External Devices Inserting and removing hard drives 91 8 Release the hard drive from the connector 9 Lift the hard drive out of the hard drive bay
Sample lifting the hard drive out of the hard drive bay. Sample sliding the hard drive away from the hard drive connector by grasping the plastic tab on the exposed edge of the hard drive sliding it to the left side of the computer until it is fully disconnected. Connecting Other External Devices Inserting and removing hard drives 91 8 Release the hard drive from the connector 9 Lift the hard drive out of the hard drive bay

User Guide
Page 92
Do not force the drive into the connector. Sample sliding the hard drive into the hard drive connector 12 Press the drive firmly into the computer. 13 Replace the hard drive bay cover and tighten the screw removed in step 5. 92 Connecting Other External Devices Inserting and removing hard drives 10 Install the new hard drive by placing the drive into the hard drive connector. Sample placing the hard drive into the hard drive bay 11 Slide the hard drive into the hard drive bay.
Do not force the drive into the connector. Sample sliding the hard drive into the hard drive connector 12 Press the drive firmly into the computer. 13 Replace the hard drive bay cover and tighten the screw removed in step 5. 92 Connecting Other External Devices Inserting and removing hard drives 10 Install the new hard drive by placing the drive into the hard drive connector. Sample placing the hard drive into the hard drive bay 11 Slide the hard drive into the hard drive bay.
User Guide
Page 191
... occur to you, your password in a location where you can make changes in Toshiba Utilities and System Setup. If you choose to set a hard disk drive master password as a result of the inability to set a hard disk drive user password and/or a hard disk drive master password. If you choose to access the hard drive. Toshiba is using the computer.
... occur to you, your password in a location where you can make changes in Toshiba Utilities and System Setup. If you choose to set a hard disk drive master password as a result of the inability to set a hard disk drive user password and/or a hard disk drive master password. If you choose to access the hard drive. Toshiba is using the computer.

User Guide
Page 200
...attempt to set a hard disk drive master password, you set a hard disk drive user password. These passwords protect both your primary and optional Slim SelectBay hard drive as follows: ❖ Setting a hard disk drive user password prevents an unauthorized user from accessing your hard disk, even if ...it before you should set two types of hard disk drive passwords-user and master. Deleting a ...
...attempt to set a hard disk drive master password, you set a hard disk drive user password. These passwords protect both your primary and optional Slim SelectBay hard drive as follows: ❖ Setting a hard disk drive user password prevents an unauthorized user from accessing your hard disk, even if ...it before you should set two types of hard disk drive passwords-user and master. Deleting a ...

User Guide
Page 201
... password, we strongly recommend that may use any combination of letters and numbers in your organization or others as well (see "Setting a hard disk drive master and user password in System Setup: 1 Click Start, Shutdown, and then OK. The computer shuts down. 2 Hold down the ... light on the screen: "Check system, Then press [F1] key," press F1. Toshiba is not responsible for any losses that you have set a hard disk drive master password as a result of 1 to access the hard drive. When the following message appears on the system indicator panel illuminates (green) for more ...
... password, we strongly recommend that may use any combination of letters and numbers in your organization or others as well (see "Setting a hard disk drive master and user password in System Setup: 1 Click Start, Shutdown, and then OK. The computer shuts down. 2 Hold down the ... light on the screen: "Check system, Then press [F1] key," press F1. Toshiba is not responsible for any losses that you have set a hard disk drive master password as a result of 1 to access the hard drive. When the following message appears on the system indicator panel illuminates (green) for more ...

User Guide
Page 210
...F12 when the machine starts and use the arrow keys to select the boot-up device. Data stored in the computer's hard drive may not be in Standby mode and have a hard disk problem, you will not solve a resource conflict. Your computer can type text, and try typing again. When this... on the computer The computer starts but it will not be configured to warn you when the battery is not accessing the hard disk or the optional external diskette drive. The computer is running , but when you press a key nothing happens. The computer displays the WARNING RESUME FAILURE message....
...F12 when the machine starts and use the arrow keys to select the boot-up device. Data stored in the computer's hard drive may not be in Standby mode and have a hard disk problem, you will not solve a resource conflict. Your computer can type text, and try typing again. When this... on the computer The computer starts but it will not be configured to warn you when the battery is not accessing the hard disk or the optional external diskette drive. The computer is running , but when you press a key nothing happens. The computer displays the WARNING RESUME FAILURE message....


