

User Guide
Page 29
... 67 Connecting an optional external diskette drive........68 Connecting external speakers or headphones.........69 Connecting an external microphone 70 Using an expansion device 70 Adding memory 71 Installing memory modules 71 Hard Drive Recovery Utilities 77 Creating Recovery CDs/DVDs 78
... 67 Connecting an optional external diskette drive........68 Connecting external speakers or headphones.........69 Connecting an external microphone 70 Using an expansion device 70 Adding memory 71 Installing memory modules 71 Hard Drive Recovery Utilities 77 Creating Recovery CDs/DVDs 78

User Guide
Page 33
...Changing or removing existing key assignments 176 TOSHIBA HW Setup 176 Accessing TOSHIBA HW Setup 176 TOSHIBA Power Saver 179 TOSHIBA Mobile Extension 180 TOSHIBA Password Utility 182 TOSHIBA Zooming Utility 184 TOSHIBA CD/DVD Drive Acoustic Silencer ...........185 TOSHIBA SD™ Memory Boot Utility 186 PC Diagnostic Tool 187 TOSHIBA Mic Effect 188 TOSHIBA Application Installer 188 Chapter 7: Keeping Your...a Windows user password 193 Using a power-on (user-level) password 193 Setting a power-on (user-level) password ......193 Creating a user token on an SD™ memory card 195
...Changing or removing existing key assignments 176 TOSHIBA HW Setup 176 Accessing TOSHIBA HW Setup 176 TOSHIBA Power Saver 179 TOSHIBA Mobile Extension 180 TOSHIBA Password Utility 182 TOSHIBA Zooming Utility 184 TOSHIBA CD/DVD Drive Acoustic Silencer ...........185 TOSHIBA SD™ Memory Boot Utility 186 PC Diagnostic Tool 187 TOSHIBA Mic Effect 188 TOSHIBA Application Installer 188 Chapter 7: Keeping Your...a Windows user password 193 Using a power-on (user-level) password 193 Setting a power-on (user-level) password ......193 Creating a user token on an SD™ memory card 195

User Guide
Page 34
........195 Deleting a user token on an SD™ memory card 196 Using the power-on (user-level) password .....196 Using a supervisor password 197 Setting a supervisor password 197 Creating a supervisor token on an SD™ memory card 199 Deleting a supervisor password 199 Deleting a supervisor... token on an optional SD™ Memory Card 200 Hard disk drive passwords 200 Setting a hard disk drive user only password in...
........195 Deleting a user token on an SD™ memory card 196 Using the power-on (user-level) password .....196 Using a supervisor password 197 Setting a supervisor password 197 Creating a supervisor token on an SD™ memory card 199 Deleting a supervisor password 199 Deleting a supervisor... token on an optional SD™ Memory Card 200 Hard disk drive passwords 200 Setting a hard disk drive user only password in...

User Guide
Page 35
35 Contents Fixing a problem with Device Manager ...........216 Memory problems 218 Power and the batteries 219 Keyboard problems 221 Display problems 222 Disk drive problems 224 DVD-ROM or multi-function drive problems...227... computing habits 240 Data and system configuration backup in Windows XP 241 If you need further assistance 247 Before you contact Toshiba 247 Contacting Toshiba 248 Other Toshiba Internet Web sites 249 Toshiba's worldwide offices 249 Appendix A: Hot Keys 251 Volume Mute 251 Password security 252 Without a password 252 With a password 252 Maintaining ...
35 Contents Fixing a problem with Device Manager ...........216 Memory problems 218 Power and the batteries 219 Keyboard problems 221 Display problems 222 Disk drive problems 224 DVD-ROM or multi-function drive problems...227... computing habits 240 Data and system configuration backup in Windows XP 241 If you need further assistance 247 Before you contact Toshiba 247 Contacting Toshiba 248 Other Toshiba Internet Web sites 249 Toshiba's worldwide offices 249 Appendix A: Hot Keys 251 Volume Mute 251 Password security 252 Without a password 252 With a password 252 Maintaining ...

User Guide
Page 46
... to your computer. Do not use it could cause the CPU to run at a lower performance level or cause the computer to , a mouse, keyboard, printer, memory, and PC Cards. 46 Getting Started Setting up your computer Important information on your computer's cooling fan Your computer may be located on the bottom...
... to your computer. Do not use it could cause the CPU to run at a lower performance level or cause the computer to , a mouse, keyboard, printer, memory, and PC Cards. 46 Getting Started Setting up your computer Important information on your computer's cooling fan Your computer may be located on the bottom...

User Guide
Page 49
... See "Connecting a local printer" on page 65. ❖ Connect an external monitor. See "Connecting to , a mouse, keyboard, printer, memory, and PC cards. See "Adding memory" on page 66. ❖ Connect a full-size keyboard. See "Connecting a mouse" on page 71. ❖ Connect a mouse. See... "Using external display devices" on page 93. For more memory. These components include, but are not limited to a power source" on page 47. Your computer comes with a rechargeable battery pack that must be...
... See "Connecting a local printer" on page 65. ❖ Connect an external monitor. See "Connecting to , a mouse, keyboard, printer, memory, and PC cards. See "Adding memory" on page 66. ❖ Connect a full-size keyboard. See "Connecting a mouse" on page 71. ❖ Connect a mouse. See... "Using external display devices" on page 93. For more memory. These components include, but are not limited to a power source" on page 47. Your computer comes with a rechargeable battery pack that must be...

User Guide
Page 57
..., you can use . Getting Started Turning off the computer 57 Turning off the computer It is a good idea to turn off your system settings to memory. The next time you turn off , it for the first time, leave the computer plugged into a power source (even though the computer is off) to...
..., you can use . Getting Started Turning off the computer 57 Turning off the computer It is a good idea to turn off your system settings to memory. The next time you turn off , it for the first time, leave the computer plugged into a power source (even though the computer is off) to...

User Guide
Page 71
... module cool to room temperature before you will become hot. NOTE Before adding external devices or memory, Toshiba recommends setting up your software" on memory options, check the accessories information that came with your software. There are two memory expansion slots (primary and secondary) located under your computer. See "Setting up your system or...
... module cool to room temperature before you will become hot. NOTE Before adding external devices or memory, Toshiba recommends setting up your software" on memory options, check the accessories information that came with your software. There are two memory expansion slots (primary and secondary) located under your computer. See "Setting up your system or...
User Guide
Page 72
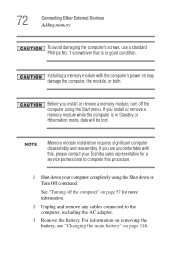
... 57 for a service professional to the computer, including the AC adapter. 3 Remove the battery. If you install or remove a memory module while the computer is in Standby or Hibernation mode, data will be lost. For information on removing the battery, see "Changing... module, or both. 72 Connecting Other External Devices Adding memory To avoid damaging the computer's screws, use a standard Phillips No. 1 screwdriver that is in good condition. Installing a memory module with this, please contact your Toshiba sales representative for more information. 2 Unplug and remove any...
... 57 for a service professional to the computer, including the AC adapter. 3 Remove the battery. If you install or remove a memory module while the computer is in Standby or Hibernation mode, data will be lost. For information on removing the battery, see "Changing... module, or both. 72 Connecting Other External Devices Adding memory To avoid damaging the computer's screws, use a standard Phillips No. 1 screwdriver that is in good condition. Installing a memory module with this, please contact your Toshiba sales representative for more information. 2 Unplug and remove any...

User Guide
Page 73
Pull the brace out by grasping the left and the right sides. Sample removing the retaining screw 5 Turn the computer over and slide the display latch to locate and remove the retaining screw. The brace is fragile and should not be bent. Connecting Other External Devices Adding memory 73 4 Close the display panel and turn the computer upside down to the right and open the display panel. 6 Carefully insert a thin object under the rim of the keyboard brace and lift out the brace. Place the screw in a safe place so that you can retrieve it later.
Pull the brace out by grasping the left and the right sides. Sample removing the retaining screw 5 Turn the computer over and slide the display latch to locate and remove the retaining screw. The brace is fragile and should not be bent. Connecting Other External Devices Adding memory 73 4 Close the display panel and turn the computer upside down to the right and open the display panel. 6 Carefully insert a thin object under the rim of the keyboard brace and lift out the brace. Place the screw in a safe place so that you can retrieve it later.
User Guide
Page 74
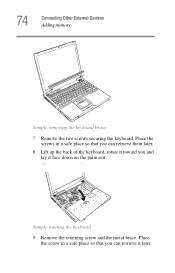
Place the screw in a safe place so that you can retrieve them later. 8 Lift up the back of the keyboard, rotate it toward you can retrieve it face down on the palm rest. Place the screws in a safe place so that you and lay it later. Sample rotating the keyboard 9 Remove the retaining screw and the metal brace. 74 Connecting Other External Devices Adding memory Sample removing the keyboard brace 7 Remove the two screws securing the keyboard.
Place the screw in a safe place so that you can retrieve them later. 8 Lift up the back of the keyboard, rotate it toward you can retrieve it face down on the palm rest. Place the screws in a safe place so that you and lay it later. Sample rotating the keyboard 9 Remove the retaining screw and the metal brace. 74 Connecting Other External Devices Adding memory Sample removing the keyboard brace 7 Remove the two screws securing the keyboard.

User Guide
Page 75
Sample installing a memory module 13 Hold the memory module by pulling the clips away from the memory module. Sample removing the metal brace 11 Remove the new memory module from its edges so that the gold connector bar faces the slot, at a slight angle to the socket. Place the module in antistatic packaging and store it in a safe place. Connecting Other External Devices Adding memory 75 10 Remove the existing memory module from the slot by its antistatic packaging. 12 Insert the memory module into the socket.
Sample installing a memory module 13 Hold the memory module by pulling the clips away from the memory module. Sample removing the metal brace 11 Remove the new memory module from its edges so that the gold connector bar faces the slot, at a slight angle to the socket. Place the module in antistatic packaging and store it in a safe place. Connecting Other External Devices Adding memory 75 10 Remove the existing memory module from the slot by its antistatic packaging. 12 Insert the memory module into the socket.

User Guide
Page 76
Sample aligning the module into the socket 15 Gently press down on the memory module connector until the clips snap into position. clip clip Sample pressing down on the memory module Do not force the memory module into place. The memory module should be level when secured in place. 76 Connecting Other External Devices Adding memory clip clip Sample inserting the memory module into the socket 14 Check that the module is lined up with the socket clips.
Sample aligning the module into the socket 15 Gently press down on the memory module connector until the clips snap into position. clip clip Sample pressing down on the memory module Do not force the memory module into place. The memory module should be level when secured in place. 76 Connecting Other External Devices Adding memory clip clip Sample inserting the memory module into the socket 14 Check that the module is lined up with the socket clips.

User Guide
Page 77
...your C: drive, leaving any of the keyboard into corresponding notches on the computer, seat the keyboard, and secure it automatically recognizes the additional memory. Hard Drive Recovery Utilities Your computer has been configured with the two screws. 18 Seat the keyboard brace and press to the factory-set... for example, a D: drive. Connecting Other External Devices Hard Drive Recovery Utilities 77 The clips on either side of the memory module will click to secure the memory module. 16 Replace the metal brace and the screw. 17 Insert the tabs on the front of the tasks in this section...
...your C: drive, leaving any of the keyboard into corresponding notches on the computer, seat the keyboard, and secure it automatically recognizes the additional memory. Hard Drive Recovery Utilities Your computer has been configured with the two screws. 18 Seat the keyboard brace and press to the factory-set... for example, a D: drive. Connecting Other External Devices Hard Drive Recovery Utilities 77 The clips on either side of the memory module will click to secure the memory module. 16 Replace the metal brace and the screw. 17 Insert the tabs on the front of the tasks in this section...

User Guide
Page 101
... reconnect, or your battery runs out of using your software documentation for example, the network you are working. Your work stays in the computer's temporary memory until you can activate. HINT: Some programs have an automatic-save feature that you save if, for details. 101 You will lose all the work...
... reconnect, or your battery runs out of using your software documentation for example, the network you are working. Your work stays in the computer's temporary memory until you can activate. HINT: Some programs have an automatic-save feature that you save if, for details. 101 You will lose all the work...

User Guide
Page 127
... the on page 179. Since Hibernation mode does not require power to the mode in which you left it from memory. NOTE For more information about the Power Saver utility, see "TOSHIBA Power Saver" on /off light changes to the hard disk. Restoring information from the hard disk takes longer than restoring... operating system, and then returns to maintain the saved information, the system settings are retained indefinitely. 127 Learning the Basics Powering down the computer Sample Toshiba Power Saver Properties Dialog Box 5 Click OK, then close the Control Panel.
... the on page 179. Since Hibernation mode does not require power to the mode in which you left it from memory. NOTE For more information about the Power Saver utility, see "TOSHIBA Power Saver" on /off light changes to the hard disk. Restoring information from the hard disk takes longer than restoring... operating system, and then returns to maintain the saved information, the system settings are retained indefinitely. 127 Learning the Basics Powering down the computer Sample Toshiba Power Saver Properties Dialog Box 5 Click OK, then close the Control Panel.

User Guide
Page 128
... all open programs and files you place your computer into either Standby or Hibernation mode immediately after the system has resumed from memory. ❖ When starting up than restarting from Standby, because information is being retrieved from the hard disk rather than from either... your computer for Hibernation 1 Click Start, Control Panel, and then Performance and Maintenance. 2 In the Control Panel window, double-click the TOSHIBA Power Saver icon. 3 Click the Setup Action tab. 128 Learning the Basics Powering down the computer Factors to consider when choosing Hibernation: &#...
... all open programs and files you place your computer into either Standby or Hibernation mode immediately after the system has resumed from memory. ❖ When starting up than restarting from Standby, because information is being retrieved from the hard disk rather than from either... your computer for Hibernation 1 Click Start, Control Panel, and then Performance and Maintenance. 2 In the Control Panel window, double-click the TOSHIBA Power Saver icon. 3 Click the Setup Action tab. 128 Learning the Basics Powering down the computer Factors to consider when choosing Hibernation: &#...
User Guide
Page 130
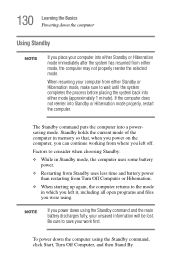
Standby holds the current mode of the computer in memory so that, when you power on the computer, you can continue working from either mode (approximately 1 minute). To power down the computer using the Standby ...
Standby holds the current mode of the computer in memory so that, when you power on the computer, you can continue working from either mode (approximately 1 minute). To power down the computer using the Standby ...

User Guide
Page 135
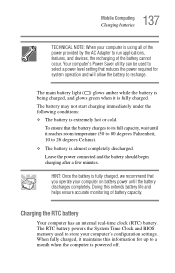
...an AC power source, you . The computer also has an internal real-time-clock (RTC) battery. The RTC battery powers the RTC memory that will provide the most stable operating environment and optimum system performance for up to work for use the preset configuration. It maintains this...TECHNICAL NOTE: The RTC battery does not charge while the computer is turned off . Power management Your computer ships with setup changes, contact Toshiba's Global Support Centre. Users who are not completely familiar with you may result in the computer, or carry additional charged battery packs with ...
...an AC power source, you . The computer also has an internal real-time-clock (RTC) battery. The RTC battery powers the RTC memory that will provide the most stable operating environment and optimum system performance for up to work for use the preset configuration. It maintains this...TECHNICAL NOTE: The RTC battery does not charge while the computer is turned off . Power management Your computer ships with setup changes, contact Toshiba's Global Support Centre. Users who are not completely familiar with you may result in the computer, or carry additional charged battery packs with ...
User Guide
Page 137
... the computer is using all of the power provided by the AC Adapter to recharge. The RTC battery powers the System Time Clock and BIOS memory used to store your computer is powered off. Your computer's Power Saver utility can be used to select a power level setting that you operate your...
... the computer is using all of the power provided by the AC Adapter to recharge. The RTC battery powers the System Time Clock and BIOS memory used to store your computer is powered off. Your computer's Power Saver utility can be used to select a power level setting that you operate your...


