
User Guide
Page 25
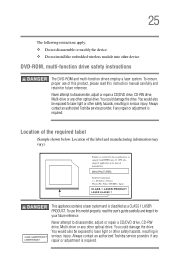
...may vary.) This appliance contains a laser system and is required. To use of the required label (Sample shown below. Always contact an authorized Toshiba service provider, if any repair or adjustment is classified as a CLASS 1 LASER PRODUCT. To ensure proper use this instruction manual carefully and ...retain for your future reference. You would also be exposed to disassemble, adjust or repair a CD/DVD drive, CD-RW drive, Multi-drive or any other optical drive. You could damage the drive. Location of this product, please read ...
...may vary.) This appliance contains a laser system and is required. To use of the required label (Sample shown below. Always contact an authorized Toshiba service provider, if any repair or adjustment is classified as a CLASS 1 LASER PRODUCT. To ensure proper use this instruction manual carefully and ...retain for your future reference. You would also be exposed to disassemble, adjust or repair a CD/DVD drive, CD-RW drive, Multi-drive or any other optical drive. You could damage the drive. Location of this product, please read ...

User Guide
Page 29
... Connecting an external microphone 70 Using an expansion device 70 Adding memory 71 Installing memory modules 71 Hard Drive Recovery Utilities 77 Creating Recovery CDs/DVDs 78
... Connecting an external microphone 70 Using an expansion device 70 Adding memory 71 Installing memory modules 71 Hard Drive Recovery Utilities 77 Creating Recovery CDs/DVDs 78

User Guide
Page 31
... 109 Using the Toshiba Assist button 110 Starting a program 111 Starting a program from Windows® Explorer .112 Starting a program from the Run dialog box ..113 Saving your work 114 File names 116 Using a file extension 116 Printing your work 116 Using the DVD-ROM or multi-...124 Powering down the computer 124 Using Turn Off or Shut down 125 Using Hibernation 127 Using Standby 130 Toshiba's online resources 132 Chapter 4: Mobile Computing 133 Toshiba's energy-saver design 133 Running the computer on battery power 133 Battery Notice 134 Power management 135 Using additional...
... 109 Using the Toshiba Assist button 110 Starting a program 111 Starting a program from Windows® Explorer .112 Starting a program from the Run dialog box ..113 Saving your work 114 File names 116 Using a file extension 116 Printing your work 116 Using the DVD-ROM or multi-...124 Powering down the computer 124 Using Turn Off or Shut down 125 Using Hibernation 127 Using Standby 130 Toshiba's online resources 132 Chapter 4: Mobile Computing 133 Toshiba's energy-saver design 133 Running the computer on battery power 133 Battery Notice 134 Power management 135 Using additional...

User Guide
Page 33
... Changing or removing existing key assignments 176 TOSHIBA HW Setup 176 Accessing TOSHIBA HW Setup 176 TOSHIBA Power Saver 179 TOSHIBA Mobile Extension 180 TOSHIBA Password Utility 182 TOSHIBA Zooming Utility 184 TOSHIBA CD/DVD Drive Acoustic Silencer ...........185 TOSHIBA SD™ Memory Boot Utility 186 PC Diagnostic Tool 187 TOSHIBA Mic Effect 188 TOSHIBA Application Installer 188 Chapter 7: Keeping Your...
... Changing or removing existing key assignments 176 TOSHIBA HW Setup 176 Accessing TOSHIBA HW Setup 176 TOSHIBA Power Saver 179 TOSHIBA Mobile Extension 180 TOSHIBA Password Utility 182 TOSHIBA Zooming Utility 184 TOSHIBA CD/DVD Drive Acoustic Silencer ...........185 TOSHIBA SD™ Memory Boot Utility 186 PC Diagnostic Tool 187 TOSHIBA Mic Effect 188 TOSHIBA Application Installer 188 Chapter 7: Keeping Your...

User Guide
Page 35
...Device Manager ...........216 Memory problems 218 Power and the batteries 219 Keyboard problems 221 Display problems 222 Disk drive problems 224 DVD-ROM or multi-function drive problems...227 Sound system problems 228 PC Card problems 228 Printer problems 232 Modem problems 233 ... Data and system configuration backup in Windows XP 241 If you need further assistance 247 Before you contact Toshiba 247 Contacting Toshiba 248 Other Toshiba Internet Web sites 249 Toshiba's worldwide offices 249 Appendix A: Hot Keys 251 Volume Mute 251 Password security 252 Without a password 252...
...Device Manager ...........216 Memory problems 218 Power and the batteries 219 Keyboard problems 221 Display problems 222 Disk drive problems 224 DVD-ROM or multi-function drive problems...227 Sound system problems 228 PC Card problems 228 Printer problems 232 Modem problems 233 ... Data and system configuration backup in Windows XP 241 If you need further assistance 247 Before you contact Toshiba 247 Contacting Toshiba 248 Other Toshiba Internet Web sites 249 Toshiba's worldwide offices 249 Appendix A: Hot Keys 251 Volume Mute 251 Password security 252 Without a password 252...

User Guide
Page 77
..., seat the keyboard, and secure it with a hard disk partition to allow you can: ❖ Create Hard Drive Recovery CDs or DVDs using your hard disk drive or reinstall selected applications and software features or utilities. NOTE It is strongly recommended that you create recovery CDs.../ DVDs before performing any other partitions you turn on page 78. When you may have created intact, for example, a D: drive. Hard Drive ...
..., seat the keyboard, and secure it with a hard disk partition to allow you can: ❖ Create Hard Drive Recovery CDs or DVDs using your hard disk drive or reinstall selected applications and software features or utilities. NOTE It is strongly recommended that you create recovery CDs.../ DVDs before performing any other partitions you turn on page 78. When you may have created intact, for example, a D: drive. Hard Drive ...
User Guide
Page 78
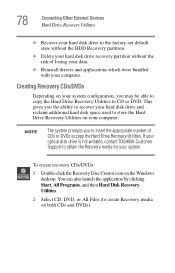
... your data. ❖ Reinstall drivers and applications which were bundled with your computer. If your optical disk drive is not writable, contact TOSHIBA Customer Support to CD or DVD. You can also launch the application by clicking Start, All Programs, and then Hard Disk Recovery Utilities. 2 Select CD... factory-set default state without the HDD Recovery partition. ❖ Delete your hard disk drive recovery partition without the risk of CDs or DVDs to copy the Hard Drive Recovery Utilities. This gives you may be able to copy the Hard Drive Recovery Utilities to obtain the Recovery...
... your data. ❖ Reinstall drivers and applications which were bundled with your computer. If your optical disk drive is not writable, contact TOSHIBA Customer Support to CD or DVD. You can also launch the application by clicking Start, All Programs, and then Hard Disk Recovery Utilities. 2 Select CD... factory-set default state without the HDD Recovery partition. ❖ Delete your hard disk drive recovery partition without the risk of CDs or DVDs to copy the Hard Drive Recovery Utilities. This gives you may be able to copy the Hard Drive Recovery Utilities to obtain the Recovery...
User Guide
Page 79
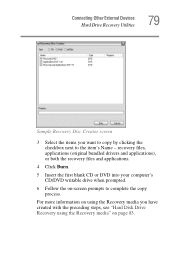
recovery files, applications (original bundled drivers and applications), or both the recovery files and applications. 4 Click Burn. 5 Insert the first blank CD or DVD into your computer's CD/DVD writable drive when prompted. 6 Follow the on-screen prompts to the item's Name - For more information on using the Recovery media you want to...
recovery files, applications (original bundled drivers and applications), or both the recovery files and applications. 4 Click Burn. 5 Insert the first blank CD or DVD into your computer's CD/DVD writable drive when prompted. 6 Follow the on-screen prompts to the item's Name - For more information on using the Recovery media you want to...
User Guide
Page 83
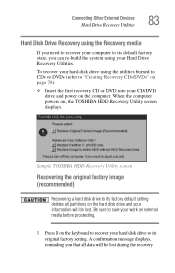
... will be lost during the recovery A confirmation message displays, reminding you that all partitions on , the TOSHIBA HDD Recovery Utility screen displays. Sample TOSHIBA HDD Recovery Utility screen Recovering the original factory image (recommended) Recovering a hard disk drive to its original... factory setting. To recover your hard disk drive using the utilities burned to CDs or DVDs (refer to "Creating Recovery CDs/DVDs" on page...
... will be lost during the recovery A confirmation message displays, reminding you that all partitions on , the TOSHIBA HDD Recovery Utility screen displays. Sample TOSHIBA HDD Recovery Utility screen Recovering the original factory image (recommended) Recovering a hard disk drive to its original... factory setting. To recover your hard disk drive using the utilities burned to CDs or DVDs (refer to "Creating Recovery CDs/DVDs" on page...
User Guide
Page 87
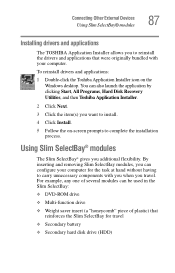
...HDD) By inserting and removing Slim SelectBay modules, you can configure your computer. You can be used in the Slim SelectBay: ❖ DVD-ROM drive ❖ Multi-function drive ❖ Weight saver insert (a "honeycomb" piece of plastic) that were originally bundled with you ...when you additional flexibility. Connecting Other External Devices Using Slim SelectBay® modules 87 Installing drivers and applications The TOSHIBA Application Installer allows you to reinstall the drivers and applications that reinforces the Slim SelectBay for the task at hand without having...
...HDD) By inserting and removing Slim SelectBay modules, you can configure your computer. You can be used in the Slim SelectBay: ❖ DVD-ROM drive ❖ Multi-function drive ❖ Weight saver insert (a "honeycomb" piece of plastic) that were originally bundled with you ...when you additional flexibility. Connecting Other External Devices Using Slim SelectBay® modules 87 Installing drivers and applications The TOSHIBA Application Installer allows you to reinstall the drivers and applications that reinforces the Slim SelectBay for the task at hand without having...

User Guide
Page 117
... or multi-function drive Optical storage has become the preferred medium for software, music, and video. Digital versatile discs (DVDs) provide a significant increase in data storage and support features that are not available on now. 2 Open the File menu of copies to print. 4 Click Print. ... Print. These features include wide-screen movies, multiple language tracks, digital surround sound, multiple camera angles, and interactive menus. 117 Learning the Basics Using the DVD-ROM or multi-function drive To print a file: 1 If your printer is not on, turn it on any other video platform.
... or multi-function drive Optical storage has become the preferred medium for software, music, and video. Digital versatile discs (DVDs) provide a significant increase in data storage and support features that are not available on now. 2 Open the File menu of copies to print. 4 Click Print. ... Print. These features include wide-screen movies, multiple language tracks, digital surround sound, multiple camera angles, and interactive menus. 117 Learning the Basics Using the DVD-ROM or multi-function drive To print a file: 1 If your printer is not on, turn it on any other video platform.

User Guide
Page 118
.... If you to play in the format of the other region. On the fourth change regions four times. NOTE For optimum CD and DVD performance, it is recommended that changing from region 1 to region 2 and back to region 1 is counted as listen to access reference material such as catalogs, ...as well as two changes. Note that you to change , the region is "locked in." 118 Learning the Basics Using the DVD-ROM or multi-function drive If a DVD-ROM drive or multi-function drive is not currently installed in the Slim SelectBay, follow the instructions in "Using Slim SelectBay®...
.... If you to play in the format of the other region. On the fourth change regions four times. NOTE For optimum CD and DVD performance, it is recommended that changing from region 1 to region 2 and back to region 1 is counted as listen to access reference material such as catalogs, ...as well as two changes. Note that you to change , the region is "locked in." 118 Learning the Basics Using the DVD-ROM or multi-function drive If a DVD-ROM drive or multi-function drive is not currently installed in the Slim SelectBay, follow the instructions in "Using Slim SelectBay®...
User Guide
Page 119
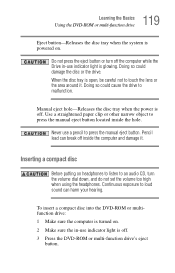
... computer and damage it . Doing so could damage the disc or the drive. Pencil lead can harm your hearing. 119 Learning the Basics Using the DVD-ROM or multi-function drive Eject button-Releases the disc tray when the system is powered on headphones to listen to touch the lens or... the area around it . Never use a pencil to malfunction. To insert a compact disc into the DVD-ROM or multifunction drive: 1 Make sure the computer is turned on. 2 Make sure the in -use indicator light is off . Manual eject hole-Releases the...
... computer and damage it . Doing so could damage the disc or the drive. Pencil lead can harm your hearing. 119 Learning the Basics Using the DVD-ROM or multi-function drive Eject button-Releases the disc tray when the system is powered on headphones to listen to touch the lens or... the area around it . Never use a pencil to malfunction. To insert a compact disc into the DVD-ROM or multifunction drive: 1 Make sure the computer is turned on. 2 Make sure the in -use indicator light is off . Manual eject hole-Releases the...

User Guide
Page 120
Sample pressing the eject button To avoid damaging a disc or losing data, check that the disc activity light is off . 4 Grasp the tray and pull it fully open if the computer's power is off before opening the disc tray. 120 Learning the Basics Using the DVD-ROM or multi-function drive The disc tray slides partially out of the fully extended drive tray HINT: The drive will not open . Sample of the drive (about 1 inch).
Sample pressing the eject button To avoid damaging a disc or losing data, check that the disc activity light is off . 4 Grasp the tray and pull it fully open if the computer's power is off before opening the disc tray. 120 Learning the Basics Using the DVD-ROM or multi-function drive The disc tray slides partially out of the fully extended drive tray HINT: The drive will not open . Sample of the drive (about 1 inch).

User Guide
Page 121
... it by its center hole and edge. Sample of positioning the disc in the disc tray, label side up. 121 Learning the Basics Using the DVD-ROM or multi-function drive 5 Hold the disc by its edges and check that it . If the disc is clean and free of the disc.... If you handle the disc incorrectly, you feel it as described in "Caring for CDs and DVDs" on page 123. 6 Place the disc carefully in the drive 7 Gently press the disc onto the center spindle until you could cause the drive to...
... it by its center hole and edge. Sample of positioning the disc in the disc tray, label side up. 121 Learning the Basics Using the DVD-ROM or multi-function drive 5 Hold the disc by its edges and check that it . If the disc is clean and free of the disc.... If you handle the disc incorrectly, you feel it as described in "Caring for CDs and DVDs" on page 123. 6 Place the disc carefully in the drive 7 Gently press the disc onto the center spindle until you could cause the drive to...

User Guide
Page 122
122 Learning the Basics Using the DVD-ROM or multi-function drive 8 Make sure the disc is completely on the spindle and is fully open the disc tray, wait for assistance. 9 Push .... If you remove it. 2 Pull the tray until it is lying flat on the drive. If this happens, contact Toshiba support for it to close it. To remove a compact disc (CD or DVD) with the computer on Do not press the eject button while the in by pressing gently on the center...
122 Learning the Basics Using the DVD-ROM or multi-function drive 8 Make sure the disc is completely on the spindle and is fully open the disc tray, wait for assistance. 9 Push .... If you remove it. 2 Pull the tray until it is lying flat on the drive. If this happens, contact Toshiba support for it to close it. To remove a compact disc (CD or DVD) with the computer on Do not press the eject button while the in by pressing gently on the center...

User Guide
Page 123
...direct sunlight or extreme heat or cold. ❖ To clean a disc that is fully open, remove the disc, and place it . Caring for CDs and DVDs ❖ Store your discs in their original containers to protect them from reading the data properly. ❖ Do not expose discs to start from the... center of a disc. ❖ Hold a disc by its protective cover. 3 Gently push the tray in the drive. Pencil lead can prevent the DVD-ROM or multi-function drive from scratches and keep them clean. ❖ Do not bend a disc or place heavy objects on the surface can break...
...direct sunlight or extreme heat or cold. ❖ To clean a disc that is fully open, remove the disc, and place it . Caring for CDs and DVDs ❖ Store your discs in their original containers to protect them from reading the data properly. ❖ Do not expose discs to start from the... center of a disc. ❖ Hold a disc by its protective cover. 3 Gently push the tray in the drive. Pencil lead can prevent the DVD-ROM or multi-function drive from scratches and keep them clean. ❖ Do not bend a disc or place heavy objects on the surface can break...

User Guide
Page 134
...depending on product model, configuration, applications, power management settings and features utilized, as well as the natural performance variations produced by Toshiba at least once a month until the battery is continuously operated on AC power, either through an AC adapter or a docking ...station (if applicable to your computer or visit the Toshiba web site at www.accessories.toshiba.com. This may shorten the life of individual components. NOTE For optimum DVD performance, Toshiba recommends that you may also have a second battery installed in the computer...
...depending on product model, configuration, applications, power management settings and features utilized, as well as the natural performance variations produced by Toshiba at least once a month until the battery is continuously operated on AC power, either through an AC adapter or a docking ...station (if applicable to your computer or visit the Toshiba web site at www.accessories.toshiba.com. This may shorten the life of individual components. NOTE For optimum DVD performance, Toshiba recommends that you may also have a second battery installed in the computer...

User Guide
Page 143
...to choose a Power Profile and discuss each power-saving option. To do this: 1 Click Start, Control Panel, Performance and Maintenance, and then Toshiba Power Saver. Power Profiles You can conserve power and extend the operating time of your battery: ❖ Enable Standby or Hibernation, which the ...fully charged battery pack lasts when you are using them, you can greatly increase the length of time you can use the hard disk, DVD-ROM or multifunction drive, diskette drives, or other optional devices ❖ Where you are working, since operating time decreases at low temperatures ...
...to choose a Power Profile and discuss each power-saving option. To do this: 1 Click Start, Control Panel, Performance and Maintenance, and then Toshiba Power Saver. Power Profiles You can conserve power and extend the operating time of your battery: ❖ Enable Standby or Hibernation, which the ...fully charged battery pack lasts when you are using them, you can greatly increase the length of time you can use the hard disk, DVD-ROM or multifunction drive, diskette drives, or other optional devices ❖ Where you are working, since operating time decreases at low temperatures ...

User Guide
Page 145
... Profile: 1 Press Fn and F2 simultaneously to press Fn, press F2 until you select the desired Power Profile. You are : Full Power, High Power, Normal, DVD Playback, Presentation, and Long Life. 3 Release the Fn key. Sample Power Profile mode pop-up window 2 While continuing to display the Power Profile pop-up... window disappears. For more information on setting the battery Power Profile, see "TOSHIBA Power Saver" on page 179. The Power Profile options are now in the selected mode.
... Profile: 1 Press Fn and F2 simultaneously to press Fn, press F2 until you select the desired Power Profile. You are : Full Power, High Power, Normal, DVD Playback, Presentation, and Long Life. 3 Release the Fn key. Sample Power Profile mode pop-up window 2 While continuing to display the Power Profile pop-up... window disappears. For more information on setting the battery Power Profile, see "TOSHIBA Power Saver" on page 179. The Power Profile options are now in the selected mode.


