

User Guide
Page 28
Contents Introduction 37 This guide 38 Safety icons 39 Other icons used 40 Other documentation 40 Service options 41 Chapter 1: Getting Started 42 Selecting a place to work 42 Creating a computer-friendly environment........42 Keeping yourself comfortable 43 Precautions 43 Important information on your computer's cooling fan 46 Setting up your computer 46 Setting up your software 47 Registering your computer with Toshiba 48 Adding external devices 49 Connecting to a power source 50 Using the main battery 53 28
Contents Introduction 37 This guide 38 Safety icons 39 Other icons used 40 Other documentation 40 Service options 41 Chapter 1: Getting Started 42 Selecting a place to work 42 Creating a computer-friendly environment........42 Keeping yourself comfortable 43 Precautions 43 Important information on your computer's cooling fan 46 Setting up your computer 46 Setting up your software 47 Registering your computer with Toshiba 48 Adding external devices 49 Connecting to a power source 50 Using the main battery 53 28

User Guide
Page 31
31 Contents Disabling or enabling the Dual Pointing Device 109 Using the Toshiba Assist button 110 Starting a program 111 Starting a program from Windows® Explorer .112 Starting a program from the Run dialog box ..113 Saving ...Powering down the computer 124 Using Turn Off or Shut down 125 Using Hibernation 127 Using Standby 130 Toshiba's online resources 132 Chapter 4: Mobile Computing 133 Toshiba's energy-saver design 133 Running the computer on battery power 133 Battery Notice 134 Power management 135 Using additional batteries 135 Charging batteries 136 Charging the main...
31 Contents Disabling or enabling the Dual Pointing Device 109 Using the Toshiba Assist button 110 Starting a program 111 Starting a program from Windows® Explorer .112 Starting a program from the Run dialog box ..113 Saving ...Powering down the computer 124 Using Turn Off or Shut down 125 Using Hibernation 127 Using Standby 130 Toshiba's online resources 132 Chapter 4: Mobile Computing 133 Toshiba's energy-saver design 133 Running the computer on battery power 133 Battery Notice 134 Power management 135 Using additional batteries 135 Charging batteries 136 Charging the main...

User Guide
Page 32
... 143 Using a hot key to set the Power Profile .........145 Changing the main battery 146 Removing the battery from the computer .......146 Inserting a charged battery 148 Taking care of your battery 148 Safety precautions 148 Maximizing battery life 149 Disposing of used batteries safely 150 Traveling tips 152 Chapter 5: Exploring Your Computer's Features 153 Exploring the...
... 143 Using a hot key to set the Power Profile .........145 Changing the main battery 146 Removing the battery from the computer .......146 Inserting a charged battery 148 Taking care of your battery 148 Safety precautions 148 Maximizing battery life 149 Disposing of used batteries safely 150 Traveling tips 152 Chapter 5: Exploring Your Computer's Features 153 Exploring the...

User Guide
Page 35
...Data and system configuration backup in Windows XP 241 If you need further assistance 247 Before you contact Toshiba 247 Contacting Toshiba 248 Other Toshiba Internet Web sites 249 Toshiba's worldwide offices 249 Appendix A: Hot Keys 251 Volume Mute 251 Password security 252 Without a password... 252 With a password 252 Maintaining security when the battery is not fully charged 253 Power usage mode 254 ...
...Data and system configuration backup in Windows XP 241 If you need further assistance 247 Before you contact Toshiba 247 Contacting Toshiba 248 Other Toshiba Internet Web sites 249 Toshiba's worldwide offices 249 Appendix A: Hot Keys 251 Volume Mute 251 Password security 252 Without a password... 252 With a password 252 Maintaining security when the battery is not fully charged 253 Power usage mode 254 ...

User Guide
Page 44
... part of the body. Turn off the computer. 2. Continuous operation for Safety and Comfort. Avoid prolonged contact to prevent heat injury to skin. Remove the battery pack. If you have taken the computer to an authorized service center. 44 Getting Started Selecting a place to work Never allow any liquids to spill...
... part of the body. Turn off the computer. 2. Continuous operation for Safety and Comfort. Avoid prolonged contact to prevent heat injury to skin. Remove the battery pack. If you have taken the computer to an authorized service center. 44 Getting Started Selecting a place to work Never allow any liquids to spill...

User Guide
Page 46
... AC adapter. To prevent possible overheating of the computer. NOTE The cooling fan location will vary depending on the computer. Your computer contains a rechargeable main battery that needs to be drawn in air by creating a vacuum. See "Connecting to shut down. To use external power or to charge the... battery you can use the computer on surfaces with objects that cools the CPU by the cooling fan. Do not use it could cause the CPU ...
... AC adapter. To prevent possible overheating of the computer. NOTE The cooling fan location will vary depending on the computer. Your computer contains a rechargeable main battery that needs to be drawn in air by creating a vacuum. See "Connecting to shut down. To use external power or to charge the... battery you can use the computer on surfaces with objects that cools the CPU by the cooling fan. Do not use it could cause the CPU ...

User Guide
Page 49
...in modem to complete "Setting up your software" on page 47. After setting up your computer, you can use external power or to charge the battery, you must be sure to a telephone line. See "Connecting a mouse" on page 93. See "Inserting and removing PC Cards" on page.... See "Adding memory" on page 61. ❖ Connect a local printer. See "Connecting a local printer" on page 50. Your computer comes with a rechargeable battery pack that must attach the AC adapter. See "Connecting to , a mouse, keyboard, printer, memory, and PC cards. For more memory. See "Using an external...
...in modem to complete "Setting up your software" on page 47. After setting up your computer, you can use external power or to charge the battery, you must be sure to a telephone line. See "Connecting a mouse" on page 93. See "Inserting and removing PC Cards" on page.... See "Adding memory" on page 61. ❖ Connect a local printer. See "Connecting a local printer" on page 50. Your computer comes with a rechargeable battery pack that must attach the AC adapter. See "Connecting to , a mouse, keyboard, printer, memory, and PC cards. For more memory. See "Using an external...

User Guide
Page 50
... power to follow the steps in the exact order as described in the User's Guide. Always use the Toshiba AC adapter that was provided with your computer, or use Toshiba recommended alternate models to avoid any metal parts. Failure to operate. As a general safety precaution, avoid touching...an electrical shock or minor bodily injury when touched. Always grasp the plug directly. Connecting the power cord/cable to charge the computer's main battery. Use the power cord/ cable and AC adapter to connect the computer to a live electrical outlet, or to a live electrical outlet ...
... power to follow the steps in the exact order as described in the User's Guide. Always use the Toshiba AC adapter that was provided with your computer, or use Toshiba recommended alternate models to avoid any metal parts. Failure to operate. As a general safety precaution, avoid touching...an electrical shock or minor bodily injury when touched. Always grasp the plug directly. Connecting the power cord/cable to charge the computer's main battery. Use the power cord/ cable and AC adapter to connect the computer to a live electrical outlet, or to a live electrical outlet ...

User Guide
Page 52
... cord/cable or plug; Never tamper with wet hands. Doing any of the main battery's current charge: ❖ Glows amber while the main battery is being charged. (AC adapter connected) ❖ Glows green when the main battery is fully charged. Never attempt to disassemble or repair an AC adapter or... the power cord/cable to a live electrical outlet. never run a cord/cable through a pinch point such as a door or window; The computer's main battery light gives you an indication of the above may damage the cables, and/or result in a fire or electric shock, possibly resulting in place;
... cord/cable or plug; Never tamper with wet hands. Doing any of the main battery's current charge: ❖ Glows amber while the main battery is being charged. (AC adapter connected) ❖ Glows green when the main battery is fully charged. Never attempt to disassemble or repair an AC adapter or... the power cord/cable to a live electrical outlet. never run a cord/cable through a pinch point such as a door or window; The computer's main battery light gives you an indication of the above may damage the cables, and/or result in a fire or electric shock, possibly resulting in place;

User Guide
Page 53
... the AC power light flashes amber during charging, either the main battery is malfunctioning, or it . After that, the main battery will be completely charged and ready to charge a fully charged battery can damage the battery. Once the battery is charged for the first time, avoid leaving the computer plugged ... first charge it is not receiving correct input from the AC power supply. Getting Started Using the main battery 53 ❖ Is unlit when the main battery has discharged, the battery is not charging, or the AC adapter is not plugged into a live wall outlet for several hours ...
... the AC power light flashes amber during charging, either the main battery is malfunctioning, or it . After that, the main battery will be completely charged and ready to charge a fully charged battery can damage the battery. Once the battery is charged for the first time, avoid leaving the computer plugged ... first charge it is not receiving correct input from the AC power supply. Getting Started Using the main battery 53 ❖ Is unlit when the main battery has discharged, the battery is not charging, or the AC adapter is not plugged into a live wall outlet for several hours ...

User Guide
Page 54
... management settings, and features used to select a power level setting that reduces the power required for the first time TECHNICAL NOTE: The RTC battery does not charge while the computer is turned off, even when AC power is now ready for you to recharge. 54 Getting Started Using the... computer for system operation and allows the battery to turn it . Opening the display panel 1 Slide the display latch to run applications, features, and devices, the recharging of the power provided...
... management settings, and features used to select a power level setting that reduces the power required for the first time TECHNICAL NOTE: The RTC battery does not charge while the computer is turned off, even when AC power is now ready for you to recharge. 54 Getting Started Using the... computer for system operation and allows the battery to turn it . Opening the display panel 1 Slide the display latch to run applications, features, and devices, the recharging of the power provided...

User Guide
Page 55
...contains an extremely large number of the screen technology. This is also an intrinsic characteristic of thin-film transistors (TFT) and is operated on battery power. Over a period of time, and depending on the usage of the computer, the brightness of the icons or switches shown on your... to all those features. When the computer is manufactured using high-precision technology. Below are examples of some of the screen while on battery power, the screen will deteriorate. Never lift the computer by the display panel. Small bright dots may appear on your screen display when...
...contains an extremely large number of the screen technology. This is also an intrinsic characteristic of thin-film transistors (TFT) and is operated on battery power. Over a period of time, and depending on the usage of the computer, the brightness of the icons or switches shown on your... to all those features. When the computer is manufactured using high-precision technology. Below are examples of some of the screen while on battery power, the screen will deteriorate. Never lift the computer by the display panel. Small bright dots may appear on your screen display when...

User Guide
Page 56
... power To turn on the computer: 1 Make sure any external devices (such as the AC adapter, if you plan to use AC power rather than battery power) are properly connected and ready. 2 Check to ensure that any drive is in until the operating system has loaded completely. Never turn off light...
... power To turn on the computer: 1 Make sure any external devices (such as the AC adapter, if you plan to use AC power rather than battery power) are properly connected and ready. 2 Check to ensure that any drive is in until the operating system has loaded completely. Never turn off light...

User Guide
Page 57
.... When you power down the computer, you have work in loss of data. Doing so may take up to three hours to recharge the main battery. The next time you turn on page 124. With the computer off the computer while any drive is in use. Never turn off , it for... information, see "Powering down command if you have three options to choose from: Turn Off (or Shut down when connected to fully charge the main battery.
.... When you power down the computer, you have work in loss of data. Doing so may take up to three hours to recharge the main battery. The next time you turn on page 124. With the computer off the computer while any drive is in use. Never turn off , it for... information, see "Powering down command if you have three options to choose from: Turn Off (or Shut down when connected to fully charge the main battery.
User Guide
Page 58
For information about taking care of your computer's main battery, see "Using Hibernation" on page 127). Never spray cleaner directly onto the computer. Never use harsh or caustic chemical products to keep your computer clean, ... your computer Closing the display panel When you have the audible warning set , the computer performs Nothing, Standby, or Hibernate (see "Running the computer on battery power" on page 133. Cleaning the computer Keep liquids, including cleaning fluid, out of the computer. 58 Getting Started Caring for your computer This section...
For information about taking care of your computer's main battery, see "Using Hibernation" on page 127). Never spray cleaner directly onto the computer. Never use harsh or caustic chemical products to keep your computer clean, ... your computer Closing the display panel When you have the audible warning set , the computer performs Nothing, Standby, or Hibernate (see "Running the computer on battery power" on page 133. Cleaning the computer Keep liquids, including cleaning fluid, out of the computer. 58 Getting Started Caring for your computer This section...
User Guide
Page 72
... page 57 for a service professional to the computer, including the AC adapter. 3 Remove the battery. If you are uncomfortable with the computer's power on may damage the computer, the module, or both. NOTE Memory module installation requires ... memory module while the computer is in Standby or Hibernation mode, data will be lost. See "Turning off the computer using the Shut down your Toshiba sales representative for more information. 2 Unplug and remove any cables connected to complete this , please contact your computer completely using the Start menu. Installing ...
... page 57 for a service professional to the computer, including the AC adapter. 3 Remove the battery. If you are uncomfortable with the computer's power on may damage the computer, the module, or both. NOTE Memory module installation requires ... memory module while the computer is in Standby or Hibernation mode, data will be lost. See "Turning off the computer using the Shut down your Toshiba sales representative for more information. 2 Unplug and remove any cables connected to complete this , please contact your computer completely using the Start menu. Installing ...

User Guide
Page 77
... Drive Recovery Utilities Your computer has been configured with the two screws. 18 Seat the keyboard brace and press to secure latches. 19 Install the battery pack. 20 Turn the computer over and restart it automatically recognizes the additional memory.
... Drive Recovery Utilities Your computer has been configured with the two screws. 18 Seat the keyboard brace and press to secure latches. 19 Install the battery pack. 20 Turn the computer over and restart it automatically recognizes the additional memory.
User Guide
Page 87
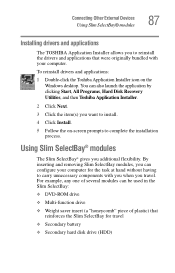
...drive ❖ Weight saver insert (a "honeycomb" piece of plastic) that were originally bundled with you when you travel ❖ Secondary battery ❖ Secondary hard disk drive (HDD) For example, any one of several modules can configure your computer. Using Slim SelectBay®... Using Slim SelectBay® modules 87 Installing drivers and applications The TOSHIBA Application Installer allows you to complete the installation process. To reinstall drivers and applications: 1 Double-click the Toshiba Application Installer icon on -screen prompts to reinstall the drivers and ...
...drive ❖ Weight saver insert (a "honeycomb" piece of plastic) that were originally bundled with you when you travel ❖ Secondary battery ❖ Secondary hard disk drive (HDD) For example, any one of several modules can configure your computer. Using Slim SelectBay®... Using Slim SelectBay® modules 87 Installing drivers and applications The TOSHIBA Application Installer allows you to complete the installation process. To reinstall drivers and applications: 1 Double-click the Toshiba Application Installer icon on -screen prompts to reinstall the drivers and ...
User Guide
Page 90
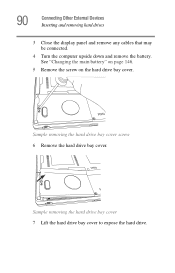
90 Connecting Other External Devices Inserting and removing hard drives 3 Close the display panel and remove any cables that may be connected. 4 Turn the computer upside down and remove the battery. Sample removing the hard drive bay cover 7 Lift the hard drive bay cover to expose the hard drive. See "Changing the main battery" on page 146. 5 Remove the screw on the hard drive bay cover. Sample removing the hard drive bay cover screw 6 Remove the hard drive bay cover.
90 Connecting Other External Devices Inserting and removing hard drives 3 Close the display panel and remove any cables that may be connected. 4 Turn the computer upside down and remove the battery. Sample removing the hard drive bay cover 7 Lift the hard drive bay cover to expose the hard drive. See "Changing the main battery" on page 146. 5 Remove the screw on the hard drive bay cover. Sample removing the hard drive bay cover screw 6 Remove the hard drive bay cover.

User Guide
Page 101
... can activate. Chapter 3 Learning the Basics This chapter covers the basics of using goes down and you must restart your computer to reconnect, or your battery runs out of charge while you are using your computer. Your work frequently. HINT: Some programs have an automatic-save it to the hard disk...
... can activate. Chapter 3 Learning the Basics This chapter covers the basics of using goes down and you must restart your computer to reconnect, or your battery runs out of charge while you are using your computer. Your work frequently. HINT: Some programs have an automatic-save it to the hard disk...


