User Guide
Page 5
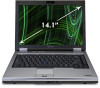
...-distance transmission charges.) In order to program this information into your fax transmission, refer to make changes in advance that you to the fax software instructions installed on this change. If these changes might affect your service or the operation of the transmission, the date and time it can. Contact the state public utility commission, public service commission or corporation commission for repair or...
...-distance transmission charges.) In order to program this information into your fax transmission, refer to make changes in advance that you to the fax software instructions installed on this change. If these changes might affect your service or the operation of the transmission, the date and time it can. Contact the state public utility commission, public service commission or corporation commission for repair or...

User Guide
Page 33
... Card Format Utility .........158 TOSHIBA SD™ Memory Boot Utility 159 Booting from a bootable SD card 160 Mouse Utility 161 TOSHIBA Hardware Setup 162 USB Sleep and Charge Utility 164 Starting the USB Sleep and Charge Utility.......164 USB Sleep and Charge 164 Enabling USB Sleep and Charge 166 Power supply mode settings 166 Battery settings 166 TOSHIBA Zooming Utility 167 TOSHIBA Button Support 168 CD/DVD Drive Acoustic Silencer 169 TOSHIBA Accessibility 170 Trusted Platform Module (TPM 171 Fingerprint Authentication Utility 172 Fingerprint utility limitations 172 Using...
... Card Format Utility .........158 TOSHIBA SD™ Memory Boot Utility 159 Booting from a bootable SD card 160 Mouse Utility 161 TOSHIBA Hardware Setup 162 USB Sleep and Charge Utility 164 Starting the USB Sleep and Charge Utility.......164 USB Sleep and Charge 164 Enabling USB Sleep and Charge 166 Power supply mode settings 166 Battery settings 166 TOSHIBA Zooming Utility 167 TOSHIBA Button Support 168 CD/DVD Drive Acoustic Silencer 169 TOSHIBA Accessibility 170 Trusted Platform Module (TPM 171 Fingerprint Authentication Utility 172 Fingerprint utility limitations 172 Using...
User Guide
Page 35
...Display brightness 222 Disabling or enabling wireless devices............223 Disabling or enabling the Toshiba Dual Pointing Device 224 Zoom (Display resolution 225 Keyboard hot key functions 226 Appendix B: Power Cord/Cable Connectors 227 Appendix C: TOSHIBA PC Health Monitor 228 Enabling the TOSHIBA PC Health Monitor 229 If a TOSHIBA PC Health Monitor message is displayed 230 Cleaning the cooling module 231 Appendix D: Important information for Microsoft® Windows® 7 users 233 Setting up your software 233 Getting detailed product specifications 233 Creating recovery DVDs...
...Display brightness 222 Disabling or enabling wireless devices............223 Disabling or enabling the Toshiba Dual Pointing Device 224 Zoom (Display resolution 225 Keyboard hot key functions 226 Appendix B: Power Cord/Cable Connectors 227 Appendix C: TOSHIBA PC Health Monitor 228 Enabling the TOSHIBA PC Health Monitor 229 If a TOSHIBA PC Health Monitor message is displayed 230 Cleaning the cooling module 231 Appendix D: Important information for Microsoft® Windows® 7 users 233 Setting up your software 233 Getting detailed product specifications 233 Creating recovery DVDs...
User Guide
Page 54
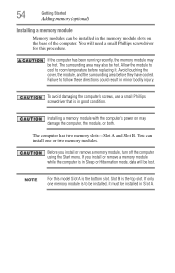
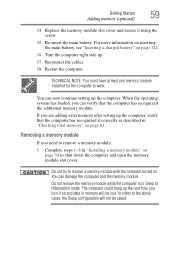
... be lost. Avoid touching the cover, the module, and the surrounding area before replacing it must be installed, it . The computer has two memory slots-Slot A and Slot B. NOTE For this procedure. 54 Getting Started Adding memory (optional) Installing a memory module Memory modules can install one memory module is in Sleep or Hibernation mode, data will need a small Phillips screwdriver for this model Slot A is the top slot. To avoid damaging the computer's screws, use a small Phillips...
... be lost. Avoid touching the cover, the module, and the surrounding area before replacing it must be installed, it . The computer has two memory slots-Slot A and Slot B. NOTE For this procedure. 54 Getting Started Adding memory (optional) Installing a memory module Memory modules can install one memory module is in Sleep or Hibernation mode, data will need a small Phillips screwdriver for this model Slot A is the top slot. To avoid damaging the computer's screws, use a small Phillips...
User Guide
Page 59
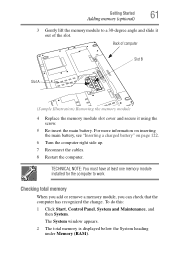
... the main battery, see "Inserting a charged battery" on page 122. 16 Turn the computer right side up the computer, verify that the computer has recognized the additional memory module. When the operating system has loaded, you need to work. Getting Started 59 Adding memory (optional) 14 Replace the memory module slot cover and secure it correctly as described in "Checking total memory" on and data in Sleep or Hibernation mode.
... the main battery, see "Inserting a charged battery" on page 122. 16 Turn the computer right side up the computer, verify that the computer has recognized the additional memory module. When the operating system has loaded, you need to work. Getting Started 59 Adding memory (optional) 14 Replace the memory module slot cover and secure it correctly as described in "Checking total memory" on and data in Sleep or Hibernation mode.
User Guide
Page 61
... or remove a memory module, you can check that the computer has recognized the change. To do this: 1 Click Start, Control Panel, System and Maintenance, and then System. The System window appears. 2 The total memory is displayed below the System heading under Memory (RAM). Getting Started 61 Adding memory (optional) 3 Gently lift the memory module to work. For more information on inserting the main battery, see "Inserting a charged battery" on page 122. 6 Turn the...
... or remove a memory module, you can check that the computer has recognized the change. To do this: 1 Click Start, Control Panel, System and Maintenance, and then System. The System window appears. 2 The total memory is displayed below the System heading under Memory (RAM). Getting Started 61 Adding memory (optional) 3 Gently lift the memory module to work. For more information on inserting the main battery, see "Inserting a charged battery" on page 122. 6 Turn the...
User Guide
Page 62
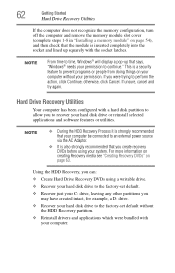
62 Getting Started Hard Drive Recovery Utilities If the computer does not recognize the memory configuration, turn off the computer and remove the memory module slot cover (complete steps 1-8 in "Installing a memory module" on page 54), and then check that the module is inserted completely into the socket and lined up that you create recovery DVDs before using a writable drive. ❖ Recover your hard disk drive to the factory-set default. ❖ Recover just your C: drive, leaving any other partitions you were trying...
62 Getting Started Hard Drive Recovery Utilities If the computer does not recognize the memory configuration, turn off the computer and remove the memory module slot cover (complete steps 1-8 in "Installing a memory module" on page 54), and then check that the module is inserted completely into the socket and lined up that you create recovery DVDs before using a writable drive. ❖ Recover your hard disk drive to the factory-set default. ❖ Recover just your C: drive, leaving any other partitions you were trying...
User Guide
Page 64
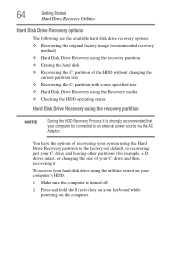
...10070; Recovering the C: partition with a user specified size ❖ Hard Disk Drive Recovery using the Recovery media ❖ Checking the HDD operating status Hard Disk Drive Recovery using the recovery partition NOTE During the HDD Recovery Process it . You have the options of recovering your system using the Hard Drive Recovery partition to an external power source via the AC Adaptor. 64 Getting Started Hard Drive Recovery Utilities Hard Disk Drive Recovery options The following are the available hard disk drive recovery options: ❖ Recovering the original factory image...
...10070; Recovering the C: partition with a user specified size ❖ Hard Disk Drive Recovery using the Recovery media ❖ Checking the HDD operating status Hard Disk Drive Recovery using the recovery partition NOTE During the HDD Recovery Process it . You have the options of recovering your system using the Hard Drive Recovery partition to an external power source via the AC Adaptor. 64 Getting Started Hard Drive Recovery Utilities Hard Disk Drive Recovery options The following are the available hard disk drive recovery options: ❖ Recovering the original factory image...
User Guide
Page 74
... mouse button. The function of the TouchPad. Disabling or enabling the TouchPad™ The TouchPad™ is enabled by default. This feature can also connect an external monitor or projector via the RGB (monitor) port. Control buttons When a step instructs you can be disabled or changed in the Mouse Properties dialog box. To change the enable/disable TouchPad setting, press Fn + F9. This hot key enables/disables the TouchPad. Using external display devices Your computer comes with any wheel device on the program you are two active...
... mouse button. The function of the TouchPad. Disabling or enabling the TouchPad™ The TouchPad™ is enabled by default. This feature can also connect an external monitor or projector via the RGB (monitor) port. Control buttons When a step instructs you can be disabled or changed in the Mouse Properties dialog box. To change the enable/disable TouchPad setting, press Fn + F9. This hot key enables/disables the TouchPad. Using external display devices Your computer comes with any wheel device on the program you are two active...
User Guide
Page 153
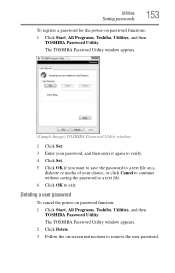
Utilities Setting passwords 153 To register a password for the power-on password function: 1 Click Start, All Programs, Toshiba, Utilities, and then TOSHIBA Password Utility. Deleting a user password To cancel the power-on password functions: 1 Click Start, All Programs, Toshiba, Utilities, and then TOSHIBA Password Utility. The TOSHIBA Password Utility window appears. (Sample Image) TOSHIBA Password Utility window 2 Click Set. 3 Enter your choice, or click Cancel to continue without saving the password to a text file. 6 Click OK to remove the user password. The TOSHIBA Password ...
Utilities Setting passwords 153 To register a password for the power-on password function: 1 Click Start, All Programs, Toshiba, Utilities, and then TOSHIBA Password Utility. Deleting a user password To cancel the power-on password functions: 1 Click Start, All Programs, Toshiba, Utilities, and then TOSHIBA Password Utility. The TOSHIBA Password Utility window appears. (Sample Image) TOSHIBA Password Utility window 2 Click Set. 3 Enter your choice, or click Cancel to continue without saving the password to a text file. 6 Click OK to remove the user password. The TOSHIBA Password ...

User Guide
Page 183
... routine. ❖ The screen does not look right. The voltage level must be able to change the system in the DC-IN socket. To open the Startup menu: 1 Restart your computer. 2 Press F8 when your computer model. To do this, use the options in the Startup menu. The Windows® Advanced Boot Options menu displays these problems, use the options in the Startup menu to start . ❖ The operating system responds differently...
... routine. ❖ The screen does not look right. The voltage level must be able to change the system in the DC-IN socket. To open the Startup menu: 1 Restart your computer. 2 Press F8 when your computer model. To do this, use the options in the Startup menu. The Windows® Advanced Boot Options menu displays these problems, use the options in the Startup menu to start . ❖ The operating system responds differently...
User Guide
Page 187
... Down menu appears. 2 Click Shut Down. The computer shuts down completely. 3 Remove the memory module, following the instructions in "Removing a memory module" on page 59. 4 Reinstall the memory module, following the instructions in case the new version is not using functions. TECHNICAL NOTE: You must have at least one device to be faulty. For more information about Device Manager, refer to work. If the error recurs without the memory module installed, the error...
... Down menu appears. 2 Click Shut Down. The computer shuts down completely. 3 Remove the memory module, following the instructions in "Removing a memory module" on page 59. 4 Reinstall the memory module, following the instructions in case the new version is not using functions. TECHNICAL NOTE: You must have at least one device to be faulty. For more information about Device Manager, refer to work. If the error recurs without the memory module installed, the error...
User Guide
Page 190
... not set for an external monitor. You may have gone into a working . If you are using the built-in screen, make sure the display priority is firmly attached. HINT: Holding the Fn key and pressing the F5 key several times will restart and recognize the device. The Shut Down menu appears. 2 Click Restart. If no password is blank. Display problems Here are some typical display problems and...
... not set for an external monitor. You may have gone into a working . If you are using the built-in screen, make sure the display priority is firmly attached. HINT: Holding the Fn key and pressing the F5 key several times will restart and recognize the device. The Shut Down menu appears. 2 Click Restart. If no password is blank. Display problems Here are some typical display problems and...
User Guide
Page 249
... set system options or control system parameters, such as a mouse. hot key - (1) A feature in combination with any device to help improve processing speed. internal device - See also diskette. See device. K keyboard shortcut - Interlaced monitors take two passes to the internal storage drive the current state of your work , including all open files and programs, when you use to the same state it was when the computer was turned...
... set system options or control system parameters, such as a mouse. hot key - (1) A feature in combination with any device to help improve processing speed. internal device - See also diskette. See device. K keyboard shortcut - Interlaced monitors take two passes to the internal storage drive the current state of your work , including all open files and programs, when you use to the same state it was when the computer was turned...
User Guide
Page 255
... Cards 213 audio files 135 audio features 135 B backing up computer in Windows® 7 239 backing up files 93 battery changing 120 charge indicator light 50, 114 charge not lasting 189 charging 48, 50 conserving power 117 disposal 125 low charge 116 monitoring power 50, 114 not charging 188 notifications 116 power plan 218 power plan hot key 119 real-time clock (RTC) 111 removing 120 BIOS Setup see TOSHIBA Hardware Setup Bridge Media Adapter inserting memory media 140 removing memory media 141 button power...
... Cards 213 audio files 135 audio features 135 B backing up computer in Windows® 7 239 backing up files 93 battery changing 120 charge indicator light 50, 114 charge not lasting 189 charging 48, 50 conserving power 117 disposal 125 low charge 116 monitoring power 50, 114 not charging 188 notifications 116 power plan 218 power plan hot key 119 real-time clock (RTC) 111 removing 120 BIOS Setup see TOSHIBA Hardware Setup Bridge Media Adapter inserting memory media 140 removing memory media 141 button power...
User Guide
Page 256
... Device Manager 186 checking properties 186 devices keyboard 76 mouse 76 Disk Defragmenter 193 disk drive corrupted/damaged data files 193 missing files/trouble accessing a disk 192 running slow 193 diskette drive cannot insert a diskette 193 cannot read a diskette 193 connecting 78 external, connecting 78 display does not look normal/flickers 191 external monitor not working 191 screen is blank 190 display device external 74 display output settings 75 display, external adjusting 76 disposal information 27 disposing of used batteries...
... Device Manager 186 checking properties 186 devices keyboard 76 mouse 76 Disk Defragmenter 193 disk drive corrupted/damaged data files 193 missing files/trouble accessing a disk 192 running slow 193 diskette drive cannot insert a diskette 193 cannot read a diskette 193 connecting 78 external, connecting 78 display does not look normal/flickers 191 external monitor not working 191 screen is blank 190 display device external 74 display output settings 75 display, external adjusting 76 disposal information 27 disposing of used batteries...

User Guide
Page 257
... Support Windows® operating system 185 Hibernation mode 80 configuring 84 starting again from 86 hot key display brightness 222 Hibernation mode 220 keyboard overlays 226 Lock (Instant security) 217 Output (Display switch) 221 power plan 218 Sleep mode 219 volume mute 216 Zoom (Display resolution) 225 zooming 226 Hot Key Cards 211 Hot key functions 215 hot key power plan 119 http 133 I i.LINK port 141 icon 128 desktop 128 moving to desktop 128 recycle bin 128 safety 40 installation memory module...
... Support Windows® operating system 185 Hibernation mode 80 configuring 84 starting again from 86 hot key display brightness 222 Hibernation mode 220 keyboard overlays 226 Lock (Instant security) 217 Output (Display switch) 221 power plan 218 Sleep mode 219 volume mute 216 Zoom (Display resolution) 225 zooming 226 Hot Key Cards 211 Hot key functions 215 hot key power plan 119 http 133 I i.LINK port 141 icon 128 desktop 128 moving to desktop 128 recycle bin 128 safety 40 installation memory module...

User Guide
Page 258
... hot keys 226 not working 181 overlay keys 96 special Windows® keys 95 troubleshooting 189 using 94 keyboard, external 76 keyboard, full-size 94 L Learning about User Account Control in Windows® 7 236 lock computer, using 90 M main battery removing 120 memory adding 53 problem solving 187 removing memory module slot cover 56 memory module inserting 57 installation 54 removing 61 memory module slot 56 microphone 135 modem connecting to telephone line 131 problem solving 198 monitor 74 connecting 74 not working 190 mouse installing 76 mouse utility 161 N network accessing 131 Connect...
... hot keys 226 not working 181 overlay keys 96 special Windows® keys 95 troubleshooting 189 using 94 keyboard, external 76 keyboard, full-size 94 L Learning about User Account Control in Windows® 7 236 lock computer, using 90 M main battery removing 120 memory adding 53 problem solving 187 removing memory module slot cover 56 memory module inserting 57 installation 54 removing 61 memory module slot 56 microphone 135 modem connecting to telephone line 131 problem solving 198 monitor 74 connecting 74 not working 190 mouse installing 76 mouse utility 161 N network accessing 131 Connect...
User Guide
Page 259
... Device Manager 186 disk drive is slow 193 display is blank 190 external display not working 191 external monitor 190 faulty memory 187 hardware conflict 185 high-pitched noise 195 Internet bookmarked site not found 184 Internet connection is slow 184 keyboard not responding 181 missing files/trouble accessing a disk 192 modem not receiving or transmitting 198 no sound 195 non-system disk or disk error 182 PC Card 195 checklist 196 error occurs 197 hot...
... Device Manager 186 disk drive is slow 193 display is blank 190 external display not working 191 external monitor 190 faulty memory 187 hardware conflict 185 high-pitched noise 195 Internet bookmarked site not found 184 Internet connection is slow 184 keyboard not responding 181 missing files/trouble accessing a disk 192 modem not receiving or transmitting 198 no sound 195 non-system disk or disk error 182 PC Card 195 checklist 196 error occurs 197 hot...

User Guide
Page 261
...; wireless networking 130 Windows® 7 accessing the Mouse utility 237 accessing Web Camera Application Help 237 backing up computer 239 blank screen while watching DVD 238 checking device properties/status 237 checking total memory (RAM) 235 creating recovery DVDs/media 234 creating system restore points 239 desktop 234 getting specifications 233 Hard Drive Recovery Utilities 234 registering your computer 234 re-installing drivers and applications 236 removing hardware safely 237 screen saver appears while watching DVD 238 selecting a power plan 237 setting battery notifications...
...; wireless networking 130 Windows® 7 accessing the Mouse utility 237 accessing Web Camera Application Help 237 backing up computer 239 blank screen while watching DVD 238 checking device properties/status 237 checking total memory (RAM) 235 creating recovery DVDs/media 234 creating system restore points 239 desktop 234 getting specifications 233 Hard Drive Recovery Utilities 234 registering your computer 234 re-installing drivers and applications 236 removing hardware safely 237 screen saver appears while watching DVD 238 selecting a power plan 237 setting battery notifications...


