User Manual
Page 5
..., in their equipment, operations or procedures. Connection to make any message unless such message clearly contains in advance that you with the best service it can. If trouble is a REN of the transmission, the date and time it unlawful for information. Disconnection If you to make changes in writing, to allow you should ever decide to use a computer or...
..., in their equipment, operations or procedures. Connection to make any message unless such message clearly contains in advance that you with the best service it can. If trouble is a REN of the transmission, the date and time it unlawful for information. Disconnection If you to make changes in writing, to allow you should ever decide to use a computer or...

User Manual
Page 29
... and specifications ....49 Turning on the power 49 Adding memory (optional 50 Installing a memory module 51 Removing a memory module 56 Hard Drive Recovery Utilities 58 Creating Recovery CDs/DVDs 59 Hard Disk Drive Recovery Options 60 Installing drivers and applications 66 Using the Toshiba Dual Pointing Device 67 Using the TouchPad 67 Disabling or enabling the TouchPad 68 Using external display devices 68 Directing the display output when you turn on the computer 69 Adjusting the quality of the external display......70 Using an external keyboard 70 Using a mouse 70 Connecting...
... and specifications ....49 Turning on the power 49 Adding memory (optional 50 Installing a memory module 51 Removing a memory module 56 Hard Drive Recovery Utilities 58 Creating Recovery CDs/DVDs 59 Hard Disk Drive Recovery Options 60 Installing drivers and applications 66 Using the Toshiba Dual Pointing Device 67 Using the TouchPad 67 Disabling or enabling the TouchPad 68 Using external display devices 68 Directing the display output when you turn on the computer 69 Adjusting the quality of the external display......70 Using an external keyboard 70 Using a mouse 70 Connecting...
User Manual
Page 43
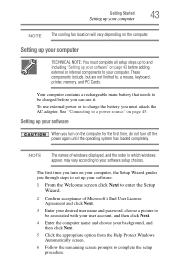
... Started 43 Setting up your computer NOTE The cooling fan location will vary depending on your computer, the Setup Wizard guides you through steps to set up your software. 1 From the Welcome screen click Next to enter the Setup Wizard. 2 Confirm acceptance of windows displayed, and the order in which windows appear, may vary according to , a mouse, keyboard, printer, memory, and PC Cards. The first time you turn off the power...
... Started 43 Setting up your computer NOTE The cooling fan location will vary depending on your computer, the Setup Wizard guides you through steps to set up your software. 1 From the Welcome screen click Next to enter the Setup Wizard. 2 Confirm acceptance of windows displayed, and the order in which windows appear, may vary according to , a mouse, keyboard, printer, memory, and PC Cards. The first time you turn off the power...
User Manual
Page 51
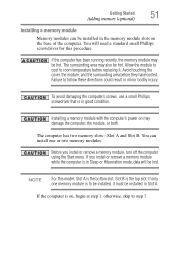
... can be hot. Slot B is in Sleep or Hibernation mode, data will need a standard small Phillips screwdriver for this model, Slot A is in the memory module slots on , begin at step 1; Getting Started 51 Adding memory (optional) Installing a memory module Memory modules can install one memory module is on the base of the computer. Before you install or remove a memory module while the computer is the top slot. Installing a memory module with the computer's power on may be installed in good...
... can be hot. Slot B is in Sleep or Hibernation mode, data will need a standard small Phillips screwdriver for this model, Slot A is in the memory module slots on , begin at step 1; Getting Started 51 Adding memory (optional) Installing a memory module Memory modules can install one memory module is on the base of the computer. Before you install or remove a memory module while the computer is the top slot. Installing a memory module with the computer's power on may be installed in good...
User Manual
Page 53
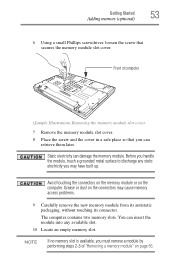
... memory module slot cover 7 Remove the memory module slot cover. 8 Place the screw and the cover in a safe place so that secures the memory module slot cover. Static electricity can insert the module into any static electricity you may cause memory access problems. 9 Carefully remove the new memory module from its antistatic packaging, without touching its connector. You can damage the memory module. Grease or dust on the connectors may have built up. Getting Started 53 Adding memory (optional) 6 Using...
... memory module slot cover 7 Remove the memory module slot cover. 8 Place the screw and the cover in a safe place so that secures the memory module slot cover. Static electricity can insert the module into any static electricity you may cause memory access problems. 9 Carefully remove the new memory module from its antistatic packaging, without touching its connector. You can damage the memory module. Grease or dust on the connectors may have built up. Getting Started 53 Adding memory (optional) 6 Using...
User Manual
Page 55
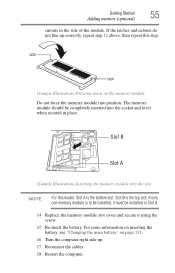
... Replace the memory module slot cover and secure it must be completely inserted into position. Slot B is to be installed, it using the screw. 15 Re-insert the battery. For more information on inserting the battery, see "Changing the main battery" on the memory module Do not force the memory module into the socket and level when secured in the side of the module. Getting Started 55 Adding memory (optional...
... Replace the memory module slot cover and secure it must be completely inserted into position. Slot B is to be installed, it using the screw. 15 Re-insert the battery. For more information on inserting the battery, see "Changing the main battery" on the memory module Do not force the memory module into the socket and level when secured in the side of the module. Getting Started 55 Adding memory (optional...
User Manual
Page 58
... says, "Windows® needs your permission to time, Windows® will display a pop-up that the computer has recognized the change. Hard Drive Recovery Utilities (Available on your computer without your hard disk drive or reinstall selected applications and software features or utilities. 58 Getting Started Hard Drive Recovery Utilities 4 Replace the memory module slot cover and tighten the screw. 5 Re-insert the battery. NOTE From time to continue." This is a security feature to recover your...
... says, "Windows® needs your permission to time, Windows® will display a pop-up that the computer has recognized the change. Hard Drive Recovery Utilities (Available on your computer without your hard disk drive or reinstall selected applications and software features or utilities. 58 Getting Started Hard Drive Recovery Utilities 4 Replace the memory module slot cover and tighten the screw. 5 Re-insert the battery. NOTE From time to continue." This is a security feature to recover your...
User Manual
Page 61
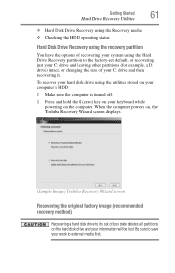
... work to its out of your C: drive and then recovering it. Getting Started 61 Hard Drive Recovery Utilities ❖ Hard Disk Drive Recovery using the Recovery media ❖ Checking the HDD operating status Hard Disk Drive Recovery using the recovery partition You have the options of recovering your system using the utilities stored on your computer's HDD: 1 Make sure the computer is turned off. 2 Press and hold the 0 (zero) key on your keyboard while powering on the computer. When the computer powers on, the Toshiba Recovery Wizard screen displays...
... work to its out of your C: drive and then recovering it. Getting Started 61 Hard Drive Recovery Utilities ❖ Hard Disk Drive Recovery using the Recovery media ❖ Checking the HDD operating status Hard Disk Drive Recovery using the recovery partition You have the options of recovering your system using the utilities stored on your computer's HDD: 1 Make sure the computer is turned off. 2 Press and hold the 0 (zero) key on your keyboard while powering on the computer. When the computer powers on, the Toshiba Recovery Wizard screen displays...
User Manual
Page 68
... the cursor to the right mouse button. Before connecting an external monitor or video projector, configure your computer for your operating system and devices. Control buttons When a step instructs you need a larger screen. The primary button usually corresponds to the left . The function of device you are connecting. For more information, see "Disabling or enabling the Dual Pointing Device" on the program you are using. 68 Getting Started Using external display devices ❖ To move the cursor...
... the cursor to the right mouse button. Before connecting an external monitor or video projector, configure your computer for your operating system and devices. Control buttons When a step instructs you need a larger screen. The primary button usually corresponds to the left . The function of device you are connecting. For more information, see "Disabling or enabling the Dual Pointing Device" on the program you are using. 68 Getting Started Using external display devices ❖ To move the cursor...
User Manual
Page 86
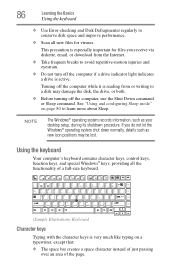
... the computer if a drive indicator light indicates a drive is active. This precaution is reading from the Internet. ❖ Take frequent breaks to a disk may be lost. Turning off the computer, use the Shut Down command or Sleep command. Using the keyboard Your computer's keyboard contains character keys, control keys, function keys, and special Windows® keys, providing all new files for files you do not let the Windows® operating system shut down normally...
... the computer if a drive indicator light indicates a drive is active. This precaution is reading from the Internet. ❖ Take frequent breaks to a disk may be lost. Turning off the computer, use the Shut Down command or Sleep command. Using the keyboard Your computer's keyboard contains character keys, control keys, function keys, and special Windows® keys, providing all new files for files you do not let the Windows® operating system shut down normally...
User Manual
Page 144
... to save the password to a text file on -screen instructions to access your password in a location where you can later access it should you not remember it again to verify. 6 Click Set. 7 Click OK if you want to exit. Using a user password A user password provides power-on password function: 1 Click Start, All Programs, Toshiba, Utilities, then click TOSHIBA Assist. Disabling a user password To cancel the power-on password protection. 144 Toshiba Utilities Using a user password Setting a user password To register a password for any losses...
... to save the password to a text file on -screen instructions to access your password in a location where you can later access it should you not remember it again to verify. 6 Click Set. 7 Click OK if you want to exit. Using a user password A user password provides power-on password function: 1 Click Start, All Programs, Toshiba, Utilities, then click TOSHIBA Assist. Disabling a user password To cancel the power-on password protection. 144 Toshiba Utilities Using a user password Setting a user password To register a password for any losses...
User Manual
Page 171
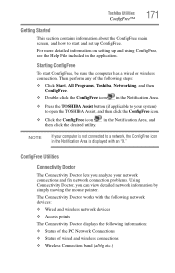
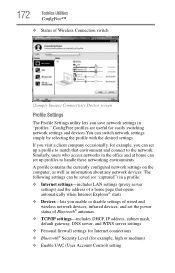
... network devices: ❖ Wired and wireless network devices ❖ Access points The Connectivity Doctor displays the following steps: ❖ Click Start, All Programs, Toshiba, Networking, and then ConfigFree. ❖ Double-click the ConfigFree icon in the Notification Area. ❖ Press the TOSHIBA Assist button (if applicable to your network connections and fix network connection problems. Using Connectivity Doctor, you can view detailed network information by simply moving the mouse pointer. ConfigFree Utilities Connectivity Doctor The Connectivity...
... network devices: ❖ Wired and wireless network devices ❖ Access points The Connectivity Doctor displays the following steps: ❖ Click Start, All Programs, Toshiba, Networking, and then ConfigFree. ❖ Double-click the ConfigFree icon in the Notification Area. ❖ Press the TOSHIBA Assist button (if applicable to your network connections and fix network connection problems. Using Connectivity Doctor, you can view detailed network information by simply moving the mouse pointer. ConfigFree Utilities Connectivity Doctor The Connectivity...
User Manual
Page 172
... occasionally, for example, high or medium) ❖ Enable UAC (User Account Control) setting Similarly, users who access networks in the office and at home can set up a profile to match that opens automatically when Internet Explorer® starts ❖ Devices-lets you enable or disable settings of wired and wireless network devices, infrared devices, and set the power status of Bluetooth® antennas ❖ TCP/IP settings-includes DHCP, IP address, subnet mask...
... occasionally, for example, high or medium) ❖ Enable UAC (User Account Control) setting Similarly, users who access networks in the office and at home can set up a profile to match that opens automatically when Internet Explorer® starts ❖ Devices-lets you enable or disable settings of wired and wireless network devices, infrared devices, and set the power status of Bluetooth® antennas ❖ TCP/IP settings-includes DHCP, IP address, subnet mask...
User Manual
Page 179
... ❖ Disable Driver Signature Enforcement ❖ Start Windows® normally When you may have to change the system in the Startup menu to fix the problem. If you change your system's configuration or verify the startup procedure to fix the problem. To do this, use the options in some way such as installing a new program or adding a device. The Windows® Advanced Boot Options menu displays these problems, use the options in the Startup menu. Using Startup options to fix problems If the operating system...
... ❖ Disable Driver Signature Enforcement ❖ Start Windows® normally When you may have to change the system in the Startup menu to fix the problem. If you change your system's configuration or verify the startup procedure to fix the problem. To do this, use the options in some way such as installing a new program or adding a device. The Windows® Advanced Boot Options menu displays these problems, use the options in the Startup menu. Using Startup options to fix problems If the operating system...
User Manual
Page 187
... result of colors displayed: 1 Right-click in screen, make sure the display priority is not set for the screen. HINT: Holding the Fn key and pressing the F5 key several times will advance you to continue working power outlet. ❖ Check that the cable connecting the external monitor to the computer is firmly attached. ❖ Try adjusting the contrast and brightness controls on the external monitor. ❖ Press Fn...
... result of colors displayed: 1 Right-click in screen, make sure the display priority is not set for the screen. HINT: Holding the Fn key and pressing the F5 key several times will advance you to continue working power outlet. ❖ Check that the cable connecting the external monitor to the computer is firmly attached. ❖ Try adjusting the contrast and brightness controls on the external monitor. ❖ Press Fn...
User Manual
Page 232
... turn the computer off . interlaced - Memory cache installed on the screen that activates a memory resident program. Internet - See also diskette. hot key - (1) A feature in combination with any device to add or remove devices from a computer while the computer is slower than L1 cache and faster than main memory. A feature of many Toshiba notebook computers that saves to the hard disk the current state of your work , including all open...
... turn the computer off . interlaced - Memory cache installed on the screen that activates a memory resident program. Internet - See also diskette. hot key - (1) A feature in combination with any device to add or remove devices from a computer while the computer is slower than L1 cache and faster than main memory. A feature of many Toshiba notebook computers that saves to the hard disk the current state of your work , including all open...

User Manual
Page 238
... 135 memory 50 adding memory 50 Alt keys 87 Application Cards 207 audio files 130 audio features 130 B backing up files 85 battery changing 113 charge indicator light 47, 107 charge not lasting 185 charging 45, 47 conserving power 110 disposal 117 low charge 109 monitoring power 47, 107 not charging 185 power plan 214 power usage hot key 112 real-time clock (RTC) 104 removing 113 BIOS Setup see Toshiba Hardware Setup button power 50, 60 start 122 C CD creating 99...
... 135 memory 50 adding memory 50 Alt keys 87 Application Cards 207 audio files 130 audio features 130 B backing up files 85 battery changing 113 charge indicator light 47, 107 charge not lasting 185 charging 45, 47 conserving power 110 disposal 117 low charge 109 monitoring power 47, 107 not charging 185 power plan 214 power usage hot key 112 real-time clock (RTC) 104 removing 113 BIOS Setup see Toshiba Hardware Setup button power 50, 60 start 122 C CD creating 99...

User Manual
Page 239
... 45 connection set up 126 control buttons 68 critical applications 3 Ctrl keys 87 D desktop creating new icon 121 major features 121 desktop exploration 120 desktop icons 121 Device Manager 183 checking properties 183 devices keyboard 70 mouse 70 Disk Defragmenter 189 disk drive corrupted/damaged data files 189 missing files/trouble accessing a disk 188 running slow 189 diskette drive cannot insert a diskette 190 cannot read a diskette 190 connecting 72 external, connecting 72 display...
... 45 connection set up 126 control buttons 68 critical applications 3 Ctrl keys 87 D desktop creating new icon 121 major features 121 desktop exploration 120 desktop icons 121 Device Manager 183 checking properties 183 devices keyboard 70 mouse 70 Disk Defragmenter 189 disk drive corrupted/damaged data files 189 missing files/trouble accessing a disk 188 running slow 189 diskette drive cannot insert a diskette 190 cannot read a diskette 190 connecting 72 external, connecting 72 display...
User Manual
Page 241
... slot cover 53 memory module installation 51 installing inserting into socket 54 removing 57 microphone 130 modem determining COM port 123 problem solving 194 resetting port to default settings 123 upgrading 123 monitor 68 connecting 68 not working 187 mouse installing 70 serial 70 N network accessing 125 Dial-Up Networking Wizard 125 networking wireless 125 O opening the display panel 48 optical drive problems 190 troubleshooting 190 other documentation 39 overlay keys 88 P password disabling a user 144, 146 setting a user 144 types 143 passwords instant, using 143 setting 143 PC Card...
... slot cover 53 memory module installation 51 installing inserting into socket 54 removing 57 microphone 130 modem determining COM port 123 problem solving 194 resetting port to default settings 123 upgrading 123 monitor 68 connecting 68 not working 187 mouse installing 70 serial 70 N network accessing 125 Dial-Up Networking Wizard 125 networking wireless 125 O opening the display panel 48 optical drive problems 190 troubleshooting 190 other documentation 39 overlay keys 88 P password disabling a user 144, 146 setting a user 144 types 143 passwords instant, using 143 setting 143 PC Card...
User Manual
Page 243
... 44 worldwide offices 205 Toshiba Assist 137 TOSHIBA Button Controls 156 Toshiba Dual Pointing Device 67 Toshiba Hardware Setup 153 Toshiba online resources 101 Toshiba utilities 136 traveling tips 119 troubleshooting DVD player general problems 197 external keyboard 186 keyboard 186 keypad overlay 186 optical drive 190 turning on the computer 50 turning on the power 49 U user password, disabling 144, 146 user password, setting 144 using a file extension 93 using the Toshiba Dual Pointing Device 67 V video projector adjusting display 70 W warranty limited warranty...
... 44 worldwide offices 205 Toshiba Assist 137 TOSHIBA Button Controls 156 Toshiba Dual Pointing Device 67 Toshiba Hardware Setup 153 Toshiba online resources 101 Toshiba utilities 136 traveling tips 119 troubleshooting DVD player general problems 197 external keyboard 186 keyboard 186 keypad overlay 186 optical drive 190 turning on the computer 50 turning on the power 49 U user password, disabling 144, 146 user password, setting 144 using a file extension 93 using the Toshiba Dual Pointing Device 67 V video projector adjusting display 70 W warranty limited warranty...


