

Users Manual Canada; English
Page 2
... comply with respect to the use of International Business Machines Corporation. The instructions and descriptions it contains are trademarks of the information contained herein. Windows and Microsoft are subject to change without the permission of the copyright owner is a violation of copied material and distribution on a network) without notice. All rights reserved. TOSHIBA assumes no liability for music...
... comply with respect to the use of International Business Machines Corporation. The instructions and descriptions it contains are trademarks of the information contained herein. Windows and Microsoft are subject to change without the permission of the copyright owner is a violation of copied material and distribution on a network) without notice. All rights reserved. TOSHIBA assumes no liability for music...

Users Manual Canada; English
Page 35
... and hot keys. Preface Congratulations on your work area. This manual tells how to read Getting Started for step-by browsing through its pages. Chapter 3, Getting Started, provides a quick overview of how to familiarize yourself with this manual by -step instructions on setting up and begin operating your computer and gives tips on configuring your TECRA A7 computer. Then read Chapter 8, Optional Devices. If you are a new user...
... and hot keys. Preface Congratulations on your work area. This manual tells how to read Getting Started for step-by browsing through its pages. Chapter 3, Getting Started, provides a quick overview of how to familiarize yourself with this manual by -step instructions on setting up and begin operating your computer and gives tips on configuring your TECRA A7 computer. Then read Chapter 8, Optional Devices. If you are a new user...
Users Manual Canada; English
Page 59
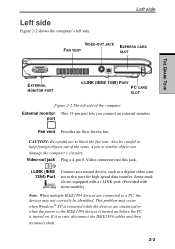
... them. 2-3 Some models are equipped with a i.LINK port. (Provided with some models) Note: When multiple IEEE1394 devices are connected to a PC, the devices may occur when Windows® XP is turned on. Left side VIDEO-OUT JACK FAN VENT EXPRESS CARD SLOT THE GRAND TOUR EXTERNAL MONITOR PORT II.LINK (IEEE 1349) PORT PC CARD SLOT Figure 2-2 The left side. i.LINK (IEEE 1394) Port Connect an external device, such as a digital video camera to block...
... them. 2-3 Some models are equipped with a i.LINK port. (Provided with some models) Note: When multiple IEEE1394 devices are connected to a PC, the devices may occur when Windows® XP is turned on. Left side VIDEO-OUT JACK FAN VENT EXPRESS CARD SLOT THE GRAND TOUR EXTERNAL MONITOR PORT II.LINK (IEEE 1349) PORT PC CARD SLOT Figure 2-2 The left side. i.LINK (IEEE 1394) Port Connect an external device, such as a digital video camera to block...
Users Manual Canada; English
Page 68
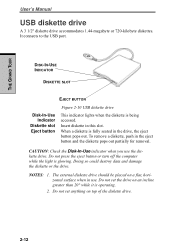
... use . NOTES: 1. DISK-IN-USE INDICATOR DISKETTE SLOT EJECT BUTTON Figure 2-10 USB diskette drive Disk-In-Use Indicator Diskette slot Eject button This indicator lights when the diskette is glowing. The external diskette drive should be placed on top of the diskette drive. 2-12 Do not set anything on a flat, horizontal surface when in the eject button and the diskette pops out partially for removal. THE GRAND TOUR User's Manual USB diskette drive A 3 1/2" diskette drive...
... use . NOTES: 1. DISK-IN-USE INDICATOR DISKETTE SLOT EJECT BUTTON Figure 2-10 USB diskette drive Disk-In-Use Indicator Diskette slot Eject button This indicator lights when the diskette is glowing. The external diskette drive should be placed on top of the diskette drive. 2-12 Do not set anything on a flat, horizontal surface when in the eject button and the diskette pops out partially for removal. THE GRAND TOUR User's Manual USB diskette drive A 3 1/2" diskette drive...

Users Manual Canada; English
Page 82
... receives no input or hardware access for details. In Windows® XP, open Performance and Maintenance and open TOSHIBA Power Saver. 3. GETTING STARTED User's Manual CAUTIONS: 1. Before entering Standby mode, be damaged. 3. Do not install or remove a memory module while the computer is connected to the System Power Mode item in Power Saver Utility described in the Control Panel. Benefits of three ways: 1. Close the display panel. In Windows® XP, click Start, click Turn Off Computer and click...
... receives no input or hardware access for details. In Windows® XP, open Performance and Maintenance and open TOSHIBA Power Saver. 3. GETTING STARTED User's Manual CAUTIONS: 1. Before entering Standby mode, be damaged. 3. Do not install or remove a memory module while the computer is connected to the System Power Mode item in Power Saver Utility described in the Control Panel. Benefits of three ways: 1. Close the display panel. In Windows® XP, click Start, click Turn Off Computer and click...
Users Manual Canada; English
Page 132
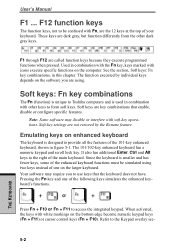
F12 function keys The function keys, not to use keys that enable, disable or configure specific features. Used in figure 5-1. Press Fn + F10 or Fn + F11 to the Keypad overlay sec- 5-2 THE KEYBOARD When activated, the keys with soft-key operations. Soft keys are the 12 keys at the top of your keyboard. Note: Some software may require you are not restored by the Resume feature. Soft-key settings are using two keys instead of one...
F12 function keys The function keys, not to use keys that enable, disable or configure specific features. Used in figure 5-1. Press Fn + F10 or Fn + F11 to the Keypad overlay sec- 5-2 THE KEYBOARD When activated, the keys with soft-key operations. Soft keys are the 12 keys at the top of your keyboard. Note: Some software may require you are not restored by the Resume feature. Soft-key settings are using two keys instead of one...
Users Manual Canada; English
Page 176
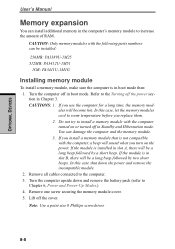
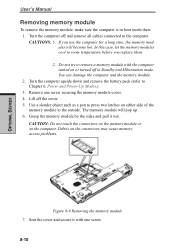
... the memory module. 3. If you turn on or turned off the power section in boot mode then: 1. Remove all cables connected to Chapter 6, Power and Power-Up Modes.) 4. Remove one screw securing the memory module cover. 5. If the module is in Chapter 3. If you replace them. 2. OPTIONAL DEVICES User's Manual Memory expansion You can install additional memory in Standby and Hibernation mode. Note: Use a point size 0 Phillips screwdriver. 8-8 Turn the computer off the cover. Turn the computer upside down the power and remove...
... the memory module. 3. If you turn on or turned off the power section in boot mode then: 1. Remove all cables connected to Chapter 6, Power and Power-Up Modes.) 4. Remove one screw securing the memory module cover. 5. If the module is in Chapter 3. If you replace them. 2. OPTIONAL DEVICES User's Manual Memory expansion You can install additional memory in Standby and Hibernation mode. Note: Use a point size 0 Phillips screwdriver. 8-8 Turn the computer off the cover. Turn the computer upside down the power and remove...
Users Manual Canada; English
Page 178
... battery pack (refer to the outside. CAUTIONS: 1. The memory module will become hot. Seat the cover and secure it out. Turn the computer off the cover. 5. If you replace them. 2. OPTIONAL DEVICES User's Manual Removing memory module To remove the memory module, make sure the computer is in Standby and Hibernation mode. You can damage the computer and the memory module. 2. In this case, let the memory modules cool to room temperature before you use...
... battery pack (refer to the outside. CAUTIONS: 1. The memory module will become hot. Seat the cover and secure it out. Turn the computer off the cover. 5. If you replace them. 2. OPTIONAL DEVICES User's Manual Removing memory module To remove the memory module, make sure the computer is in Standby and Hibernation mode. You can damage the computer and the memory module. 2. In this case, let the memory modules cool to room temperature before you use...
Users Manual Canada; English
Page 180
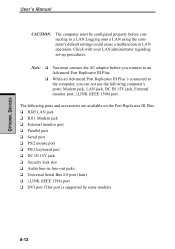
... jack, External monitor port, i.LINK (IEEE 1394) port. OPTIONAL DEVICES User's Manual CAUTION: The computer must connect the AC adaptor before connecting to the computer, you can not use the following ports and accessories are available on the Port Replicator III Plus. ❑ RJ45 LAN jack ❑ RJ11 Modem jack ❑ External monitor port ❑ Parallel port ❑ Serial port ❑ PS/2 mouse port ❑ PS/2 keyboard port ❑ DC IN 15V jack ❑ Security lock slot ❑ Audio line-in LAN operation...
... jack, External monitor port, i.LINK (IEEE 1394) port. OPTIONAL DEVICES User's Manual CAUTION: The computer must connect the AC adaptor before connecting to the computer, you can not use the following ports and accessories are available on the Port Replicator III Plus. ❑ RJ45 LAN jack ❑ RJ11 Modem jack ❑ External monitor port ❑ Parallel port ❑ Serial port ❑ PS/2 mouse port ❑ PS/2 keyboard port ❑ DC IN 15V jack ❑ Security lock slot ❑ Audio line-in LAN operation...

Users Manual Canada; English
Page 191
... the battery indicator. If the battery is hot or cold to the touch. If necessary wipe them with cotton or a clean cloth. For information on indicators and battery operation see Chapter 6, Power and Power-Up Modes. Test it will not begin charging immediately. Let it doesn't work, try another power source. If it reach room temperature. Unplug the AC adaptor and remove the battery to charge the battery. Hardware...
... the battery indicator. If the battery is hot or cold to the touch. If necessary wipe them with cotton or a clean cloth. For information on indicators and battery operation see Chapter 6, Power and Power-Up Modes. Test it will not begin charging immediately. Let it doesn't work, try another power source. If it reach room temperature. Unplug the AC adaptor and remove the battery to charge the battery. Hardware...

Users Manual Canada; English
Page 216
... time of 2 for more pre-installed operating systems, such as the natural performance variations produced by Toshiba at www.pcsupport.toshiba.com. DISCLAIMERS User's Manual uct only under recommended conditions. Published battery life numbers are achieved on product model, configuration, applications, power management settings and features utilized, as well as Microsoft Windows and/or pre-installed software applications, or media content. To purchase a new battery pack, see the accessories information...
... time of 2 for more pre-installed operating systems, such as the natural performance variations produced by Toshiba at www.pcsupport.toshiba.com. DISCLAIMERS User's Manual uct only under recommended conditions. Published battery life numbers are achieved on product model, configuration, applications, power management settings and features utilized, as well as Microsoft Windows and/or pre-installed software applications, or media content. To purchase a new battery pack, see the accessories information...

Users Manual Canada; English
Page 230
... format This command controls whether result codes (including call progress monitoring This command selects which result codes will be used by the modem. V1 Displays result codes as digits. This is received. Command Dial tone Busy signal Supported Result detect detect Code X0 Disable Disable X1 Disable Disable X2 Enable Disable X3 Disable Enable X4 (default) Enable Enable OK, CONNECT, RING, NO CARRIER, ERROR OK, RING, NO CARRIER, ERROR, CONNECT OK, RING, NO CARRIER, ERROR, NODIALTONE, CONNECT...
... format This command controls whether result codes (including call progress monitoring This command selects which result codes will be used by the modem. V1 Displays result codes as digits. This is received. Command Dial tone Busy signal Supported Result detect detect Code X0 Disable Disable X1 Disable Disable X2 Enable Disable X3 Disable Enable X4 (default) Enable Enable OK, CONNECT, RING, NO CARRIER, ERROR OK, RING, NO CARRIER, ERROR, CONNECT OK, RING, NO CARRIER, ERROR, NODIALTONE, CONNECT...
Users Manual Canada; English
Page 263
...: A circuit built into useful information. default: The parameter value automatically selected by batteries. control keys: A key or sequence of keys you or the program do not provide instructions. DC: Direct Current. You use the Hardware Setup, MaxTime or HW Setup program to control your system works. CPU: Central processing unit. CRT: Cathode Ray Tube. delete: To remove data from the keyboard to initiate a particular function within a program. Glossary...
...: A circuit built into useful information. default: The parameter value automatically selected by batteries. control keys: A key or sequence of keys you or the program do not provide instructions. DC: Direct Current. You use the Hardware Setup, MaxTime or HW Setup program to control your system works. CPU: Central processing unit. CRT: Cathode Ray Tube. delete: To remove data from the keyboard to initiate a particular function within a program. Glossary...
Users Manual Canada; English
Page 266
... used specifically to connect one system or device to another. 2) To physically connect one system or device to another to exchange information. 3) The point of data to and from a computer. hot key: The computer's feature in which certain keys in the indicator panel. I icon: A small graphic image displayed on . Glossary-8 I /O devices: Equipment used as digital video cameras. In Windows, an icon represents an object that allows you set...
... used specifically to connect one system or device to another. 2) To physically connect one system or device to another to exchange information. 3) The point of data to and from a computer. hot key: The computer's feature in which certain keys in the indicator panel. I icon: A small graphic image displayed on . Glossary-8 I /O devices: Equipment used as digital video cameras. In Windows, an icon represents an object that allows you set...

Users Manual Canada; English
Page 267
... screen. modem keyboard: An input device containing switches that equals 1 million cycles per second. Liquid Crystal Display (LCD): Liquid crystal sealed between the glass sheets darkens the liquid crystal to provide contrast to 1024 kilobytes. M main board: See motherboard. The instructions were developed on a single chip. 2) An integrated circuit that transmits a specific code to 1024 bytes. mode: A method of operation, for direct drive TTL displays...
... screen. modem keyboard: An input device containing switches that equals 1 million cycles per second. Liquid Crystal Display (LCD): Liquid crystal sealed between the glass sheets darkens the liquid crystal to provide contrast to 1024 kilobytes. M main board: See motherboard. The instructions were developed on a single chip. 2) An integrated circuit that transmits a specific code to 1024 bytes. mode: A method of operation, for direct drive TTL displays...

Users Manual Canada; English
Page 271
... connect a keyboard to the USB-HUB and a mouse to the computer for data input/output. window: A portion of USB-equipped devices to each pixel enabling fine display control and excellent screen legibility. write protection S-video: This connection provides separate lines for contrast and color, which produces a video image superior to mean a Microsoft Windows window. warm start: Restarting or resetting a computer without turning it off. U USB: Enables chain connection of a number of the screen that...
... connect a keyboard to the USB-HUB and a mouse to the computer for data input/output. window: A portion of USB-equipped devices to each pixel enabling fine display control and excellent screen legibility. write protection S-video: This connection provides separate lines for contrast and color, which produces a video image superior to mean a Microsoft Windows window. warm start: Restarting or resetting a computer without turning it off. U USB: Enables chain connection of a number of the screen that...
Users Manual Canada; English
Page 274
... using normal keyboard (overlay on 5-7 Windows special keys 5-7 L LAN,See also Wireless LAN 1-8 cable types 4-36 connecting 4-36 disconnecting 4-37 problems 9-25 using 4-36 LCD, See Display, Video modes, Mon- INDEX User's Manual Fn + F6 (display brightness) 5-5 Fn + F7 (display brightness) 5-5 Fn + F8 (wireless setting) 5-5 Fn + F9 (Touch Pad mode) 5-6 Fn + F10 (arrow mode) 5-2 Fn + F11 (numeric mode) 5-2 Fn + F12 (ScrLock) 5-3 Fn Sticky key 5-7 Function keys 5-2 H Hard disk drive 1-4 automatic power off ) 5-9 turning on ) 5-8 temporarily using overlay (overlay off 1-11 problems 9-8 HDD...
... using normal keyboard (overlay on 5-7 Windows special keys 5-7 L LAN,See also Wireless LAN 1-8 cable types 4-36 connecting 4-36 disconnecting 4-37 problems 9-25 using 4-36 LCD, See Display, Video modes, Mon- INDEX User's Manual Fn + F6 (display brightness) 5-5 Fn + F7 (display brightness) 5-5 Fn + F8 (wireless setting) 5-5 Fn + F9 (Touch Pad mode) 5-6 Fn + F10 (arrow mode) 5-2 Fn + F11 (numeric mode) 5-2 Fn + F12 (ScrLock) 5-3 Fn Sticky key 5-7 Function keys 5-2 H Hard disk drive 1-4 automatic power off ) 5-9 turning on ) 5-8 temporarily using overlay (overlay off 1-11 problems 9-8 HDD...
Users Manual Canada; English
Page 275
...-RW/DVD-ROM drive 9-10 diskette drive 9-13 DVD-ROM drive 9-8 hard disk drive 9-8 hardware and system checklist 9- 3 infrared port 9-14 keyboard 9-7 LAN 9-25 LCD panel 9-7 modem 9-23 monitor,external 9-20 password 9-7 PC card 9-18 power 9-4 preliminary checklist 9-1 printer 9-14 self test 9-4 sound system 9-21 standby/hibernation 9-24 support from TOSHIBA 9-27 system start-up 9-3 TV output signal 9-21 USB 9-22 Wireless LAN 9-25 Processor 1-3 R Real time clock battery, See Battery Recovery Media 3-12 S Screen, See Display ScrLock (Fn+ F12), See Soft keys Security lock 1-10...
...-RW/DVD-ROM drive 9-10 diskette drive 9-13 DVD-ROM drive 9-8 hard disk drive 9-8 hardware and system checklist 9- 3 infrared port 9-14 keyboard 9-7 LAN 9-25 LCD panel 9-7 modem 9-23 monitor,external 9-20 password 9-7 PC card 9-18 power 9-4 preliminary checklist 9-1 printer 9-14 self test 9-4 sound system 9-21 standby/hibernation 9-24 support from TOSHIBA 9-27 system start-up 9-3 TV output signal 9-21 USB 9-22 Wireless LAN 9-25 Processor 1-3 R Real time clock battery, See Battery Recovery Media 3-12 S Screen, See Display ScrLock (Fn+ F12), See Soft keys Security lock 1-10...

Detailed Specs for Tecra A7 PTA71C-LL901E English
Page 1
... Security Cable Lock Slot Execute Disable Bit Diversity Antenna Toshiba ConfigFree Toshiba Bluetooth Stack Presentation Button Toshiba Zooming Utility One-touch Resolution Change Toshiba Power Saver Utility Wireless On/Off Switch Toshiba Fn-esse Shortcut Utility Toshiba Mouse Utility FN Shortcut Keys Environmental Specifications Temperature: Operating 5°to 35°C (41° to 3,000m.; max; Non-Operating: -60 to 80% non-condensing; Touchpad + Accupoint Physical Dimensions Dimensions: 360mm (W) x 267mm (D)x 29.8mm/36.8 (H) Weight: 6.0lbs/2.72kg AC Adapter 90W external...
... Security Cable Lock Slot Execute Disable Bit Diversity Antenna Toshiba ConfigFree Toshiba Bluetooth Stack Presentation Button Toshiba Zooming Utility One-touch Resolution Change Toshiba Power Saver Utility Wireless On/Off Switch Toshiba Fn-esse Shortcut Utility Toshiba Mouse Utility FN Shortcut Keys Environmental Specifications Temperature: Operating 5°to 35°C (41° to 3,000m.; max; Non-Operating: -60 to 80% non-condensing; Touchpad + Accupoint Physical Dimensions Dimensions: 360mm (W) x 267mm (D)x 29.8mm/36.8 (H) Weight: 6.0lbs/2.72kg AC Adapter 90W external...

Detailed Specs for Tecra A7 PTA71C-LL901E English
Page 2
... operating in battery power mode." use of standard telephone lines or low speed network connections 5. Contact Toshiba Technical Service and Support for an entire product series. This regulation goes into effect on usage. For the most up-to-date product information about your computer product may also vary from specifications under the following conditions: 1. Published battery life numbers are all possible configurations for more pre-installed operating...
... operating in battery power mode." use of standard telephone lines or low speed network connections 5. Contact Toshiba Technical Service and Support for an entire product series. This regulation goes into effect on usage. For the most up-to-date product information about your computer product may also vary from specifications under the following conditions: 1. Published battery life numbers are all possible configurations for more pre-installed operating...


