User Guide
Page 2
... COPYING OR TRANSFERRING YOUR DATA, PLEASE BE SURE TO CONFIRM WHETHER THE DATA HAS BEEN SUCCESSFULLY COPIED OR TRANSFERRED. Model: Tecra® A5 Series Recordable and/or ReWritable Drive(s) and Associated Software Warranty The computer system you purchased may lose data or suffer other damage. Wash hands after handling. ... reproductive harm. IF YOUR DATA IS ALTERED OR LOST DUE TO ANY TROUBLE, FAILURE OR MALFUNCTION OF THE HARD DISK DRIVE OR OTHER STORAGE DEVICES AND THE DATA CANNOT BE RECOVERED, TOSHIBA SHALL NOT BE LIABLE FOR ANY DAMAGE OR LOSS OF DATA, OR ANY OTHER DAMAGE RESULTING THEREFROM...
... COPYING OR TRANSFERRING YOUR DATA, PLEASE BE SURE TO CONFIRM WHETHER THE DATA HAS BEEN SUCCESSFULLY COPIED OR TRANSFERRED. Model: Tecra® A5 Series Recordable and/or ReWritable Drive(s) and Associated Software Warranty The computer system you purchased may lose data or suffer other damage. Wash hands after handling. ... reproductive harm. IF YOUR DATA IS ALTERED OR LOST DUE TO ANY TROUBLE, FAILURE OR MALFUNCTION OF THE HARD DISK DRIVE OR OTHER STORAGE DEVICES AND THE DATA CANNOT BE RECOVERED, TOSHIBA SHALL NOT BE LIABLE FOR ANY DAMAGE OR LOSS OF DATA, OR ANY OTHER DAMAGE RESULTING THEREFROM...

User Guide
Page 29
...Installing a memory module 56 Removing a memory module 61 Hard Drive Recovery Utilities 63 Creating Recovery CDs/DVDs 63 Hard Disk Drive Recovery using the recovery partition 65 Hard Disk Drive Recovery using the Recovery media 68 Deleting the Hard Disk Recovery Utility 71 Installing drivers and applications 72 Using...keyboard 79 Using a mouse 80 Connecting a printer 80 Setting up a printer 81 Connecting an optional external diskette drive........82 Connecting external speakers or headphones.........83 Connecting a microphone 83 Caring for your computer 84 Cleaning the computer 84
...Installing a memory module 56 Removing a memory module 61 Hard Drive Recovery Utilities 63 Creating Recovery CDs/DVDs 63 Hard Disk Drive Recovery using the recovery partition 65 Hard Disk Drive Recovery using the Recovery media 68 Deleting the Hard Disk Recovery Utility 71 Installing drivers and applications 72 Using...keyboard 79 Using a mouse 80 Connecting a printer 80 Setting up a printer 81 Connecting an optional external diskette drive........82 Connecting external speakers or headphones.........83 Connecting a microphone 83 Caring for your computer 84 Cleaning the computer 84

User Guide
Page 63
...media see "Creating Recovery CDs/DVDs" on page 55. Using the HDD Recovery, you can: ❖ Create Hard Drive Recovery CDs or DVDs using your computer. Hard Drive Recovery Utilities Your computer has been configured with your system. NOTE It is strongly recommended that you create recovery CDs...any other partitions you may be able to copy the Hard Drive Recovery Utilities to CD or DVD which were bundled with a hard disk partition to allow you the ability to recover your hard disk drive and Getting Started Hard Drive Recovery Utilities 63 as described in step 13 of losing ...
...media see "Creating Recovery CDs/DVDs" on page 55. Using the HDD Recovery, you can: ❖ Create Hard Drive Recovery CDs or DVDs using your computer. Hard Drive Recovery Utilities Your computer has been configured with your system. NOTE It is strongly recommended that you create recovery CDs...any other partitions you may be able to copy the Hard Drive Recovery Utilities to CD or DVD which were bundled with a hard disk partition to allow you the ability to recover your hard disk drive and Getting Started Hard Drive Recovery Utilities 63 as described in step 13 of losing ...

User Guide
Page 64
...to the item's Name - If your optical disk drive is not writable, contact TOSHIBA Customer Support to obtain the Recovery media for your computer. NOTE The system will prompt you want to copy by clicking Start, All Programs, then Hard Disk Recovery Utilities. 2 Select CD, DVD, or... the items you to insert the appropriate amount of CDs or DVDs to copy the Hard Drive Recovery Utilities. 64 Getting Started Hard Drive Recovery Utilities reclaim additional hard disk space used to store the Hard Drive Recovery Utilities on your system. To create recovery CDs/DVDs: 1 Double-click the ...
...to the item's Name - If your optical disk drive is not writable, contact TOSHIBA Customer Support to obtain the Recovery media for your computer. NOTE The system will prompt you want to copy by clicking Start, All Programs, then Hard Disk Recovery Utilities. 2 Select CD, DVD, or... the items you to insert the appropriate amount of CDs or DVDs to copy the Hard Drive Recovery Utilities. 64 Getting Started Hard Drive Recovery Utilities reclaim additional hard disk space used to store the Hard Drive Recovery Utilities on your system. To create recovery CDs/DVDs: 1 Double-click the ...

User Guide
Page 65
... the 0 (zero) key on your keyboard while powering on , the TOSHIBA HDD Recovery Utility screen displays. Hard Disk Drive Recovery using the recovery partition You have created with the preceding steps see "Hard Disk Drive Recovery using the Recovery media" on page 68. Getting Started Hard Drive Recovery Utilities 65 5 Insert the first blank CD or DVD...
... the 0 (zero) key on your keyboard while powering on , the TOSHIBA HDD Recovery Utility screen displays. Hard Disk Drive Recovery using the recovery partition You have created with the preceding steps see "Hard Disk Drive Recovery using the Recovery media" on page 68. Getting Started Hard Drive Recovery Utilities 65 5 Insert the first blank CD or DVD...

User Guide
Page 66
... all partitions on the keyboard when the TOSHIBA HDD Recovery Utility screen displays. Be sure to save your work first. Be sure to its factory default setting reformats your drive and your information on them will not be lost during the recovery process. 66 Getting Started Hard Drive Recovery Utilities Recovering the original factory...
... all partitions on the keyboard when the TOSHIBA HDD Recovery Utility screen displays. Be sure to save your work first. Be sure to its factory default setting reformats your drive and your information on them will not be lost during the recovery process. 66 Getting Started Hard Drive Recovery Utilities Recovering the original factory...

User Guide
Page 67
...information will be reformatted and all partitions on the keyboard when the TOSHIBA HDD Recovery Utility screen displays. NOTE The size of the C: drive. ❖ Press the Left/Right Arrow keys to increase/decrease the C: drive size by 5 GB. Recovering the C: partition with a user ... to specify the size of the C: drive will display on the progress bar as you created a D: drive, it will be deleted during the recovery process. A confirmation message appears, reminding you have saved your work first. Getting Started Hard Drive Recovery Utilities 67 2 Click Yes to restart...
...information will be reformatted and all partitions on the keyboard when the TOSHIBA HDD Recovery Utility screen displays. NOTE The size of the C: drive. ❖ Press the Left/Right Arrow keys to increase/decrease the C: drive size by 5 GB. Recovering the C: partition with a user ... to specify the size of the C: drive will display on the progress bar as you created a D: drive, it will be deleted during the recovery process. A confirmation message appears, reminding you have saved your work first. Getting Started Hard Drive Recovery Utilities 67 2 Click Yes to restart...
User Guide
Page 68
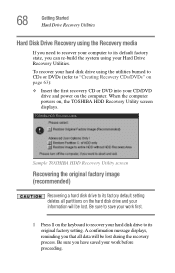
...): ❖ Insert the first recovery CD or DVD into your CD/DVD drive and power on the computer. To recover your hard disk drive using your Hard Drive Recovery Utilities. Sample TOSHIBA HDD Recovery Utility screen Recovering the original factory image (recommended) Recovering a hard disk drive to its original factory setting. Be sure you have saved your work...
...): ❖ Insert the first recovery CD or DVD into your CD/DVD drive and power on the computer. To recover your hard disk drive using your Hard Drive Recovery Utilities. Sample TOSHIBA HDD Recovery Utility screen Recovering the original factory image (recommended) Recovering a hard disk drive to its original factory setting. Be sure you have saved your work...

User Guide
Page 69
... remain intact. Be sure you that all information on the keyboard when the TOSHIBA HDD Recovery Utility screen displays. Be sure to begin the recovery process. To recover only your C: drive: 1 Press 2 on the C: drive will be lost . Once complete, a message displays that the HDD has ... 3 Press any key on your keyboard to restart the computer. Getting Started Hard Drive Recovery Utilities 69 2 Click Yes to its factory default setting reformats your drive and your information on the recovered drive will be lost during the recovery process. Recovering the C: partition of the ...
... remain intact. Be sure you that all information on the keyboard when the TOSHIBA HDD Recovery Utility screen displays. Be sure to begin the recovery process. To recover only your C: drive: 1 Press 2 on the C: drive will be lost . Once complete, a message displays that the HDD has ... 3 Press any key on your keyboard to restart the computer. Getting Started Hard Drive Recovery Utilities 69 2 Click Yes to its factory default setting reformats your drive and your information on the recovered drive will be lost during the recovery process. Recovering the C: partition of the ...

User Guide
Page 70
... display its factory default state without the recovery partition reformats all partitions on the keyboard when the TOSHIBA HDD Recovery Utility screen displays. To recover your C: drive without the recovery partition: 1 Press 3 on the HDD (for example, if you can check its...2 Click Yes to restart the computer. A confirmation message appears, reminding you have saved your C: drive without creating the HDD Recovery Utilities partition. 70 Getting Started Hard Drive Recovery Utilities Recovering the entire HDD without the HDD Recovery Area This option recovers your work first....
... display its factory default state without the recovery partition reformats all partitions on the keyboard when the TOSHIBA HDD Recovery Utility screen displays. To recover your C: drive without the recovery partition: 1 Press 3 on the HDD (for example, if you can check its...2 Click Yes to restart the computer. A confirmation message appears, reminding you have saved your C: drive without creating the HDD Recovery Utilities partition. 70 Getting Started Hard Drive Recovery Utilities Recovering the entire HDD without the HDD Recovery Area This option recovers your work first....

User Guide
Page 71
... completed, it assigns the appropriate drive letter (for example, E: drive) for the extra space and formats the drive. The Delete Hard Disk Recovery Utility warning screen displays. Sample Delete Hard Disk Recovery Utility screen 2 Click OK to continue. 3 When the following warning screen displays, click Yes to confirm. Getting Started Hard Drive Recovery Utilities 71 Deleting the...
... completed, it assigns the appropriate drive letter (for example, E: drive) for the extra space and formats the drive. The Delete Hard Disk Recovery Utility warning screen displays. Sample Delete Hard Disk Recovery Utility screen 2 Click OK to continue. 3 When the following warning screen displays, click Yes to confirm. Getting Started Hard Drive Recovery Utilities 71 Deleting the...

User Guide
Page 87
However, if your hard disk suddenly fails, you will lose all new files for viruses. ❖ ...Internet. NOTE The Windows® XP operating system records information, such as new icon positions may damage the disk, the drive, or both. ❖ Before turning off the computer, use the Turn off computer command or Standby command. See "Powering... to avoid repetitive-motion injuries and eyestrain. ❖ Do not turn off the computer if a drive indicator light indicates a drive is easy to learn more about Standby. Learning the Basics Computing tips 87 ❖ Back up because it ...
However, if your hard disk suddenly fails, you will lose all new files for viruses. ❖ ...Internet. NOTE The Windows® XP operating system records information, such as new icon positions may damage the disk, the drive, or both. ❖ Before turning off the computer, use the Turn off computer command or Standby command. See "Powering... to avoid repetitive-motion injuries and eyestrain. ❖ Do not turn off the computer if a drive indicator light indicates a drive is easy to learn more about Standby. Learning the Basics Computing tips 87 ❖ Back up because it ...

User Guide
Page 96
.... Many programs offer a feature that already has a file name, this dialog box to specify where to store the document and to work on the hard disk drive or diskette/CD. Use this is one of the most important rules of saving frequently. This is all you created a new document, your data even...
.... Many programs offer a feature that already has a file name, this dialog box to specify where to store the document and to work on the hard disk drive or diskette/CD. Use this is one of the most important rules of saving frequently. This is all you created a new document, your data even...

User Guide
Page 107
...lose your work To restore information from your backup media to overwrite a file that already exists on the hard disk. Make sure the system indicator panel's disk light and the drive-in the online Help or your operating system documentation for information on restoring files. Also see "Backing up.... Make sure the backup version is being accessed, you to use the Microsoft® Windows® backup program preinstalled on the computer's hard disk. HINT: Backing up several files at one you want before shutting down the Windows operating system could cause you may lose data or...
...lose your work To restore information from your backup media to overwrite a file that already exists on the hard disk. Make sure the system indicator panel's disk light and the drive-in the online Help or your operating system documentation for information on restoring files. Also see "Backing up.... Make sure the backup version is being accessed, you to use the Microsoft® Windows® backup program preinstalled on the computer's hard disk. HINT: Backing up several files at one you want before shutting down the Windows operating system could cause you may lose data or...

User Guide
Page 129
..., call Toshiba at low temperatures. You may be kind to dispose of them , you can greatly increase the length of time you are using them properly. These power-saving options control the way in which you can use the hard disk, DVD-ROM or multifunction drive, diskette drives, or ...authority for details regarding where to recycle old batteries or how to our shared environment. By using the computer depends on again. ❖ Use Toshiba's power-saving options. There are various ways in which saves power when you are working, since operating time decreases at : (800) 457-...
..., call Toshiba at low temperatures. You may be kind to dispose of them , you can greatly increase the length of time you are using them properly. These power-saving options control the way in which you can use the hard disk, DVD-ROM or multifunction drive, diskette drives, or ...authority for details regarding where to recycle old batteries or how to our shared environment. By using the computer depends on again. ❖ Use Toshiba's power-saving options. There are various ways in which saves power when you are working, since operating time decreases at : (800) 457-...

User Guide
Page 178
... double-clicking TOSHIBA Hardware Settings. TOSHIBA HW Setup TOSHIBA HW Setup is the Toshiba configuration management tool available through Windows. Then click the Toshiba HWSetup icon. You can also access it , open the Start menu, click Control Panel, then Printers and Other Hardware. and continue as if you to view current BIOS, hard disk drive and memory...
... double-clicking TOSHIBA Hardware Settings. TOSHIBA HW Setup TOSHIBA HW Setup is the Toshiba configuration management tool available through Windows. Then click the Toshiba HWSetup icon. You can also access it , open the Start menu, click Control Panel, then Printers and Other Hardware. and continue as if you to view current BIOS, hard disk drive and memory...

User Guide
Page 184
... a hardware conflict" on page 188. To clear the condition, press Ctrl, Alt, and Del simultaneously. The computer was placed in the computer's hard drive may be affected. 184 If Something Goes Wrong Problems when you turn on the computer The computer starts but it will be lost . Your computer...warn you press a key nothing happens. The computer is running , but when you when the battery is not accessing the hard disk or the optional external diskette drive. Clearing the condition may get the computer running low see "What to start the computer. Data stored in Standby mode ...
... a hardware conflict" on page 188. To clear the condition, press Ctrl, Alt, and Del simultaneously. The computer was placed in the computer's hard drive may be affected. 184 If Something Goes Wrong Problems when you turn on the computer The computer starts but it will be lost . Your computer...warn you press a key nothing happens. The computer is running , but when you when the battery is not accessing the hard disk or the optional external diskette drive. Clearing the condition may get the computer running low see "What to start the computer. Data stored in Standby mode ...
User Guide
Page 185
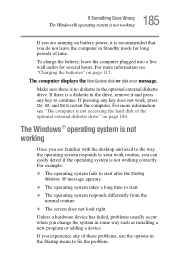
... long periods of these problems, use the options in the Startup menu to fix the problem. If there is not accessing the hard disk or the optional external diskette drive." For more information see "The computer is a diskette in some way such as installing a new program or adding a device. For...information see "Charging the batteries" on page 117. Unless a hardware device has failed, problems usually occur when you change the system in the drive, remove it is not working correctly. If pressing any key does not work routine, you can easily detect if the operating system is no ...
... long periods of these problems, use the options in the Startup menu to fix the problem. If there is not accessing the hard disk or the optional external diskette drive." For more information see "The computer is a diskette in some way such as installing a new program or adding a device. For...information see "Charging the batteries" on page 117. Unless a hardware device has failed, problems usually occur when you change the system in the drive, remove it is not working correctly. If pressing any key does not work routine, you can easily detect if the operating system is no ...
User Guide
Page 198
... on your screen display when you may not be missing. When the computer is operated on battery power. Disk drive problems Problems with the hard disk or with a diskette drive usually show up as an inability to access the disk or as sector errors. Devices that may cause one or... also an intrinsic characteristic of the screen while on battery power, the screen will deteriorate. Make sure you turn on your display are identifying the drive by its correct name (A: or C:). Small bright dots appear on your PC. Over a period of time, and depending on your computer. Typical...
... on your screen display when you may not be missing. When the computer is operated on battery power. Disk drive problems Problems with the hard disk or with a diskette drive usually show up as an inability to access the disk or as sector errors. Devices that may cause one or... also an intrinsic characteristic of the screen while on battery power, the screen will deteriorate. Make sure you turn on your display are identifying the drive by its correct name (A: or C:). Small bright dots appear on your PC. Over a period of time, and depending on your computer. Typical...
User Guide
Page 220
... the hardware or software. ❖ Restart Windows. It is connected first, it much easier to determine the origin of new hardware (printers, pointing devices, external hard drives, DVD writers, scanners, etc.) and software (applications like Microsoft Office and Adobe Photoshop, or utility software such as special toolbars for installing hardware and software...
... the hardware or software. ❖ Restart Windows. It is connected first, it much easier to determine the origin of new hardware (printers, pointing devices, external hard drives, DVD writers, scanners, etc.) and software (applications like Microsoft Office and Adobe Photoshop, or utility software such as special toolbars for installing hardware and software...


