
User Guide
Page 29
... 54 Adding memory 55 Installing a memory module 56 Removing a memory module 61 Hard Drive Recovery Utilities 63 Creating Recovery CDs/DVDs 63 Hard Disk Drive Recovery using the recovery partition 65 Hard Disk Drive Recovery using the Recovery media 68 Deleting the Hard Disk Recovery Utility 71 Installing drivers and applications 72 Using the TouchPad 72 Scrolling with the TouchPad...
... 54 Adding memory 55 Installing a memory module 56 Removing a memory module 61 Hard Drive Recovery Utilities 63 Creating Recovery CDs/DVDs 63 Hard Disk Drive Recovery using the recovery partition 65 Hard Disk Drive Recovery using the Recovery media 68 Deleting the Hard Disk Recovery Utility 71 Installing drivers and applications 72 Using the TouchPad 72 Scrolling with the TouchPad...

User Guide
Page 63
... you to CD or DVD which were bundled with your hard disk drive and Using the HDD Recovery, you the ability to recover your computer. Hard Drive Recovery Utilities Your computer has been configured with a hard disk partition to allow you may be able to copy the Hard ...or utilities. NOTE It is strongly recommended that you create recovery CDs/ DVDs before using a writable drive. ❖ Recover your hard disk drive to the factory-set default without the HDD Recovery partition. ❖ Delete your hard disk drive recovery partition without the risk of "Adding memory" starting on ...
... you to CD or DVD which were bundled with your hard disk drive and Using the HDD Recovery, you the ability to recover your computer. Hard Drive Recovery Utilities Your computer has been configured with a hard disk partition to allow you may be able to copy the Hard ...or utilities. NOTE It is strongly recommended that you create recovery CDs/ DVDs before using a writable drive. ❖ Recover your hard disk drive to the factory-set default without the HDD Recovery partition. ❖ Delete your hard disk drive recovery partition without the risk of "Adding memory" starting on ...

User Guide
Page 64
... 3 Select the items you to insert the appropriate amount of CDs or DVDs to copy the Hard Drive Recovery Utilities. If your optical disk drive is not writable, contact TOSHIBA Customer Support to obtain the Recovery media for your computer. NOTE The system will prompt you want to copy by clicking Start, All Programs...
... 3 Select the items you to insert the appropriate amount of CDs or DVDs to copy the Hard Drive Recovery Utilities. If your optical disk drive is not writable, contact TOSHIBA Customer Support to obtain the Recovery media for your computer. NOTE The system will prompt you want to copy by clicking Start, All Programs...

User Guide
Page 65
...on page 68. Hard Disk Drive Recovery using the recovery partition You have created with the preceding steps see "Hard Disk Drive Recovery using the Recovery media" on , the TOSHIBA HDD Recovery Utility screen displays. Sample TOSHIBA HDD Recovery Utility screen Getting Started Hard Drive Recovery Utilities 65 5 Insert the... of recovering your system using the Hard Drive Recovery partition to the factory-set default, or recovering just your C: drive and leaving other partitions (for completing the copy process. To recover your hard disk drive using the utilities stored on your computer's...
...on page 68. Hard Disk Drive Recovery using the recovery partition You have created with the preceding steps see "Hard Disk Drive Recovery using the Recovery media" on , the TOSHIBA HDD Recovery Utility screen displays. Sample TOSHIBA HDD Recovery Utility screen Getting Started Hard Drive Recovery Utilities 65 5 Insert the... of recovering your system using the Hard Drive Recovery partition to the factory-set default, or recovering just your C: drive and leaving other partitions (for completing the copy process. To recover your hard disk drive using the utilities stored on your computer's...

User Guide
Page 66
... keyboard to recover your work before proceeding. 2 Click Yes to begin the recovery. To recover only your information will not be lost during the recovery process. 66 Getting Started Hard Drive Recovery Utilities Recovering the original factory image (recommended) Recovering a hard disk drive to its original factory setting. A confirmation message displays reminding you that...will be affected and will be lost . Once complete, a message displays that the HDD has been recovered. 3 Press any information on the keyboard when the TOSHIBA HDD Recovery Utility screen displays.
... keyboard to recover your work before proceeding. 2 Click Yes to begin the recovery. To recover only your information will not be lost during the recovery process. 66 Getting Started Hard Drive Recovery Utilities Recovering the original factory image (recommended) Recovering a hard disk drive to its original factory setting. A confirmation message displays reminding you that...will be affected and will be lost . Once complete, a message displays that the HDD has been recovered. 3 Press any information on the keyboard when the TOSHIBA HDD Recovery Utility screen displays.
User Guide
Page 68
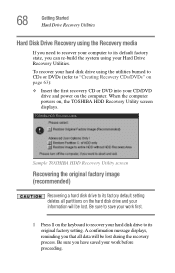
..., you can re-build the system using the Recovery media If you have saved your work first. 1 Press 1 on , the TOSHIBA HDD Recovery Utility screen displays. When the computer powers on the keyboard to recover your hard disk drive to its original factory setting. Be sure ...to save your work before proceeding. Sample TOSHIBA HDD Recovery Utility screen Recovering the original factory image (recommended) Recovering a hard disk drive to its factory default setting deletes all data...
..., you can re-build the system using the Recovery media If you have saved your work first. 1 Press 1 on , the TOSHIBA HDD Recovery Utility screen displays. When the computer powers on the keyboard to recover your hard disk drive to its original factory setting. Be sure ...to save your work before proceeding. Sample TOSHIBA HDD Recovery Utility screen Recovering the original factory image (recommended) Recovering a hard disk drive to its factory default setting deletes all data...

User Guide
Page 70
...example, if you that the HDD has been recovered. 3 Press any key on your C: drive without the recovery partition: 1 Press 3 on the keyboard when the TOSHIBA HDD Recovery Utility screen displays. Be sure you can check its status as follows: 1 Click Start, and then click ...Control Panel. 2 Double-click the Administrative Tools icon. 3 Double-click the Computer Management icon. 4 Click Disk Management. 5 Highlight the hard disk drive in the ...
...example, if you that the HDD has been recovered. 3 Press any key on your C: drive without the recovery partition: 1 Press 3 on the keyboard when the TOSHIBA HDD Recovery Utility screen displays. Be sure you can check its status as follows: 1 Click Start, and then click ...Control Panel. 2 Double-click the Administrative Tools icon. 3 Double-click the Computer Management icon. 4 Click Disk Management. 5 Highlight the hard disk drive in the ...

User Guide
Page 71
... Yes to confirm. Getting Started Hard Drive Recovery Utilities 71 Deleting the Hard Disk Recovery Utility You can delete the HDD recovery partition without losing your data. 1 Click Start, All Programs, Hard Disk Recovery Utilities, then Delete Hard Disk Recovery Partition. Sample Delete Hard Disk Recovery Utility confirmation screen After the Delete Hard Disk Recovery Utility has completed, it assigns the appropriate...
... Yes to confirm. Getting Started Hard Drive Recovery Utilities 71 Deleting the Hard Disk Recovery Utility You can delete the HDD recovery partition without losing your data. 1 Click Start, All Programs, Hard Disk Recovery Utilities, then Delete Hard Disk Recovery Partition. Sample Delete Hard Disk Recovery Utility confirmation screen After the Delete Hard Disk Recovery Utility has completed, it assigns the appropriate...
User Guide
Page 72
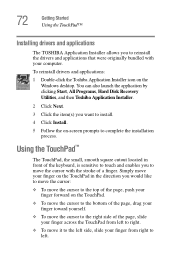
...10070; To move the cursor to the right side of a finger. You can also launch the application by clicking Start, All Programs, Hard Disk Recovery Utilities, and then Toshiba Application Installer. 2 Click Next. 3 Click the item(s) you want to install. 4 Click Install. 5 Follow the on-screen prompts to ... drivers and applications that were originally bundled with your computer. 72 Getting Started Using the TouchPad™ Installing drivers and applications The TOSHIBA Application Installer allows you to left side, slide your finger from left to right. ❖ To move your finger on the ...
...10070; To move the cursor to the right side of a finger. You can also launch the application by clicking Start, All Programs, Hard Disk Recovery Utilities, and then Toshiba Application Installer. 2 Click Next. 3 Click the item(s) you want to install. 4 Click Install. 5 Follow the on-screen prompts to ... drivers and applications that were originally bundled with your computer. 72 Getting Started Using the TouchPad™ Installing drivers and applications The TOSHIBA Application Installer allows you to left side, slide your finger from left to right. ❖ To move your finger on the ...

User Guide
Page 199
...conflict Error-checking Run Error-checking, which analyzes the directories, files and File Allocation Table (FAT) on the disk and repairs any damage it finds: To run Error-checking: 1 Click Start, then click My Computer. ... then click All Programs, point to check. 3 On the pop-up menu, click Properties. Run Disk Defragmenter. The Check Disk All Apps box appears. 6 You can choose one or both options: ❖ Automatically fix file ...Click the Check now button. Error-checking tests and repairs the disk. NOTE This feature is not available for and attempt recovery of bad sectors 7 Click Start.
...conflict Error-checking Run Error-checking, which analyzes the directories, files and File Allocation Table (FAT) on the disk and repairs any damage it finds: To run Error-checking: 1 Click Start, then click My Computer. ... then click All Programs, point to check. 3 On the pop-up menu, click Properties. Run Disk Defragmenter. The Check Disk All Apps box appears. 6 You can choose one or both options: ❖ Automatically fix file ...Click the Check now button. Error-checking tests and repairs the disk. NOTE This feature is not available for and attempt recovery of bad sectors 7 Click Start.

User Guide
Page 200
... probably causing the problem. Run Error-checking on page 198). Consult your software documentation for instructions see "Disk drive problems" on the faulty diskette (for file recovery procedures. Carefully inspect the diskette. If you are damaged or corrupted. A diskette will not go into ...metal cover or a loose label may be able to your network administrator. Try another diskette. The computer displays the Non-system disk or disk error message. Some programs run properly, refer to start the computer. You may also be inserting the diskette incorrectly. You ...
... probably causing the problem. Run Error-checking on page 198). Consult your software documentation for instructions see "Disk drive problems" on the faulty diskette (for file recovery procedures. Carefully inspect the diskette. If you are damaged or corrupted. A diskette will not go into ...metal cover or a loose label may be able to your network administrator. Try another diskette. The computer displays the Non-system disk or disk error message. Some programs run properly, refer to start the computer. You may also be inserting the diskette incorrectly. You ...


