Owner's Manual - English
Page 1
EXIT ENTER MENU INPUT ON/STANDBY ON LAMP FAN TEMP BUSY 1 CONTENTS Before use CONTROL C(OYM/PPBU/PTERR) IN 1 AUINDIO VIDEOVIIDNEO S-VIDEO R - L OWNER'S MANUAL 3LCD PROJECTOR TLP-MT7E 23565376 SAEUTTO KEYSATUOTNOE VOL/ADJ. AUDIO -
EXIT ENTER MENU INPUT ON/STANDBY ON LAMP FAN TEMP BUSY 1 CONTENTS Before use CONTROL C(OYM/PPBU/PTERR) IN 1 AUINDIO VIDEOVIIDNEO S-VIDEO R - L OWNER'S MANUAL 3LCD PROJECTOR TLP-MT7E 23565376 SAEUTTO KEYSATUOTNOE VOL/ADJ. AUDIO -

Owner's Manual - English
Page 7
...qualified technician to restore the product to qualified service personnel under the following the operating instructions. If glass components, including lens and lamp, should break, please handle with care to injury. f) When the product exhibits a distinct change in proper operating condition. If...performance - Refer all servicing to rain or water. this product yourself as an improper adjustment of the lamp rupturing, thoroughly clean the area around the projector and discard any edible items placed in fire, electric shock, or other hazards. Safety Check Upon completion...
...qualified technician to restore the product to qualified service personnel under the following the operating instructions. If glass components, including lens and lamp, should break, please handle with care to injury. f) When the product exhibits a distinct change in proper operating condition. If...performance - Refer all servicing to rain or water. this product yourself as an improper adjustment of the lamp rupturing, thoroughly clean the area around the projector and discard any edible items placed in fire, electric shock, or other hazards. Safety Check Upon completion...

Owner's Manual - English
Page 9
... 34 Displaying Information 35 Others Before calling service personal 70 Pin assignment of COMPONENT IN connector 72 Applicable signal 73 Controlling the projector by using RS-232C 75 Specifications 80 Factory reset mode 61 PIP menu setting 63 Maintenance Trouble indications 64 Air filter cleaning... 65 Lens and main unit cleaning 67 Lamp replacement 68 Operations Projection on the menu screen 36 Operating the menu screen 37 QUICK MENU adjustments and settings 38 FULL MENU...
... 34 Displaying Information 35 Others Before calling service personal 70 Pin assignment of COMPONENT IN connector 72 Applicable signal 73 Controlling the projector by using RS-232C 75 Specifications 80 Factory reset mode 61 PIP menu setting 63 Maintenance Trouble indications 64 Air filter cleaning... 65 Lens and main unit cleaning 67 Lamp replacement 68 Operations Projection on the menu screen 36 Operating the menu screen 37 QUICK MENU adjustments and settings 38 FULL MENU...
Owner's Manual - English
Page 10
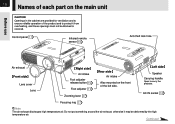
Control panel 11 LAMP FAN TEMP BUSY Infrared remote sensor 15 Anti-theft lock hole MENU INPUT ON/STANDBY ON EXIT ENTER KEYSATUOTNOE VOL/ADJ. Left side Speaker Carrying handle Open to carry the projector. AUDIO - SAEUTTO Rear side Air intake Also mounted on the main unit Before use CAUTION Openings... high temperature air. L Right side Air intake Foot adjuster release button 19 Foot adjuster 19 Zooming lever 27 ENTER MENU INPUT TEMP BUSY LAMP FAN ON/STANDBY ON EXIT KEYASUTOTONE VOL/ADJ. 10 Names of each part on the front of the product and to protect it may ...
Control panel 11 LAMP FAN TEMP BUSY Infrared remote sensor 15 Anti-theft lock hole MENU INPUT ON/STANDBY ON EXIT ENTER KEYSATUOTNOE VOL/ADJ. Left side Speaker Carrying handle Open to carry the projector. AUDIO - SAEUTTO Rear side Air intake Also mounted on the main unit Before use CAUTION Openings... high temperature air. L Right side Air intake Foot adjuster release button 19 Foot adjuster 19 Zooming lever 27 ENTER MENU INPUT TEMP BUSY LAMP FAN ON/STANDBY ON EXIT KEYASUTOTONE VOL/ADJ. 10 Names of each part on the front of the product and to protect it may ...
Owner's Manual - English
Page 11
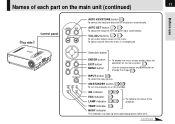
...28 To turn the projector on the main unit (continued) 11 CONTENTS Before use Top side Control panel AUTO KEYSTONE AUTO SET VOL/ADJ. TEMP indicator 64 BUSY indicator This indicator may light up when operating process takes time. Continued ON indicator 25 28 FAN indicator 25 LAMP indicator 25 28 ...To indicate the status of the Computer input automatically. Names of each part on or off (standby). AUTO SET button 27 33 To adjust the image of the projector. VOL/ADJ buttons 27 37 To set and/or...
...28 To turn the projector on the main unit (continued) 11 CONTENTS Before use Top side Control panel AUTO KEYSTONE AUTO SET VOL/ADJ. TEMP indicator 64 BUSY indicator This indicator may light up when operating process takes time. Continued ON indicator 25 28 FAN indicator 25 LAMP indicator 25 28 ...To indicate the status of the Computer input automatically. Names of each part on or off (standby). AUTO SET button 27 33 To adjust the image of the projector. VOL/ADJ buttons 27 37 To set and/or...
Owner's Manual - English
Page 15
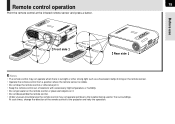
...About 5m PIP FREEKZEEYSTONMINEUPTUETAUTO CALL RESIZE VOL/ADJ MENU STANODNB/Y SET EXIT About 15° About 15° ENTER MENU INPUT TEMP BUSY LAMP FAN ON/STANDBY ON EXIT KEYASUTOTONE VOL/ADJ. SAEUTTO Rear side Notes • The remote control may not operate when there is ... . • Do not disassemble the remote control. • Under unusual circumstances the remote control may not operate well due to the projector and retry the operation. SAEUTTO Before use ENTER CT-90072 About About 15° 15° About 5m PIP FREEKZEEYSTONMINEUPTUETAUTO CALL RESIZE VOL...
...About 5m PIP FREEKZEEYSTONMINEUPTUETAUTO CALL RESIZE VOL/ADJ MENU STANODNB/Y SET EXIT About 15° About 15° ENTER MENU INPUT TEMP BUSY LAMP FAN ON/STANDBY ON EXIT KEYASUTOTONE VOL/ADJ. SAEUTTO Rear side Notes • The remote control may not operate when there is ... . • Do not disassemble the remote control. • Under unusual circumstances the remote control may not operate well due to the projector and retry the operation. SAEUTTO Before use ENTER CT-90072 About About 15° 15° About 5m PIP FREEKZEEYSTONMINEUPTUETAUTO CALL RESIZE VOL...
Owner's Manual - English
Page 17
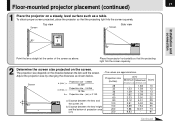
Screen Top view Side view Screen 17 CONTENTS FAN TEMP LAMP ON ON/STANDBY INPUT EXIT AUTO SET VOL/ADJ. Place the projector horizontally so that the projecting light hits the screen squarely. Screen Projection size - 0.8660 a (min.) = 25.339 a (max.) = Projection size - 0.6766 ...Point the lens straight at the center of projection area (cm) • The values are approximations. To obtain proper screen projected, place the projector so that the projecting light hits the screen squarely. 2 Determine the screen size projected on a steady, level surface such as a table. ...
Screen Top view Side view Screen 17 CONTENTS FAN TEMP LAMP ON ON/STANDBY INPUT EXIT AUTO SET VOL/ADJ. Place the projector horizontally so that the projecting light hits the screen squarely. Screen Projection size - 0.8660 a (min.) = 25.339 a (max.) = Projection size - 0.6766 ...Point the lens straight at the center of projection area (cm) • The values are approximations. To obtain proper screen projected, place the projector so that the projecting light hits the screen squarely. 2 Determine the screen size projected on a steady, level surface such as a table. ...

Owner's Manual - English
Page 18
...be distorted. In such a case, leave the projector for several seconds and then the ON indicator lights in orange and the projector turns to see. ENTER MENU INPUT TEMP BUSY LAMP FAN ON/STANDBY ON EXIT KEYASUTOTONE VOL/ADJ. SAEUTTO TEMP LAMP ON BUSY FAN Power cord (Supplied) Light (Orange...) The three indicators, TEMP, LAMP, and ON, light in green for an ...
...be distorted. In such a case, leave the projector for several seconds and then the ON indicator lights in orange and the projector turns to see. ENTER MENU INPUT TEMP BUSY LAMP FAN ON/STANDBY ON EXIT KEYASUTOTONE VOL/ADJ. SAEUTTO TEMP LAMP ON BUSY FAN Power cord (Supplied) Light (Orange...) The three indicators, TEMP, LAMP, and ON, light in green for an ...
Owner's Manual - English
Page 19
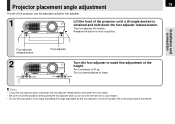
... release button and lower the front slowly. • Be sure to let the front fall on your fingers. • Do not tilt the projector at an angle exceeding the range adjustable by the foot adjusters, since the duration life of the height. Installation and connection Foot adjuster release button...Lower Foot adjuster Turn the foot adjuster to make fine adjustment of the lamp may be adjusted using the foot adjuster. 19 CONTENTS 1 Lift the front of the projector until a tilt angle desired is obtained and hold the projector when putting the foot adjuster back so as not to hold down the...
... release button and lower the front slowly. • Be sure to let the front fall on your fingers. • Do not tilt the projector at an angle exceeding the range adjustable by the foot adjusters, since the duration life of the height. Installation and connection Foot adjuster release button...Lower Foot adjuster Turn the foot adjuster to make fine adjustment of the lamp may be adjusted using the foot adjuster. 19 CONTENTS 1 Lift the front of the projector until a tilt angle desired is obtained and hold the projector when putting the foot adjuster back so as not to hold down the...
Owner's Manual - English
Page 25
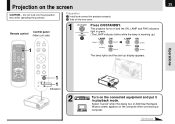
...projector turns on the connected equipment and put it in green. (The LAMP indicator blinks while the lamp is warming up.) LAMP (Green) Flashing ON (Green) FAN (Green) LAMP (Green) ON (Green) FAN (Green) The lamp lights and the start up display appears. SAEUTTO 2 Turn on and the ON, LAMP... BUSY FAN 1 1 Indicators TEMP BUSY LAMP FAN ENTER MENU INPUT ON/STANDBY ON EXIT KEYASUTOTONE VOL/ADJ. Continued Operations 25 Projection on the computer when connecting a computer. Preparation 1 Install and connect the projector properly. 2 Take off the lens cover. Control ...
...projector turns on the connected equipment and put it in green. (The LAMP indicator blinks while the lamp is warming up.) LAMP (Green) Flashing ON (Green) FAN (Green) LAMP (Green) ON (Green) FAN (Green) The lamp lights and the start up display appears. SAEUTTO 2 Turn on and the ON, LAMP... BUSY FAN 1 1 Indicators TEMP BUSY LAMP FAN ENTER MENU INPUT ON/STANDBY ON EXIT KEYASUTOTONE VOL/ADJ. Continued Operations 25 Projection on the computer when connecting a computer. Preparation 1 Install and connect the projector properly. 2 Take off the lens cover. Control ...
Owner's Manual - English
Page 26
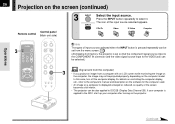
... applied to the VIDEO jack can be selected.) (Signal sent from the computer) • If you project an image from a computer with an LCD screen while monitoring the image on the computer, the image may not be projected properly, depending on a computer is displayed enlarged or reduced, so ...on the computer model. The icon of the input source selected appears. ENTER EXIT MENU INPUT ON/STANDBY TEMP LAMP ON BUSY FAN 3 3 INPUT Select the input source. 26 Projection on the projector. In this case, turn off the computer display. Press the INPUT button repeatedly to the DDC, start ...
... applied to the VIDEO jack can be selected.) (Signal sent from the computer) • If you project an image from a computer with an LCD screen while monitoring the image on the computer, the image may not be projected properly, depending on a computer is displayed enlarged or reduced, so ...on the computer model. The icon of the input source selected appears. ENTER EXIT MENU INPUT ON/STANDBY TEMP LAMP ON BUSY FAN 3 3 INPUT Select the input source. 26 Projection on the projector. In this case, turn off the computer display. Press the INPUT button repeatedly to the DDC, start ...
Owner's Manual - English
Page 27
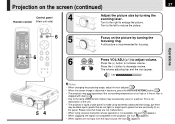
...input source, the icon appears. A still picture is clogged with dust. 64 • Due to the lamp characteristic, flickers may occasionally occur in keystone, press the AUTO KEYSTONE button. 29 • The projector may be black spots (pixels that do not light) or bright spots (pixels that these are not malfunctions... volume. Press the (-) button to reduce the picture. Focus on the picture by turning the zooming lever. Turn to the right to the projector, the icon appears. • When signals are constantly lit) on the panel. This is not malfunction of the unit. • The...
...input source, the icon appears. A still picture is clogged with dust. 64 • Due to the lamp characteristic, flickers may occasionally occur in keystone, press the AUTO KEYSTONE button. 29 • The projector may be black spots (pixels that do not light) or bright spots (pixels that these are not malfunctions... volume. Press the (-) button to reduce the picture. Focus on the picture by turning the zooming lever. Turn to the right to the projector, the icon appears. • When signals are constantly lit) on the panel. This is not malfunction of the unit. • The...
Owner's Manual - English
Page 28
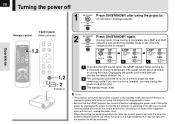
...of power in a hurry, however, you to expel the heat remaining inside. Notes • The projector consumes about 20W of time. • Be sure that the LAMP indicator has turned off Operations Remote control Control panel (Main unit side) AUTO KEYSTONE AUTO SET INPUT ... 1,2 VOL/ADJ. Cutting the power by unplugging the power cord while the projector is operating or the light source lamp is necessary. When the lamp is set . (The ON indicator turns in orange.) LAMP ON (Green) (Orange) LAMP ON (off) (Orange) LAMP ON (off) (Orange) Flashing FAN A (Green) B FAN (Green)...
...of power in a hurry, however, you to expel the heat remaining inside. Notes • The projector consumes about 20W of time. • Be sure that the LAMP indicator has turned off Operations Remote control Control panel (Main unit side) AUTO KEYSTONE AUTO SET INPUT ... 1,2 VOL/ADJ. Cutting the power by unplugging the power cord while the projector is operating or the light source lamp is necessary. When the lamp is set . (The ON indicator turns in orange.) LAMP ON (Green) (Orange) LAMP ON (off) (Orange) LAMP ON (off) (Orange) Flashing FAN A (Green) B FAN (Green)...
Owner's Manual - English
Page 29
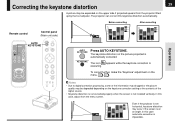
..., keystone distortion may occur if the screen is executing. In this keystone distortion automatically. The projector can correct this case automatic correction is impossible. In this case, adjust from the projector lifted up by the foot adjuster. SAEUTTO AUTO KEYSTONE Press AUTO KEYSTONE. To correct further,... SET VOL/ADJ. MENU VOL/ADJ ENTER EXIT MENU INPUT ENTER CT-90072 EXIT ON/STANDBY TEMP LAMP ON BUSY FAN ENTER MENU INPUT TEMP BUSY LAMP FAN ON/STANDBY ON EXIT KEYASUTOTONE VOL/ADJ. The keystone distortion on the picture projected is not installed...
..., keystone distortion may occur if the screen is executing. In this keystone distortion automatically. The projector can correct this case automatic correction is impossible. In this case, adjust from the projector lifted up by the foot adjuster. SAEUTTO AUTO KEYSTONE Press AUTO KEYSTONE. To correct further,... SET VOL/ADJ. MENU VOL/ADJ ENTER EXIT MENU INPUT ENTER CT-90072 EXIT ON/STANDBY TEMP LAMP ON BUSY FAN ENTER MENU INPUT TEMP BUSY LAMP FAN ON/STANDBY ON EXIT KEYASUTOTONE VOL/ADJ. The keystone distortion on the picture projected is not installed...
Owner's Manual - English
Page 33
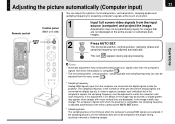
...EXIT ENTER EXIT MENU INPUT ON/STANDBY TEMP LAMP ON BUSY FAN ENTER MENU INPUT TEMP BUSY LAMP FAN ON/STANDBY ON EXIT KEYASUTOTONE VOL/ADJ. If this adjustment is off , the individual dots cannot be sampled at which the projector is compatible, the sampling frequency is adjusted automatically...* Sampling phase The sampling phase is the number of times per second the analog signals are converted into digital signals inside the projector. If the sampling phase is off , details of a button. SAEUTTO Notes • Automatic adjustment may change. For computer's signals with which ...
...EXIT ENTER EXIT MENU INPUT ON/STANDBY TEMP LAMP ON BUSY FAN ENTER MENU INPUT TEMP BUSY LAMP FAN ON/STANDBY ON EXIT KEYASUTOTONE VOL/ADJ. If this adjustment is off , the individual dots cannot be sampled at which the projector is compatible, the sampling frequency is adjusted automatically...* Sampling phase The sampling phase is the number of times per second the analog signals are converted into digital signals inside the projector. If the sampling phase is off , details of a button. SAEUTTO Notes • Automatic adjustment may change. For computer's signals with which ...
Owner's Manual - English
Page 35
...can be reset when the lamp is replaced. • The "Version" is the version of the control program used in the projector and is used for lamp replacement. (It should not be used as a lamp warranty time counter.) If the time indicated here nears 1000, contact your store of purchase... about obtaining a replacement lamp (TLPLX10, sold separately). • The "Lamp time" can be displayed. ...
...can be reset when the lamp is replaced. • The "Version" is the version of the control program used in the projector and is used for lamp replacement. (It should not be used as a lamp warranty time counter.) If the time indicated here nears 1000, contact your store of purchase... about obtaining a replacement lamp (TLPLX10, sold separately). • The "Lamp time" can be displayed. ...
Owner's Manual - English
Page 43
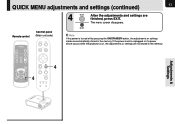
... adjustments and settings are automatically stored in the memory. If the power cord is unplugged or if a power failure occurs while the projector is turned off by pressing the ON/STANDBY button, the adjustments or settings made are finished, press EXIT. SAEUTTO The menu screen disappears.... Adjustments & Settings ENTER MENU INPUT TEMP BUSY LAMP FAN ON/STANDBY ON EXIT KEYASUTOTONE VOL/ADJ. QUICK MENU adjustments and settings (continued) 43 Remote control Control panel (Main unit side)...
... adjustments and settings are automatically stored in the memory. If the power cord is unplugged or if a power failure occurs while the projector is turned off by pressing the ON/STANDBY button, the adjustments or settings made are finished, press EXIT. SAEUTTO The menu screen disappears.... Adjustments & Settings ENTER MENU INPUT TEMP BUSY LAMP FAN ON/STANDBY ON EXIT KEYASUTOTONE VOL/ADJ. QUICK MENU adjustments and settings (continued) 43 Remote control Control panel (Main unit side)...

Owner's Manual - English
Page 49
... and settings - The menu screen disappears. SAEUTTO Adjustments & Settings ENTER MENU INPUT TEMP BUSY LAMP FAN ON/STANDBY ON EXIT KEYASUTOTONE VOL/ADJ. If the power cord is unplugged or if a power failure occurs while the projector is turned off by pressing the ON/STANDBY button, the adjustments or settings made are...
... and settings - The menu screen disappears. SAEUTTO Adjustments & Settings ENTER MENU INPUT TEMP BUSY LAMP FAN ON/STANDBY ON EXIT KEYASUTOTONE VOL/ADJ. If the power cord is unplugged or if a power failure occurs while the projector is turned off by pressing the ON/STANDBY button, the adjustments or settings made are...
Owner's Manual - English
Page 51
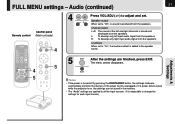
... L+R: The sound of the left input audio signal from the speakers. If the power cord is unplugged or if a power failure occurs while the projector is produced from the speakers. L: To develop only left and right channels is added to adjust and set. EXIT Notes • If the power ...MUTE PIP CALL RESIZE MENU VOL/ADJ ENTER CT-90072 EXIT VOL/ADJ. 4 ENTER EXIT 4 5 MENU INPUT ON/STANDBY TEMP LAMP ON BUSY FAN 5 ENTER MENU INPUT TEMP BUSY LAMP FAN ON/STANDBY ON EXIT KEYASUTOTONE VOL/ADJ. Speaker output When set to "On", the loudness effect is mixed and developed...
... L+R: The sound of the left input audio signal from the speakers. If the power cord is unplugged or if a power failure occurs while the projector is produced from the speakers. L: To develop only left and right channels is added to adjust and set. EXIT Notes • If the power ...MUTE PIP CALL RESIZE MENU VOL/ADJ ENTER CT-90072 EXIT VOL/ADJ. 4 ENTER EXIT 4 5 MENU INPUT ON/STANDBY TEMP LAMP ON BUSY FAN 5 ENTER MENU INPUT TEMP BUSY LAMP FAN ON/STANDBY ON EXIT KEYASUTOTONE VOL/ADJ. Speaker output When set to "On", the loudness effect is mixed and developed...
Owner's Manual - English
Page 52
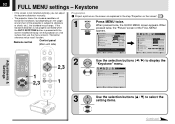
...RESIZE MENU VOL/ADJ ENTER CT-90072 EXIT VOL/ADJ. 1 2,3 ENTER EXIT MENU INPUT ON/STANDBY TEMP LAMP ON BUSY FAN 2,3 1 ENTER MENU INPUT TEMP BUSY LAMP FAN ON/STANDBY ON EXIT KEYASUTOTONE VOL/ADJ. If the keystone distortion is not properly corrected when the ..., you can adjust the keystone distortion manually. • The projector stores the standard conditions of horizontal installation, but depending on the usage environment (if the projector is pressed with the screen installed vertically, set the projector on the screen". 25 1 MENU MENU Press MENU twice. ...
...RESIZE MENU VOL/ADJ ENTER CT-90072 EXIT VOL/ADJ. 1 2,3 ENTER EXIT MENU INPUT ON/STANDBY TEMP LAMP ON BUSY FAN 2,3 1 ENTER MENU INPUT TEMP BUSY LAMP FAN ON/STANDBY ON EXIT KEYASUTOTONE VOL/ADJ. If the keystone distortion is not properly corrected when the ..., you can adjust the keystone distortion manually. • The projector stores the standard conditions of horizontal installation, but depending on the usage environment (if the projector is pressed with the screen installed vertically, set the projector on the screen". 25 1 MENU MENU Press MENU twice. ...


