Owner's Manual - English
Page 4
... ventilation and to the operating instructions. 4. This set has been designed and manufactured to operate from overheating, and these openings must not be repaired by placing the product on . DO NOT REMOVE THE CABINET COVER, OR YOU MAY BE EXPOSED TO DANGEROUS VOLTAGE. Power Sources This product should not be blocked by the user. Continued The strong light from the lamp may cause damage...
... ventilation and to the operating instructions. 4. This set has been designed and manufactured to operate from overheating, and these openings must not be repaired by placing the product on . DO NOT REMOVE THE CABINET COVER, OR YOU MAY BE EXPOSED TO DANGEROUS VOLTAGE. Power Sources This product should not be blocked by the user. Continued The strong light from the lamp may cause damage...

Owner's Manual - English
Page 7
... INSTRUCTIONS (continued) 7 CONTENTS Before use 16. Unauthorized substitutions may expose you to service this indicates a need for repair service. This product incorporates glass components, including a lens and a lamp. Servicing Do not attempt to dangerous voltage or other hazards. (Replacement of any way. Safety Check Upon completion of the lamp only should be sure the service technician has used replacement parts specified by following conditions: a) When the power-supply cord...
... INSTRUCTIONS (continued) 7 CONTENTS Before use 16. Unauthorized substitutions may expose you to service this indicates a need for repair service. This product incorporates glass components, including a lens and a lamp. Servicing Do not attempt to dangerous voltage or other hazards. (Replacement of any way. Safety Check Upon completion of the lamp only should be sure the service technician has used replacement parts specified by following conditions: a) When the power-supply cord...

Owner's Manual - English
Page 9
... IN connector 72 Applicable signal 73 Controlling the projector by using RS-232C 75 Specifications 80 Keystone 52 FULL MENU settings - Factory reset mode 61 PIP menu setting 63 Maintenance Trouble indications 64 Air filter cleaning 65 Lens and main unit cleaning 67 Lamp replacement 68 Operations Projection on the menu screen 36 Operating the menu screen 37 QUICK MENU adjustments and settings 38 FULL MENU adjustments and settings - Default setting 57 FULL MENU settings - Display 54 FULL MENU settings - Picture 44 FULL MENU settings - Audio 50 FULL MENU settings -
... IN connector 72 Applicable signal 73 Controlling the projector by using RS-232C 75 Specifications 80 Keystone 52 FULL MENU settings - Factory reset mode 61 PIP menu setting 63 Maintenance Trouble indications 64 Air filter cleaning 65 Lens and main unit cleaning 67 Lamp replacement 68 Operations Projection on the menu screen 36 Operating the menu screen 37 QUICK MENU adjustments and settings 38 FULL MENU adjustments and settings - Default setting 57 FULL MENU settings - Display 54 FULL MENU settings - Picture 44 FULL MENU settings - Audio 50 FULL MENU settings -
Owner's Manual - English
Page 10
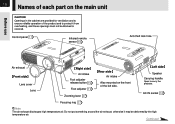
... the high temperature air. Control panel 11 LAMP FAN TEMP BUSY Infrared remote sensor 15 Anti-theft lock hole MENU INPUT ON/STANDBY ON EXIT ENTER KEYSATUOTNOE VOL/ADJ. Left side Speaker Carrying handle Open to protect it may be blocked or covered. AC IN socket 18 Focusing ring 27 Note The air exhaust discharges high temperature air. SAEUTTO Air exhaust Front side Lens cover Lens CONTROL C(OCMOPMOPNUETNETRI)N AUINDIO VIDEOVIIDNEO S-VIDEO R - 10 Names of each part on...
... the high temperature air. Control panel 11 LAMP FAN TEMP BUSY Infrared remote sensor 15 Anti-theft lock hole MENU INPUT ON/STANDBY ON EXIT ENTER KEYSATUOTNOE VOL/ADJ. Left side Speaker Carrying handle Open to protect it may be blocked or covered. AC IN socket 18 Focusing ring 27 Note The air exhaust discharges high temperature air. SAEUTTO Air exhaust Front side Lens cover Lens CONTROL C(OCMOPMOPNUETNETRI)N AUINDIO VIDEOVIIDNEO S-VIDEO R - 10 Names of each part on...
Owner's Manual - English
Page 11
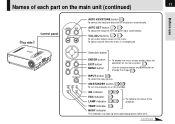
... use Top side Control panel AUTO KEYSTONE AUTO SET VOL/ADJ. TEMP indicator 64 BUSY indicator This indicator may light up when operating process takes time. ON indicator 25 28 FAN indicator 25 LAMP indicator 25 28 To indicate the status of the Computer input automatically. AUTO KEYSTONE button 29 To correct the keystone distortion of the picture automatically. ENTER MENU INPUT TEMP BUSY LAMP FAN ON/STANDBY ON EXIT KEYASUTOTONE VOL/ADJ. Names of each part on the menu screen. 37 Use the selection button and EXIT button...
... use Top side Control panel AUTO KEYSTONE AUTO SET VOL/ADJ. TEMP indicator 64 BUSY indicator This indicator may light up when operating process takes time. ON indicator 25 28 FAN indicator 25 LAMP indicator 25 28 To indicate the status of the Computer input automatically. AUTO KEYSTONE button 29 To correct the keystone distortion of the picture automatically. ENTER MENU INPUT TEMP BUSY LAMP FAN ON/STANDBY ON EXIT KEYASUTOTONE VOL/ADJ. Names of each part on the menu screen. 37 Use the selection button and EXIT button...
Owner's Manual - English
Page 16
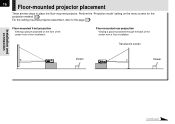
Floor-mounted rear projection Viewing a picture projected through the back of the screen from a floor installation. Installation and connection 16 Floor-mounted projector placement There are two ways to the page 20 . Perform the "Projection mode" setting on the front of the screen from a floor installation. Translucent screen Viewer Viewer Continued Floor-mounted front projection Viewing a picture projected on the menu screen for the projection method. 59 For the ceiling-mounted projector placement, refer to place the floor-mounted projector.
Floor-mounted rear projection Viewing a picture projected through the back of the screen from a floor installation. Installation and connection 16 Floor-mounted projector placement There are two ways to the page 20 . Perform the "Projection mode" setting on the front of the screen from a floor installation. Translucent screen Viewer Viewer Continued Floor-mounted front projection Viewing a picture projected on the menu screen for the projection method. 59 For the ceiling-mounted projector placement, refer to place the floor-mounted projector.
Owner's Manual - English
Page 17
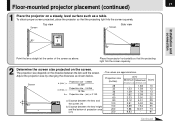
Adjust the projection size by changing the distances as above. b(cm) 10 12 13 15 22 29 36 55 73 91 Continued To obtain proper screen projected, place the projector so that the projecting light hits the screen squarely. 2 Determine the screen size projected on the distance between the lens height and the bottom of the screen as shown below. Screen Top view Side view Screen 17 CONTENTS FAN TEMP LAMP ON ON/STANDBY INPUT EXIT AUTO SET VOL...
Adjust the projection size by changing the distances as above. b(cm) 10 12 13 15 22 29 36 55 73 91 Continued To obtain proper screen projected, place the projector so that the projecting light hits the screen squarely. 2 Determine the screen size projected on the distance between the lens height and the bottom of the screen as shown below. Screen Top view Side view Screen 17 CONTENTS FAN TEMP LAMP ON ON/STANDBY INPUT EXIT AUTO SET VOL...

Owner's Manual - English
Page 18
... FAN Power cord (Supplied) Light (Orange) The three indicators, TEMP, LAMP, and ON, light in green for an adequate time (1 to 2 hours, depending on the room's condition) before using it, so it adjusts to the ambient temperature. • If the screen is moved from a cold location to a warm location, or when the ambient temperature in orange and the projector turns to the standby mode. Do not perform any operations while the three indicators are not installed properly, the projected picture...
... FAN Power cord (Supplied) Light (Orange) The three indicators, TEMP, LAMP, and ON, light in green for an adequate time (1 to 2 hours, depending on the room's condition) before using it, so it adjusts to the ambient temperature. • If the screen is moved from a cold location to a warm location, or when the ambient temperature in orange and the projector turns to the standby mode. Do not perform any operations while the three indicators are not installed properly, the projected picture...
Owner's Manual - English
Page 20
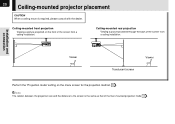
Installation and connection Viewer Translucent screen Viewer Perform the "Projection mode" setting on the front of the floor-mounted projection mode 16 . Ceiling-mounted front projection Viewing a picture projected on the menu screen for the projection method. 59 Note The relation between the projection size and the distance to the screen is required, please consult with the dealer. 20 Ceiling-mounted projector placement CAUTION When a ceiling mount is the same as that of the screen from a ceiling installation. Ceiling-mounted rear projection Viewing a picture projected ...
Installation and connection Viewer Translucent screen Viewer Perform the "Projection mode" setting on the front of the floor-mounted projection mode 16 . Ceiling-mounted front projection Viewing a picture projected on the menu screen for the projection method. 59 Note The relation between the projection size and the distance to the screen is required, please consult with the dealer. 20 Ceiling-mounted projector placement CAUTION When a ceiling mount is the same as that of the screen from a ceiling installation. Ceiling-mounted rear projection Viewing a picture projected ...
Owner's Manual - English
Page 25
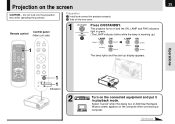
... FAN 1 1 Indicators TEMP BUSY LAMP FAN ENTER MENU INPUT ON/STANDBY ON EXIT KEYASUTOTONE VOL/ADJ. Select "Cancel" when the dialog box of Add New Hardware Wizard screen appears on the screen CAUTION - Projection on the computer when connecting a computer. The projector turns on the connected equipment and put it in green. (The LAMP indicator blinks while the lamp is warming up.) LAMP (Green) Flashing ON (Green) FAN (Green) LAMP (Green) ON (Green) FAN (Green) The lamp lights and the start up display appears. Preparation 1 Install and connect...
... FAN 1 1 Indicators TEMP BUSY LAMP FAN ENTER MENU INPUT ON/STANDBY ON EXIT KEYASUTOTONE VOL/ADJ. Select "Cancel" when the dialog box of Add New Hardware Wizard screen appears on the screen CAUTION - Projection on the computer when connecting a computer. The projector turns on the connected equipment and put it in green. (The LAMP indicator blinks while the lamp is warming up.) LAMP (Green) Flashing ON (Green) FAN (Green) LAMP (Green) ON (Green) FAN (Green) The lamp lights and the start up display appears. Preparation 1 Install and connect...
Owner's Manual - English
Page 26
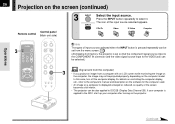
... after turning on the projector. Press the INPUT button repeatedly to DDC2B (Display Data Channel 2B). SAEUTTO Continued For details on controlling the computer display, etc., refer to the computer's manual and description on the software for the computer used. • An image on the screen (continued) Operations Control panel Remote control (Main unit side) 3 INPUT ON / STANDBY KEYSTONE AUTO SET FREEZE MUTE PIP CALL RESIZE MENU VOL/ADJ ENTER CT-90072 EXIT AUTO KEYSTONE AUTO SET VOL...
... after turning on the projector. Press the INPUT button repeatedly to DDC2B (Display Data Channel 2B). SAEUTTO Continued For details on controlling the computer display, etc., refer to the computer's manual and description on the software for the computer used. • An image on the screen (continued) Operations Control panel Remote control (Main unit side) 3 INPUT ON / STANDBY KEYSTONE AUTO SET FREEZE MUTE PIP CALL RESIZE MENU VOL/ADJ ENTER CT-90072 EXIT AUTO KEYSTONE AUTO SET VOL...
Owner's Manual - English
Page 27
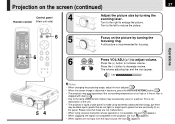
... projector's liquid crystal panel is clogged with dust. 64 • Due to increase volume. Press the (+) button to the lamp characteristic, flickers may occasionally occur in keystone, press the AUTO KEYSTONE button. 29 • The projector may stop operating if the surrounding temperature is too high or if the air filter is made using extremely advanced technology, but there may be black spots (pixels that do not light...
... projector's liquid crystal panel is clogged with dust. 64 • Due to increase volume. Press the (+) button to the lamp characteristic, flickers may occasionally occur in keystone, press the AUTO KEYSTONE button. 29 • The projector may stop operating if the surrounding temperature is too high or if the air filter is made using extremely advanced technology, but there may be black spots (pixels that do not light...
Owner's Manual - English
Page 28
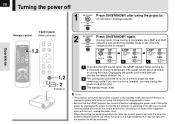
...LAMP ON (Green) (Orange) LAMP ON (off) (Orange) LAMP ON (off) (Orange) Flashing FAN A (Green) B FAN (Green) C FAN (Off) A To protect the light source lamp, the LAMP indicator blinks as long as a minimum of time. • Be sure that the LAMP indicator has turned off Operations Remote control Control panel (Main unit side) AUTO KEYSTONE AUTO SET INPUT ON / STANDBY KEYSTONE AUTO SET FREEZE MUTE PIP CALL RESIZE 1,2 VOL/ADJ. MENU VOL/ADJ ENTER EXIT MENU INPUT ENTER CT-90072 EXIT ON/STANDBY 1,2 TEMP LAMP ON BUSY FAN 2 Indicators ENTER MENU INPUT TEMP...
...LAMP ON (Green) (Orange) LAMP ON (off) (Orange) LAMP ON (off) (Orange) Flashing FAN A (Green) B FAN (Green) C FAN (Off) A To protect the light source lamp, the LAMP indicator blinks as long as a minimum of time. • Be sure that the LAMP indicator has turned off Operations Remote control Control panel (Main unit side) AUTO KEYSTONE AUTO SET INPUT ON / STANDBY KEYSTONE AUTO SET FREEZE MUTE PIP CALL RESIZE 1,2 VOL/ADJ. MENU VOL/ADJ ENTER EXIT MENU INPUT ENTER CT-90072 EXIT ON/STANDBY 1,2 TEMP LAMP ON BUSY FAN 2 Indicators ENTER MENU INPUT TEMP...
Owner's Manual - English
Page 35
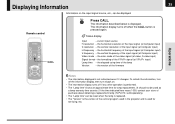
... resolution of the input signal (at Computer input) Video mode - Displaying Information 35 Information on . • The information display turns off if any other operation is performed. • The "Lamp time" shows an approximate time for servicing, etc. Remote control INPUT ON / STANDBY KEYSTONE AUTO SET FREEZE MUTE PIP CALL RESIZE MENU VOL/ADJ CALL CALL Press CALL. The information display turns off when the CALL button is displayed. the vertical frequency of the lamp Version - current input source H-resolution...
... resolution of the input signal (at Computer input) Video mode - Displaying Information 35 Information on . • The information display turns off if any other operation is performed. • The "Lamp time" shows an approximate time for servicing, etc. Remote control INPUT ON / STANDBY KEYSTONE AUTO SET FREEZE MUTE PIP CALL RESIZE MENU VOL/ADJ CALL CALL Press CALL. The information display turns off when the CALL button is displayed. the vertical frequency of the lamp Version - current input source H-resolution...

Owner's Manual - English
Page 36
... by the INPUT button Language Set the display language used for menus and messages FULL MENU Picture Item Contrast Brightness Color Tint Sharpness Phase Frequency Position Level Picture mode Video mode Signal format Screen size 44 Meaning Adjust the image contrast Adjust the image brightness Adjust the image color Adjust the image tint Adjust the image sharpness Adjust the image flicker (dot clock timing adjustment) Adjust the vertical stripes with detailed images (dot clock frequency adjustment) Adjust the horizontal and vertical positions of the image Adjust the red, green and blue level...
... by the INPUT button Language Set the display language used for menus and messages FULL MENU Picture Item Contrast Brightness Color Tint Sharpness Phase Frequency Position Level Picture mode Video mode Signal format Screen size 44 Meaning Adjust the image contrast Adjust the image brightness Adjust the image color Adjust the image tint Adjust the image sharpness Adjust the image flicker (dot clock timing adjustment) Adjust the vertical stripes with detailed images (dot clock frequency adjustment) Adjust the horizontal and vertical positions of the image Adjust the red, green and blue level...
Owner's Manual - English
Page 37
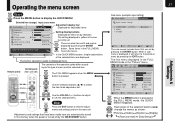
... button to adjust or set by the ON/STANDBY button. Setting display buttons Displayed for adjustable items Contrast +6 Brightness 0 Phase 0 Picture mode Bright Kystone 0 Input source setting Language True color [ENTER] [ENTER] Adjust the contrast of the image. MENUFULL Item Adjust EXIT Quit In the QUICK MENU screen, simple explanations of the selection buttons ( / ) change the menus as shown: [Picture] [Audio] [Keystone] [Display] [Factory reset mode] [Default Settings] Adjustments & Settings 37 MENU The FULL MENU appears when the MENU MENU button is displayed...
... button to adjust or set by the ON/STANDBY button. Setting display buttons Displayed for adjustable items Contrast +6 Brightness 0 Phase 0 Picture mode Bright Kystone 0 Input source setting Language True color [ENTER] [ENTER] Adjust the contrast of the image. MENUFULL Item Adjust EXIT Quit In the QUICK MENU screen, simple explanations of the selection buttons ( / ) change the menus as shown: [Picture] [Audio] [Keystone] [Display] [Factory reset mode] [Default Settings] Adjustments & Settings 37 MENU The FULL MENU appears when the MENU MENU button is displayed...
Owner's Manual - English
Page 61
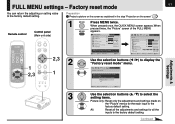
... LAMP FAN ON/STANDBY ON EXIT KEYASUTOTONE VOL/ADJ. All: Reset all the adjustments and settings for the each item on the screen". 25 Remote control Control panel (Main unit side) AUTO KEYSTONE AUTO SET INPUT ON / STANDBY KEYSTONE AUTO SET FREEZE MUTE PIP CALL RESIZE MENU VOL/ADJ ENTER CT-90072 EXIT VOL/ADJ. 1 2,3 ENTER EXIT MENU INPUT ON/STANDBY TEMP LAMP ON BUSY FAN 2,3 1 1 2 MENU MENU Press MENU twice. When pressed twice, the "Picture" screen of the image. QUICK MENU Contrast +6 Brightness 0 Color 0 Picture mode Keystone 0 Input source setting...
... LAMP FAN ON/STANDBY ON EXIT KEYASUTOTONE VOL/ADJ. All: Reset all the adjustments and settings for the each item on the screen". 25 Remote control Control panel (Main unit side) AUTO KEYSTONE AUTO SET INPUT ON / STANDBY KEYSTONE AUTO SET FREEZE MUTE PIP CALL RESIZE MENU VOL/ADJ ENTER CT-90072 EXIT VOL/ADJ. 1 2,3 ENTER EXIT MENU INPUT ON/STANDBY TEMP LAMP ON BUSY FAN 2,3 1 1 2 MENU MENU Press MENU twice. When pressed twice, the "Picture" screen of the image. QUICK MENU Contrast +6 Brightness 0 Color 0 Picture mode Keystone 0 Input source setting...
Owner's Manual - English
Page 62
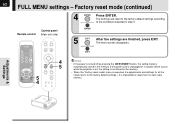
Remote control Control panel (Main unit side) AUTO KEYSTONE AUTO SET INPUT ON / STANDBY KEYSTONE AUTO SET FREEZE MUTE PIP CALL RESIZE MENU VOL/ADJ ENTER CT-90072 EXIT 5 4 VOL/ADJ. If the power cord is unplugged or if a power failure occurs while the projector is on, the setting is not stored in the memory. • When the "Factory reset mode" menu is executed, the adjustments and settings for all the inputs return to the factory default settings. ( It is automatically...
Remote control Control panel (Main unit side) AUTO KEYSTONE AUTO SET INPUT ON / STANDBY KEYSTONE AUTO SET FREEZE MUTE PIP CALL RESIZE MENU VOL/ADJ ENTER CT-90072 EXIT 5 4 VOL/ADJ. If the power cord is unplugged or if a power failure occurs while the projector is on, the setting is not stored in the memory. • When the "Factory reset mode" menu is executed, the adjustments and settings for all the inputs return to the factory default settings. ( It is automatically...
Owner's Manual - English
Page 64
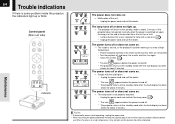
TEMP LAMP ON (Flashing in orange) (Lit in red) BUSY FAN The power turns off or does not come on. → The lamp cover is not properly attached. • Unplug the power cord and reattach the lamp cover. 69 * The icon appears before use. ENTER EXIT MENU INPUT ON/STANDBY TEMP LAMP ON BUSY FAN Indicator ENTER MENU INPUT TEMP BUSY LAMP FAN ON/STANDBY ON EXIT KEYASUTOTONE VOL/ADJ. If the projector does not operate normally when the power is switched on...
TEMP LAMP ON (Flashing in orange) (Lit in red) BUSY FAN The power turns off or does not come on. → The lamp cover is not properly attached. • Unplug the power cord and reattach the lamp cover. 69 * The icon appears before use. ENTER EXIT MENU INPUT ON/STANDBY TEMP LAMP ON BUSY FAN Indicator ENTER MENU INPUT TEMP BUSY LAMP FAN ON/STANDBY ON EXIT KEYASUTOTONE VOL/ADJ. If the projector does not operate normally when the power is switched on...
Owner's Manual - English
Page 70
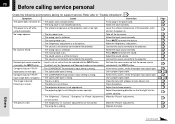
... turn the power on . Attach the cover correctly. Select the input source correctly. Press MUTE to the projector. Make the "Brightness" adjustment. Connect the source correctly to restore the picture. Select the input source correctly. Press MUTE to the projector. Adjust the sound volume. Connect the source correctly to restore the sound. Set from the menu screen so that the light hits the screen squarely. At the menu screen, set for support service. Clean the lens with the INPUT button. Adjust the distance properly...
... turn the power on . Attach the cover correctly. Select the input source correctly. Press MUTE to the projector. Make the "Brightness" adjustment. Connect the source correctly to restore the picture. Select the input source correctly. Press MUTE to the projector. Adjust the sound volume. Connect the source correctly to restore the sound. Set from the menu screen so that the light hits the screen squarely. At the menu screen, set for support service. Clean the lens with the INPUT button. Adjust the distance properly...


