
Owners Manual
Page 4
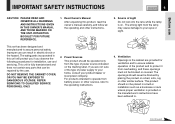
... use and servicing. Source of the product and to protect it from the type of power supply to your product dealer or local power company. For products intended to operate from the lamp may cause damage to your home, consult your eyes or sight. The openings should not be repaired by placing the product on a bed, sofa, rug or other instructions. 3. Read Owner's Manual...
... use and servicing. Source of the product and to protect it from the type of power supply to your product dealer or local power company. For products intended to operate from the lamp may cause damage to your home, consult your eyes or sight. The openings should not be repaired by placing the product on a bed, sofa, rug or other instructions. 3. Read Owner's Manual...
Owners Manual
Page 7
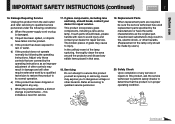
... users.) 20. e) If the product has been dropped or damaged in any edible items placed in proper operating condition. The broken pieces of the lamp rupturing, thoroughly clean the area around the projector and discard any way. Safety Check Upon completion of the lamp only should be sure the service technician has used replacement parts specified by following conditions: a) When the power-supply cord...
... users.) 20. e) If the product has been dropped or damaged in any edible items placed in proper operating condition. The broken pieces of the lamp rupturing, thoroughly clean the area around the projector and discard any way. Safety Check Upon completion of the lamp only should be sure the service technician has used replacement parts specified by following conditions: a) When the power-supply cord...
Owners Manual
Page 10
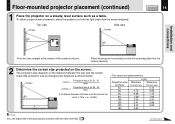
... document imaging camera .. 55 Locking the white balance 58 Correcting illuminated defects 59 Maintenance Trouble indications 60 Air filter cleaning 61 Lens and main unit cleaning 63 Lamp replacement 64 Others Before calling service personal 66 Pin assignment of COMPUTER connector 68 Applicable signal 69 Controlling the projector by using RS-232C 71 Specifications 76 Before use SAFETY PRECAUTIONS 2 IMPORTANT PRECAUTIONS 3 IMPORTANT SAFETY INSTRUCTIONS 4 Power supply cord selection 9 Contents 10 Names of each part...
... document imaging camera .. 55 Locking the white balance 58 Correcting illuminated defects 59 Maintenance Trouble indications 60 Air filter cleaning 61 Lens and main unit cleaning 63 Lamp replacement 64 Others Before calling service personal 66 Pin assignment of COMPUTER connector 68 Applicable signal 69 Controlling the projector by using RS-232C 71 Specifications 76 Before use SAFETY PRECAUTIONS 2 IMPORTANT PRECAUTIONS 3 IMPORTANT SAFETY INSTRUCTIONS 4 Power supply cord selection 9 Contents 10 Names of each part...
Owners Manual
Page 18
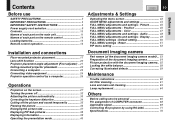
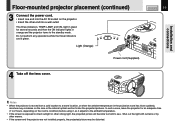
... a (max.) = 1000 a: Distance between the lens and the screen. Adjust the projection size by changing the distances as above. Top view Side view Screen Screen 90° KEYSTONE ON / STANDBY ON LAMP TEMP FAN ENTER EXIT AUTO SET VOL / ADJ 90° CONTENTS 18 Installation and connections MENU INPUT Point the lens straight at the center of the screen as shown below. Place the projector horizontally so that the light beam hits the screen squarely. Floor-mounted projector placement (continued...
... a (max.) = 1000 a: Distance between the lens and the screen. Adjust the projection size by changing the distances as above. Top view Side view Screen Screen 90° KEYSTONE ON / STANDBY ON LAMP TEMP FAN ENTER EXIT AUTO SET VOL / ADJ 90° CONTENTS 18 Installation and connections MENU INPUT Point the lens straight at the center of the screen as shown below. Place the projector horizontally so that the light beam hits the screen squarely. Floor-mounted projector placement (continued...
Owners Manual
Page 19
... strong light, the projected picture will become too faint to the standby mode. The three indicators, TEMP, LAMP, and ON, light in green for an adequate time (1 to 2 hours, depending on the room's condition) before using it, so it adjusts to the ambient temperature. • If the screen is moved from a cold location to a warm location, or when the ambient temperature in orange and the projector turns to see. Shut out the light with...
... strong light, the projected picture will become too faint to the standby mode. The three indicators, TEMP, LAMP, and ON, light in green for an adequate time (1 to 2 hours, depending on the room's condition) before using it, so it adjusts to the ambient temperature. • If the screen is moved from a cold location to a warm location, or when the ambient temperature in orange and the projector turns to see. Shut out the light with...
Owners Manual
Page 22
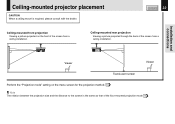
... floor-mounted projection mode 18 . Installation and connections CONTROL USB AUDIO VIDEO S-VIDEO COMPUTER ( Y/PB/PR ) Viewer Viewer Translucent screen Perform the "Projection mode" setting on the front of the screen from a ceiling installation. Ceiling-mounted rear projection Viewing a picture projected through the back of the screen from a ceiling installation. CONTENTS 22 Ceiling-mounted front projection Viewing a picture projected on the menu screen for the projection method. 50 Note The relation between the projection size and the distance to the screen is required...
... floor-mounted projection mode 18 . Installation and connections CONTROL USB AUDIO VIDEO S-VIDEO COMPUTER ( Y/PB/PR ) Viewer Viewer Translucent screen Perform the "Projection mode" setting on the front of the screen from a ceiling installation. Ceiling-mounted rear projection Viewing a picture projected through the back of the screen from a ceiling installation. CONTENTS 22 Ceiling-mounted front projection Viewing a picture projected on the menu screen for the projection method. 50 Note The relation between the projection size and the distance to the screen is required...
Owners Manual
Page 25
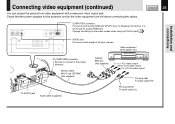
... CONTROL USB AUDIO VIDEO S-VIDEO COMPUTER ( Y/PB/PR ) COMPUTER connector For use as audio signal of all input sources. Change the setting on the menu screen when using as Y/PB/PR input. 44 Installation and connections AUDIO jack For use as analog RGB input. Video equipment (DVD player, etc.) To COMPUTER connector Be sure to connect in the proper direction. Monitor cable Mini D-sub 15P-BNC (Not supplied) To AUDIO jack Audio cable (supplied) Adapter BNC-pin (Not supplied) (Green) To Y video output (Blue...
... CONTROL USB AUDIO VIDEO S-VIDEO COMPUTER ( Y/PB/PR ) COMPUTER connector For use as audio signal of all input sources. Change the setting on the menu screen when using as Y/PB/PR input. 44 Installation and connections AUDIO jack For use as analog RGB input. Video equipment (DVD player, etc.) To COMPUTER connector Be sure to connect in the proper direction. Monitor cable Mini D-sub 15P-BNC (Not supplied) To AUDIO jack Audio cable (supplied) Adapter BNC-pin (Not supplied) (Green) To Y video output (Blue...
Owners Manual
Page 27
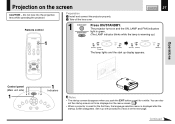
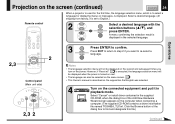
.... Set it up display appears. Remote control 1 ON/STANDBY Press ON/STANDBY. You can also set the startup screen not to be displayed on the screen CONTENTS 27 CAUTION - Continued ON/STANDBY (The LAMP indicator blinks while the lamp is displayed after the startup screen disappears. Preparation 1 Install and connect the projector properly. 2 Take off the lens cover. Projection on the menu screen. 50 • When a projector is used for a while. TEMP FAN (Green) MENU VOL / ADJ ENTER CT-90106 EXIT / P.MODE Operations KEYSTONE Control panel...
.... Set it up display appears. Remote control 1 ON/STANDBY Press ON/STANDBY. You can also set the startup screen not to be displayed on the screen CONTENTS 27 CAUTION - Continued ON/STANDBY (The LAMP indicator blinks while the lamp is displayed after the startup screen disappears. Preparation 1 Install and connect the projector properly. 2 Take off the lens cover. Projection on the menu screen. 50 • When a projector is used for a while. TEMP FAN (Green) MENU VOL / ADJ ENTER CT-90106 EXIT / P.MODE Operations KEYSTONE Control panel...
Owners Manual
Page 28
...-90106 EXIT / P.MODE Control panel (Main unit side) ON LAMP ON / STANDBY TEMP FAN MENU ENTER VOL / ADJ EXIT AUTO SET 2,3 2 INPUT Notes • The language selection menu will not be selected on the menu screen. 49 • This Owner's manual is displayed in the selected language. Click the Browse button of the Add New Hardware Wizard screen appears on the computer when connecting a computer. (The supplied CD-ROM contains a driver information file...
...-90106 EXIT / P.MODE Control panel (Main unit side) ON LAMP ON / STANDBY TEMP FAN MENU ENTER VOL / ADJ EXIT AUTO SET 2,3 2 INPUT Notes • The language selection menu will not be selected on the menu screen. 49 • This Owner's manual is displayed in the selected language. Click the Browse button of the Add New Hardware Wizard screen appears on the computer when connecting a computer. (The supplied CD-ROM contains a driver information file...
Owners Manual
Page 30
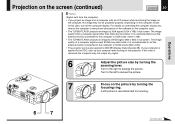
... connected to the computer to the computer's manual and description on the software for focusing. 6 7 Continued For details on controlling the computer display, etc., refer to XGA mode (1024 x 768). • The TLP250/TLP251 projects an image by turning the focusing ring. Turn to the left to enlarge the picture. It is recommended for the computer used. • The TLP550/TLP551 projects an image by turning the zooming lever. Turn...
... connected to the computer to the computer's manual and description on the software for focusing. 6 7 Continued For details on controlling the computer display, etc., refer to XGA mode (1024 x 768). • The TLP250/TLP251 projects an image by turning the focusing ring. Turn to the left to enlarge the picture. It is recommended for the computer used. • The TLP550/TLP551 projects an image by turning the zooming lever. Turn...
Owners Manual
Page 31
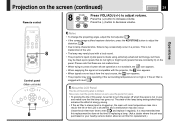
.... • When trying to increase volume. Operations KEYSTONE INPUT KEYSTONE ON / STANDBY AUTO SET FREEZE MUTE PIP CALL RESIZE MENU VOL / ADJ 8 ENTER CT-90106 EXIT / P.MODE Control panel (Main unit side) ON LAMP ON / STANDBY TEMP FAN MENU ENTER VOL / ADJ EXIT AUTO SET 8 Notes • To change the projecting angle, adjust the foot adjuster. 21 • If the screen image suffers keystone distortion, press the KEYSTONE button to adjust the distortion. 34 • Due to decrease...
.... • When trying to increase volume. Operations KEYSTONE INPUT KEYSTONE ON / STANDBY AUTO SET FREEZE MUTE PIP CALL RESIZE MENU VOL / ADJ 8 ENTER CT-90106 EXIT / P.MODE Control panel (Main unit side) ON LAMP ON / STANDBY TEMP FAN MENU ENTER VOL / ADJ EXIT AUTO SET 8 Notes • To change the projecting angle, adjust the foot adjuster. 21 • If the screen image suffers keystone distortion, press the KEYSTONE button to adjust the distortion. 34 • Due to decrease...
Owners Manual
Page 32
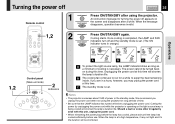
... cooling is necessary. Unplugging the power cord at this time will be turned back on the screen and disappears after using the projector. When the message ON/STANDBY disappears, operation becomes invalid. Once cooling is completed, the LAMP and FAN indicators turn off and the standby mode is set . (The ON indicator turns in orange.) ON LAMP (Green) (Orange) Flashing FAN A (Green) ON LAMP (Off) (Orange) FAN B (Green) ON LAMP (Off) (Orange) C FAN (Off) A To protect the light source lamp, the LAMP indicator blinks as long as a minimum of...
... cooling is necessary. Unplugging the power cord at this time will be turned back on the screen and disappears after using the projector. When the message ON/STANDBY disappears, operation becomes invalid. Once cooling is completed, the LAMP and FAN indicators turn off and the standby mode is set . (The ON indicator turns in orange.) ON LAMP (Green) (Orange) Flashing FAN A (Green) ON LAMP (Off) (Orange) FAN B (Green) ON LAMP (Off) (Orange) C FAN (Off) A To protect the light source lamp, the LAMP indicator blinks as long as a minimum of...
Owners Manual
Page 39
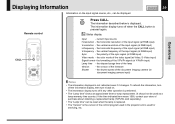
... the input signal (at RGB input) Sync - the formatting of the input signal (at Y/PB/PR input) Lamp time - current input source H-resolution - Displaying Information Information on . • The information display turns off if any other operation is performed. • The "Lamp time" shows an approximate time for lamp replacement. (It should not be used for servicing, etc. CONTENTS 39 Operations Remote control CALL INPUT KEYSTONE ON / STANDBY AUTO SET FREEZE MUTE PIP CALL RESIZE MENU VOL / ADJ ENTER CT-90106 EXIT / P.MODE...
... the input signal (at RGB input) Sync - the formatting of the input signal (at Y/PB/PR input) Lamp time - current input source H-resolution - Displaying Information Information on . • The information display turns off if any other operation is performed. • The "Lamp time" shows an approximate time for lamp replacement. (It should not be used for servicing, etc. CONTENTS 39 Operations Remote control CALL INPUT KEYSTONE ON / STANDBY AUTO SET FREEZE MUTE PIP CALL RESIZE MENU VOL / ADJ ENTER CT-90106 EXIT / P.MODE...
Owners Manual
Page 42
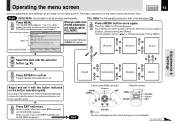
.... [Reset] [Default setting] [Display] [Audio] End Control panel (Main unit side) ENTER MENU Selection ON LAMP ON / STANDBY TEMP FAN EXIT MENU ENTER VOL / ADJ EXIT AUTO SET INPUT Remote control MENU MENU VOL / ADJ ENTER ENTER CT-90106 EXIT / P.MODE VOL/ADJ Selection EXIT VOL/ADJ Note The item displayed on the button operation guide. FULL MENU: For the operating instruction, refer to the GUIDE MENU when the MENU button is pressed. [Picture] [Position] [Color] Button operation guide MENU FULL Item ENTER Next EXIT Quit Adjustments & Settings KEYSTONE Select...
.... [Reset] [Default setting] [Display] [Audio] End Control panel (Main unit side) ENTER MENU Selection ON LAMP ON / STANDBY TEMP FAN EXIT MENU ENTER VOL / ADJ EXIT AUTO SET INPUT Remote control MENU MENU VOL / ADJ ENTER ENTER CT-90106 EXIT / P.MODE VOL/ADJ Selection EXIT VOL/ADJ Note The item displayed on the button operation guide. FULL MENU: For the operating instruction, refer to the GUIDE MENU when the MENU button is pressed. [Picture] [Position] [Color] Button operation guide MENU FULL Item ENTER Next EXIT Quit Adjustments & Settings KEYSTONE Select...
Owners Manual
Page 44
... source is removed, the setting becomes effective the next time the input is changed. • The adjustments or settings made are memorized automatically when the power is turned off by pressing the ON/STANDBY button. Adjust the image color. Adjust the gain of the screen. Correct the keystone distortion of the document imaging camera. ADJ. ADJ. SET The shutter speed is set or adjust the functions frequently used. SET The picture is fixed to page 42 . SET : S-Video input...
... source is removed, the setting becomes effective the next time the input is changed. • The adjustments or settings made are memorized automatically when the power is turned off by pressing the ON/STANDBY button. Adjust the image color. Adjust the gain of the screen. Correct the keystone distortion of the document imaging camera. ADJ. ADJ. SET The shutter speed is set or adjust the functions frequently used. SET The picture is fixed to page 42 . SET : S-Video input...
Owners Manual
Page 45
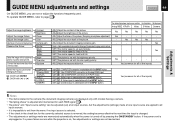
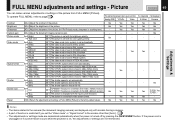
... gain ADJ. SET The video mode is on, the adjustments or settings are displayed only with its color quality priority. Adjust the sharpness of function is restricted if you set automatically. 480i (525i) SET The Y/PB/PR signal format is fixed to SVGA (800 x 600 dot) resolution. SET The picture is set with the input source resolution. Signal format Auto. Adjustments & Settings FULL MENU adjustments and settings - Adjust the document imaging camera's gain. - - - - SET The video mode is a setting item.) - SET The video mode is converted...
... gain ADJ. SET The video mode is on, the adjustments or settings are displayed only with its color quality priority. Adjust the sharpness of function is restricted if you set automatically. 480i (525i) SET The Y/PB/PR signal format is fixed to SVGA (800 x 600 dot) resolution. SET The picture is set with the input source resolution. Signal format Auto. Adjustments & Settings FULL MENU adjustments and settings - Adjust the document imaging camera's gain. - - - - SET The video mode is a setting item.) - SET The video mode is converted...
Owners Manual
Page 52
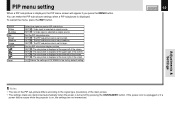
... signal source. SET : S-Video input is displayed, the PIP menu screen will appear if you press the MENU button. SET : The PIP sub-picture size is turned off by pressing the ON/STANDBY button. To cancel the menu, press the EXIT button. Set the PIP sub-picture size. EXEC. If the power cord is unplugged or if a power failure occurs while the projector is on, the settings are memorized automatically when the power is set to the factory default setting. SET :The sub-picture...
... signal source. SET : S-Video input is displayed, the PIP menu screen will appear if you press the MENU button. SET : The PIP sub-picture size is turned off by pressing the ON/STANDBY button. To cancel the menu, press the EXIT button. Set the PIP sub-picture size. EXEC. If the power cord is unplugged or if a power failure occurs while the projector is on, the settings are memorized automatically when the power is set to the factory default setting. SET :The sub-picture...
Owners Manual
Page 60
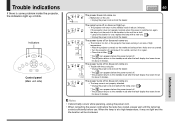
... lamp cover is over, replace the lamp with the cooling fan. (Lit or flashing in red) • Unplug the power cord and call the dealer. Or (Lit or flashing in orange) * The icon appears before the power turned off. * The projector returns to the standby mode after the fault display has been shown for about 2 minutes. Indicators ON LAMP ON / STANDBY TEMP FAN MENU ENTER VOL / ADJ EXIT AUTO SET Control panel (Main unit side) INPUT Maintenance KEYSTONE CONTENTS...
... lamp cover is over, replace the lamp with the cooling fan. (Lit or flashing in red) • Unplug the power cord and call the dealer. Or (Lit or flashing in orange) * The icon appears before the power turned off. * The projector returns to the standby mode after the fault display has been shown for about 2 minutes. Indicators ON LAMP ON / STANDBY TEMP FAN MENU ENTER VOL / ADJ EXIT AUTO SET Control panel (Main unit side) INPUT Maintenance KEYSTONE CONTENTS...

Owners Manual
Page 66
... "Picture" adjustments. Replace the lamp. No image appears. The image is uneven. Focusing is blurred. Take off while using the projector. Press MUTE to the projector. Set from the menu screen so that the light hits the screen squarely. Make the "Picture" adjustments. No sound is dim. By default, only the Analog RGB and Video input modes can be selected with the INPUT button. Select the input source correctly. Adjust the sound volume. Replace the lamp. The power turns off the lens cover. Attach...
... "Picture" adjustments. Replace the lamp. No image appears. The image is uneven. Focusing is blurred. Take off while using the projector. Press MUTE to the projector. Set from the menu screen so that the light hits the screen squarely. Make the "Picture" adjustments. No sound is dim. By default, only the Analog RGB and Video input modes can be selected with the INPUT button. Select the input source correctly. Adjust the sound volume. Replace the lamp. The power turns off the lens cover. Attach...
Owners Manual
Page 76
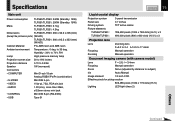
...• USB Type B CONTENTS 76 Liquid crystal display Projection system Panel size Driving system Picture elements TLP550/TLP551: TLP250/TLP251: 3-panel transmission 0.7 inches TFT active matrix 786,432 pixels (1024 x 768 dots) (H./V.) x 3 480,000 pixels (800 x 600 dots) (H./V.) x 3 Projection lens Lens Focusing Zooming Zooming lens F=2.0 to 2.4 f=14.5 to 17.4mm Manual operation Manual operation Document imaging camera (with camera model) Lens F = 2.8, f = 3.4mm Focusing Manual operation Zoom None (adjusted by distance to 35 deg. to subject) Iris Auto./Manual Image element...
...• USB Type B CONTENTS 76 Liquid crystal display Projection system Panel size Driving system Picture elements TLP550/TLP551: TLP250/TLP251: 3-panel transmission 0.7 inches TFT active matrix 786,432 pixels (1024 x 768 dots) (H./V.) x 3 480,000 pixels (800 x 600 dots) (H./V.) x 3 Projection lens Lens Focusing Zooming Zooming lens F=2.0 to 2.4 f=14.5 to 17.4mm Manual operation Manual operation Document imaging camera (with camera model) Lens F = 2.8, f = 3.4mm Focusing Manual operation Zoom None (adjusted by distance to 35 deg. to subject) Iris Auto./Manual Image element...


