

Owners Manual
Page 7
...product may cause to qualified service personnel under the following the operating instructions. This product incorporates glass components, including a lens and a lamp. The broken pieces of glass may fall, causing serious injury to a child or adult, and serious damage to dangerous voltage or...need for repair service. S3125A 16. Damage Requiring Service Unplug this product yourself as an improper adjustment of the lamp rupturing, thoroughly clean the area around the projector and discard any way. this product on an unstable cart, stand, tripod, bracket, or table. In the...
...product may cause to qualified service personnel under the following the operating instructions. This product incorporates glass components, including a lens and a lamp. The broken pieces of glass may fall, causing serious injury to a child or adult, and serious damage to dangerous voltage or...need for repair service. S3125A 16. Damage Requiring Service Unplug this product yourself as an improper adjustment of the lamp rupturing, thoroughly clean the area around the projector and discard any way. this product on an unstable cart, stand, tripod, bracket, or table. In the...

Owners Manual
Page 15
... tilt. Speaker : Outputs audio sound. p.24 Infrared remote sensor : Senses commands from outside the projector. Air exhaust : Expels air that has grown hot inside the projector. p.24 Zooming lever : Adjusts screen size. Lamp cover : Remove to stow the foot adjuster. Preparations Names of each part on the main unit 65 4 3 2 1 PUSH 78 Back...
... tilt. Speaker : Outputs audio sound. p.24 Infrared remote sensor : Senses commands from outside the projector. Air exhaust : Expels air that has grown hot inside the projector. p.24 Zooming lever : Adjusts screen size. Lamp cover : Remove to stow the foot adjuster. Preparations Names of each part on the main unit 65 4 3 2 1 PUSH 78 Back...

Owners Manual
Page 16
...temperature too high. p.28 AUTO/Auto button : Automatically adjusts frequency and phase. Keystone / button : Adjusts image distortion caused by tilting the projector. Press the Volume button to 16:9. p.26 Blank button : Cuts off the sound temporarily. p.26 4:3/16:9 button : Press the ...4:3/16:9 button to switch the image aspect ratio from 4:3 to reduce the volume. p.21 MENU/Menu button : Displays menus. p.25 LAMP indicator : Displays lamp mode. p.37 Enter button : Confirms the selection. p.25 Volume / button : Press the Volume button to as follows: Selection buttons &#...
...temperature too high. p.28 AUTO/Auto button : Automatically adjusts frequency and phase. Keystone / button : Adjusts image distortion caused by tilting the projector. Press the Volume button to 16:9. p.26 Blank button : Cuts off the sound temporarily. p.26 4:3/16:9 button : Press the ...4:3/16:9 button to switch the image aspect ratio from 4:3 to reduce the volume. p.21 MENU/Menu button : Displays menus. p.25 LAMP indicator : Displays lamp mode. p.37 Enter button : Confirms the selection. p.25 Volume / button : Press the Volume button to as follows: Selection buttons &#...
Owners Manual
Page 19
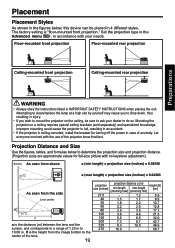
Attempting to clean/replace the lamp at a high site by yourself may cause you to drop down, thus resulting in injury. • If you wish to mount the projector on a ceiling requires special ceiling brackets (sold separately) and specialized knowledge. Floor-mounted front projection Floor-...instructions listed in 4 different styles. Set the projection type in the Advanced menu p.32 , in accordance with the use of the projector know that fact. Placement Placement Styles As shown in the figures below to determine the projection size and projection distance. (Projection sizes are...
Attempting to clean/replace the lamp at a high site by yourself may cause you to drop down, thus resulting in injury. • If you wish to mount the projector on a ceiling requires special ceiling brackets (sold separately) and specialized knowledge. Floor-mounted front projection Floor-...instructions listed in 4 different styles. Set the projection type in the Advanced menu p.32 , in accordance with the use of the projector know that fact. Placement Placement Styles As shown in the figures below to determine the projection size and projection distance. (Projection sizes are...
Owners Manual
Page 21
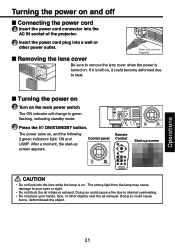
... the power cord 1 Insert the power cord connector into the AC IN socket of the projector. 2 Insert the power cord plug into the lens while the lamp is turned on , and the following 2 green indicators light: ON and LAMP. After a moment, the start-up screen CAUTION • Do not look into a ...(Supplied) ■ Removing the lens cover Be sure to green flashing, indicating standby mode. 2 Press the I/ ON/STANDBY button. The strong light from the lamp may cause damage to internal overheating. • Do not place your eyes or sight. • Do not block the air intake or exhaust.
... the power cord 1 Insert the power cord connector into the AC IN socket of the projector. 2 Insert the power cord plug into the lens while the lamp is turned on , and the following 2 green indicators light: ON and LAMP. After a moment, the start-up screen CAUTION • Do not look into a ...(Supplied) ■ Removing the lens cover Be sure to green flashing, indicating standby mode. 2 Press the I/ ON/STANDBY button. The strong light from the lamp may cause damage to internal overheating. • Do not place your eyes or sight. • Do not block the air intake or exhaust.
Owners Manual
Page 22
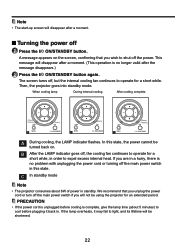
...an extended period. A message appears on . When cooling lamp During internal cooling After cooling complete (Green) Flashing (Green) (Green) (Green) Flashing A B C A During cooling, the LAMP indicator flashes. If you will not be using the projector for a short while. PRECAUTION • If the ...ON/STANDBY button. In this state. C In standby mode Note • The projector consumes about 5 minutes) to light, and its lifetime will disappear after a moment. (This operation is complete, give the lamp time (about 6W of power in this state, the power cannot be shortened....
...an extended period. A message appears on . When cooling lamp During internal cooling After cooling complete (Green) Flashing (Green) (Green) (Green) Flashing A B C A During cooling, the LAMP indicator flashes. If you will not be using the projector for a short while. PRECAUTION • If the ...ON/STANDBY button. In this state. C In standby mode Note • The projector consumes about 5 minutes) to light, and its lifetime will disappear after a moment. (This operation is complete, give the lamp time (about 6W of power in this state, the power cannot be shortened....

Owners Manual
Page 24
...appear. • If no signal is not malfunction. (The lifetime of the lamp depends on the projector and the monitor's display may be black spots (pixels that do not light) or bright spots (pixels that a lamp characteristics may rarely cause the brightness to SVGA (800 × 600) resolution...properly. Please note that the computer's external output should be set to fluctuate slightly. • A lamp is input, the "For best image quality, lower image resolution. 5 Projector placement angle adjustments The placement angle and the height of the projected image can be adjusted when an ...
...appear. • If no signal is not malfunction. (The lifetime of the lamp depends on the projector and the monitor's display may be black spots (pixels that do not light) or bright spots (pixels that a lamp characteristics may rarely cause the brightness to SVGA (800 × 600) resolution...properly. Please note that the computer's external output should be set to fluctuate slightly. • A lamp is input, the "For best image quality, lower image resolution. 5 Projector placement angle adjustments The placement angle and the height of the projected image can be adjusted when an ...

Owners Manual
Page 32
RGB YCbCr YPbPr Uses this function to dim the projector lamp light output which will also change on and off the lamp if the projector does not detect an input signal for RGB input signal only. Selects the position of on-screen display menu on ... Auto Shutdown OSD Timeout Menu Position Factory Reset Description Automatically scans the input source. Lamp hour counter is reversed horizontally. Manually selects signal type. The image is displayed in second). Resets the projector to apply. The image is selectable for specified time period (30 minutes). ON ...
RGB YCbCr YPbPr Uses this function to dim the projector lamp light output which will also change on and off the lamp if the projector does not detect an input signal for RGB input signal only. Selects the position of on-screen display menu on ... Auto Shutdown OSD Timeout Menu Position Factory Reset Description Automatically scans the input source. Lamp hour counter is reversed horizontally. Manually selects signal type. The image is displayed in second). Resets the projector to apply. The image is selectable for specified time period (30 minutes). ON ...

Owners Manual
Page 34
...lamp could burn out. Lamp replacement A lamp is not malfunction. (The lifetime of the lamp depends on the ceiling, it is broken • If glass components, including a lamp and a lens, should break, please handle with care to avoid injury due to broken pieces and contact your Toshiba dealership when the lamp... from the wall outlet, leave and completely ventilate the room. Then, thoroughly clean the area around the projector and discard any edible items placed in the lamp along with a loud noise due to impact or deterioration, or fail to use your dealer for repair service...
...lamp could burn out. Lamp replacement A lamp is not malfunction. (The lifetime of the lamp depends on the ceiling, it is broken • If glass components, including a lamp and a lens, should break, please handle with care to avoid injury due to broken pieces and contact your Toshiba dealership when the lamp... from the wall outlet, leave and completely ventilate the room. Then, thoroughly clean the area around the projector and discard any edible items placed in the lamp along with a loud noise due to impact or deterioration, or fail to use your dealer for repair service...

Owners Manual
Page 35
Wait for at least 1 hour. 3 Remove the lamp cover. 3 1 1 Lamp cover Loosen the screws on p.37 , and the lamp's lifetime may be automatically reset. Grasp the lamp handle and pull the 4 1 lamp assembly directly out of the projector. 5 Mount the new lamp. 2 2 Align the orientation, press down until the bottom is reached, and lock in place using the...
Wait for at least 1 hour. 3 Remove the lamp cover. 3 1 1 Lamp cover Loosen the screws on p.37 , and the lamp's lifetime may be automatically reset. Grasp the lamp handle and pull the 4 1 lamp assembly directly out of the projector. 5 Mount the new lamp. 2 2 Align the orientation, press down until the bottom is reached, and lock in place using the...
Owners Manual
Page 36
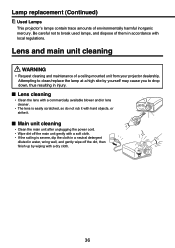
...after unplugging the power cord. • Wipe dirt off the dirt, then finish up by yourself may cause you to break used lamps, and dispose of them in water, wring well, and gently wipe off the main unit gently with a soft cloth. •...Lens and main unit cleaning WARNING • Request cleaning and maintenance of environmentally harmful inorganic mercury. Lamp replacement (Continued) Used Lamps This projector's lamps contain trace amounts of a ceiling-mounted unit from your projector dealership. Attempting to clean/replace the lamp at a high site by wiping with local regulations.
...after unplugging the power cord. • Wipe dirt off the dirt, then finish up by yourself may cause you to break used lamps, and dispose of them in water, wring well, and gently wipe off the main unit gently with a soft cloth. •...Lens and main unit cleaning WARNING • Request cleaning and maintenance of environmentally harmful inorganic mercury. Lamp replacement (Continued) Used Lamps This projector's lamps contain trace amounts of a ceiling-mounted unit from your projector dealership. Attempting to clean/replace the lamp at a high site by wiping with local regulations.

Owners Manual
Page 37
...(Green) Flashing (Green) (Amber) Flashing (Green) The lamp is in good condition and is cooling the lamp for shutdown. The projector is powered and ready. (Green) Flashing (Green) Flashing (Amber) The projector system has some problems with its end of projector state. Do not unplug the power cable or turn off. ...If the lamp is too high. The lamp will turn the power switch off before the lamp LED turns off , then the ballast ...
...(Green) Flashing (Green) (Amber) Flashing (Green) The lamp is in good condition and is cooling the lamp for shutdown. The projector is powered and ready. (Green) Flashing (Green) Flashing (Amber) The projector system has some problems with its end of projector state. Do not unplug the power cable or turn off. ...If the lamp is too high. The lamp will turn the power switch off before the lamp LED turns off , then the ballast ...
Owners Manual
Page 38
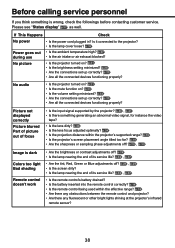
... or contrast adjustments off? p.28 , p.29 • Is the screen dirty? • Is the lamp nearing the end of focus • Is the input signal supported by the projector? p.21 • Is the brightness setting minimized? p.18 • Are there any obstructions between the remote... control and projector? • Are there any fluorescent or other bright lights shining at the projector's infrared remote sensor? 38 Is it connected to the projector? • Is the lamp cover loose? p.36 • Is the lens focus adjusted ...
... or contrast adjustments off? p.28 , p.29 • Is the screen dirty? • Is the lamp nearing the end of focus • Is the input signal supported by the projector? p.21 • Is the brightness setting minimized? p.18 • Are there any obstructions between the remote... control and projector? • Are there any fluorescent or other bright lights shining at the projector's infrared remote sensor? 38 Is it connected to the projector? • Is the lamp cover loose? p.36 • Is the lens focus adjusted ...

