
Owners Manual
Page 2
.... REFER SERVICING TO QUALIFIED PERSONNEL ONLY. MODEL NAME: TDP-S20 USA only TRADE NAME: DATA PROJECTOR Tested To Comply With FCC Standards FOR HOME OR OFFICE USE MODEL NAME: TDP-S20 FCC NOTICE: This device complies with the limits for help. This equipment generates, uses and can radiate radio frequency energy and, if not installed and used in a residential installation. If this product or cords associated with...
.... REFER SERVICING TO QUALIFIED PERSONNEL ONLY. MODEL NAME: TDP-S20 USA only TRADE NAME: DATA PROJECTOR Tested To Comply With FCC Standards FOR HOME OR OFFICE USE MODEL NAME: TDP-S20 FCC NOTICE: This device complies with the limits for help. This equipment generates, uses and can radiate radio frequency energy and, if not installed and used in a residential installation. If this product or cords associated with...

Owners Manual
Page 3
... REMOVE THE CABINET COVER, OR YOU MAY BE EXPOSED TO DANGEROUS VOLTAGE. Read Owner's Manual 3. Power Sources 4. The openings should be repaired by the user. Use a soft cloth for installation, use liquid cleaners or aerosol cleaners. Before Using IMPORTANT SAFETY INSTRUCTIONS CAUTION: PLEASE READ AND OBSERVE ALL WARNINGS AND INSTRUCTIONS GIVEN IN THIS OWNER'S MANUAL AND THOSE MARKED ON THE UNIT. Do not look into the lens while the lamp...
... REMOVE THE CABINET COVER, OR YOU MAY BE EXPOSED TO DANGEROUS VOLTAGE. Read Owner's Manual 3. Power Sources 4. The openings should be repaired by the user. Use a soft cloth for installation, use liquid cleaners or aerosol cleaners. Before Using IMPORTANT SAFETY INSTRUCTIONS CAUTION: PLEASE READ AND OBSERVE ALL WARNINGS AND INSTRUCTIONS GIVEN IN THIS OWNER'S MANUAL AND THOSE MARKED ON THE UNIT. Do not look into the lens while the lamp...
Owners Manual
Page 4
... other hazards. Attachments Do not use the product in damage and will often require extensive work by the product manufacturer as opening or removing covers may touch dangerous voltage points or short-out parts that area. 18. If glass components, including lens and lamp, should break, contact your dealer for repair service. If such parts should be moved with care to...
... other hazards. Attachments Do not use the product in damage and will often require extensive work by the product manufacturer as opening or removing covers may touch dangerous voltage points or short-out parts that area. 18. If glass components, including lens and lamp, should break, contact your dealer for repair service. If such parts should be moved with care to...
Owners Manual
Page 5
.... IMPORTANT SAFETY INSTRUCTIONS (Continued) 19. Safety Check Upon completion of any other hazards. (Replacement of fire. 8 POWER SUPPLY CORD SELECTION If your hands caught when setting the camera arm back in its original position. (Models equipped with children should be careful not to such a change in a risk of the lamp only should be sure the service technician has used replacement parts specified by users.) 20...
.... IMPORTANT SAFETY INSTRUCTIONS (Continued) 19. Safety Check Upon completion of any other hazards. (Replacement of fire. 8 POWER SUPPLY CORD SELECTION If your hands caught when setting the camera arm back in its original position. (Models equipped with children should be careful not to such a change in a risk of the lamp only should be sure the service technician has used replacement parts specified by users.) 20...
Owners Manual
Page 6
....) arising from the use of or the inability to use this Instruction Manual. • Toshiba Corporation accepts no liability whatsoever for a long time. EXEMPTION CLAUSES • Toshiba Corporation bears no responsibility in the case of damages arising from natural disaster such as follows. Trademarks • VGA, SVGA, XGA, SXGA, UXGA are trademarks or registered trademarks of the imaging software or broadcast program...
....) arising from the use of or the inability to use this Instruction Manual. • Toshiba Corporation accepts no liability whatsoever for a long time. EXEMPTION CLAUSES • Toshiba Corporation bears no responsibility in the case of damages arising from natural disaster such as follows. Trademarks • VGA, SVGA, XGA, SXGA, UXGA are trademarks or registered trademarks of the imaging software or broadcast program...
Owners Manual
Page 7
... display setting menu 31 The default setting menu 32 Displaying Information (Status display 33 Using the document camera 34 How to use the document camera 34 Image projection with the document camera 36 Locking the white balance 37 Maintenance About lamp ...38 Lamp replacement 38 Lens and main unit cleaning 40 12 Others Trouble indications 41 Before calling service personnel 42 Specifications ...44 List of general specifications 44 Document camera specifications (TDP-S21 44 List of supported signals (RGB signals...
... display setting menu 31 The default setting menu 32 Displaying Information (Status display 33 Using the document camera 34 How to use the document camera 34 Image projection with the document camera 36 Locking the white balance 37 Maintenance About lamp ...38 Lamp replacement 38 Lens and main unit cleaning 40 12 Others Trouble indications 41 Before calling service personnel 42 Specifications ...44 List of general specifications 44 Document camera specifications (TDP-S21 44 List of supported signals (RGB signals...
Owners Manual
Page 8
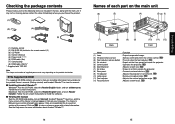
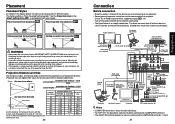
...Owner's Manual ■ (5) Power cord (See note) ■ (6) RGB cable (3m) ■ (7) Carrying bag ■ (8) RGB cable (25cm)* *: Supplied with the main unit. Follow the on the main unit (6) (5) (4) (3) (2) (1) (7) (8) (9) (9) Back (10) (11) (12) Front Name : Function (1) Lens (2) Infrared remote sensor (3) Foot adjuster release button (4) Air exhaust (5) Control panel (6) Zooming lever (7) Air intake (8) Rear panel (9) Tilt adjuster (10) Lamp cover (11) Foot adjuster (12) Focusing lever : Projects expanded image. : Senses commands from outside the projector. : Connects...
...Owner's Manual ■ (5) Power cord (See note) ■ (6) RGB cable (3m) ■ (7) Carrying bag ■ (8) RGB cable (25cm)* *: Supplied with the main unit. Follow the on the main unit (6) (5) (4) (3) (2) (1) (7) (8) (9) (9) Back (10) (11) (12) Front Name : Function (1) Lens (2) Infrared remote sensor (3) Foot adjuster release button (4) Air exhaust (5) Control panel (6) Zooming lever (7) Air intake (8) Rear panel (9) Tilt adjuster (10) Lamp cover (11) Foot adjuster (12) Focusing lever : Projects expanded image. : Senses commands from outside the projector. : Connects...
Owners Manual
Page 9
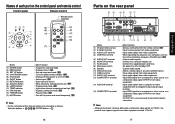
... source, or a component video signal (Y/PB/PR) from video equipment. : When operating the projector via a computer, connect this to as Y/PB/PR, the product also supports signals from video equipment marked "Y/CB/CR." 17 Preparations For TDP-S21, use exclusively for document camera connection. p.22 : Displays whether power is on /off the picture and sound temporarily. p.22 : Selects input. p.28 : Cuts off (standby). p.29 : Sets up image and mode. p.23 : Lights when internal temperature...
... source, or a component video signal (Y/PB/PR) from video equipment. : When operating the projector via a computer, connect this to as Y/PB/PR, the product also supports signals from video equipment marked "Y/CB/CR." 17 Preparations For TDP-S21, use exclusively for document camera connection. p.22 : Displays whether power is on /off the picture and sound temporarily. p.22 : Selects input. p.28 : Cuts off (standby). p.29 : Sets up image and mode. p.23 : Lights when internal temperature...
Owners Manual
Page 10
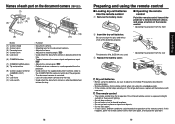
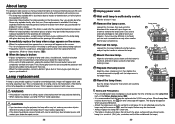
... camera input and previous input. e Replace the battery cover. • Operating the projector from remote control when not using the remote control ■ Loading dry-cell batteries into the remote control q Remove the battery cover. ■ Operating the remote control Point the remote control toward the projector's infrared remote sensor, and press a button on the document camera (TDP-S21) (1) (2) (10) (4) (6) (7) (3) (8) (12) (5) (9) (11) Name (1) Camera head (2) Camera lens (3) Focusing lever (4) Camera arm (5) Lock lever (6) CAMERA button (7) CAMERA GAIN buttons (8) Tip...
... camera input and previous input. e Replace the battery cover. • Operating the projector from remote control when not using the remote control ■ Loading dry-cell batteries into the remote control q Remove the battery cover. ■ Operating the remote control Point the remote control toward the projector's infrared remote sensor, and press a button on the document camera (TDP-S21) (1) (2) (10) (4) (6) (7) (3) (8) (12) (5) (9) (11) Name (1) Camera head (2) Camera lens (3) Focusing lever (4) Camera arm (5) Lock lever (6) CAMERA button (7) CAMERA GAIN buttons (8) Tip...
Owners Manual
Page 11
... Projection mode in the default setting menu p.32 , in accordance with TDP-S21) Audio cable (not supplied) To audio output To audio output To audio output White (L)/ Red (R) AV cable (not supplied) To video output RGB cable (supplied) To RGB output VCR Monitor cable Mini D-sub 15P-BNC (not supplied) To Y/CB/CR output Green (Y)/Blue (CB)/Red (CR) Conversion adapter BNC-pin (not supplied) Computer Document camera Computer DVD video recorder, etc. Attempting to clean/replace the lamp at a high...
... Projection mode in the default setting menu p.32 , in accordance with TDP-S21) Audio cable (not supplied) To audio output To audio output To audio output White (L)/ Red (R) AV cable (not supplied) To video output RGB cable (supplied) To RGB output VCR Monitor cable Mini D-sub 15P-BNC (not supplied) To Y/CB/CR output Green (Y)/Blue (CB)/Red (CR) Conversion adapter BNC-pin (not supplied) Computer Document camera Computer DVD video recorder, etc. Attempting to clean/replace the lamp at a high...
Owners Manual
Page 12
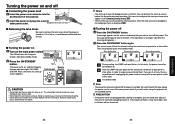
... to shut off the power. Control panel Remote Control TEMP LAMP FAN (Orange) Start-up screen will disappear after the message disappears.) 2 Press the ON/STANDBY button again. C In standby mode Note • The projector consumes about 5 minutes) to heat. ■ Turning the power on 1 Turn on . If the lamp overheats, it back in a hurry, there is displayed p.24 . ■ Turning the power off 1 Press the ON/STANDBY button. Operations Turning the power on and off ■ Connecting the power cord 1 Insert the power cord...
... to shut off the power. Control panel Remote Control TEMP LAMP FAN (Orange) Start-up screen will disappear after the message disappears.) 2 Press the ON/STANDBY button again. C In standby mode Note • The projector consumes about 5 minutes) to heat. ■ Turning the power on 1 Turn on . If the lamp overheats, it back in a hurry, there is displayed p.24 . ■ Turning the power off 1 Press the ON/STANDBY button. Operations Turning the power on and off ■ Connecting the power cord 1 Insert the power cord...
Owners Manual
Page 13
... is connected and turned on the power. q Lift up the projector while pressing the foot adjuster release button, then slowly lower the projector. 6 Adjusting the screen size and focus q Use the zooming lever to adjust the focus. 2 7 Adjusting the volume with the DVD software for lamp power selection and configuration is displayed in a selected language. w Use the focusing lever to adjust the screen 1 size. If this projector (SVGA) will be adjusted when an audio signal is being input from the Default setting menu p.32...
... is connected and turned on the power. q Lift up the projector while pressing the foot adjuster release button, then slowly lower the projector. 6 Adjusting the screen size and focus q Use the zooming lever to adjust the focus. 2 7 Adjusting the volume with the DVD software for lamp power selection and configuration is displayed in a selected language. w Use the focusing lever to adjust the screen 1 size. If this projector (SVGA) will be adjusted when an audio signal is being input from the Default setting menu p.32...

Owners Manual
Page 14
... supported by using simple operations. 1 Press the SET UP button. Use the buttons to adjust the items in a slant angle of ±15 degrees. • Keystone adjustment will not change the projector placement angle while projecting the image, the picture will undergo keystone (trapezoidal) distortion. Using handy features ■ Using auto setting This function sets up the projector to the optimum state for each type of the input signal by the projector p.45 , p.46 . • Keystone adjustment...
... supported by using simple operations. 1 Press the SET UP button. Use the buttons to adjust the items in a slant angle of ±15 degrees. • Keystone adjustment will not change the projector placement angle while projecting the image, the picture will undergo keystone (trapezoidal) distortion. Using handy features ■ Using auto setting This function sets up the projector to the optimum state for each type of the input signal by the projector p.45 , p.46 . • Keystone adjustment...
Owners Manual
Page 15
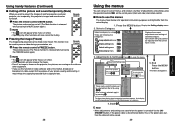
...; Cutting off the picture and sound temporarily (Mute) When you use this projector's images and sound can call up on-screen menus, and conduct a number of adjustments and settings using the operation buttons p.16 on the control panel (main unit side) and remote control. ■ How to use the following four categories: Image adjustment menu p.30 Display setting menu p.31 Displays the current adjustments and settings of selected category. temporarily, this function on video software sold on the market...
...; Cutting off the picture and sound temporarily (Mute) When you use this projector's images and sound can call up on-screen menus, and conduct a number of adjustments and settings using the operation buttons p.16 on the control panel (main unit side) and remote control. ■ How to use the following four categories: Image adjustment menu p.30 Display setting menu p.31 Displays the current adjustments and settings of selected category. temporarily, this function on video software sold on the market...
Owners Manual
Page 16
... image color. Lighter Deeper No Yes Yes No Tint *1 Adjust the tint of the languages below to use for displaying the menu and messages [ : Enter setting mode] [ :Selection] [Apply: ] English/Français/Deutsch/Italiano/Español/Português/Russian/ Swedish/Türkçe/ / / / Screen to display when there is no input signal (Logo) (Blue) (Black) Display icons as function guides On Off Display start-up screen when power...
... image color. Lighter Deeper No Yes Yes No Tint *1 Adjust the tint of the languages below to use for displaying the menu and messages [ : Enter setting mode] [ :Selection] [Apply: ] English/Français/Deutsch/Italiano/Español/Português/Russian/ Swedish/Türkçe/ / / / Screen to display when there is no input signal (Logo) (Blue) (Black) Display icons as function guides On Off Display start-up screen when power...
Owners Manual
Page 17
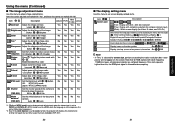
... 4: Displays [Lamp time] as a counter of lamp use the projector, for customer service, etc. "Yes": displayed, "No": not displayed Item Input Mode name H-resolution V-resolution H-frequency V-frequency Sync Signal format Video mode Lamp time Lamp reset count Total time Version Description Computer Y/PB/PR Input source name Yes Yes RGB input mode [Note 1] Yes No Horizontal resolution (in dots) Yes No Vertical resolution (in accordance with signals is referred to [High] increases the cooling fan speed. Using the menu (Continued) ■ The default setting menu This menu shows...
... 4: Displays [Lamp time] as a counter of lamp use the projector, for customer service, etc. "Yes": displayed, "No": not displayed Item Input Mode name H-resolution V-resolution H-frequency V-frequency Sync Signal format Video mode Lamp time Lamp reset count Total time Version Description Computer Y/PB/PR Input source name Yes Yes RGB input mode [Note 1] Yes No Horizontal resolution (in dots) Yes No Vertical resolution (in accordance with signals is referred to [High] increases the cooling fan speed. Using the menu (Continued) ■ The default setting menu This menu shows...
Owners Manual
Page 20
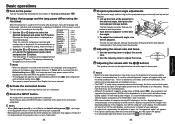
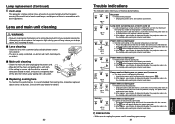
... Precautions • Press the button twice to display (a rough guide) the time of the arrow with care to cool (for your convenience. 4 Pull out the lamp. Wait for the lamp to avoid injury and contact your dealer for repair service. 38 1 Unplug power cord. 2 Wait until the lamp cover is no longer loose. 2 5 1 7 Reset the lamp timer. Wait for instructions on a ceiling, request a lamp replacement from the wall outlet...
... Precautions • Press the button twice to display (a rough guide) the time of the arrow with care to cool (for your convenience. 4 Pull out the lamp. Wait for the lamp to avoid injury and contact your dealer for repair service. 38 1 Unplug power cord. 2 Wait until the lamp cover is no longer loose. 2 5 1 7 Reset the lamp timer. Wait for instructions on a ceiling, request a lamp replacement from the wall outlet...
Owners Manual
Page 21
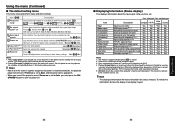
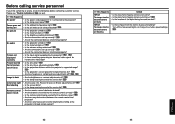
... a ceiling-mounted unit from your projector dealership. LAMP (Orange flashing) LAMP (Green lit or Off) TEMP FAN (Red lit) TEMP (Green lit or Off) (Red lit) FAN (Green flashing) Power went out during use , or won 't come on ⇒ Lamp temperature is not correctly connected. • Disconnect the power plug and check the connection with the camera. ❈ The icon will not clear the problem, unplug the power cord, and contact your dealer for details. 40 Others Trouble indications The indicator lights...
... a ceiling-mounted unit from your projector dealership. LAMP (Orange flashing) LAMP (Green lit or Off) TEMP FAN (Red lit) TEMP (Green lit or Off) (Red lit) FAN (Green flashing) Power went out during use , or won 't come on ⇒ Lamp temperature is not correctly connected. • Disconnect the power plug and check the connection with the camera. ❈ The icon will not clear the problem, unplug the power cord, and contact your dealer for details. 40 Others Trouble indications The indicator lights...
Owners Manual
Page 22
... sampling phase adjustments off the fluorescent lights, or change the shutter speed settings. No audio • Is the projector turned on ? p.19 • Is the remote control being focused too dark? • Is there impact from the document camera are flickering Check • Is the document imaging camera's lens dirty? • Is the document imaging camera out of its service life? Turn off ? p.25 • Is the projection distance within...
... sampling phase adjustments off the fluorescent lights, or change the shutter speed settings. No audio • Is the projector turned on ? p.19 • Is the remote control being focused too dark? • Is there impact from the document camera are flickering Check • Is the document imaging camera's lens dirty? • Is the document imaging camera out of its service life? Turn off ? p.25 • Is the projection distance within...
Owners Manual
Page 23
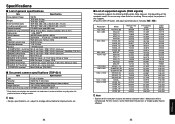
... resolution (800 × 600 pixels) will be affected. 44 45 Please adjust the projector if this reason, some information may be lost, or image quality may show flicker or streaking. Connection terminal Others Specifications ■ List of supported signals (RGB signals) This projector supports the following RGB signals. subject to change without notice for improvements, etc. ■ List of general specifications Item Specification Consumption Power 230 W Weight TDP-S20...
... resolution (800 × 600 pixels) will be affected. 44 45 Please adjust the projector if this reason, some information may be lost, or image quality may show flicker or streaking. Connection terminal Others Specifications ■ List of supported signals (RGB signals) This projector supports the following RGB signals. subject to change without notice for improvements, etc. ■ List of general specifications Item Specification Consumption Power 230 W Weight TDP-S20...


