

User Guide
Page 1
... CONTENTS Safety Instructions iii Introduction 1 Image Resolution 1 Compatibility 1 Unpacking the Projector 1 Usage Guidelines 3 If You Need Assistance 4 Warranty 4 Setting up the Projector 5 Connecting a Computer 7 Connecting a Video Player 9 Powering up the Projector and Adjusting the Image 11 Turning Off the Projector 12 Using the Projector 13 Basic Image Adjustment 13 Using the Remote Control 13 Adjusting...
... CONTENTS Safety Instructions iii Introduction 1 Image Resolution 1 Compatibility 1 Unpacking the Projector 1 Usage Guidelines 3 If You Need Assistance 4 Warranty 4 Setting up the Projector 5 Connecting a Computer 7 Connecting a Video Player 9 Powering up the Projector and Adjusting the Image 11 Turning Off the Projector 12 Using the Projector 13 Basic Image Adjustment 13 Using the Remote Control 13 Adjusting...

User Guide
Page 3
...the power cord. Warning: Hot surface. Follow all service to the lamp door on . •Warning: To replace the lamp, turn the projector off by equipment. To avoid burns, wait 30 minutes before opening the lamp door. Connect the power cord to the User's Guide. Do ...not touch. Servicing your new projector. See the following page for the customer service contact information. • Caution: Don't block ventilation openings. Safety Terms: • Warning: Don't...
...the power cord. Warning: Hot surface. Follow all service to the lamp door on . •Warning: To replace the lamp, turn the projector off by equipment. To avoid burns, wait 30 minutes before opening the lamp door. Connect the power cord to the User's Guide. Do ...not touch. Servicing your new projector. See the following page for the customer service contact information. • Caution: Don't block ventilation openings. Safety Terms: • Warning: Don't...

User Guide
Page 4
... any edible items placed in a vendor-approved case; Spilled liquids may block the vents. Transport the projector in that may damage your Toshiba dealer or projectors.toshiba.com for more information. Important Operating Considerations Do not place the projector on the projector. In the unlikely event of the bulb rupturing, thoroughly clean the area behind the...
... any edible items placed in a vendor-approved case; Spilled liquids may block the vents. Transport the projector in that may damage your Toshiba dealer or projectors.toshiba.com for more information. Important Operating Considerations Do not place the projector on the projector. In the unlikely event of the bulb rupturing, thoroughly clean the area behind the...

User Guide
Page 5
... is missing. NOTE: The projector is specifically designed for easy, built-in Figure 1. It packs XGA 1024x768 graphics with the items shown in digital/analog and USB connectivity. The projector cannot compress screen resolutions above 1024x768. INTRODUCTION The Toshiba TDP-P3 is compatible with 1080i HDTV format. 1 Unpacking the Projector The projector comes with 16.7 million colors...
... is missing. NOTE: The projector is specifically designed for easy, built-in Figure 1. It packs XGA 1024x768 graphics with the items shown in digital/analog and USB connectivity. The projector cannot compress screen resolutions above 1024x768. INTRODUCTION The Toshiba TDP-P3 is compatible with 1080i HDTV format. 1 Unpacking the Projector The projector comes with 16.7 million colors...

User Guide
Page 6
TDP-P3 projector + lens cap 2. Power cord 5. Audio cable 9. M1-DA analog computer cable 7. Audio cable adapter 2 User's Guide and quick start card 4. Introduction NOTE: The contents of your 1 2 shipping box may vary depending on the projector configuration you've ordered. 5 7 6 11 4 9 8 3 10 FIGURE 1 Shipping box contents 1. Composite video cable 10. Soft carry case 3. Macintosh adaptor 8. S-video cable 11. Remote control 6.
TDP-P3 projector + lens cap 2. Power cord 5. Audio cable 9. M1-DA analog computer cable 7. Audio cable adapter 2 User's Guide and quick start card 4. Introduction NOTE: The contents of your 1 2 shipping box may vary depending on the projector configuration you've ordered. 5 7 6 11 4 9 8 3 10 FIGURE 1 Shipping box contents 1. Composite video cable 10. Soft carry case 3. Macintosh adaptor 8. S-video cable 11. Remote control 6.

User Guide
Page 7
The bright light may harm your Toshiba dealer or projectors.toshiba.com for extended periods of projector Usage Guidelines • Do not look directly into the projection lens when the lamp is turned on. speaker zoom ring keypad Security lock focus ring ... components. Restricting the air flow can cause it to reach room temperature before attempting to drop it back on the projector. refer to overheat and turn it . • Avoid leaving the projector in a vendor-approved hard or soft case; Be especially careful not to turn off. If this happens, allow it to...
The bright light may harm your Toshiba dealer or projectors.toshiba.com for extended periods of projector Usage Guidelines • Do not look directly into the projection lens when the lamp is turned on. speaker zoom ring keypad Security lock focus ring ... components. Restricting the air flow can cause it to reach room temperature before attempting to drop it back on the projector. refer to overheat and turn it . • Avoid leaving the projector in a vendor-approved hard or soft case; Be especially careful not to turn off. If this happens, allow it to...

User Guide
Page 9
..."Projected Image Size" on page 46. 13.0 ft. 7.8 ft. 3.2 ft. 5 ft. 12 ft. 20 ft. SETTING UP THE PROJECTOR 1 Place the projector on a flat surface. • The projector must be within 10 feet (3 m) of your power source and within 6 feet (1.8 m) of your computer. • If you want... to project from the lens of the projector to reverse the image. 2 Position the projector the desired distance from the screen. • The distance from behind a translucent screen, set up the projector behind your screen. Figure 3 shows three projected image sizes.
..."Projected Image Size" on page 46. 13.0 ft. 7.8 ft. 3.2 ft. 5 ft. 12 ft. 20 ft. SETTING UP THE PROJECTOR 1 Place the projector on a flat surface. • The projector must be within 10 feet (3 m) of your power source and within 6 feet (1.8 m) of your computer. • If you want... to project from the lens of the projector to reverse the image. 2 Position the projector the desired distance from the screen. • The distance from behind a translucent screen, set up the projector behind your screen. Figure 3 shows three projected image sizes.

User Guide
Page 10
If you continue, make sure the distance between it and the projector is turned off. in in composite S-video video Audio in FIGURE 4 Connector panel M1-DA data interface to USB mouse to computer video to computer FIGURE 5 M1-DA analog computer cable to projector 6 Setting up the Projector NOTE: Before you 're connecting a computer, make sure the projector is unplugged and your equipment is 6 feet or less.
If you continue, make sure the distance between it and the projector is turned off. in in composite S-video video Audio in FIGURE 4 Connector panel M1-DA data interface to USB mouse to computer video to computer FIGURE 5 M1-DA analog computer cable to projector 6 Setting up the Projector NOTE: Before you 're connecting a computer, make sure the projector is unplugged and your equipment is 6 feet or less.

User Guide
Page 11
... analog computer cable FIGURE 6 Connecting the projector to your computer. Connecting a Computer The projector ships with an M1-DA analog computer cable. USB mouse in in the Appendix of the M1-DA analog computer cable into the video connector on page 40 or visit support.toshiba.com for the command that does not...
... analog computer cable FIGURE 6 Connecting the projector to your computer. Connecting a Computer The projector ships with an M1-DA analog computer cable. USB mouse in in the Appendix of the M1-DA analog computer cable into the video connector on page 40 or visit support.toshiba.com for the command that does not...

User Guide
Page 12
... USB mouse is supported for use it (it is hotpluggable). Do you 're ready to power up the Projector and Adjusting the Image" on page 11. 8 Skip to control the computer's mouse from the projector's remote or keypad? 1 Plug the end of the audio cable into the on your computer. connector Now... you want to "Powering up the projector and your computer. 2 Plug the other end of the M1-DA analog computer cable into the audio connector on your computer. Do you want to ...
... USB mouse is supported for use it (it is hotpluggable). Do you 're ready to power up the Projector and Adjusting the Image" on page 11. 8 Skip to control the computer's mouse from the projector's remote or keypad? 1 Plug the end of the audio cable into the on your computer. connector Now... you want to "Powering up the projector and your computer. 2 Plug the other end of the M1-DA analog computer cable into the audio connector on your computer. Do you want to ...

User Guide
Page 13
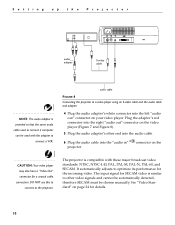
... out" connector on the video player (Figure 8). 3 Plug the other end of the cable into the "video-out" connector on the projector (Figure 8). nector on the projector. • If you 're using an S-video cable, connect it to the audio cable and audio adapter. 2 Plug the composite video... uses a round, four-prong S-video connector, you'll need only the audio cable, audio adapter, and composite video cable that shipped with the projector. • If your video player (Figure 7). See the previous pages for details. NOTE: HDTV sources are connected to a video player using the...
... out" connector on the video player (Figure 8). 3 Plug the other end of the cable into the "video-out" connector on the projector (Figure 8). nector on the projector. • If you 're using an S-video cable, connect it to the audio cable and audio adapter. 2 Plug the composite video... uses a round, four-prong S-video connector, you'll need only the audio cable, audio adapter, and composite video cable that shipped with the projector. • If your video player (Figure 7). See the previous pages for details. NOTE: HDTV sources are connected to a video player using the...
User Guide
Page 14
... connector on page 24 for a coaxial cable connection. audio cable FIGURE 8 Connecting the projector to connect a VCR. DO NOT use this to connect to connect a computer can be chosen manually. The projector is similar to other end into the audio cable. 6 Plug the audio cable into ...'s other video signals and cannot be automatically detected, therefore SECAM must be used to the projector. The input signal for the incoming video. Setting up the Projector audio adapter in in " projector. Plug the adapter's red connector into the "audio in S-video cable NOTE: The audio...
... connector on page 24 for a coaxial cable connection. audio cable FIGURE 8 Connecting the projector to connect a VCR. DO NOT use this to connect to connect a computer can be chosen manually. The projector is similar to other end into the audio cable. 6 Plug the audio cable into ...'s other video signals and cannot be automatically detected, therefore SECAM must be used to the projector. The input signal for the incoming video. Setting up the Projector audio adapter in in " projector. Plug the adapter's red connector into the "audio in S-video cable NOTE: The audio...

User Guide
Page 15
..., press the source button on the keypad (page 16) or the video button on the remote to load the correct driver (the computer considers the projector a Plug and Play Monitor). Make sure your electrical outlet. NOTE: The first time you connected a video player, turn the lamp on and off. 3 Turn on... the lamp by pressing the lamp on/off button on /off button to the projector, the computer may appear. For more information about the menus, see Figure 12 on page 16). • The startup screen appears. 4 If you connect ...
..., press the source button on the keypad (page 16) or the video button on the remote to load the correct driver (the computer considers the projector a Plug and Play Monitor). Make sure your electrical outlet. NOTE: The first time you connected a video player, turn the lamp on and off. 3 Turn on... the lamp by pressing the lamp on/off button on /off button to the projector, the computer may appear. For more information about the menus, see Figure 12 on page 16). • The startup screen appears. 4 If you connect ...

User Guide
Page 16
... image again.) To completely power off , then wait 1 minute while the lamp cools before unplugging the projector. If you want to cool. see "Standby Time" on immediately, you turn the lamp back on... page 24 for the lamp to turn the lamp off the projector, unplug it 's too hot. 12 The Lamp LED will be extended if you must allow about a... minute for details.) After 15 minutes, the lamp goes out (the projector keeps running . (You can change the amount of time, press the standby button on the Lamp LED...
... image again.) To completely power off , then wait 1 minute while the lamp cools before unplugging the projector. If you want to cool. see "Standby Time" on immediately, you turn the lamp back on... page 24 for the lamp to turn the lamp off the projector, unplug it 's too hot. 12 The Lamp LED will be extended if you must allow about a... minute for details.) After 15 minutes, the lamp goes out (the projector keeps running . (You can change the amount of time, press the standby button on the Lamp LED...
User Guide
Page 17
...is about 25 feet. NOTE: To control the computer's mouse from the on the bottom. See page 8 for optimum operation is out of the projector (page 15) or center the image by adjusting its horizontal or vertical position (page 23). For best results, point the remote directly at the ... bars after you must be less than or equal to the computer. Basic Image Adjustment 1 Make sure you point the remote at the projector. USING THE PROJECTOR This section describes how to use and make adjustments to reset the automatic sync and tracking. If that has four function buttons, a disk...
...is about 25 feet. NOTE: To control the computer's mouse from the on the bottom. See page 8 for optimum operation is out of the projector (page 15) or center the image by adjusting its horizontal or vertical position (page 23). For best results, point the remote directly at the ... bars after you must be less than or equal to the computer. Basic Image Adjustment 1 Make sure you point the remote at the projector. USING THE PROJECTOR This section describes how to use and make adjustments to reset the automatic sync and tracking. If that has four function buttons, a disk...

User Guide
Page 18
... the edge of the remote simulates your computer's right mouse button; Then, when you're in PowerPoint's Slide Show mode, a left mouse button. Using the Projector disk mouse right mouse button NOTE: If the remote is inactive for this, choose Options from the Tools menu, click the View Tab, de-select...
... the edge of the remote simulates your computer's right mouse button; Then, when you're in PowerPoint's Slide Show mode, a left mouse button. Using the Projector disk mouse right mouse button NOTE: If the remote is inactive for this, choose Options from the Tools menu, click the View Tab, de-select...

User Guide
Page 19
... (under finger) elevator foot FIGURE 11 Adjusting the height of the projector 15 zoom ring focus ring FIGURE 10 Focus ring and zoom ring The projector is clear. To raise the projector: 1 Press and hold the elevator button (Figure 11). 2 Raise the projector to the height you want, then release the button to lock... the elevator foot into position. Adjusting the Projector To focus the image, rotate the focus ring (Figure 10) until the image is equipped with a self-locking, quick-release elevator foot and button (Figure ...
... (under finger) elevator foot FIGURE 11 Adjusting the height of the projector 15 zoom ring focus ring FIGURE 10 Focus ring and zoom ring The projector is clear. To raise the projector: 1 Press and hold the elevator button (Figure 11). 2 Raise the projector to the height you want, then release the button to lock... the elevator foot into position. Adjusting the Projector To focus the image, rotate the focus ring (Figure 10) until the image is equipped with a self-locking, quick-release elevator foot and button (Figure ...

User Guide
Page 20
... menus. An orange LED indicates the software is initializing or the lamp is currently on the remote. 16 Menu Press the menu button to the projector, select between them by pressing the source button on the keypad or the computer or video button on . For more than one source (computer ...Video (remote only) When you can turn the lamp on /off button to close the menus, the projector saves any changes you made. The Lamp LED indicates the state of the lamp. Using the Projector Using the Keypad and Remote Buttons While the menus are displayed, the volume, source, and standby buttons...
... menus. An orange LED indicates the software is initializing or the lamp is currently on the remote. 16 Menu Press the menu button to the projector, select between them by pressing the source button on the keypad or the computer or video button on . For more than one source (computer ...Video (remote only) When you can turn the lamp on /off button to close the menus, the projector saves any changes you made. The Lamp LED indicates the state of the lamp. Using the Projector Using the Keypad and Remote Buttons While the menus are displayed, the volume, source, and standby buttons...

User Guide
Page 21
see "Standby Time" on page 24 for details. • If you press standby again within 15 minutes, the projector returns to normal operations immediately. • If you press standby again after 15 minutes. Volume (keypad only) To increase the volume, press volume + ume, press ... don't press standby again, the lamp turns off after 15 minutes, there is displayed for 15 minutes. You can change the amount of time the projector stays in standby mode;
see "Standby Time" on page 24 for details. • If you press standby again within 15 minutes, the projector returns to normal operations immediately. • If you press standby again after 15 minutes. Volume (keypad only) To increase the volume, press volume + ume, press ... don't press standby again, the lamp turns off after 15 minutes, there is displayed for 15 minutes. You can change the amount of time the projector stays in standby mode;

User Guide
Page 22
...screen Reset all > Image Controls blue Language Status use the disk mouse on the keypad or remote. Using the On-Screen Menus The projector has six drop-down navigation buttons or the disk mouse to move back to the top of these buttons to navigate through to highlight the...made (for example, video standards do not apply to increase or decrease a value; some submenus, such as Brightness, consist of settings. Using the Projector NOTE: Some menu items may be grayed out at certain times. Some submenus, such as Standby Time, consist of options you scroll through the menus...
...screen Reset all > Image Controls blue Language Status use the disk mouse on the keypad or remote. Using the On-Screen Menus The projector has six drop-down navigation buttons or the disk mouse to move back to the top of these buttons to navigate through to highlight the...made (for example, video standards do not apply to increase or decrease a value; some submenus, such as Brightness, consist of settings. Using the Projector NOTE: Some menu items may be grayed out at certain times. Some submenus, such as Standby Time, consist of options you scroll through the menus...


