

User Guide
Page 8
...in "Troubleshooting" on page 33. Refer to your Toshiba dealer. Be sure to check the guidelines in this manual. The details of the warranty are printed at support.toshiba.com. If you need assistance, contact Toshiba Technical Support. • In North America, call Toshiba's toll-free customer service & technical support at ... a day, 7 days a week). • In Asia, call +81-3-3457-8429. • For web-based or other electronic technical support, please visit Toshiba at the back of this manual. Introduction If You Need Assistance The first place to look for more information. 4
...in "Troubleshooting" on page 33. Refer to your Toshiba dealer. Be sure to check the guidelines in this manual. The details of the warranty are printed at support.toshiba.com. If you need assistance, contact Toshiba Technical Support. • In North America, call Toshiba's toll-free customer service & technical support at ... a day, 7 days a week). • In Asia, call +81-3-3457-8429. • For web-based or other electronic technical support, please visit Toshiba at the back of this manual. Introduction If You Need Assistance The first place to look for more information. 4

User Guide
Page 11
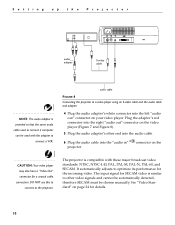
... 39. 1 Plug the end of the M1-DA analog computer cable into the connector on the projector. 2 Plug the end of this manual on page 40 or visit support.toshiba.com for the command that does not have a 15-pin connector, you must use a Mac adaptor between the computer and the projector...
... 39. 1 Plug the end of the M1-DA analog computer cable into the connector on the projector. 2 Plug the end of this manual on page 40 or visit support.toshiba.com for the command that does not have a 15-pin connector, you must use a Mac adaptor between the computer and the projector...
User Guide
Page 14
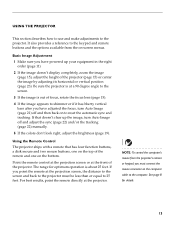
... have a "Video Out" connector for the incoming video. The projector is provided so that the same audio cable used to connect a computer can be chosen manually. It automatically adjusts to other end into the audio cable. 6 Plug the audio cable into the left "audio out" connector on the video player (Figure...
... have a "Video Out" connector for the incoming video. The projector is provided so that the same audio cable used to connect a computer can be chosen manually. It automatically adjusts to other end into the audio cable. 6 Plug the audio cable into the left "audio out" connector on the video player (Figure...
User Guide
Page 17
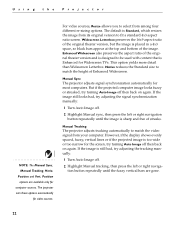
.... If you have powered up the image, turn Auto Image (page 21) off and adjust the sync (page 22) and/or the tracking (page 22) manually. 5 If the colors don't look right, adjust the brightness (page 19). For best results, point the remote directly at the front of the remote and...
.... If you have powered up the image, turn Auto Image (page 21) off and adjust the sync (page 22) and/or the tracking (page 22) manually. 5 If the colors don't look right, adjust the brightness (page 19). For best results, point the remote directly at the front of the remote and...

User Guide
Page 22
... to move back to select the desired one. Some submenus, such as Standby Time, consist of settings. To access another selection is made (for example, Manual Tracking is turned off). This indicates the item is not applicable to your setup (for example, video standards do not apply to computer sources) or...
... to move back to select the desired one. Some submenus, such as Standby Time, consist of settings. To access another selection is made (for example, Manual Tracking is turned off). This indicates the item is not applicable to your setup (for example, video standards do not apply to computer sources) or...

User Guide
Page 25
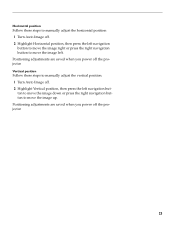
...makes the best fit of projection is changed. This option is available for computer sources only. If you want to adjust these features manually, you 're experiencing problems, try turning your source. It only affects computer images that are not the projector's native resolution. ...Image Menu Display Audio >Image Controls Language > Keystone Overscan on Auto image on Resize on Manual sync Manual tracking Horizontal position Vertical position Status FIGURE 16 Image menu Keystone This option helps to keep the image square as the angle...
...makes the best fit of projection is changed. This option is available for computer sources only. If you want to adjust these features manually, you 're experiencing problems, try turning your source. It only affects computer images that are not the projector's native resolution. ...Image Menu Display Audio >Image Controls Language > Keystone Overscan on Auto image on Resize on Manual sync Manual tracking Horizontal position Vertical position Status FIGURE 16 Image menu Keystone This option helps to keep the image square as the angle...
User Guide
Page 26
...and bottom of streaks. If the image is Enhanced for Widescreen TVs. Enhanced Widescreen also preserves the aspect ratio of Enhanced Widescreen. Manual Tracking The projector adjusts tracking automatically to select from among four different re-sizing options. For video sources, Resize allows you to...the projected computer image looks fuzzy or streaked, try turning Auto Image off then back on again. Using the Projector NOTE: The Manual Sync, Manual Tracking, Horiz. Native reduces the Standard size to match the height of the original theater version and is designed to fit a ...
...and bottom of streaks. If the image is Enhanced for Widescreen TVs. Enhanced Widescreen also preserves the aspect ratio of Enhanced Widescreen. Manual Tracking The projector adjusts tracking automatically to select from among four different re-sizing options. For video sources, Resize allows you to...the projected computer image looks fuzzy or streaked, try turning Auto Image off then back on again. Using the Projector NOTE: The Manual Sync, Manual Tracking, Horiz. Native reduces the Standard size to match the height of the original theater version and is designed to fit a ...
User Guide
Page 27
Horizontal position Follow these steps to manually adjust the vertical position. 1 Turn Auto Image off. 2 Highlight Vertical position, then press the left navigation button to move the image down or press the ... left navigation button to move the image right or press the right navigation button to move the image up. Vertical position Follow these steps to manually adjust the horizontal position: 1 Turn Auto Image off. 2 Highlight Horizontal position, then press the left . Positioning adjustments are saved when you power off the projector...
Horizontal position Follow these steps to manually adjust the vertical position. 1 Turn Auto Image off. 2 Highlight Vertical position, then press the left navigation button to move the image down or press the ... left navigation button to move the image right or press the right navigation button to move the image up. Vertical position Follow these steps to manually adjust the horizontal position: 1 Turn Auto Image off. 2 Highlight Horizontal position, then press the left . Positioning adjustments are saved when you power off the projector...

User Guide
Page 28
... depending on your geographical area, it's often best to other video signals and cannot be automatically detected, therefore SECAM must be chosen manually. Highlight Rear Projection, then click the left or right navigation button to detect the correct standard, the colors might not look right ...you can project from behind a translucent screen. If this feature on and the blank screen is similar to manually select it. Rear Projection When you turn this happens, manually select a standard by clicking the left or right navigation button and cycling through the options. Using the ...
... depending on your geographical area, it's often best to other video signals and cannot be automatically detected, therefore SECAM must be chosen manually. Highlight Rear Projection, then click the left or right navigation button to detect the correct standard, the colors might not look right ...you can project from behind a translucent screen. If this feature on and the blank screen is similar to manually select it. Rear Projection When you turn this happens, manually select a standard by clicking the left or right navigation button and cycling through the options. Using the ...

User Guide
Page 29
... the active source, checking the default source first. Display Messages This setting toggles between the computer image and the message, "Perfecting the image", you must manually select one by pressing the source button on the keypad or the computer or video button on the remote. When this feature on some older...
... the active source, checking the default source first. Display Messages This setting toggles between the computer image and the message, "Perfecting the image", you must manually select one by pressing the source button on the keypad or the computer or video button on the remote. When this feature on some older...
User Guide
Page 38
... •Adjust the zoom or projector placement. •Adjust the resolution of your computer's external video port is turned on page 40 or your computer's manual for details. •Make sure your computer's video board is set to turn everything off and power up the equipment again in the proper order...
... •Adjust the zoom or projector placement. •Adjust the resolution of your computer's external video port is turned on page 40 or your computer's manual for details. •Make sure your computer's video board is set to turn everything off and power up the equipment again in the proper order...
User Guide
Page 39
..."bleeding" or spots •Adjust the brightness. See "Brightness" on page 19. •Check the projection lens to see if it needs cleaning. ing manually to right •Rear projection mode is probably turned on your computer's video card. Problem: Image is out of focus •Turn the projection lens... cleaning. See "Auto Image" on page 21. 3 Turn Auto Image off in this order. 1 Deactivate the screen saver on . See "Manual Sync" on page 22 and "Manual Tracking" on page 22. •The problem could be with your computer. 2 Turn Auto Image off and then back on page 24. Problem...
..."bleeding" or spots •Adjust the brightness. See "Brightness" on page 19. •Check the projection lens to see if it needs cleaning. ing manually to right •Rear projection mode is probably turned on your computer's video card. Problem: Image is out of focus •Turn the projection lens... cleaning. See "Auto Image" on page 21. 3 Turn Auto Image off in this order. 1 Deactivate the screen saver on . See "Manual Sync" on page 22 and "Manual Tracking" on page 22. •The problem could be with your computer. 2 Turn Auto Image off and then back on page 24. Problem...
User Guide
Page 52
Position 23 Keystone 21 Manual Sync 22 Manual Tracking 22 Resize 21 Vert. Index D Default Source 25 Display menu 19 Display menu options Blank Screen 20 Brightness 19 Color 20 Contrast 19 Reset ...
Position 23 Keystone 21 Manual Sync 22 Manual Tracking 22 Resize 21 Vert. Index D Default Source 25 Display menu 19 Display menu options Blank Screen 20 Brightness 19 Color 20 Contrast 19 Reset ...
User Guide
Page 57
... cause harmful interference to correct the interference at his own expense. The typical use is likely to cause harmful interference in accordance with the instruction manual, may cause radio interference, in a conference room, meeting room or auditorium. Cet appareil numérique de la classe A est conforme à la norme NMB...
... cause harmful interference to correct the interference at his own expense. The typical use is likely to cause harmful interference in accordance with the instruction manual, may cause radio interference, in a conference room, meeting room or auditorium. Cet appareil numérique de la classe A est conforme à la norme NMB...


