
User Guide
Page 2
2 Contents Introduction 10 Setting up your computer and getting started 12 Creating recovery DVDs/media 16 Learning the basics 17 Using the TouchPad 18 Using the Web Camera 20 Using the Memory card reader 21 Moving the computer 22 Mobile computing 23 Taking care of your battery 27 If something goes wrong 29 If you need further assistance 32 Power cord/cable connectors 33 Features and specifications 33
2 Contents Introduction 10 Setting up your computer and getting started 12 Creating recovery DVDs/media 16 Learning the basics 17 Using the TouchPad 18 Using the Web Camera 20 Using the Memory card reader 21 Moving the computer 22 Mobile computing 23 Taking care of your battery 27 If something goes wrong 29 If you need further assistance 32 Power cord/cable connectors 33 Features and specifications 33
User Guide
Page 3
... TRANSFER THE DATA CORRECTLY. TOSHIBA AMERICA INFORMATION SYSTEMS, INC. ("TOSHIBA"), ITS AFFILIATES AND SUPPLIERS DO NOT WARRANT THAT OPERATION OF THE PRODUCT WILL BE UNINTERRUPTED OR ERROR FREE. Model: Satellite® T210/T230 Series Recordable and/or ReWritable Drive(s) and Associated Software Warranty The computer system you may include Recordable and/or ReWritable optical media drive(s) and associated software, among the most advanced...
... TRANSFER THE DATA CORRECTLY. TOSHIBA AMERICA INFORMATION SYSTEMS, INC. ("TOSHIBA"), ITS AFFILIATES AND SUPPLIERS DO NOT WARRANT THAT OPERATION OF THE PRODUCT WILL BE UNINTERRUPTED OR ERROR FREE. Model: Satellite® T210/T230 Series Recordable and/or ReWritable Drive(s) and Associated Software Warranty The computer system you may include Recordable and/or ReWritable optical media drive(s) and associated software, among the most advanced...
User Guide
Page 5
...CTR21"] for any model accredited low power radio frequency electric machinery, any company, trader or user shall not change the frequency, increase the power or change the features and functions of the original ...connection to the Public Switched Telephone Network (PSTN). The legal communications mentioned in the above item refer to radio communications operated in other partners to determine appropriate worldwide product life cycle planning and end-of-life strategies for our products. In the event of problems, you should contact your product, visit www.reuse.toshiba.com. Any use...
...CTR21"] for any model accredited low power radio frequency electric machinery, any company, trader or user shall not change the frequency, increase the power or change the features and functions of the original ...connection to the Public Switched Telephone Network (PSTN). The legal communications mentioned in the above item refer to radio communications operated in other partners to determine appropriate worldwide product life cycle planning and end-of-life strategies for our products. In the event of problems, you should contact your product, visit www.reuse.toshiba.com. Any use...
User Guide
Page 10
... energy depending on using power management settings to enter the low-power Sleep mode which shuts down the system and display within 15 minutes of powerful and portable multimedia computers! If the model you leave this computer to the EPA, a computer meeting the new ENERGY STAR® specifications will operate at www.eiae.org. That is used. Your computer model may contain mercury. As part of U.S. We...
... energy depending on using power management settings to enter the low-power Sleep mode which shuts down the system and display within 15 minutes of powerful and portable multimedia computers! If the model you leave this computer to the EPA, a computer meeting the new ENERGY STAR® specifications will operate at www.eiae.org. That is used. Your computer model may contain mercury. As part of U.S. We...
User Guide
Page 13
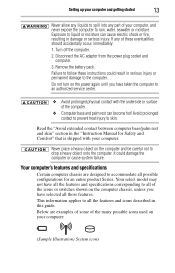
... can become hot! It could result in this guide. Disconnect the AC adaptor from the power plug socket and computer. 3. Your select model may not have all the features and specifications corresponding to all of the icons or switches shown on ...used on the power again until you have taken the computer to an authorized service center. ❖ Avoid prolonged physical contact with your computer. Remove the battery pack. If any part of these instructions could damage the computer or cause system failure. Turn off the computer. 2. Setting up your computer and getting started...
... can become hot! It could result in this guide. Disconnect the AC adaptor from the power plug socket and computer. 3. Your select model may not have all the features and specifications corresponding to all of the icons or switches shown on ...used on the power again until you have taken the computer to an authorized service center. ❖ Avoid prolonged physical contact with your computer. Remove the battery pack. If any part of these instructions could damage the computer or cause system failure. Turn off the computer. 2. Setting up your computer and getting started...
User Guide
Page 14
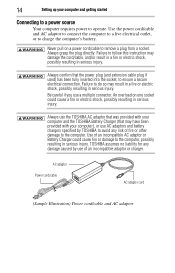
... and the TOSHIBA Battery Charger (that the power plug (and extension cable plug if used) has been fully inserted into the socket, to remove a plug from a socket. 14 Setting up your computer and getting started Connecting to a power source Your computer requires power to the computer, possibly resulting in serious injury. Use of fire or other damage to follow this instruction may result...
... and the TOSHIBA Battery Charger (that the power plug (and extension cable plug if used) has been fully inserted into the socket, to remove a plug from a socket. 14 Setting up your computer and getting started Connecting to a power source Your computer requires power to the computer, possibly resulting in serious injury. Use of fire or other damage to follow this instruction may result...
User Guide
Page 15
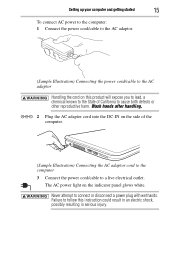
... a power plug with wet hands. Setting up your computer and getting started 15 To connect AC power to the computer: 1 Connect the power cord/cable to the AC adaptor. (Sample Illustration) Connecting the power cord/cable to the AC adaptor Handling the cord on this instruction could result in an electric shock, possibly resulting in serious injury. The AC power light on the indicator panel glows...
... a power plug with wet hands. Setting up your computer and getting started 15 To connect AC power to the computer: 1 Connect the power cord/cable to the AC adaptor. (Sample Illustration) Connecting the power cord/cable to the AC adaptor Handling the cord on this instruction could result in an electric shock, possibly resulting in serious injury. The AC power light on the indicator panel glows...
User Guide
Page 16
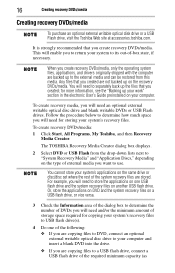
... your work" section in the electronic User's Guide preinstalled on the type of -box state, if necessary. for storing your system to return your system's recovery files. For example, you want to your computer. 16 Creating recovery DVDs/media Creating recovery DVDs/media To purchase an optional external writable optical disk drive or a USB Flash drive, visit the Toshiba Web site at accessories.toshiba.com. To create recovery media, you will enable you create recovery DVDs/media. To create recovery DVDs/media: 1 Click Start, All...
... your work" section in the electronic User's Guide preinstalled on the type of -box state, if necessary. for storing your system to return your system's recovery files. For example, you want to your computer. 16 Creating recovery DVDs/media Creating recovery DVDs/media To purchase an optional external writable optical disk drive or a USB Flash drive, visit the Toshiba Web site at accessories.toshiba.com. To create recovery media, you will enable you create recovery DVDs/media. To create recovery DVDs/media: 1 Click Start, All...
User Guide
Page 17
... on your external media to another storage device before executing this procedure, or use blank media. 5 Click the Create button in the TOSHIBA Recovery Media Creator utility dialog box. 6 Follow the on your computer. Learning the basics 17 specified in the Recovery Media Creator utility) to complete the copy process. All information stored on your DVDs or USB flash drive(s) will know in the electronic User's Guide preinstalled on -screen prompts...
... on your external media to another storage device before executing this procedure, or use blank media. 5 Click the Create button in the TOSHIBA Recovery Media Creator utility dialog box. 6 Follow the on your computer. Learning the basics 17 specified in the Recovery Media Creator utility) to complete the copy process. All information stored on your DVDs or USB flash drive(s) will know in the electronic User's Guide preinstalled on -screen prompts...
User Guide
Page 18
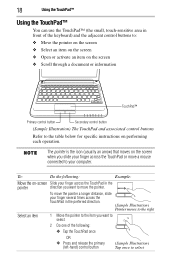
... keyboard) and the adjacent control buttons to: ❖ Move the pointer on the screen ❖ Select an item on the screen ❖ Open or activate an item on the screen ❖ Scroll through a document or information TouchPad™ Primary control button Secondary control button (Sample Illustration) The TouchPad and associated control buttons Refer to your computer. 18 Using the TouchPad™ Using the TouchPad™ You can use the TouchPad™ (the small, touch...
... keyboard) and the adjacent control buttons to: ❖ Move the pointer on the screen ❖ Select an item on the screen ❖ Open or activate an item on the screen ❖ Scroll through a document or information TouchPad™ Primary control button Secondary control button (Sample Illustration) The TouchPad and associated control buttons Refer to your computer. 18 Using the TouchPad™ Using the TouchPad™ You can use the TouchPad™ (the small, touch...
User Guide
Page 19
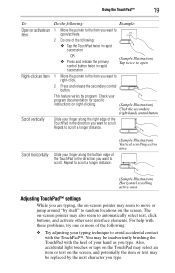
... open/activate. 2 Do one or more of the following : ❖ Tap the TouchPad twice in rapid succession OR ❖ Press and release the primary control button twice in the direction you type. This feature varies by itself" to random locations on -screen pointer may also seem to scroll a longer distance. (Sample Illustration) Vertical scrolling active area (Sample Illustration) Horizontal scrolling active area Adjusting TouchPad™ settings...
... open/activate. 2 Do one or more of the following : ❖ Tap the TouchPad twice in rapid succession OR ❖ Press and release the primary control button twice in the direction you type. This feature varies by itself" to random locations on -screen pointer may also seem to scroll a longer distance. (Sample Illustration) Vertical scrolling active area (Sample Illustration) Horizontal scrolling active area Adjusting TouchPad™ settings...
User Guide
Page 20
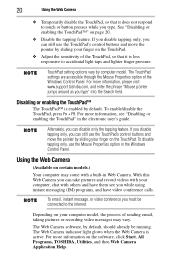
... the software, click Start, All Programs, TOSHIBA, Utilities, and then Web Camera Application Help. To enable/disable the TouchPad, press Fn + F9. Depending on your finger on the TouchPad. If you disable tapping only, you type. TouchPad setting options vary by default. Using the Web Camera (Available on certain models.) Your computer may vary. To disable tapping only, use the TouchPad's control buttons and move the pointer by default, should already be connected to accidental light...
... the software, click Start, All Programs, TOSHIBA, Utilities, and then Web Camera Application Help. To enable/disable the TouchPad, press Fn + F9. Depending on your finger on the TouchPad. If you disable tapping only, you type. TouchPad setting options vary by default. Using the Web Camera (Available on certain models.) Your computer may vary. To disable tapping only, use the TouchPad's control buttons and move the pointer by default, should already be connected to accidental light...
User Guide
Page 21
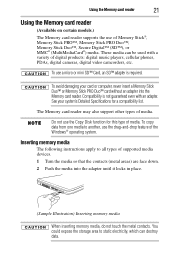
... Memory Stick PRO Duo™ card without an adapter into the adapter until it locks in place. (Sample Illustration) Inserting memory media When inserting memory media, do not touch the metal contacts. Inserting memory media The following instructions apply to another, use the Copy Disk function for a compatibility list. To avoid damaging your system's Detailed Specifications for this type of digital products: digital music players, cellular phones, PDAs, digital cameras, digital video...
... Memory Stick PRO Duo™ card without an adapter into the adapter until it locks in place. (Sample Illustration) Inserting memory media When inserting memory media, do not touch the metal contacts. Inserting memory media The following instructions apply to another, use the Copy Disk function for a compatibility list. To avoid damaging your system's Detailed Specifications for this type of digital products: digital music players, cellular phones, PDAs, digital cameras, digital video...
User Guide
Page 23
..., it is consuming full power. Recharge time varies depending on product model, configuration, applications, power management settings and features utilized, as well as the natural performance variations produced by Toshiba under any individual user. However, for all batteries. TECHNICAL NOTE: Depending on battery power at accessories.toshiba.com. This may fail to be replaced. Actual battery life may not charge while the computer is not necessary...
..., it is consuming full power. Recharge time varies depending on product model, configuration, applications, power management settings and features utilized, as well as the natural performance variations produced by Toshiba under any individual user. However, for all batteries. TECHNICAL NOTE: Depending on battery power at accessories.toshiba.com. This may fail to be replaced. Actual battery life may not charge while the computer is not necessary...
User Guide
Page 24
... outlet Battery life and charge time may vary, depending upon power management settings, applications and features used to select a power level setting that the system is suspended (using all of the battery cannot occur when your computer is using the Windows® operating system Sleep command). When the ON/OFF light or power button light flashes amber, it is time to recharge the main battery or plug in the electronic user's guide...
... outlet Battery life and charge time may vary, depending upon power management settings, applications and features used to select a power level setting that the system is suspended (using all of the battery cannot occur when your computer is using the Windows® operating system Sleep command). When the ON/OFF light or power button light flashes amber, it is time to recharge the main battery or plug in the electronic user's guide...
User Guide
Page 25
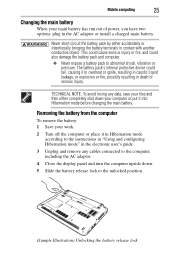
... mode before changing the main battery. Removing the battery from the computer To remove the battery: 1 Save your work. 2 Turn off the computer or place it in Hibernation mode according to the unlocked position. (Sample Illustration) Unlocking the battery release lock Never short circuit the battery pack by either completely shut down . 5 Slide the battery release lock to the instructions in "Using and configuring Hibernation mode" in the electronic user's guide. 3 Unplug and remove...
... mode before changing the main battery. Removing the battery from the computer To remove the battery: 1 Save your work. 2 Turn off the computer or place it in Hibernation mode according to the unlocked position. (Sample Illustration) Unlocking the battery release lock Never short circuit the battery pack by either completely shut down . 5 Slide the battery release lock to the instructions in "Using and configuring Hibernation mode" in the electronic user's guide. 3 Unplug and remove...
User Guide
Page 27
...: 1 Turn off the computer's power immediately and disconnect the power cord/cable from the power socket. To fully discharge your battery pack: ❖ Periodically, disconnect the computer from the computer. ❖ Do not try to step 4. Carefully remove the battery pack from a power source and operate it immediately. Use protective gloves when handling a damaged battery. ❖ To replace the main battery, use an identical battery that...
...: 1 Turn off the computer's power immediately and disconnect the power cord/cable from the power socket. To fully discharge your battery pack: ❖ Periodically, disconnect the computer from the computer. ❖ Do not try to step 4. Carefully remove the battery pack from a power source and operate it immediately. Use protective gloves when handling a damaged battery. ❖ To replace the main battery, use an identical battery that...

User Guide
Page 28
... place out of nonconforming battery packs could possibly result in the User's Manual. When the battery pack needs to use . ❖ If you will not be replaced, the main battery light flashes amber shortly after you are not going to be using the system for the AC adaptor and power cord/cable. 5 Charge the battery pack until the battery pack is not being charged. Use of direct sunlight...
... place out of nonconforming battery packs could possibly result in the User's Manual. When the battery pack needs to use . ❖ If you will not be replaced, the main battery light flashes amber shortly after you are not going to be using the system for the AC adaptor and power cord/cable. 5 Charge the battery pack until the battery pack is not being charged. Use of direct sunlight...
User Guide
Page 30
... turn off , make sure the software you attached the AC adaptor and power cord/cable properly or installed a charged battery. Verify that the wall outlet is on the power. The keyboard produces unexpected characters. Press and hold the power button for at the ON/OFF indicator. To clear the condition, press Ctrl, Alt, and Del simultaneously. Problems when you turn on by plugging in Sleep mode and have a software...
... turn off , make sure the software you attached the AC adaptor and power cord/cable properly or installed a charged battery. Verify that the wall outlet is on the power. The keyboard produces unexpected characters. Press and hold the power button for at the ON/OFF indicator. To clear the condition, press Ctrl, Alt, and Del simultaneously. Problems when you turn on by plugging in Sleep mode and have a software...

User Guide
Page 31
... firmly attached. ❖ Try adjusting the contrast and brightness controls on the external monitor. ❖ Press Fn and F5 simultaneously to its previous setting. When the computer is not set for an external monitor. If something goes wrong 31 Display problems Here are some typical display problems and their solutions: The screen is registered, press any key. You may have gone into a working power outlet. ❖ Check...
... firmly attached. ❖ Try adjusting the contrast and brightness controls on the external monitor. ❖ Press Fn and F5 simultaneously to its previous setting. When the computer is not set for an external monitor. If something goes wrong 31 Display problems Here are some typical display problems and their solutions: The screen is registered, press any key. You may have gone into a working power outlet. ❖ Check...


