User Guide
Page 22
... (recommended recovery method 55 Recovering of factory default software with user's data 57 Recovering without changing the internal storage drive partitions 60 Recovering to a custom size partition 63 Creating recovery media 65 Restoring from recovery media 67 Erasing the Internal Storage Drive 69 Checking the internal storage drive operating status 71 Installing drivers and applications 71 Using the touch pad 72 Adjusting touch pad settings 75 Disabling or enabling the touch pad 75 Connecting an external device 76 Using external display devices 76 Selecting video cables 77
... (recommended recovery method 55 Recovering of factory default software with user's data 57 Recovering without changing the internal storage drive partitions 60 Recovering to a custom size partition 63 Creating recovery media 65 Restoring from recovery media 67 Erasing the Internal Storage Drive 69 Checking the internal storage drive operating status 71 Installing drivers and applications 71 Using the touch pad 72 Adjusting touch pad settings 75 Disabling or enabling the touch pad 75 Connecting an external device 76 Using external display devices 76 Selecting video cables 77

User Guide
Page 25
... 117 Connect 118 Secure 119 Protect & Fix 120 Optimize 121 TOSHIBA Recovery Media Creator 122 TOSHIBA Application Installer 122 Setting passwords 123 Using a supervisor password 123 Using a user password 125 Deleting a user password 125 TOSHIBA Face Recognition Utility 126 TOSHIBA PC Diagnostic Tool Utility 127 Mouse Utility 128 TOSHIBA Hardware Setup 129 TOSHIBA Sleep Utility 130 Starting the TOSHIBA Sleep Utility 130 USB Sleep and Charge 130 Enabling/Disabling USB Sleep and Charge......132 Power supply mode settings 132 TOSHIBA Accessibility 133 TOSHIBA Service Station...
... 117 Connect 118 Secure 119 Protect & Fix 120 Optimize 121 TOSHIBA Recovery Media Creator 122 TOSHIBA Application Installer 122 Setting passwords 123 Using a supervisor password 123 Using a user password 125 Deleting a user password 125 TOSHIBA Face Recognition Utility 126 TOSHIBA PC Diagnostic Tool Utility 127 Mouse Utility 128 TOSHIBA Hardware Setup 129 TOSHIBA Sleep Utility 130 Starting the TOSHIBA Sleep Utility 130 USB Sleep and Charge 130 Enabling/Disabling USB Sleep and Charge......132 Power supply mode settings 132 TOSHIBA Accessibility 133 TOSHIBA Service Station...
User Guide
Page 29
... with the various computer software or hardware options, visit Toshiba's Web site at support.toshiba.com. Introduction This guide 29 NOTE The product specifications and configuration information are all the features and specifications listed or illustrated. For more detailed information about your particular model, please visit Toshiba's Web site at support.toshiba.com. Your particular model may not have all subject to change without notice. For the...
... with the various computer software or hardware options, visit Toshiba's Web site at support.toshiba.com. Introduction This guide 29 NOTE The product specifications and configuration information are all the features and specifications listed or illustrated. For more detailed information about your particular model, please visit Toshiba's Web site at support.toshiba.com. Your particular model may not have all subject to change without notice. For the...
User Guide
Page 45
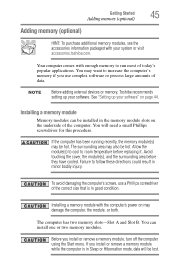
... cover, the module(s), and the surrounding area before replacing it. If you install or remove a memory module while the computer is in Sleep or Hibernation mode, data will need a small Phillips screwdriver for this procedure. To avoid damaging the computer's screws, use complex software or process large amounts of data. The computer has two memory slots-Slot A and Slot B. NOTE Before adding external devices or memory, Toshiba recommends setting up your software...
... cover, the module(s), and the surrounding area before replacing it. If you install or remove a memory module while the computer is in Sleep or Hibernation mode, data will need a small Phillips screwdriver for this procedure. To avoid damaging the computer's screws, use complex software or process large amounts of data. The computer has two memory slots-Slot A and Slot B. NOTE Before adding external devices or memory, Toshiba recommends setting up your software...
User Guide
Page 49
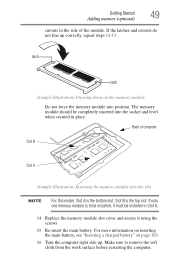
... Started 49 Adding memory (optional) cutouts in Slot A. 14 Replace the memory module slot cover and secure it must be completely inserted into the socket and level when secured in place. Make sure to be installed, it using the screws. 15 Re-insert the main battery. The memory module should be installed in the side of computer Slot B Slot A (Sample Illustration) Inserting the memory module into position. Slot B is to remove the...
... Started 49 Adding memory (optional) cutouts in Slot A. 14 Replace the memory module slot cover and secure it must be completely inserted into the socket and level when secured in place. Make sure to be installed, it using the screws. 15 Re-insert the main battery. The memory module should be installed in the side of computer Slot B Slot A (Sample Illustration) Inserting the memory module into position. Slot B is to remove the...
User Guide
Page 52
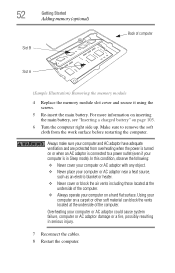
... work surface before restarting the computer. 52 Getting Started Adding memory (optional) Slot B Back of the computer. ❖ Always operate your computer on a hard flat surface. For more information on inserting the main battery, see "Inserting a charged battery" on a carpet or other soft material can block the vents located at the underside of computer Slot A (Sample Illustration) Removing the memory module 4 Replace the memory module slot cover and secure it using...
... work surface before restarting the computer. 52 Getting Started Adding memory (optional) Slot B Back of the computer. ❖ Always operate your computer on a hard flat surface. For more information on inserting the main battery, see "Inserting a charged battery" on a carpet or other soft material can block the vents located at the underside of computer Slot A (Sample Illustration) Removing the memory module 4 Replace the memory module slot cover and secure it using...
User Guide
Page 53
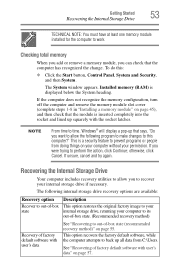
... the memory configuration, turn off the computer and remove the memory module slot cover (complete steps 1-8 in "Installing a memory module" on your computer without your permission. NOTE From time to prevent programs or people from C:\Users. otherwise, click Cancel. This is a security feature to time, Windows® will display a pop-up that the module is displayed below the System heading. Recovering the Internal Storage Drive Your computer includes recovery utilities to...
... the memory configuration, turn off the computer and remove the memory module slot cover (complete steps 1-8 in "Installing a memory module" on your computer without your permission. NOTE From time to prevent programs or people from C:\Users. otherwise, click Cancel. This is a security feature to time, Windows® will display a pop-up that the module is displayed below the System heading. Recovering the Internal Storage Drive Your computer includes recovery utilities to...
User Guide
Page 76
... need to install new software. 2 Connect the device's video or USB cable to the port on the computer and to the device. 3 Connect the device's power cable to your system, some models may automatically detect the external device. Using external display devices Your computer comes with the device to see if you can easily attach an external device your computer. You can also connect the following types of external display devices to the video ports described below: NOTE To locate your HDMI or RGB port...
... need to install new software. 2 Connect the device's video or USB cable to the port on the computer and to the device. 3 Connect the device's power cable to your system, some models may automatically detect the external device. Using external display devices Your computer comes with the device to see if you can easily attach an external device your computer. You can also connect the following types of external display devices to the video ports described below: NOTE To locate your HDMI or RGB port...
User Guide
Page 77
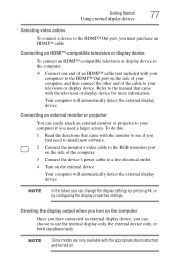
... or display device to the computer: ❖ Connect one end of the computer. 3 Connect the device's power cable to a live electrical outlet. 4 Turn on . Refer to the manual that came with your computer) to the HDMI™ Out port on the computer Once you have connected an external display device, you first need a larger screen. Getting Started 77 Using external display devices Selecting video cables To connect a device to the HDMI™ Out port, you can change the display settings by...
... or display device to the computer: ❖ Connect one end of the computer. 3 Connect the device's power cable to a live electrical outlet. 4 Turn on . Refer to the manual that came with your computer) to the HDMI™ Out port on the computer Once you have connected an external display device, you first need a larger screen. Getting Started 77 Using external display devices Selecting video cables To connect a device to the HDMI™ Out port, you can change the display settings by...
User Guide
Page 126
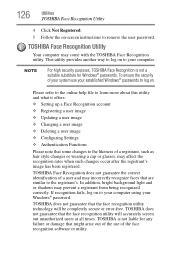
... times. If recognition fails, log on to your computer using your established Windows® passwords to log on. This utility provides another way to log on -screen instructions to remove the user password. TOSHIBA is not a suitable substitute for any failure or damage that some changes to the registrant's. 126 Utilities TOSHIBA Face Recognition Utility 4 Click Not Registered. 5 Follow the on to your computer...
... times. If recognition fails, log on to your computer using your established Windows® passwords to log on. This utility provides another way to log on -screen instructions to remove the user password. TOSHIBA is not a suitable substitute for any failure or damage that some changes to the registrant's. 126 Utilities TOSHIBA Face Recognition Utility 4 Click Not Registered. 5 Follow the on to your computer...
User Guide
Page 133
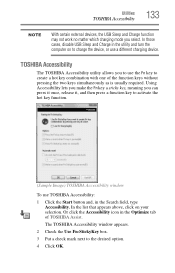
... cases, disable USB Sleep and Charge in the Optimize tab of the function keys without pressing the two keys simultaneously as is usually required. TOSHIBA Accessibility The TOSHIBA Accessibility utility allows you select. Or click the Accessibility icon in the utility and turn the computer on your selection. Utilities TOSHIBA Accessibility 133 NOTE With certain external devices, the USB Sleep and Charge function may not work no matter which charging mode you to use the Fn key to create a hot key combination...
... cases, disable USB Sleep and Charge in the Optimize tab of the function keys without pressing the two keys simultaneously as is usually required. TOSHIBA Accessibility The TOSHIBA Accessibility utility allows you select. Or click the Accessibility icon in the utility and turn the computer on your selection. Utilities TOSHIBA Accessibility 133 NOTE With certain external devices, the USB Sleep and Charge function may not work no matter which charging mode you to use the Fn key to create a hot key combination...
User Guide
Page 139
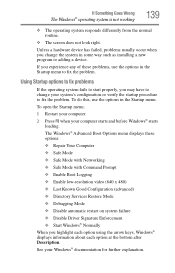
... change the system in some way such as installing a new program or adding a device. The Windows® Advanced Boot Options menu displays these options: ❖ Repair Your Computer ❖ Safe Mode ❖ Safe Mode with Networking ❖ Safe Mode with Command Prompt ❖ Enable Boot Logging ❖ Enable low-resolution video (640 x 480) ❖ Last Known Good Configuration (advanced) ❖ Directory Services Restore Mode ❖ Debugging Mode ❖ Disable automatic restart on system failure ❖ Disable Driver Signature Enforcement ❖ Start Windows...
... change the system in some way such as installing a new program or adding a device. The Windows® Advanced Boot Options menu displays these options: ❖ Repair Your Computer ❖ Safe Mode ❖ Safe Mode with Networking ❖ Safe Mode with Command Prompt ❖ Enable Boot Logging ❖ Enable low-resolution video (640 x 480) ❖ Last Known Good Configuration (advanced) ❖ Directory Services Restore Mode ❖ Debugging Mode ❖ Disable automatic restart on system failure ❖ Disable Driver Signature Enforcement ❖ Start Windows...
User Guide
Page 144
... or incompatible with the keyboard or to update your keyboard driver. If this , press F4. If you connected may have connected an external keyboard and the operating system displays one or more keyboard error messages. If you through the display options. Press any key to make sure the display priority is not set for the builtin screen. 144 If Something Goes Wrong Keyboard problems Keyboard problems You have gone into a working power outlet. ❖ Check...
... or incompatible with the keyboard or to update your keyboard driver. If this , press F4. If you connected may have connected an external keyboard and the operating system displays one or more keyboard error messages. If you through the display options. Press any key to make sure the display priority is not set for the builtin screen. 144 If Something Goes Wrong Keyboard problems Keyboard problems You have gone into a working power outlet. ❖ Check...
User Guide
Page 155
... 154). If anything , use the System Restore utility to back up your data or your files. Most of new hardware (printers, pointing devices, external hard drives, optical disc drive writers, scanners, etc.) and software (applications like Microsoft® Office and Adobe® Photoshop®, or utility software such as read from optical discs. Follow these steps to "Saving system configuration with the Windows® operating system" on page...
... 154). If anything , use the System Restore utility to back up your data or your files. Most of new hardware (printers, pointing devices, external hard drives, optical disc drive writers, scanners, etc.) and software (applications like Microsoft® Office and Adobe® Photoshop®, or utility software such as read from optical discs. Follow these steps to "Saving system configuration with the Windows® operating system" on page...
User Guide
Page 177
..., CPU cache, L1 cache. HDMI-CEC (HDMI Consumer Electronics Control)-One A/V component can control another while using a pointing device such as the battery save mode. (2) A key or combination of using this function, if connected with the Fn key can set system options or control system parameters, such as a mouse. K keyboard shortcut-A key or combination of pixels is running and have the operating system automatically recognize the change. Hibernation-A feature of many Toshiba computers...
..., CPU cache, L1 cache. HDMI-CEC (HDMI Consumer Electronics Control)-One A/V component can control another while using a pointing device such as the battery save mode. (2) A key or combination of using this function, if connected with the Fn key can set system options or control system parameters, such as a mouse. K keyboard shortcut-A key or combination of pixels is running and have the operating system automatically recognize the change. Hibernation-A feature of many Toshiba computers...
User Guide
Page 184
... power light 40 accessing network 112 adding memory check total memory 53 memory (optional) 45 optional external devices 44 adequate ventilation cooling fan 39 adjusting touch pad settings 75 audio features 112 B backing up files 82, 85 battery battery life 93 Call2Recycle™ 106 care 104, 105 changing 101 charge indicator light 42 charge time 94 charger 94 charging 43, 94 charging the real-time clock (RTC) 95 conserving power 99 determine remaining power 97 disposal 105 indicator light 97 installation...
... power light 40 accessing network 112 adding memory check total memory 53 memory (optional) 45 optional external devices 44 adequate ventilation cooling fan 39 adjusting touch pad settings 75 audio features 112 B backing up files 82, 85 battery battery life 93 Call2Recycle™ 106 care 104, 105 changing 101 charge indicator light 42 charge time 94 charger 94 charging 43, 94 charging the real-time clock (RTC) 95 conserving power 99 determine remaining power 97 disposal 105 indicator light 97 installation...
User Guide
Page 185
... monitor 77 power cord/cable 42 power source 41 cooling fan adequate ventilation 39 customize computer settings 78 D data/entire system backup troubleshooting 154 desktop creating new icon 109 exploring the 108 icons 109 recycle bin 109 standard features 109 Windows® operating system 108 Device Manager fixing a problem 141 directing display output 77 disabling touch pad 75, 164 display troubleshooting 145 display devices external 76 display output settings 78 display, external adjusting 78 disposal information 20 disposing of used batteries 105 DVD removing...
... monitor 77 power cord/cable 42 power source 41 cooling fan adequate ventilation 39 customize computer settings 78 D data/entire system backup troubleshooting 154 desktop creating new icon 109 exploring the 108 icons 109 recycle bin 109 standard features 109 Windows® operating system 108 Device Manager fixing a problem 141 directing display output 77 disabling touch pad 75, 164 display troubleshooting 145 display devices external 76 display output settings 78 display, external adjusting 78 disposal information 20 disposing of used batteries 105 DVD removing...
User Guide
Page 186
... 89 DVD player troubleshooting 151 DVDs using 86 E eject button optical disc drive 87 eject, optical disc drive 87 enabling touch pad 75, 164 ENERGY STAR® 27 exploring desktop 108 external display device HDMI™ Out port 76 RGB (monitor) port 76 external display, adjusting 78 F files backing up 82, 85 restore 86 saving 85 function keys 83 H headphones using 113 Help and Support troubleshooting 140 hot key disabling or enabling wireless devices 166 display brightness 162 keyboard overlays 165 Lock (Instant security) 162 Output (Display switch) 163 volume mute...
... 89 DVD player troubleshooting 151 DVDs using 86 E eject button optical disc drive 87 eject, optical disc drive 87 enabling touch pad 75, 164 ENERGY STAR® 27 exploring desktop 108 external display device HDMI™ Out port 76 RGB (monitor) port 76 external display, adjusting 78 F files backing up 82, 85 restore 86 saving 85 function keys 83 H headphones using 113 Help and Support troubleshooting 140 hot key disabling or enabling wireless devices 166 display brightness 162 keyboard overlays 165 Lock (Instant security) 162 Output (Display switch) 163 volume mute...
User Guide
Page 188
...-saving features 92 power management 94 optimum performance 94 power plans selecting power plan options 100 power saving options 99 precautions safety 37 printer troubleshooting 148 problem solving contacting Toshiba 158 Startup options 139 program, starting 84 program, starting from Start menu 85 projector connecting 77 R real-time clock (RTC) battery 93 recording sounds 112 recovery checking internal storage drive operating status 71 creating recovery media 65 erasing internal storage drive 69 installing drivers and applications 71 internal storage drive 53 out...
...-saving features 92 power management 94 optimum performance 94 power plans selecting power plan options 100 power saving options 99 precautions safety 37 printer troubleshooting 148 problem solving contacting Toshiba 158 Startup options 139 program, starting 84 program, starting from Start menu 85 projector connecting 77 R real-time clock (RTC) battery 93 recording sounds 112 recovery checking internal storage drive operating status 71 creating recovery media 65 erasing internal storage drive 69 installing drivers and applications 71 internal storage drive 53 out...
User Guide
Page 189
... memory 45 TOSHIBA Application Installer 122 TOSHIBA Assist 117 Connect tab 118 Optimize tab 121 Protect & Fix tab 120 Secure tab 119 TOSHIBA Face Recognition Utility 126 TOSHIBA Hardware Setup 129 TOSHIBA PC Diagnostic Tool Utility 127 TOSHIBA Recovery Media Creator 122 TOSHIBA Service Station 134 TOSHIBA Sleep Utility 130 touch pad using 72 traveling tips 107 troubleshooting 144 AC power light is blinking 137 battery light is blinking 138 bookmarked site not found 140 checking device properties 141 computer will not start...
... memory 45 TOSHIBA Application Installer 122 TOSHIBA Assist 117 Connect tab 118 Optimize tab 121 Protect & Fix tab 120 Secure tab 119 TOSHIBA Face Recognition Utility 126 TOSHIBA Hardware Setup 129 TOSHIBA PC Diagnostic Tool Utility 127 TOSHIBA Recovery Media Creator 122 TOSHIBA Service Station 134 TOSHIBA Sleep Utility 130 touch pad using 72 traveling tips 107 troubleshooting 144 AC power light is blinking 137 battery light is blinking 138 bookmarked site not found 140 checking device properties 141 computer will not start...


