

User Guide
Page 10
... government for panEuropean single terminal connection to the Public Switched Telephone Network (PSTN). Please contact your product, visit www.reuse.toshiba.com. 10 The European Union WEEE (Waste from Electrical and Electronic Equipment) Directive Information The European Union WEEE (Waste from... Electrical and Electronic Equipment) Directive is intended to appropriate facilities for recovery and recycling. In the European Union, this symbol indicates that focus on the market in European Union (EU) member countries...
... government for panEuropean single terminal connection to the Public Switched Telephone Network (PSTN). Please contact your product, visit www.reuse.toshiba.com. 10 The European Union WEEE (Waste from Electrical and Electronic Equipment) Directive Information The European Union WEEE (Waste from... Electrical and Electronic Equipment) Directive is intended to appropriate facilities for recovery and recycling. In the European Union, this symbol indicates that focus on the market in European Union (EU) member countries...
User Guide
Page 29
... memory (optional 51 Installing a memory module 52 Removing a memory module 57 Checking total memory 59 Hard Drive Recovery Utilities 60 Creating Recovery DVDs 60 Hard Disk Drive Recovery options 61 Hard Disk Drive Recovery using the Recovery media 67 Checking the HDD operating status 69 Installing drivers and applications 69 Using the TouchPad 70 Scrolling...
... memory (optional 51 Installing a memory module 52 Removing a memory module 57 Checking total memory 59 Hard Drive Recovery Utilities 60 Creating Recovery DVDs 60 Hard Disk Drive Recovery options 61 Hard Disk Drive Recovery using the Recovery media 67 Checking the HDD operating status 69 Installing drivers and applications 69 Using the TouchPad 70 Scrolling...

User Guide
Page 60
..., you may have created intact, for your system. For more information on creating Recovery media see "Creating Recovery DVDs" on your computer. 60 Getting Started Hard Drive Recovery Utilities Hard Drive Recovery Utilities Your computer has been configured with your computer. The Toshiba Customer Support Center in the United States is (800) 457-7777, outside...
..., you may have created intact, for your system. For more information on creating Recovery media see "Creating Recovery DVDs" on your computer. 60 Getting Started Hard Drive Recovery Utilities Hard Drive Recovery Utilities Your computer has been configured with your computer. The Toshiba Customer Support Center in the United States is (800) 457-7777, outside...

User Guide
Page 61
Getting Started Hard Drive Recovery Utilities 61 To create recovery DVDs: 1 Click Start, All Programs, Toshiba, Recovery, and then Recovery Disc Creator. 2 Select DVD (to the item's Name-recovery files, applications (original bundled drivers and applications), or both the recovery files and applications. 4 Click Create. 5 Insert the first blank DVD into your writable optical drive when prompted. 6 Follow...
Getting Started Hard Drive Recovery Utilities 61 To create recovery DVDs: 1 Click Start, All Programs, Toshiba, Recovery, and then Recovery Disc Creator. 2 Select DVD (to the item's Name-recovery files, applications (original bundled drivers and applications), or both the recovery files and applications. 4 Click Create. 5 Insert the first blank DVD into your writable optical drive when prompted. 6 Follow...

User Guide
Page 62
...) key on your keyboard while powering on the computer. 3 If your computer be connected to step 4. (Sample Image) Product Recovery Menu screen 4 When the Toshiba Recovery Wizard screen displays, select one at this time. To recover your hard disk drive using the utilities stored on your computer's HDD... If not skip to an external power source via the AC Adaptor. 62 Getting Started Hard Drive Recovery Utilities Hard Disk Drive Recovery using the recovery partition NOTE During the HDD Recovery Process it . The options are: ❖ Recovery of the options and then click Next.
...) key on your keyboard while powering on the computer. 3 If your computer be connected to step 4. (Sample Image) Product Recovery Menu screen 4 When the Toshiba Recovery Wizard screen displays, select one at this time. To recover your hard disk drive using the utilities stored on your computer's HDD... If not skip to an external power source via the AC Adaptor. 62 Getting Started Hard Drive Recovery Utilities Hard Disk Drive Recovery using the recovery partition NOTE During the HDD Recovery Process it . The options are: ❖ Recovery of the options and then click Next.

User Guide
Page 63
... 63 ❖ Erase the hard disk (Sample Image) Toshiba Recovery Wizard screen Recovering the original factory image (recommended recovery method) Recovering a hard disk drive to its out of box state deletes all partitions on the hard disk drive and your ...work to save your information will be lost. Be sure to external media first. 1 On the Toshiba Recovery Wizard screen, select Recovery of Factory Default Software screen The Recovery of Factory Default Software screen appears. (Sample Image) Recovery of Factory Default Software, and then click Next.
... 63 ❖ Erase the hard disk (Sample Image) Toshiba Recovery Wizard screen Recovering the original factory image (recommended recovery method) Recovering a hard disk drive to its out of box state deletes all partitions on the hard disk drive and your ...work to save your information will be lost. Be sure to external media first. 1 On the Toshiba Recovery Wizard screen, select Recovery of Factory Default Software screen The Recovery of Factory Default Software screen appears. (Sample Image) Recovery of Factory Default Software, and then click Next.

User Guide
Page 64
... and overwrite all data, then overwrites the entire HDD for security purposes. To delete the data and partitions from your hard disk: 1 On the Toshiba Recovery Wizard screen, select Erase the hard disk, and then click Next. 2 The next screen lists the two methods you can choose: ❖ Delete...several hours, depending on the size of -box-state, and then click Next. 64 Getting Started Hard Drive Recovery Utilities 2 Select Recover to out-of your HDD. Be sure to create recovery DVD's and back up your data to external media before proceeding. 3 Click Next to delete all data ...
... and overwrite all data, then overwrites the entire HDD for security purposes. To delete the data and partitions from your hard disk: 1 On the Toshiba Recovery Wizard screen, select Erase the hard disk, and then click Next. 2 The next screen lists the two methods you can choose: ❖ Delete...several hours, depending on the size of -box-state, and then click Next. 64 Getting Started Hard Drive Recovery Utilities 2 Select Recover to out-of your HDD. Be sure to create recovery DVD's and back up your data to external media before proceeding. 3 Click Next to delete all data ...
User Guide
Page 65
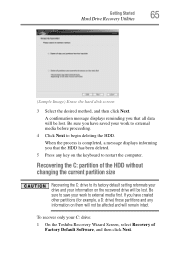
...Recovering the C: drive to its factory default setting reformats your drive and your work to restart the computer. Getting Started Hard Drive Recovery Utilities 65 (Sample Image) Erase the hard disk screen 3 Select the desired method, and then click Next. If you that...media first. To recover only your work to external media before proceeding. 4 Click Next to save your C: drive: 1 On the Toshiba Recovery Wizard Screen, select Recovery of Factory Default Software, and then click Next. A confirmation message displays reminding you have created other partitions (for example, a D: ...
...Recovering the C: drive to its factory default setting reformats your drive and your work to restart the computer. Getting Started Hard Drive Recovery Utilities 65 (Sample Image) Erase the hard disk screen 3 Select the desired method, and then click Next. If you that...media first. To recover only your work to external media before proceeding. 4 Click Next to save your C: drive: 1 On the Toshiba Recovery Wizard Screen, select Recovery of Factory Default Software, and then click Next. A confirmation message displays reminding you have created other partitions (for example, a D: ...

User Guide
Page 66
... 2 Select Recover without changing the hard drive partitions. NOTE The size of the C: drive will be lost during the recovery process) and your C: drive: 1 On the Toshiba Recovery Wizard screen, select Recovery of the C: drive. To resize and recover your information will display on your work to begin the restoration. A confirmation message appears, reminding... you have saved your keyboard to increase/decrease the C: drive size in 1 GB increments. Be sure you created a D: drive, it will be deleted during the recovery process.
... 2 Select Recover without changing the hard drive partitions. NOTE The size of the C: drive will be lost during the recovery process) and your C: drive: 1 On the Toshiba Recovery Wizard screen, select Recovery of the C: drive. To resize and recover your information will display on your work to begin the restoration. A confirmation message appears, reminding... you have saved your keyboard to increase/decrease the C: drive size in 1 GB increments. Be sure you created a D: drive, it will be deleted during the recovery process.

User Guide
Page 67
..." on page 60): 1 Insert the first recovery DVD into your Hard Drive Recovery Utilities. Getting Started Hard Drive Recovery Utilities 67 Hard Disk Drive Recovery using your optical drive and power on the computer. 2 When the initial screen displays, press F12. The options are: ❖ Toshiba Recovery wizard ❖ System Recovery Options (Sample Image) Selecting a Process screen...
..." on page 60): 1 Insert the first recovery DVD into your Hard Drive Recovery Utilities. Getting Started Hard Drive Recovery Utilities 67 Hard Disk Drive Recovery using your optical drive and power on the computer. 2 When the initial screen displays, press F12. The options are: ❖ Toshiba Recovery wizard ❖ System Recovery Options (Sample Image) Selecting a Process screen...

User Guide
Page 68
68 Getting Started Hard Drive Recovery Utilities 5 If your system offers a choice of Windows Vista® 32-bit or 64bit operating system, select one at this time. If not skip to continue. (Sample Image) Warning screen Click Yes to step 6. (Sample Image) Product Recovery Menu screen 6 A warning screen will appear stating that when the recovery is executed all data will be deleted and rewritten.
68 Getting Started Hard Drive Recovery Utilities 5 If your system offers a choice of Windows Vista® 32-bit or 64bit operating system, select one at this time. If not skip to continue. (Sample Image) Warning screen Click Yes to step 6. (Sample Image) Product Recovery Menu screen 6 A warning screen will appear stating that when the recovery is executed all data will be deleted and rewritten.

User Guide
Page 69
...to display its status in the lower portion of the screen. Getting Started Hard Drive Recovery Utilities 69 7 The Toshiba Recovery Wizard screen will appear. Please refer to "Hard Disk Drive Recovery options" on certain models) allows you to reinstall the drivers and applications that were... originally bundled with your hard disk drive, you want to explain the available recovery options. (Sample Image) Toshiba Recovery Wizard screen Checking the HDD operating...
...to display its status in the lower portion of the screen. Getting Started Hard Drive Recovery Utilities 69 7 The Toshiba Recovery Wizard screen will appear. Please refer to "Hard Disk Drive Recovery options" on certain models) allows you to reinstall the drivers and applications that were... originally bundled with your hard disk drive, you want to explain the available recovery options. (Sample Image) Toshiba Recovery Wizard screen Checking the HDD operating...

User Guide
Page 143
... on-screen prompts to reinstall the drivers and applications that were originally bundled with your computer. To reinstall drivers and applications: 1 Click Start, All Programs, Toshiba, Recovery, and then TOSHIBA Application Installer. 2 Click Next. (Sample Image) TOSHIBA Application Installer screen 3 Click the item you to complete the installation process.
... on-screen prompts to reinstall the drivers and applications that were originally bundled with your computer. To reinstall drivers and applications: 1 Click Start, All Programs, Toshiba, Recovery, and then TOSHIBA Application Installer. 2 Click Next. (Sample Image) TOSHIBA Application Installer screen 3 Click the item you to complete the installation process.

User Guide
Page 168
... press F12 when the machine starts and use the arrow keys to press F12 several times.) The computer displays the WARNING RESUME FAILURE/Windows Error Recovery - Read the documentation that the active program accepts text input. Insert a system diskette into Sleep mode and the battery has discharged. Data stored in Sleep...
... press F12 when the machine starts and use the arrow keys to press F12 several times.) The computer displays the WARNING RESUME FAILURE/Windows Error Recovery - Read the documentation that the active program accepts text input. Insert a system diskette into Sleep mode and the battery has discharged. Data stored in Sleep...
User Guide
Page 180
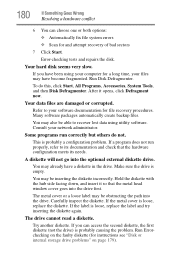
Your hard disk seems very slow. Run Disk Defragmenter. Refer to recover lost data using your computer for file recovery procedures. Many software packages automatically create backup files. Make sure the drive is probably a configuration problem. Error-checking tests ... administrator. The metal cover or a loose label may have a diskette in the drive. Run Errorchecking on the faulty diskette (for and attempt recovery of bad sectors 7 Click Start. Your data files are damaged or corrupted. Carefully inspect the diskette. 180 If Something Goes Wrong Resolving a hardware...
Your hard disk seems very slow. Run Disk Defragmenter. Refer to recover lost data using your computer for file recovery procedures. Many software packages automatically create backup files. Make sure the drive is probably a configuration problem. Error-checking tests ... administrator. The metal cover or a loose label may have a diskette in the drive. Run Errorchecking on the faulty diskette (for and attempt recovery of bad sectors 7 Click Start. Your data files are damaged or corrupted. Carefully inspect the diskette. 180 If Something Goes Wrong Resolving a hardware...


