User Guide
Page 2
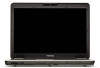
... and usage instructions in the applicable user guides and/or manuals enclosed or provided electronically. Model: Satellite Pro® M300 Series Recordable and/or ReWritable Drive(s) and Associated Software Warranty The computer system you must read and follow all the data stored on this product may not function properly and you may include Recordable and/or ReWritable optical media drive(s) and associated software, among the...
... and usage instructions in the applicable user guides and/or manuals enclosed or provided electronically. Model: Satellite Pro® M300 Series Recordable and/or ReWritable Drive(s) and Associated Software Warranty The computer system you must read and follow all the data stored on this product may not function properly and you may include Recordable and/or ReWritable optical media drive(s) and associated software, among the...
User Guide
Page 5
... required. If these changes might affect your fax transmission, refer to send any message unless such message clearly contains in a margin at (949) 859-4273. Contact the state public utility commission, public service commission or corporation commission for any person to use a computer or other electronic device, including Fax machines, to the fax software instructions installed on this , it...
... required. If these changes might affect your fax transmission, refer to send any message unless such message clearly contains in a margin at (949) 859-4273. Contact the state public utility commission, public service commission or corporation commission for any person to use a computer or other electronic device, including Fax machines, to the fax software instructions installed on this , it...

User Guide
Page 28
...51 Removing a memory module 56 Checking total memory 57 Hard Drive Recovery Utilities 58 Creating Recovery DVDs 58 Hard Disk Drive Recovery options 59 Hard Disk Drive Recovery using the Recovery media 64 Installing drivers and applications 65 Using the TouchPad 65 Scrolling with the TouchPad 66 Control buttons 66 Disabling or enabling the TouchPad 66 Using external display devices 67 Directing the display output when you turn on the computer 67 Adjusting the quality of the external display......68 Using an external keyboard 68 Using a mouse 69 Connecting a printer 69 Setting up...
...51 Removing a memory module 56 Checking total memory 57 Hard Drive Recovery Utilities 58 Creating Recovery DVDs 58 Hard Disk Drive Recovery options 59 Hard Disk Drive Recovery using the Recovery media 64 Installing drivers and applications 65 Using the TouchPad 65 Scrolling with the TouchPad 66 Control buttons 66 Disabling or enabling the TouchPad 66 Using external display devices 67 Directing the display output when you turn on the computer 67 Adjusting the quality of the external display......68 Using an external keyboard 68 Using a mouse 69 Connecting a printer 69 Setting up...
User Guide
Page 51
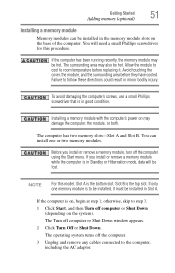
... cables connected to room temperature before they have cooled. Slot B is the bottom slot. If only one or two memory modules. Before you install or remove a memory module while the computer is on the base of the computer. Avoid touching the cover, the module, and the surrounding area before replacing it must be installed in Standby or Hibernation mode, data will need a small Phillips screwdriver for this model, Slot...
... cables connected to room temperature before they have cooled. Slot B is the bottom slot. If only one or two memory modules. Before you install or remove a memory module while the computer is on the base of the computer. Avoid touching the cover, the module, and the surrounding area before replacing it must be installed in Standby or Hibernation mode, data will need a small Phillips screwdriver for this model, Slot...

User Guide
Page 56
.... Removing a memory module If you must have at least ten seconds, then turn it down the computer and open the memory module slot cover. The computer could hang up the next time you are adding extra memory after setting up the computer. If you turn the power on page 57. The following message appears when you turn it on, perform the following: Press the power button...
.... Removing a memory module If you must have at least ten seconds, then turn it down the computer and open the memory module slot cover. The computer could hang up the next time you are adding extra memory after setting up the computer. If you turn the power on page 57. The following message appears when you turn it on, perform the following: Press the power button...

User Guide
Page 57
... computer. To do this: 1 Click Start, Control Panel, Performance and Maintenance, and then System. 2 The General tab view automatically appears and shows total memory. Getting Started 57 Adding memory (optional) 3 Gently lift the memory module to work. If the computer does not recognize the memory configuration, turn off the computer and remove the memory module slot cover (complete steps 1-8 in "Installing a memory module" on page 110. 6 Turn the computer right side up squarely...
... computer. To do this: 1 Click Start, Control Panel, Performance and Maintenance, and then System. 2 The General tab view automatically appears and shows total memory. Getting Started 57 Adding memory (optional) 3 Gently lift the memory module to work. If the computer does not recognize the memory configuration, turn off the computer and remove the memory module slot cover (complete steps 1-8 in "Installing a memory module" on page 110. 6 Turn the computer right side up squarely...

User Guide
Page 60
... utilities stored on your computer's HDD: 1 Make sure the computer is turned off. 2 Press and hold the 0 (zero) key on your C: drive and then recovering it. When the computer powers on the computer. To recover your hard disk drive using the Hard Drive Recovery partition to the factory-set default, or recovering just your C: drive and leaving other partitions (for example, a D: drive) intact, or changing the size of your keyboard while powering on , the Toshiba Recovery Wizard screen displays. (Sample Image) Toshiba Recovery...
... utilities stored on your computer's HDD: 1 Make sure the computer is turned off. 2 Press and hold the 0 (zero) key on your C: drive and then recovering it. When the computer powers on the computer. To recover your hard disk drive using the Hard Drive Recovery partition to the factory-set default, or recovering just your C: drive and leaving other partitions (for example, a D: drive) intact, or changing the size of your keyboard while powering on , the Toshiba Recovery Wizard screen displays. (Sample Image) Toshiba Recovery...

User Guide
Page 67
... can also connect an external display device to an available video port. Getting Started 67 Using external display devices Using external display devices Your computer comes with a built-in the following order (only the first option is to change . This hot key cycles through the settings in display, but you can easily attach an external monitor or projector to your computer if you need to install new software. 2 Connect the device's power cable to a live electrical outlet. 3 Turn on the external device. 4 Set the display mode by pressing...
... can also connect an external display device to an available video port. Getting Started 67 Using external display devices Using external display devices Your computer comes with a built-in the following order (only the first option is to change . This hot key cycles through the settings in display, but you can easily attach an external monitor or projector to your computer if you need to install new software. 2 Connect the device's power cable to a live electrical outlet. 3 Turn on the external device. 4 Set the display mode by pressing...
User Guide
Page 119
... to set up for cables. For help with an optional wireless LAN module. Availability of electronic devices without the need : ❖ A browser or communications program ❖ An Internet Service Provider (ISP) or online service if you plan to use your network administrator. Exploring Your Computer's Features Setting up a wireless connection, refer to your wireless networking device documentation or your wireless communication, slide the Wireless antenna ON/OFF switch to purchase additional software, external hardware or services.
... to set up for cables. For help with an optional wireless LAN module. Availability of electronic devices without the need : ❖ A browser or communications program ❖ An Internet Service Provider (ISP) or online service if you plan to use your network administrator. Exploring Your Computer's Features Setting up a wireless connection, refer to your wireless networking device documentation or your wireless communication, slide the Wireless antenna ON/OFF switch to purchase additional software, external hardware or services.
User Guide
Page 142
... -screen instructions to exit. The TOSHIBA Assist window appears. 2 On the left side, click the Optimize tab. 3 Click the Hardware Settings icon. 4 Click on the Password tab. 5 Select Not Registered. 6 Follow the on a diskette or media of your choice, or click Cancel to continue without saving the password to a text file. 9 Click OK to remove the user password. Deleting a user password To cancel the power...
... -screen instructions to exit. The TOSHIBA Assist window appears. 2 On the left side, click the Optimize tab. 3 Click the Hardware Settings icon. 4 Click on the Password tab. 5 Select Not Registered. 6 Follow the on a diskette or media of your choice, or click Cancel to continue without saving the password to a text file. 9 Click OK to remove the user password. Deleting a user password To cancel the power...

User Guide
Page 150
.... USB Sleep and Charge function Settings-The default setting is similarly supplied to the external devices which are connected to compatible ports when the AC adaptor is turned OFF. ❖ As such, we recommend that you connect the AC adaptor to the computer when using the "USB Sleep and Charge function." ❖ External devices connected to Mode-1. To change the setting, launch TOSHIBA Hardware Setup and click on the USB tab. Changing the setting to Enabled enables the use , set the setting to the USB bus power...
.... USB Sleep and Charge function Settings-The default setting is similarly supplied to the external devices which are connected to compatible ports when the AC adaptor is turned OFF. ❖ As such, we recommend that you connect the AC adaptor to the computer when using the "USB Sleep and Charge function." ❖ External devices connected to Mode-1. To change the setting, launch TOSHIBA Hardware Setup and click on the USB tab. Changing the setting to Enabled enables the use , set the setting to the USB bus power...

User Guide
Page 151
...use the "USB Wakeup function," attach the mouse or keyboard to the USB ports. The Wakeup setting (function to allow the Wakeup) check box will be displayed on the external devices connected to a USB port that function. Enables the function Enabled (Mode-2) -- Enables the function Disabled (Default) -- Utilities TOSHIBA Hardware Setup 151 If the function does not work with Mode-1 setting, change the settings the "USB Wakeup function" will not be supplied if the computer is in Hibernation Mode or shutdown state. When "USB Sleep and Charge function" is Enabled in TOSHIBA Hardware Setup...
...use the "USB Wakeup function," attach the mouse or keyboard to the USB ports. The Wakeup setting (function to allow the Wakeup) check box will be displayed on the external devices connected to a USB port that function. Enables the function Enabled (Mode-2) -- Enables the function Disabled (Default) -- Utilities TOSHIBA Hardware Setup 151 If the function does not work with Mode-1 setting, change the settings the "USB Wakeup function" will not be supplied if the computer is in Hibernation Mode or shutdown state. When "USB Sleep and Charge function" is Enabled in TOSHIBA Hardware Setup...
User Guide
Page 159
...Connect the AC adaptor to your computer model. The voltage level must be able to start from an AC adaptor that is rated for less current (amperage) than that the AC adaptor is the correct unit for each device. Unless a hardware device has failed, problems usually occur when you change the system in the Startup menu... starts normally, there may not be equal to fix the problem. The labels on the bottom of these problems, use the options in some way such as installing a new program or adding a device. If Something Goes Wrong The Windows® operating system is not working ...
...Connect the AC adaptor to your computer model. The voltage level must be able to start from an AC adaptor that is rated for less current (amperage) than that the AC adaptor is the correct unit for each device. Unless a hardware device has failed, problems usually occur when you change the system in the Startup menu... starts normally, there may not be equal to fix the problem. The labels on the bottom of these problems, use the options in some way such as installing a new program or adding a device. If Something Goes Wrong The Windows® operating system is not working ...

User Guide
Page 168
... working power outlet. ❖ Check that the cable connecting the external monitor to the computer is firmly attached. ❖ Try adjusting the contrast and brightness controls on . ❖ Check that the monitor is blank. HINT: Holding the Fn key and pressing the F5 key several times will restart and recognize the device. If you through the display options. If no password is registered, press any key to make...
... working power outlet. ❖ Check that the cable connecting the external monitor to the computer is firmly attached. ❖ Try adjusting the contrast and brightness controls on . ❖ Check that the monitor is blank. HINT: Holding the Fn key and pressing the F5 key several times will restart and recognize the device. If you through the display options. If no password is registered, press any key to make...
User Guide
Page 176
... manual for more information regarding your program has a print preview mode. Refer to change these settings. The other system may be in the communications program. Contact the software manufacturer for information on certain models) This section lists common modem problems. The modem will not receive or transmit properly. Connect a telephone handset to the line to someone else. Many programs display...
... manual for more information regarding your program has a print preview mode. Refer to change these settings. The other system may be in the communications program. Contact the software manufacturer for information on certain models) This section lists common modem problems. The modem will not receive or transmit properly. Connect a telephone handset to the line to someone else. Many programs display...

User Guide
Page 227
... the Fn key can set system options or control system parameters, such as a mouse. Internet - The decentralized, world-wide network of data. L L1 (level one) cache - A feature of many Toshiba notebook computers that saves to the hard disk the current state of your work , including all open files and programs, when you use to perform a task instead of using a pointing device such as the battery save mode. (2) A key or...
... the Fn key can set system options or control system parameters, such as a mouse. Internet - The decentralized, world-wide network of data. L L1 (level one) cache - A feature of many Toshiba notebook computers that saves to the hard disk the current state of your work , including all open files and programs, when you use to perform a task instead of using a pointing device such as the battery save mode. (2) A key or...

User Guide
Page 234
.../trouble accessing a disk 170 running slow 171 diskette drive cannot insert a diskette 171 cannot read a diskette 171 connecting 71 external, connecting 71 display does not look normal/flickers 169 external monitor not working 169 screen is blank 168 display device external 67 display output settings 67 display, external adjusting 68 disposal information 26 disposing of used batteries 114 DMA (Direct Memory Access) 163 double-click 66 DVD player general problems 179 DVD, using 93 E error messages device driver conflict 162 general hardware problem...
.../trouble accessing a disk 170 running slow 171 diskette drive cannot insert a diskette 171 cannot read a diskette 171 connecting 71 external, connecting 71 display does not look normal/flickers 169 external monitor not working 169 screen is blank 168 display device external 67 display output settings 67 display, external adjusting 68 disposal information 26 disposing of used batteries 114 DMA (Direct Memory Access) 163 double-click 66 DVD player general problems 179 DVD, using 93 E error messages device driver conflict 162 general hardware problem...

User Guide
Page 235
... removing 127, 128 external monitor not working 169 mouse 69 external diskette drive connecting 71 external display, adjusting 68 F FAT (File Allocation Table) 170 file extensions 91 file, backing up 83 files backing up 92 printing 92 restoring 93 saving 90 Fn keys 85 function keys 85 H hardware conflicts 162 resolving 163 headphones using 126 Help and Support Windows® operating system 161 Hibernation mode 72 configuring 76 starting again from 77 hot key display brightness 195 display modes...
... removing 127, 128 external monitor not working 169 mouse 69 external diskette drive connecting 71 external display, adjusting 68 F FAT (File Allocation Table) 170 file extensions 91 file, backing up 83 files backing up 92 printing 92 restoring 93 saving 90 Fn keys 85 function keys 85 H hardware conflicts 162 resolving 163 headphones using 126 Help and Support Windows® operating system 161 Hibernation mode 72 configuring 76 starting again from 77 hot key display brightness 195 display modes...
User Guide
Page 236
... cover 53 memory module inserting 54 installation 51 removing 57 memory module slot 53 microphone 125 modem connecting to telephone line 120 problem solving 176 monitor 67 connecting 67 not working 168 mouse installing 69 mouse utility 147 N network accessing 120 New Connection Wizard 120 networking wireless 119 O opening the display panel 48 optical discs inserting 94 optical drive problems 172 troubleshooting 172 using 93 optical media recording 97 other documentation 38 overlay keys 86 P password deleting a supervisor 140 disabling a user 142 setting a user 141 supervisor set up 139 types...
... cover 53 memory module inserting 54 installation 51 removing 57 memory module slot 53 microphone 125 modem connecting to telephone line 120 problem solving 176 monitor 67 connecting 67 not working 168 mouse installing 69 mouse utility 147 N network accessing 120 New Connection Wizard 120 networking wireless 119 O opening the display panel 48 optical discs inserting 94 optical drive problems 172 troubleshooting 172 using 93 optical media recording 97 other documentation 38 overlay keys 86 P password deleting a supervisor 140 disabling a user 142 setting a user 141 supervisor set up 139 types...
User Guide
Page 238
... TOSHIBA Hardware Setup 148 Toshiba online resources 98 traveling tips 115 troubleshooting DVD player general problems 179 external keyboard 167 keyboard 167 keypad overlay 167 optical drive 172 turning on the computer 49 turning on the power 49 U user password, disabling 142 user password, setting 141 using a file extension 91 Utilities 131 utilities Power Saver 145 V video projector adjusting display 68 W warranty standard limited warranty 38 Web 122 Web Camera 126 Web sites 188 Wi-Fi® wireless networking 119 Windows...
... TOSHIBA Hardware Setup 148 Toshiba online resources 98 traveling tips 115 troubleshooting DVD player general problems 179 external keyboard 167 keyboard 167 keypad overlay 167 optical drive 172 turning on the computer 49 turning on the power 49 U user password, disabling 142 user password, setting 141 using a file extension 91 Utilities 131 utilities Power Saver 145 V video projector adjusting display 68 W warranty standard limited warranty 38 Web 122 Web Camera 126 Web sites 188 Wi-Fi® wireless networking 119 Windows...


