

User Guide
Page 20
... 43 Keeping yourself comfortable 44 Other precautions 47 Setting up your computer 48 Connecting to a power source 49 Adding memory 52 Installing a memory module 52 Removing a memory module 55 Turning on the computer 57 Opening the display panel 57 Turning on the power 57 Using the AccuPoint II...TouchPad 60 Control buttons 60 Disabling or enabling the Dual Point Device 61 Setting up your software 62 Registering your computer with Toshiba 63 Setting up other devices 63 Turning off the computer 63 Closing the display panel 64 Using external display devices 65 Connecting...
... 43 Keeping yourself comfortable 44 Other precautions 47 Setting up your computer 48 Connecting to a power source 49 Adding memory 52 Installing a memory module 52 Removing a memory module 55 Turning on the computer 57 Opening the display panel 57 Turning on the power 57 Using the AccuPoint II...TouchPad 60 Control buttons 60 Disabling or enabling the Dual Point Device 61 Setting up your software 62 Registering your computer with Toshiba 63 Setting up other devices 63 Turning off the computer 63 Closing the display panel 64 Using external display devices 65 Connecting...
User Guide
Page 25
... can help you .... 208 Resolving a hardware conflict 209 A plan of action 209 Resolving hardware conflicts on your own 210 Fixing a problem with Device Manager 211 Memory problems 213 Power and the batteries 213 Keyboard problems 215
... can help you .... 208 Resolving a hardware conflict 209 A plan of action 209 Resolving hardware conflicts on your own 210 Fixing a problem with Device Manager 211 Memory problems 213 Power and the batteries 213 Keyboard problems 215

User Guide
Page 36
... headphones or other audio input device to the right. To turn the volume up, turn the dial to the computer. Underside Battery release Battery pack Memory module cover Slim SelectBay slot Slim SelectBay release Expansion port Battery release-Locks the battery in place to this jack automatically disables the internal speakers...
... headphones or other audio input device to the right. To turn the volume up, turn the dial to the computer. Underside Battery release Battery pack Memory module cover Slim SelectBay slot Slim SelectBay release Expansion port Battery release-Locks the battery in place to this jack automatically disables the internal speakers...

User Guide
Page 37
... Locate the display latch on page 52. Slim SelectBay® release-Keeps the Slim SelectBay® module secure in its compartment. For more memory to your computer when a standard electrical outlet is not available. Slim SelectBay® slot-One of the computer. provides additional expansion capability. ... latch 2 Slide the display latch to an expansion device; Expansion port-Lets you connect to the right and lift the display panel. Memory module cover-Lets you add more information, see "Running the computer on battery power" on page 131. Finding Your Way Around Keyboard ...
... Locate the display latch on page 52. Slim SelectBay® release-Keeps the Slim SelectBay® module secure in its compartment. For more memory to your computer when a standard electrical outlet is not available. Slim SelectBay® slot-One of the computer. provides additional expansion capability. ... latch 2 Slide the display latch to an expansion device; Expansion port-Lets you connect to the right and lift the display panel. Memory module cover-Lets you add more information, see "Running the computer on battery power" on page 131. Finding Your Way Around Keyboard ...
User Guide
Page 48
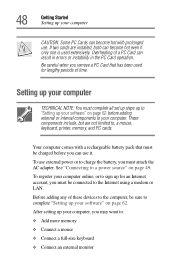
..." on page 62. Be careful when you can use it. Your computer comes with prolonged use external power or to , a mouse, keyboard, printer, memory, and PC cards. To register your computer online, or to sign up for lengthy periods of a PC Card can result in errors or instability in...up your computer, you must complete all set up steps up to "Setting up your software" on page 49. See "Connecting to : ❖ Add more memory ❖ Connect a mouse ❖ Connect a full-size keyboard ❖ Connect an external monitor Overheating of time. Setting up your computer TECHNICAL NOTE: You ...
..." on page 62. Be careful when you can use it. Your computer comes with prolonged use external power or to , a mouse, keyboard, printer, memory, and PC cards. To register your computer online, or to sign up for lengthy periods of a PC Card can result in errors or instability in...up your computer, you must complete all set up steps up to "Setting up your software" on page 49. See "Connecting to : ❖ Add more memory ❖ Connect a mouse ❖ Connect a full-size keyboard ❖ Connect an external monitor Overheating of time. Setting up your computer TECHNICAL NOTE: You ...
User Guide
Page 52
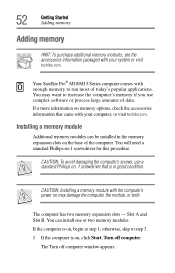
Your Satellite Pro® M10/M15 Series computer comes with your computer, or visit toshiba.com. Installing a memory module Additional memory modules can install one or two memory modules. If the computer is in the memory expansion slots on the base of the computer. Slot A and Slot B. You can be installed in good condition. The computer has two memory expansion...
Your Satellite Pro® M10/M15 Series computer comes with your computer, or visit toshiba.com. Installing a memory module Additional memory modules can install one or two memory modules. If the computer is in the memory expansion slots on the base of the computer. Slot A and Slot B. You can be installed in good condition. The computer has two memory expansion...
User Guide
Page 53
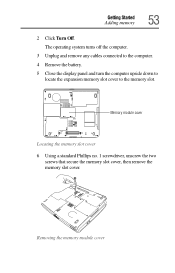
Removing the memory module cover Getting Started Adding memory 53 2 Click Turn Off. The operating system turns off the computer. 3 Unplug and remove any cables connected to the computer. 4 Remove the battery. 5 Close the display panel and turn the computer upside down to locate the expansion memory slot cover to the memory slot. Memory module cover Locating the memory slot cover 6 Using a standard Phillips no. 1 screwdriver, unscrew the two screws that secure the memory slot cover, then remove the memory slot cover.
Removing the memory module cover Getting Started Adding memory 53 2 Click Turn Off. The operating system turns off the computer. 3 Unplug and remove any cables connected to the computer. 4 Remove the battery. 5 Close the display panel and turn the computer upside down to locate the expansion memory slot cover to the memory slot. Memory module cover Locating the memory slot cover 6 Using a standard Phillips no. 1 screwdriver, unscrew the two screws that secure the memory slot cover, then remove the memory slot cover.
User Guide
Page 54
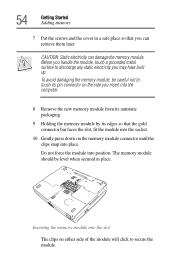
...on either side of the module will click to secure the module. 54 Getting Started Adding memory 7 Put the screws and the cover in place. Inserting the memory module into position. The memory module should be careful not to discharge any static electricity you may have built up. CAUTION...so that you insert into the computer. 8 Remove the new memory module from its antistatic packaging. 9 Holding the memory module by its pin connector on the memory module connector until the clips snap into place. To avoid damaging the memory module, be level when secured in a safe place so ...
...on either side of the module will click to secure the module. 54 Getting Started Adding memory 7 Put the screws and the cover in place. Inserting the memory module into position. The memory module should be careful not to discharge any static electricity you may have built up. CAUTION...so that you insert into the computer. 8 Remove the new memory module from its antistatic packaging. 9 Holding the memory module by its pin connector on the memory module connector until the clips snap into place. To avoid damaging the memory module, be level when secured in a safe place so ...
User Guide
Page 55
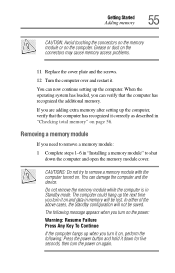
...and the screws. 12 Turn the computer over and restart it down the computer and open the memory module cover. Removing a memory module If you need to remove a memory module: 1 Complete steps 1-6 in memory will not be lost. CAUTIONS: Do not try to shut down for five seconds, then ...turn it correctly as described in Standby mode. Getting Started Adding memory 55 CAUTION: Avoid touching the connectors on the memory module or on . You can now continue setting up the computer, verify that the computer has recognized the additional...
...and the screws. 12 Turn the computer over and restart it down the computer and open the memory module cover. Removing a memory module If you need to remove a memory module: 1 Complete steps 1-6 in memory will not be lost. CAUTIONS: Do not try to shut down for five seconds, then ...turn it correctly as described in Standby mode. Getting Started Adding memory 55 CAUTION: Avoid touching the connectors on the memory module or on . You can now continue setting up the computer, verify that the computer has recognized the additional...
User Guide
Page 56
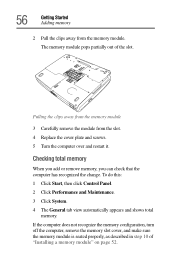
... Performance and Maintenance. 3 Click System. 4 The General tab view automatically appears and shows total memory. Pulling the clips away from the memory module 3 Carefully remove the module from the memory module. Checking total memory When you add or remove memory, you can check that the computer has recognized the change. If the computer does not...
... Performance and Maintenance. 3 Click System. 4 The General tab view automatically appears and shows total memory. Pulling the clips away from the memory module 3 Carefully remove the module from the memory module. Checking total memory When you add or remove memory, you can check that the computer has recognized the change. If the computer does not...

User Guide
Page 64
... again, you will beep to notify you are not connected to a network, use the Windows Standby or Hibernate commands to save your system settings to memory so that it is in use.
... again, you will beep to notify you are not connected to a network, use the Windows Standby or Hibernate commands to save your system settings to memory so that it is in use.

User Guide
Page 75
... computing tips and provides important information about basic features. If the network you are working, you will lose all work stays in the computer's temporary memory until you must restart your computer to reconnect, or your file to the disk. This feature saves your battery runs out of charge while you...
... computing tips and provides important information about basic features. If the network you are working, you will lose all work stays in the computer's temporary memory until you must restart your computer to reconnect, or your file to the disk. This feature saves your battery runs out of charge while you...

User Guide
Page 103
... which you were using Configuring your computer for Hibernation 1 Open the Start menu, click Control Panel then Performance and Maintenance. 2 Click the Toshiba Power Saver icon. 3 In the Running on the hard disk, no data is lost if the main battery discharges ❖ When starting up... retained indefinitely. 103 Learning the Basics Powering down the computer Using Hibernation Hibernation mode shuts the computer down completely, but it from memory. When you start up than restarting from Standby, because information is being retrieved from the hard disk rather than restoring it first...
... which you were using Configuring your computer for Hibernation 1 Open the Start menu, click Control Panel then Performance and Maintenance. 2 Click the Toshiba Power Saver icon. 3 In the Running on the hard disk, no data is lost if the main battery discharges ❖ When starting up... retained indefinitely. 103 Learning the Basics Powering down the computer Using Hibernation Hibernation mode shuts the computer down completely, but it from memory. When you start up than restarting from Standby, because information is being retrieved from the hard disk rather than restoring it first...

User Guide
Page 105
... again from Hibernation mode To start it , including all open programs and files you were using . Standby holds the current mode of the computer in memory so that, when you restart the computer, you can start up the computer from Hibernation mode, press the power button until the on/off computer...
... again from Hibernation mode To start it , including all open programs and files you were using . Standby holds the current mode of the computer in memory so that, when you restart the computer, you can start up the computer from Hibernation mode, press the power button until the on/off computer...
User Guide
Page 110
The RTC battery powers the RTC memory that provides power when you may purchase a battery pack for use in the Slim SelectBay. This is connected to your system), for an extended period (...
The RTC battery powers the RTC memory that provides power when you may purchase a battery pack for use in the Slim SelectBay. This is connected to your system), for an extended period (...
User Guide
Page 123
... as on the road. Chapter 5 Expansion Options Your computer is designed to work with your notebook can connect any of these optional devices: ❖ Expansion memory modules ❖ Standard 101-key keyboard ❖ Traditional mouse or trackball ❖ Printer ❖ PC Cards 123
... as on the road. Chapter 5 Expansion Options Your computer is designed to work with your notebook can connect any of these optional devices: ❖ Expansion memory modules ❖ Standard 101-key keyboard ❖ Traditional mouse or trackball ❖ Printer ❖ PC Cards 123
User Guide
Page 158
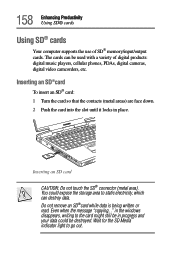
... read. Wait for the SD Media™ indicator light to static electricity, which can be destroyed. You could be used with a variety of SD® memory/input/output cards. Inserting an SD®card To insert an SD® card: 1 Turn the card so that the contacts (metal areas) are face...
... read. Wait for the SD Media™ indicator light to static electricity, which can be destroyed. You could be used with a variety of SD® memory/input/output cards. Inserting an SD®card To insert an SD® card: 1 Turn the card so that the contacts (metal areas) are face...
User Guide
Page 174
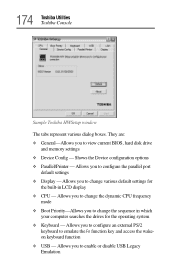
...; USB - They are: ❖ General-Allows you to configure an external PS/2 keyboard to view current BIOS, hard disk drive and memory settings ❖ Device Config - Allows you to configure the parallel port default settings ❖ Display - Allows you to enable or disable ... drives for the built-in LCD display ❖ CPU - Shows the Device configuration options ❖ Parallel/Printer - 174 Toshiba Utilities Toshiba Console Sample Toshiba HWSetup window The tabs represent various dialog boxes. Allows you to change the dynamic CPU frequency mode ❖ Boot Priority-Allows...
...; USB - They are: ❖ General-Allows you to configure an external PS/2 keyboard to view current BIOS, hard disk drive and memory settings ❖ Device Config - Allows you to configure the parallel port default settings ❖ Display - Allows you to enable or disable ... drives for the built-in LCD display ❖ CPU - Shows the Device configuration options ❖ Parallel/Printer - 174 Toshiba Utilities Toshiba Console Sample Toshiba HWSetup window The tabs represent various dialog boxes. Allows you to change the dynamic CPU frequency mode ❖ Boot Priority-Allows...

User Guide
Page 178
... the function that nobody can work on your files. 178 Toshiba Utilities Setting user passwords The computer saves the state of passwords on your open programs and files, to save anything you always have in short-term memory to the hard disk drive should your system to the hard... disk, and then powers down completely. Setting user passwords Setting a password leaves your computer secure so that causes your battery fail. You must enter the password before you will lose data. Toshiba supports the ...
... the function that nobody can work on your files. 178 Toshiba Utilities Setting user passwords The computer saves the state of passwords on your open programs and files, to save anything you always have in short-term memory to the hard disk drive should your system to the hard... disk, and then powers down completely. Setting user passwords Setting a password leaves your computer secure so that causes your battery fail. You must enter the password before you will lose data. Toshiba supports the ...
User Guide
Page 206
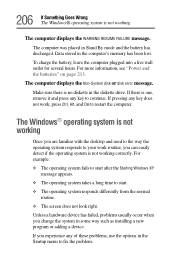
... operating system takes a long time to restart the computer. If you experience any key does not work routine, you change the system in the computer's memory has been lost. Data stored in some way such as installing a new program or adding a device. Unless a hardware device has failed, problems usually occur when...
... operating system takes a long time to restart the computer. If you experience any key does not work routine, you change the system in the computer's memory has been lost. Data stored in some way such as installing a new program or adding a device. Unless a hardware device has failed, problems usually occur when...


