
Users Manual Canada; English
Page 2
... Satellite L770/L775/L770D/L775D/Satellite Pro L770/L775/L770D/L775D 2-8 Internal Hardware Components 2-17 Chapter 3 Operating Basics Using the Touch Pad 3-1 The Keyboard 3-1 Optical disc drives 3-5 TOSHIBA VIDEO PLAYER 3-15 Using WinDVD BD for TOSHIBA 3-20 Wireless communications 3-22 LAN ...3-26 Optional devices 3-28 Memory media slot 3-28 Memory media 3-29 Media care 3-30 Inserting a memory media 3-31 Removing a memory media 3-31 Additional memory module 3-32 External monitor 3-36 HDMI ...3-37 Security lock 3-41 Optional TOSHIBA Accessories 3-42 Sound System 3-42 Video...
... Satellite L770/L775/L770D/L775D/Satellite Pro L770/L775/L770D/L775D 2-8 Internal Hardware Components 2-17 Chapter 3 Operating Basics Using the Touch Pad 3-1 The Keyboard 3-1 Optical disc drives 3-5 TOSHIBA VIDEO PLAYER 3-15 Using WinDVD BD for TOSHIBA 3-20 Wireless communications 3-22 LAN ...3-26 Optional devices 3-28 Memory media slot 3-28 Memory media 3-29 Media care 3-30 Inserting a memory media 3-31 Removing a memory media 3-31 Additional memory module 3-32 External monitor 3-36 HDMI ...3-37 Security lock 3-41 Optional TOSHIBA Accessories 3-42 Sound System 3-42 Video...
Users Manual Canada; English
Page 12
... are also defined in parentheses following formats to describe many computer operations. Keys The keyboard keys are enclosed in the Glossary. A distinctive typeface identifies the key top symbols as clicking an icon or entering text, the icon's name or the text you see to set up and begin using optional devices and troubleshooting. User's Manual xii Conventions This manual uses the following their definition. We identify...
... are also defined in parentheses following formats to describe many computer operations. Keys The keyboard keys are enclosed in the Glossary. A distinctive typeface identifies the key top symbols as clicking an icon or entering text, the icon's name or the text you see to set up and begin using optional devices and troubleshooting. User's Manual xii Conventions This manual uses the following their definition. We identify...
Users Manual Canada; English
Page 23
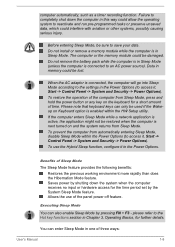
... automatically entering Sleep Mode, disable Sleep Mode within the HW Setup utility. Benefits of three ways: User's Manual 1-8 Failure to completely shut down the system when the computer receives no input or hardware access for further details. Before entering Sleep Mode, be lost. Do not install or remove a memory module while the computer is next turned on and the system returns from Sleep Mode, press and hold the power button or any key on Keyboard option is enabled...
... automatically entering Sleep Mode, disable Sleep Mode within the HW Setup utility. Benefits of three ways: User's Manual 1-8 Failure to completely shut down the system when the computer receives no input or hardware access for further details. Before entering Sleep Mode, be lost. Do not install or remove a memory module while the computer is next turned on and the system returns from Sleep Mode, press and hold the power button or any key on Keyboard option is enabled...
Users Manual Canada; English
Page 48
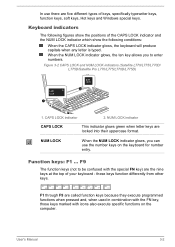
Figure 3-2 CAPS LOCK and NUM LOCK indicators (Satellite L770/L775/L770D/ L775D/Satellite Pro L770/L775/L770D/L775D) 2 1 1. Function keys: F1 ... F9 The function keys (not to enter numbers. F1 through F9 are the nine keys at the top of your keyboard - CAPS LOCK indicator 2. User's Manual 3-2 NUM LOCK When the NUM LOCK indicator glows, you to be confused with the special FN key) are called function keys because they execute programmed functions when pressed and, when used in...
Figure 3-2 CAPS LOCK and NUM LOCK indicators (Satellite L770/L775/L770D/ L775D/Satellite Pro L770/L775/L770D/L775D) 2 1 1. Function keys: F1 ... F9 The function keys (not to enter numbers. F1 through F9 are the nine keys at the top of your keyboard - CAPS LOCK indicator 2. User's Manual 3-2 NUM LOCK When the NUM LOCK indicator glows, you to be confused with the special FN key) are called function keys because they execute programmed functions when pressed and, when used in...
Users Manual Canada; English
Page 49
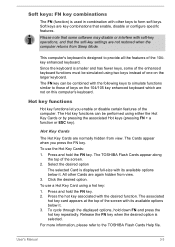
... TOSHIBA Flash Cards appear along the top of the computer. To use the Hot Key Cards: 1. Hot Key Cards The Hot Key Cards are not restored when the computer returns from Sleep Mode. The Cards appear when you enable or disable certain features of the screen. 2. To cycle through the displayed options, hold the FN key. Please note that some of one on the 104/105 key enhanced keyboard which are key combinations that the soft-key settings...
... TOSHIBA Flash Cards appear along the top of the computer. To use the Hot Key Cards: 1. Hot Key Cards The Hot Key Cards are not restored when the computer returns from Sleep Mode. The Cards appear when you enable or disable certain features of the screen. 2. To cycle through the displayed options, hold the FN key. Please note that some of one on the 104/105 key enhanced keyboard which are key combinations that the soft-key settings...

Users Manual Canada; English
Page 50
... hot keys. User's Manual 3-4 Touch Pad Pressing FN + F9 enables or disables the Touch Pad function. Enlarge Pressing FN + 2 enlarges the icon size on the desktop or the font sizes within one of the external display device. Hot keys This section describes the associated functions of the supported application windows. Sleep Pressing FN + F3 switches the system to Hibernation Mode. Hibernate Pressing FN + F4 switches the system to Sleep Mode. To restore your desktop, you must set...
... hot keys. User's Manual 3-4 Touch Pad Pressing FN + F9 enables or disables the Touch Pad function. Enlarge Pressing FN + 2 enlarges the icon size on the desktop or the font sizes within one of the external display device. Hot keys This section describes the associated functions of the supported application windows. Sleep Pressing FN + F3 switches the system to Hibernation Mode. Hibernate Pressing FN + F4 switches the system to Sleep Mode. To restore your desktop, you must set...
Users Manual Canada; English
Page 61
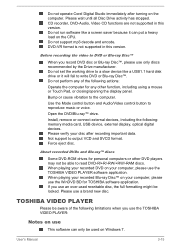
... the following : memory media card, USB device, external display, optical digital devices. Do not operate Corel Digital Studio immediately after recording important data. DVD-VR format is not supported in this version. Use the Mode control button and Audio/Video control button to the computer. Install, remove or connect external devices, including the following actions: Operate the computer for any other DVD players may not be locked. About recorded DVDs and Blu-ray™ discs Some DVD-ROM drives for TOSHIBA software application. User's Manual 3-15 Please...
... the following : memory media card, USB device, external display, optical digital devices. Do not operate Corel Digital Studio immediately after recording important data. DVD-VR format is not supported in this version. Use the Mode control button and Audio/Video control button to the computer. Install, remove or connect external devices, including the following actions: Operate the computer for any other DVD players may not be locked. About recorded DVDs and Blu-ray™ discs Some DVD-ROM drives for TOSHIBA software application. User's Manual 3-15 Please...
Users Manual Canada; English
Page 62
... recording errors. Do not open any other applications or carry out any other applications when using battery power, set the Power Options to Hibernation or Sleep Mode when running . Close all other operations during times when there is recommended the AC adaptor be used with administrator rights. Use DVD-Video discs with smooth playback. When playing DVD-Video using the TOSHIBA VIDEO PLAYER. Do not lock the computer using the control window to change the audio track...
... recording errors. Do not open any other applications or carry out any other applications when using battery power, set the Power Options to Hibernation or Sleep Mode when running . Close all other operations during times when there is recommended the AC adaptor be used with administrator rights. Use DVD-Video discs with smooth playback. When playing DVD-Video using the TOSHIBA VIDEO PLAYER. Do not lock the computer using the control window to change the audio track...
Users Manual Canada; English
Page 78
... the memory media slot. User's Manual 3-32 If you remove the memory media or turn off the power while the computer is out before touching or installing any additional memory modules. Do not remove the memory media while the computer is turned on . Do not remove only the miniSD/microSD Card while leaving the adaptor in the memory media could be fatally damaged by TOSHIBA. You should avoid mats that are installing/replacing the memory module. Use only memory modules...
... the memory media slot. User's Manual 3-32 If you remove the memory media or turn off the power while the computer is out before touching or installing any additional memory modules. Do not remove the memory media while the computer is turned on . Do not remove only the miniSD/microSD Card while leaving the adaptor in the memory media could be fatally damaged by TOSHIBA. You should avoid mats that are installing/replacing the memory module. Use only memory modules...

Users Manual Canada; English
Page 79
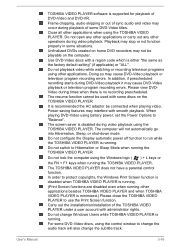
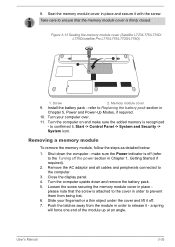
... and remove the battery pack (refer to Replacing the battery pack section in Chapter 5, Power and Power-Up Modes, if required). 5. Close the display panel. 4. Loosen the screw securing the memory module cover in place please note that the screw is off (refer to remove and fasten the screw - Use a point size 1 Phillips screwdriver. 6. Memory module cover User's Manual 3-33 Remove the AC adaptor and all cables and peripherals connected to prevent...
... and remove the battery pack (refer to Replacing the battery pack section in Chapter 5, Power and Power-Up Modes, if required). 5. Close the display panel. 4. Loosen the screw securing the memory module cover in place please note that the screw is off (refer to remove and fasten the screw - Use a point size 1 Phillips screwdriver. 6. Memory module cover User's Manual 3-33 Remove the AC adaptor and all cables and peripherals connected to prevent...
Users Manual Canada; English
Page 81
... from being lost. 6. Turn the computer on and make sure the Power indicator is attached to the cover in order to prevent them from the module in order to Replacing the battery pack section in place - make sure the added memory is firmly closed. Screw 2. Seat the memory module cover in Chapter 1, Getting Started if required). 2. Install the battery pack - to the computer. 3. Removing a memory module To remove the memory module, follow the steps...
... from being lost. 6. Turn the computer on and make sure the Power indicator is attached to the cover in order to prevent them from the module in order to Replacing the battery pack section in place - make sure the added memory is firmly closed. Screw 2. Seat the memory module cover in Chapter 1, Getting Started if required). 2. Install the battery pack - to the computer. 3. Removing a memory module To remove the memory module, follow the steps...
Users Manual Canada; English
Page 82
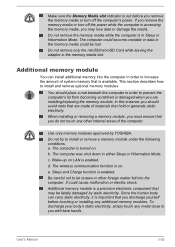
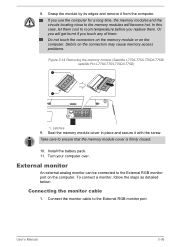
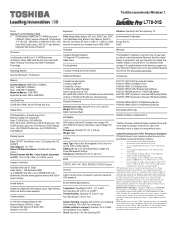
... the screw. If you replace them . Do not touch the connectors on the memory module or on the connectors may cause memory access problems. Figure 3-14 Removing the memory module (Satellite L770/L775/L770D/L775D/ satellite Pro L770/L775/L770D/L775D) 1 1 1. Latches 9. Seat the memory module cover in place and secure it from the computer. Turn your computer over. Take care to the External RGB monitor port. User's Manual 3-36 Install the battery pack. 11. In...
... the screw. If you replace them . Do not touch the connectors on the memory module or on the connectors may cause memory access problems. Figure 3-14 Removing the memory module (Satellite L770/L775/L770D/L775D/ satellite Pro L770/L775/L770D/L775D) 1 1 1. Latches 9. Seat the memory module cover in place and secure it from the computer. Turn your computer over. Take care to the External RGB monitor port. User's Manual 3-36 Install the battery pack. 11. In...
Users Manual Canada; English
Page 100
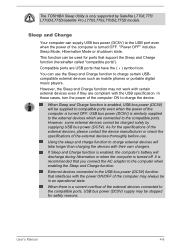
... for ports that support the Sleep and Charge function (hereinafter called "compatible ports"). Using the sleep and charge function to charge external devices will be charged solely by Satellite L770/L775/ L770D/L775D/satellite Pro L770/L775/L770D/L775D models. User's Manual 4-8 Sleep and Charge Your computer can supply USB bus power (DC5V) to the USB port even when the power of the computer is turned OFF. USB bus power (DC5V) is turned OFF. External devices connected to the USB bus power (DC5V) function that interfaces with the USB specification. Compatible ports...
... for ports that support the Sleep and Charge function (hereinafter called "compatible ports"). Using the sleep and charge function to charge external devices will be charged solely by Satellite L770/L775/ L770D/L775D/satellite Pro L770/L775/L770D/L775D models. User's Manual 4-8 Sleep and Charge Your computer can supply USB bus power (DC5V) to the USB port even when the power of the computer is turned OFF. USB bus power (DC5V) is turned OFF. External devices connected to the USB bus power (DC5V) function that interfaces with the USB specification. Compatible ports...
Users Manual Canada; English
Page 113
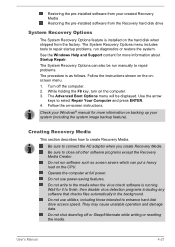
... the instructions shown on the hard disk when shipped from the Recovery hard disk drive System Recovery Options The System Recovery Options feature is installed on the onscreen menu. 1. Use the arrow keys to close all other software programs except the Recovery Media Creator. Do not use utilities, including those intended to enhance hard disk drive access speed. User's Manual 4-21 Turn off or Sleep/Hibernate while writing or rewriting the media. The Advanced Boot Options menu will be run manually to repair startup problems, run software...
... the instructions shown on the hard disk when shipped from the Recovery hard disk drive System Recovery Options The System Recovery Options feature is installed on the onscreen menu. 1. Use the arrow keys to close all other software programs except the Recovery Media Creator. Do not use utilities, including those intended to enhance hard disk drive access speed. User's Manual 4-21 Turn off or Sleep/Hibernate while writing or rewriting the media. The Advanced Boot Options menu will be run manually to repair startup problems, run software...
Users Manual Canada; English
Page 132
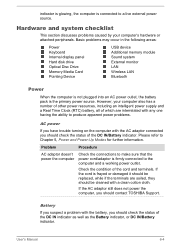
... a clean cotton cloth. If the cord is the primary power source. Basic problems may occur in the following areas: Power Keyboard Internal display panel Hard disk drive Optical Disc Drive Memory Media Card Pointing Device USB device Additional memory module Sound system External monitor LAN Wireless LAN Bluetooth Power When the computer is not plugged into an AC power outlet, the battery pack is frayed or damaged it should be replaced, while if the terminals are interrelated with any one having...
... a clean cotton cloth. If the cord is the primary power source. Basic problems may occur in the following areas: Power Keyboard Internal display panel Hard disk drive Optical Disc Drive Memory Media Card Pointing Device USB device Additional memory module Sound system External monitor LAN Wireless LAN Bluetooth Power When the computer is not plugged into an AC power outlet, the battery pack is frayed or damaged it should be replaced, while if the terminals are interrelated with any one having...

Users Manual Canada; English
Page 133
.../L775D/Satellite Pro L770/L775/L770D/L775D Models) Check the Battery indicator - if it is hot or cold to charge the battery for at the end of its operating life, you should contact a TOSHIBA Support. if it glows green, disconnect the AC adaptor and operate the computer. If the battery still does not charge, you try again. Battery doesn't charge when the AC adaptor is connected to TOSHIBA Support. (For Satellite...
.../L775D/Satellite Pro L770/L775/L770D/L775D Models) Check the Battery indicator - if it is hot or cold to charge the battery for at the end of its operating life, you should contact a TOSHIBA Support. if it glows green, disconnect the AC adaptor and operate the computer. If the battery still does not charge, you try again. Battery doesn't charge when the AC adaptor is connected to TOSHIBA Support. (For Satellite...
Users Manual Canada; English
Page 135
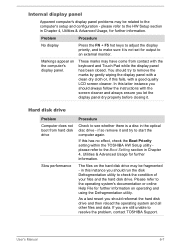
... the Boot Setting section in Chapter 4, Utilities & Advanced Usage for output to make sure it is a disc in the optical disc drive - Internal display panel Apparent computer's display panel problems may be related to the operating system's documentation or online Help File for further information. You should always follow the instructions with a good quality LCD screen cleaner. Hard disk drive Problem Computer does not boot from contact with the keyboard and Touch Pad while the display panel...
... the Boot Setting section in Chapter 4, Utilities & Advanced Usage for output to make sure it is a disc in the optical disc drive - Internal display panel Apparent computer's display panel problems may be related to the operating system's documentation or online Help File for further information. You should always follow the instructions with a good quality LCD screen cleaner. Hard disk drive Problem Computer does not boot from contact with the keyboard and Touch Pad while the display panel...
Users Manual Canada; English
Page 140
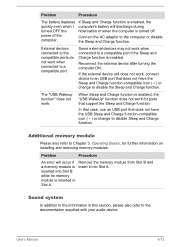
... a memory module is enabled. The "USB Wakeup function" does not work when connected to the compatible ports do not work . Additional memory module Please also refer to the computer or disable the Sleep and Charge function. External devices connected to a compatible port. If the external device still does not work for further information on installing and removing memory modules. Sound system In addition to disable the Sleep and Charge function. Reconnect the external device after turning the computer ON. Problem Procedure The battery depletes quickly even...
... a memory module is enabled. The "USB Wakeup function" does not work when connected to the compatible ports do not work . Additional memory module Please also refer to the computer or disable the Sleep and Charge function. External devices connected to a compatible port. If the external device still does not work for further information on installing and removing memory modules. Sound system In addition to disable the Sleep and Charge function. Reconnect the external device after turning the computer ON. Problem Procedure The battery depletes quickly even...
Users Manual Canada; English
Page 142
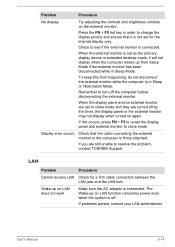
... Sleep Mode. If this from Sleep Mode if the external monitor has been disconnected while in order to resolve the problem, contact TOSHIBA Support. If you are turned off . The Wake-up on the external monitor. When the external monitor is set the display panel and external monitor to see if the external monitor is connected. Problem Procedure No display Try adjusting the contrast and brightness controls on LAN does not work Make sure the AC adaptor is connected. Check to clone mode. User's Manual...
... Sleep Mode. If this from Sleep Mode if the external monitor has been disconnected while in order to resolve the problem, contact TOSHIBA Support. If you are turned off . The Wake-up on the external monitor. When the external monitor is set the display panel and external monitor to see if the external monitor is connected. Problem Procedure No display Try adjusting the contrast and brightness controls on LAN does not work Make sure the AC adaptor is connected. Check to clone mode. User's Manual...
Detailed Specs for Satellite Pro L770 PSK3XC-01S00S English
Page 1
... DDR3 (1333MHz) Maximum Memory: 8GB DDR3 Expansion Modules: 2GB or 4GB DDR3 Hard Disk Drive 320GB (5400 RPM); Toshiba recommends Windows 7. L770-01S Model: i Satellite Pro L770 PSK3XC-01S00S 2nd Generation Intel® Core™ i5-2450M processor - 2.50GHz/3.10Ghz, Genuine Windows® 7 Professional, 17.3" HD LED, 8GB DDR3, 320GB HDD S-ATA, DVD Super-Multi Double Layer, LAN, 802.11 bgn Wireless, Integrated Web Camera, Bluetooth Processor 2nd Generation Intel...
... DDR3 (1333MHz) Maximum Memory: 8GB DDR3 Expansion Modules: 2GB or 4GB DDR3 Hard Disk Drive 320GB (5400 RPM); Toshiba recommends Windows 7. L770-01S Model: i Satellite Pro L770 PSK3XC-01S00S 2nd Generation Intel® Core™ i5-2450M processor - 2.50GHz/3.10Ghz, Genuine Windows® 7 Professional, 17.3" HD LED, 8GB DDR3, 320GB HDD S-ATA, DVD Super-Multi Double Layer, LAN, 802.11 bgn Wireless, Integrated Web Camera, Bluetooth Processor 2nd Generation Intel...


