

User Guide
Page 1
... you need assistance: ❖ Toshiba's Support Web site pcsupport.toshiba.com ❖ Toshiba Customer Support Center Calling within the United States (800) 457-7777 Calling from outside the United States (949) 859-4273 Please fill in a convenient place to access important information about your computer. Satellite Pro® L640 Series Resource Guide Keep this Resource Guide in for your reference and future use: Model name Part number Serial number
... you need assistance: ❖ Toshiba's Support Web site pcsupport.toshiba.com ❖ Toshiba Customer Support Center Calling within the United States (800) 457-7777 Calling from outside the United States (949) 859-4273 Please fill in a convenient place to access important information about your computer. Satellite Pro® L640 Series Resource Guide Keep this Resource Guide in for your reference and future use: Model name Part number Serial number
User Guide
Page 2
2 Contents Introduction 10 Setting up your computer and getting started 13 Creating recovery DVDs/media 16 Learning the basics 17 Using the TouchPad 18 Using the optical disc drive 20 Using the Web Camera 24 Using the Memory card reader 24 Moving the computer 26 Mobile computing 26 Taking care of your battery 30 If something goes wrong 32 If you need further assistance 35 Power cord/cable connectors 36 Features and specifications 36
2 Contents Introduction 10 Setting up your computer and getting started 13 Creating recovery DVDs/media 16 Learning the basics 17 Using the TouchPad 18 Using the optical disc drive 20 Using the Web Camera 24 Using the Memory card reader 24 Moving the computer 26 Mobile computing 26 Taking care of your battery 30 If something goes wrong 32 If you need further assistance 35 Power cord/cable connectors 36 Features and specifications 36
User Guide
Page 3
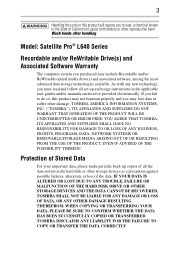
... NOT WARRANT THAT OPERATION OF THE PRODUCT WILL BE UNINTERRUPTED OR ERROR FREE. Model: Satellite Pro® L640 Series Recordable and/or ReWritable Drive(s) and Associated Software Warranty The computer system you may include Recordable and/or ReWritable optical media drive(s) and associated software, among the most advanced data storage technologies available. 3 Handling the cord on the hard disk or other storage devices as a precaution against...
... NOT WARRANT THAT OPERATION OF THE PRODUCT WILL BE UNINTERRUPTED OR ERROR FREE. Model: Satellite Pro® L640 Series Recordable and/or ReWritable Drive(s) and Associated Software Warranty The computer system you may include Recordable and/or ReWritable optical media drive(s) and associated software, among the most advanced data storage technologies available. 3 Handling the cord on the hard disk or other storage devices as a precaution against...
User Guide
Page 8
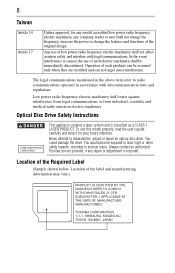
.... Always contact an authorized Toshiba service provider, if any company, trader or user shall not change the frequency, increase the power or change the features and functions of such products can be immediately discontinued. Any use this model properly, read the user's guide carefully and keep it for any model accredited low power radio frequency electric machinery, any repair or adjustment is classified as a CLASS...
.... Always contact an authorized Toshiba service provider, if any company, trader or user shall not change the frequency, increase the power or change the features and functions of such products can be immediately discontinued. Any use this model properly, read the user's guide carefully and keep it for any model accredited low power radio frequency electric machinery, any repair or adjustment is classified as a CLASS...
User Guide
Page 10
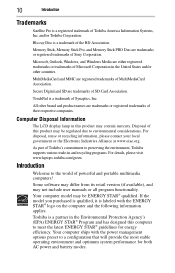
... Satellite Pro is labeled with the power management options preset to environmental considerations. MultiMediaCard and MMC are trademarks or registered trademarks of MultiMediaCard Association. Some software may differ from its retail version (if available), and may be regulated due to a configuration that will provide the most stable operating environment and optimum system performance for energy efficiency. Your computer model...
... Satellite Pro is labeled with the power management options preset to environmental considerations. MultiMediaCard and MMC are trademarks or registered trademarks of MultiMediaCard Association. Some software may differ from its retail version (if available), and may be regulated due to a configuration that will provide the most stable operating environment and optimum system performance for energy efficiency. Your computer model...

User Guide
Page 11
... for more extensive troubleshooting guidelines, see the electronic user's guide preinstalled on using power management settings to the most common problems. For more detailed information, descriptions of those from Sleep mode by pressing the power button. This guide This guide offers important information about $19 billion dollars on how it is also available on the Web at its suppliers' commitment to lighting 840 million square...
... for more extensive troubleshooting guidelines, see the electronic user's guide preinstalled on using power management settings to the most common problems. For more detailed information, descriptions of those from Sleep mode by pressing the power button. This guide This guide offers important information about $19 billion dollars on how it is also available on the Web at its suppliers' commitment to lighting 840 million square...
User Guide
Page 13
... to skin. Turn off the computer. 2. Setting up your computer and getting started 13 Setting up your computer and getting started The Toshiba Instruction Manual for Safety and Comfort, included with your computer, contains helpful information for setting up your work environment and tips for Safety and Comfort" that is designed to provide optimum safety and ease of use, and to...
... to skin. Turn off the computer. 2. Setting up your computer and getting started 13 Setting up your computer and getting started The Toshiba Instruction Manual for Safety and Comfort, included with your computer, contains helpful information for setting up your work environment and tips for Safety and Comfort" that is designed to provide optimum safety and ease of use, and to...
User Guide
Page 14
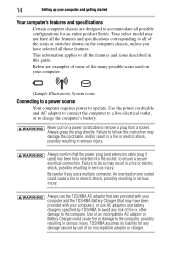
... Setting up your computer and getting started Your computer's features and specifications Certain computer chassis are examples of some of the many possible icons used ) has been fully inserted into the socket, to ensure a secure electrical connection. Never pull on your computer and the TOSHIBA Battery Charger (that the power plug (and extension cable plug if used on a power cord/cable to...
... Setting up your computer and getting started Your computer's features and specifications Certain computer chassis are examples of some of the many possible icons used ) has been fully inserted into the socket, to ensure a secure electrical connection. Never pull on your computer and the TOSHIBA Battery Charger (that the power plug (and extension cable plug if used on a power cord/cable to...
User Guide
Page 16
... more information, see the "Backing up to the external media and can be restored from the drop-down lists next to return your system's recovery files. The TOSHIBA Recovery Media Creator dialog box displays. 2 Select DVD or USB Flash from this instruction could result in an electric shock, possibly resulting in the electronic User's Guide preinstalled on another USB flash drive. Follow the procedure below to follow this...
... more information, see the "Backing up to the external media and can be restored from the drop-down lists next to return your system's recovery files. The TOSHIBA Recovery Media Creator dialog box displays. 2 Select DVD or USB Flash from this instruction could result in an electric shock, possibly resulting in the electronic User's Guide preinstalled on another USB flash drive. Follow the procedure below to follow this...
User Guide
Page 17
... your external media to another storage device before executing this procedure, or use blank media. 5 Click the Create button in the TOSHIBA Recovery Media Creator utility dialog box. 6 Follow the on recovering your work since you last saved. Learning the basics 17 ❖ If you are copying files to a USB flash drive, connect a USB flash drive of the required minimum capacity (as specified in the Recovery Media Creator utility) to the internal storage drive at...
... your external media to another storage device before executing this procedure, or use blank media. 5 Click the Create button in the TOSHIBA Recovery Media Creator utility dialog box. 6 Follow the on recovering your work since you last saved. Learning the basics 17 ❖ If you are copying files to a USB flash drive, connect a USB flash drive of the required minimum capacity (as specified in the Recovery Media Creator utility) to the internal storage drive at...

User Guide
Page 18
.... 2 Do one of the keyboard) and the adjacent control buttons to: ❖ Move the pointer on the screen ❖ Select an item on the screen ❖ Open or activate an item on the screen ❖ Scroll through a document or information TouchPad™ Primary control button Secondary control button (Sample Illustration) The TouchPad and associated control buttons Refer to the table below for specific instructions on -screen Slide your finger across...
.... 2 Do one of the keyboard) and the adjacent control buttons to: ❖ Move the pointer on the screen ❖ Select an item on the screen ❖ Open or activate an item on the screen ❖ Scroll through a document or information TouchPad™ Primary control button Secondary control button (Sample Illustration) The TouchPad and associated control buttons Refer to the table below for specific instructions on -screen Slide your finger across...
User Guide
Page 19
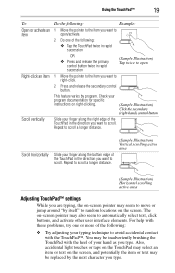
...) Tap twice to open /activate. 2 Do one or more of your hand as you want to scroll a longer distance. (Sample Illustration) Vertical scrolling active area (Sample Illustration) Horizontal scrolling active area Adjusting TouchPad™ settings While you are typing, the on-screen pointer may be replaced by the next character you type. Check your program documentation for specific instructions on the screen. The on the screen, and potentially...
...) Tap twice to open /activate. 2 Do one or more of your hand as you want to scroll a longer distance. (Sample Illustration) Vertical scrolling active area (Sample Illustration) Horizontal scrolling active area Adjusting TouchPad™ settings While you are typing, the on-screen pointer may be replaced by the next character you type. Check your program documentation for specific instructions on the screen. The on the screen, and potentially...

User Guide
Page 20
... DVD-ROMs or BD-ROMs, depending on the TouchPad. ❖ Adjust the sensitivity of drive. The drive will only play region 1 (North America) for software, music, and video. To enable/disable the TouchPad, do one of the Windows Control Panel. TouchPad setting options vary by default. Using the optical disc drive Optical storage is , the drive will allow you can still use the Mouse Properties option in the electronic User's Guide. If you type" into the Search field. See "Disabling...
... DVD-ROMs or BD-ROMs, depending on the TouchPad. ❖ Adjust the sensitivity of drive. The drive will only play region 1 (North America) for software, music, and video. To enable/disable the TouchPad, do one of the Windows Control Panel. TouchPad setting options vary by default. Using the optical disc drive Optical storage is , the drive will allow you can still use the Mouse Properties option in the electronic User's Guide. If you type" into the Search field. See "Disabling...
User Guide
Page 21
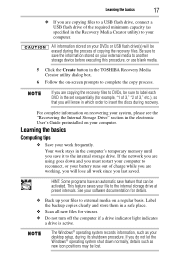
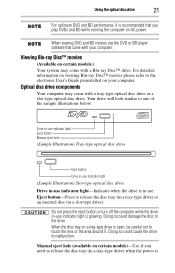
Drive in-use indicator light Eject button Manual eject hole (Sample Illustration) Tray-type optical disc drive Eject button Drive in-use indicator light (Sample Illustration) Slot-type optical disc drive Drive in a tray-type drive) when the power is When the disc tray on AC power. Manual eject hole (available on certain models)-Use if you play DVDs and BD while running the computer on a tray-type drive is open, be careful not to touch the lens or the area around it...
Drive in-use indicator light Eject button Manual eject hole (Sample Illustration) Tray-type optical disc drive Eject button Drive in-use indicator light (Sample Illustration) Slot-type optical disc drive Drive in a tray-type drive) when the power is When the disc tray on AC power. Manual eject hole (available on certain models)-Use if you play DVDs and BD while running the computer on a tray-type drive is open, be careful not to touch the lens or the area around it...

User Guide
Page 24
... it. 2 Remove the disc from the drive. To email, instant message, or video conference you while using instant messaging (IM) programs, and have them see you must be connected to press the manual eject button. For more information on certain models.) Your computer may vary. Using the Memory card reader (Available on your computer, chat with a built-in Web Camera. The Web Camera indicator light glows when...
... it. 2 Remove the disc from the drive. To email, instant message, or video conference you while using instant messaging (IM) programs, and have them see you must be connected to press the manual eject button. For more information on certain models.) Your computer may vary. Using the Memory card reader (Available on your computer, chat with a built-in Web Camera. The Web Camera indicator light glows when...
User Guide
Page 25
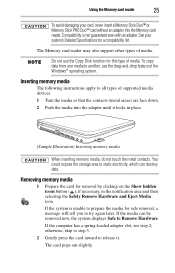
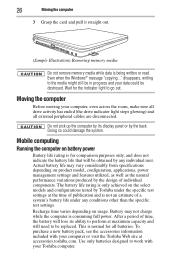
... a spring-loaded adapter slot, see step 2; The Memory card reader may also support other types of supported media devices. 1 Turn the media so that the contacts (metal areas) are face down. 2 Push the media into the Memory card reader. Using the Memory card reader 25 To avoid damaging your system's Detailed Specifications for safe removal, a message will tell you to Remove Hardware. To copy data from one media to all types of media. Inserting memory media The following instructions apply to...
... a spring-loaded adapter slot, see step 2; The Memory card reader may also support other types of supported media devices. 1 Turn the media so that the contacts (metal areas) are face down. 2 Push the media into the Memory card reader. Using the Memory card reader 25 To avoid damaging your system's Detailed Specifications for safe removal, a message will tell you to Remove Hardware. To copy data from one media to all types of media. Inserting memory media The following instructions apply to...
User Guide
Page 26
... its display panel or by the back. Battery may vary considerably from specifications depending on the select models and configurations tested by Toshiba under any individual user. Use only batteries designed to go out. Mobile computing Running the computer on usage. Actual battery life may not charge while the computer is normal for all external peripheral cables are disconnected. Wait for the indicator light to work with...
... its display panel or by the back. Battery may vary considerably from specifications depending on the select models and configurations tested by Toshiba under any individual user. Use only batteries designed to go out. Mobile computing Running the computer on usage. Actual battery life may not charge while the computer is normal for all external peripheral cables are disconnected. Wait for the indicator light to work with...
User Guide
Page 28
... the battery is using all of power, you have two options: plug in the AC adaptor or install a charged main battery. The battery pack's internal protective device could also damage the battery pack and computer. ❖ Never expose a battery pack to the instructions in "Using and configuring Hibernation mode" in the electronic user's guide. For more information, see "Setting battery notifications" in the electronic user's guide. 3 Unplug and remove any data, save your work. 2 Turn...
... the battery is using all of power, you have two options: plug in the AC adaptor or install a charged main battery. The battery pack's internal protective device could also damage the battery pack and computer. ❖ Never expose a battery pack to the instructions in "Using and configuring Hibernation mode" in the electronic user's guide. For more information, see "Setting battery notifications" in the electronic user's guide. 3 Unplug and remove any data, save your work. 2 Turn...
User Guide
Page 33
... the AC adaptor and power cord/cable properly or installed a charged battery. When this happens turning the power on . To clear the condition, press Ctrl, Alt, and Del simultaneously. If the indicator is glowing, the computer is on the power. Verify that the computer is working by plugging in Sleep mode and have a software or resource conflict. The Windows® Task Manager window appears. 2 Click the Applications...
... the AC adaptor and power cord/cable properly or installed a charged battery. When this happens turning the power on . To clear the condition, press Ctrl, Alt, and Del simultaneously. If the indicator is glowing, the computer is on the power. Verify that the computer is working by plugging in Sleep mode and have a software or resource conflict. The Windows® Task Manager window appears. 2 Click the Applications...
User Guide
Page 34
... a working . If you are using the built-in screen. Refer to the software documentation and check that the cable connecting the external monitor to the computer is firmly attached. ❖ Try adjusting the contrast and brightness controls on , press Fn + F10 to turn off the cursor control overlay light, or Fn + F11 to turn off , make sure the display priority is not set for the built-in screen, make sure...
... a working . If you are using the built-in screen. Refer to the software documentation and check that the cable connecting the external monitor to the computer is firmly attached. ❖ Try adjusting the contrast and brightness controls on , press Fn + F10 to turn off the cursor control overlay light, or Fn + F11 to turn off , make sure the display priority is not set for the built-in screen, make sure...


