User Guide
Page 31
... drive partitions 69 Recovering to a custom size partition 71 Creating recovery DVDs/media 74 Restoring from recovery DVDs/media 76 Erasing the Internal Storage Drive 78 Checking the internal storage drive operating status 80 Installing drivers and applications 80 Using the touch pad 80 Adjusting touch pad settings 84 Disabling or enabling the touch pad 84 Using external display devices 85 Selecting video cables 85 Connecting an HDMI™-compatible television or external display device............85 Connecting to a TV using HDMI™-CEC 86 Connecting an external monitor...
... drive partitions 69 Recovering to a custom size partition 71 Creating recovery DVDs/media 74 Restoring from recovery DVDs/media 76 Erasing the Internal Storage Drive 78 Checking the internal storage drive operating status 80 Installing drivers and applications 80 Using the touch pad 80 Adjusting touch pad settings 84 Disabling or enabling the touch pad 84 Using external display devices 85 Selecting video cables 85 Connecting an HDMI™-compatible television or external display device............85 Connecting to a TV using HDMI™-CEC 86 Connecting an external monitor...
User Guide
Page 35
...Enabling/Disabling USB Sleep and Charge 168 Power supply mode settings 168 USB Sleep and Music 169 TOSHIBA Button Support 170 TOSHIBA Accessibility 171 Fingerprint Authentication Utility 172 Fingerprint utility limitations 172 Using the Fingerprint Authentication Utility 172 Fingerprint Logon 173 Care and maintenance of your fingerprint reader 173 Fingerprint reader limitations 175 TOSHIBA eco Utility 176 TOSHIBA wireless LAN indicator 177 TOSHIBA Service Station 178 TOSHIBA PC Health Monitor 178 Chapter 6: If Something Goes Wrong 180 Problems that are easy to fix 180 Problems...
...Enabling/Disabling USB Sleep and Charge 168 Power supply mode settings 168 USB Sleep and Music 169 TOSHIBA Button Support 170 TOSHIBA Accessibility 171 Fingerprint Authentication Utility 172 Fingerprint utility limitations 172 Using the Fingerprint Authentication Utility 172 Fingerprint Logon 173 Care and maintenance of your fingerprint reader 173 Fingerprint reader limitations 175 TOSHIBA eco Utility 176 TOSHIBA wireless LAN indicator 177 TOSHIBA Service Station 178 TOSHIBA PC Health Monitor 178 Chapter 6: If Something Goes Wrong 180 Problems that are easy to fix 180 Problems...
User Guide
Page 39
...; Skim through and stop when a topic interests you. ❖ Use the table of the information provided herein, product specifications, configurations, prices, system/component/options availability are designed for a product Series. This guide This guide introduces the computer's features as well as some basic procedures needed to stay current with the various computer software or hardware options, visit Toshiba's Web site at support.toshiba.com.
...; Skim through and stop when a topic interests you. ❖ Use the table of the information provided herein, product specifications, configurations, prices, system/component/options availability are designed for a product Series. This guide This guide introduces the computer's features as well as some basic procedures needed to stay current with the various computer software or hardware options, visit Toshiba's Web site at support.toshiba.com.
User Guide
Page 53
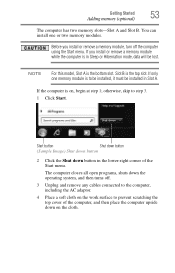
... button in Slot A. If only one or two memory modules. You can install one memory module is to step 3. 1 Click Start. If you install or remove a memory module, turn off . 3 Unplug and remove any cables connected to the computer, including the AC adaptor. 4 Place a soft cloth on the work surface to prevent scratching the top cover of the Start menu. If the computer is in Sleep or Hibernation mode, data will be installed...
... button in Slot A. If only one or two memory modules. You can install one memory module is to step 3. 1 Click Start. If you install or remove a memory module, turn off . 3 Unplug and remove any cables connected to the computer, including the AC adaptor. 4 Place a soft cloth on the work surface to prevent scratching the top cover of the Start menu. If the computer is in Sleep or Hibernation mode, data will be installed...
User Guide
Page 55
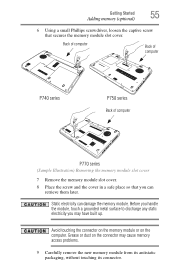
... series (Sample Illustration) Removing the memory module slot cover 7 Remove the memory module slot cover. 8 Place the screw and the cover in a safe place so that secures the memory module slot cover. Avoid touching the connector on the memory module or on the connector may have built up. Grease or dust on the computer. Getting Started 55 Adding memory (optional) 6 Using a small Phillips screwdriver, loosen the captive screw that you may cause memory access problems. 9 Carefully remove the new memory module...
... series (Sample Illustration) Removing the memory module slot cover 7 Remove the memory module slot cover. 8 Place the screw and the cover in a safe place so that secures the memory module slot cover. Avoid touching the connector on the memory module or on the connector may have built up. Grease or dust on the computer. Getting Started 55 Adding memory (optional) 6 Using a small Phillips screwdriver, loosen the captive screw that you may cause memory access problems. 9 Carefully remove the new memory module...
User Guide
Page 58
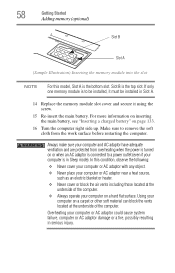
... the computer. ❖ Always operate your computer on a hard flat surface. In this model, Slot A is in Sleep mode). Make sure to remove the soft cloth from overheating when the power is turned on or when an AC adaptor is connected to be installed, it must be installed in serious injury. For more information on inserting the main battery, see "Inserting a charged battery" on a carpet or...
... the computer. ❖ Always operate your computer on a hard flat surface. In this model, Slot A is in Sleep mode). Make sure to remove the soft cloth from overheating when the power is turned on or when an AC adaptor is connected to be installed, it must be installed in serious injury. For more information on inserting the main battery, see "Inserting a charged battery" on a carpet or...
User Guide
Page 61
... the computer. Using your computer on a hard flat surface. Installed memory (RAM) is turned on page 133. 6 Turn the computer right side up. Getting Started 61 Adding memory (optional) 4 Replace the memory module slot cover and secure it using the screw. 5 Re-insert the main battery. Overheating your computer on a carpet or other soft material can check that the computer has recognized the change. The System window appears. To...
... the computer. Using your computer on a hard flat surface. Installed memory (RAM) is turned on page 133. 6 Turn the computer right side up. Getting Started 61 Adding memory (optional) 4 Replace the memory module slot cover and secure it using the screw. 5 Re-insert the main battery. Overheating your computer on a carpet or other soft material can check that the computer has recognized the change. The System window appears. To...
User Guide
Page 62
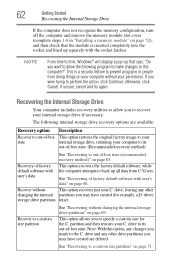
..., cancel and try again. This option allows you may have created (for the C: partition and then restores your C: drive, leaving any other drive partitions you to specify a custom size for example, a D: drive) storage drive partitions intact. 62 Getting Started Recovering the Internal Storage Drive If the computer does not recognize the memory configuration, turn off the computer and remove the memory module slot cover (complete steps 1-8 in "Installing a memory module" on page 52), and then...
..., cancel and try again. This option allows you may have created (for the C: partition and then restores your C: drive, leaving any other drive partitions you to specify a custom size for example, a D: drive) storage drive partitions intact. 62 Getting Started Recovering the Internal Storage Drive If the computer does not recognize the memory configuration, turn off the computer and remove the memory module slot cover (complete steps 1-8 in "Installing a memory module" on page 52), and then...
User Guide
Page 86
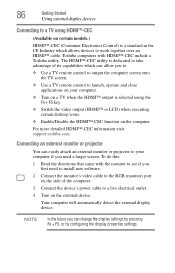
... automatically detect the external display device. NOTE In the future you first need a larger screen. 86 Getting Started Using external display devices Connecting to a TV using the Fn + F5 key. ❖ Switch the video output (HDMI™ or LCD) when executing certain desktop icons. ❖ Enable/Disable the HDMI™-CEC function on the computer. Connecting an external monitor or projector You can change the display settings by pressing Fn + F5, or by configuring the display properties settings. To do...
... automatically detect the external display device. NOTE In the future you first need a larger screen. 86 Getting Started Using external display devices Connecting to a TV using the Fn + F5 key. ❖ Switch the video output (HDMI™ or LCD) when executing certain desktop icons. ❖ Enable/Disable the HDMI™-CEC function on the computer. Connecting an external monitor or projector You can change the display settings by pressing Fn + F5, or by configuring the display properties settings. To do...
User Guide
Page 118
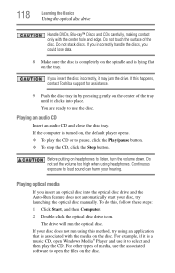
... disc drive Handle DVDs, Blu-ray™ Discs and CDs carefully, making contact only with the media on , the default player opens. ❖ To play the CD. Do not touch the surface of media, use the disc. If you incorrectly handle the discs, you insert an optical disc into place. You are ready to select and then play the CD or to listen, turn the volume...
... disc drive Handle DVDs, Blu-ray™ Discs and CDs carefully, making contact only with the media on , the default player opens. ❖ To play the CD. Do not touch the surface of media, use the disc. If you incorrectly handle the discs, you insert an optical disc into place. You are ready to select and then play the CD or to listen, turn the volume...
User Guide
Page 159
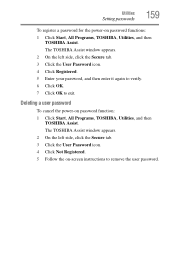
... the User Password icon. 4 Click Registered. 5 Enter your password, and then enter it again to verify. 6 Click OK. 7 Click OK to remove the user password. The TOSHIBA Assist window appears. 2 On the left side, click the Secure tab. 3 Click the User Password icon. 4 Click Not Registered. 5 Follow the on-screen instructions to exit. Utilities Setting passwords 159 To register a password for the power-on password function: 1 Click Start, All Programs, TOSHIBA, Utilities, and then TOSHIBA...
... the User Password icon. 4 Click Registered. 5 Enter your password, and then enter it again to verify. 6 Click OK. 7 Click OK to remove the user password. The TOSHIBA Assist window appears. 2 On the left side, click the Secure tab. 3 Click the User Password icon. 4 Click Not Registered. 5 Follow the on-screen instructions to exit. Utilities Setting passwords 159 To register a password for the power-on password function: 1 Click Start, All Programs, TOSHIBA, Utilities, and then TOSHIBA...
User Guide
Page 164
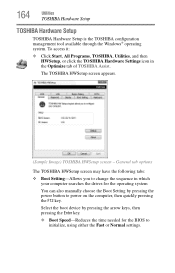
... pressing the Enter key. ❖ Boot Speed-Reduces the time needed for the operating system You can also manually choose the Boot Setting by pressing the power button to power on the computer, then quickly pressing the F12 key. To access it: ❖ Click Start, All Programs, TOSHIBA, Utilities, and then HWSetup, or click the TOSHIBA Hardware Settings icon in which your computer searches the drives for the BIOS to change the sequence...
... pressing the Enter key. ❖ Boot Speed-Reduces the time needed for the operating system You can also manually choose the Boot Setting by pressing the power button to power on the computer, then quickly pressing the F12 key. To access it: ❖ Click Start, All Programs, TOSHIBA, Utilities, and then HWSetup, or click the TOSHIBA Hardware Settings icon in which your computer searches the drives for the BIOS to change the sequence...
User Guide
Page 178
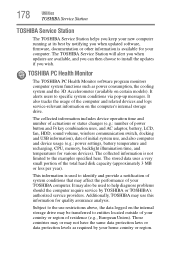
... diagnose problems should the computer require service by your TOSHIBA computer. The collected information includes device operation time and number of actuations or status changes (e.g.: number of power button and Fn key combination uses, and AC adaptor, battery, LCD, fan, HDD, sound volume, wireless communication switch, docking and USB information), date of initial system use this information for quality assurance analysis. It may use , and also computer and device usage (e.g.: power settings, battery temperature and recharging, CPU, memory, backlight...
... diagnose problems should the computer require service by your TOSHIBA computer. The collected information includes device operation time and number of actuations or status changes (e.g.: number of power button and Fn key combination uses, and AC adaptor, battery, LCD, fan, HDD, sound volume, wireless communication switch, docking and USB information), date of initial system use this information for quality assurance analysis. It may use , and also computer and device usage (e.g.: power settings, battery temperature and recharging, CPU, memory, backlight...
User Guide
Page 184
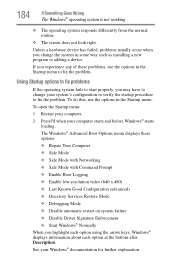
... change the system in the Startup menu. See your computer starts and before Windows® starts loading. Using Startup options to fix problems If the operating system fails to start properly, you experience any of these options: ❖ Repair Your Computer ❖ Safe Mode ❖ Safe Mode with Networking ❖ Safe Mode with Command Prompt ❖ Enable Boot Logging ❖ Enable low-resolution video (640 x 480) ❖ Last Known Good Configuration (advanced) ❖ Directory Services Restore Mode ❖ Debugging Mode ❖ Disable...
... change the system in the Startup menu. See your computer starts and before Windows® starts loading. Using Startup options to fix problems If the operating system fails to start properly, you experience any of these options: ❖ Repair Your Computer ❖ Safe Mode ❖ Safe Mode with Networking ❖ Safe Mode with Command Prompt ❖ Enable Boot Logging ❖ Enable low-resolution video (640 x 480) ❖ Last Known Good Configuration (advanced) ❖ Directory Services Restore Mode ❖ Debugging Mode ❖ Disable...
User Guide
Page 190
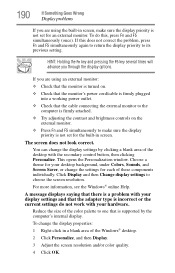
... are using an external monitor: ❖ Check that the monitor is turned on. ❖ Check that the monitor's power cord/cable is firmly plugged into a working power outlet. ❖ Check that the cable connecting the external monitor to the computer is firmly attached. ❖ Try adjusting the contrast and brightness controls on the external monitor. ❖ Press Fn and F5 simultaneously to make sure the display priority is not set for an external monitor...
... are using an external monitor: ❖ Check that the monitor is turned on. ❖ Check that the monitor's power cord/cable is firmly plugged into a working power outlet. ❖ Check that the cable connecting the external monitor to the computer is firmly attached. ❖ Try adjusting the contrast and brightness controls on the external monitor. ❖ Press Fn and F5 simultaneously to make sure the display priority is not set for an external monitor...

User Guide
Page 231
... operating system automatically recognize the change. Internet-The decentralized, world-wide network of using this function, if connected with HDMI cables. See also cache, CPU cache, L1 cache. When you use to help improve processing speed. Interlaced monitors take two passes to transmit high quality audio and video signal via a single cable in combination with the Fn key can control another while using a pointing device such as the battery save mode. (2) A key...
... operating system automatically recognize the change. Internet-The decentralized, world-wide network of using this function, if connected with HDMI cables. See also cache, CPU cache, L1 cache. When you use to help improve processing speed. Interlaced monitors take two passes to transmit high quality audio and video signal via a single cable in combination with the Fn key can control another while using a pointing device such as the battery save mode. (2) A key...
User Guide
Page 239
... 135 battery indicator light 126 BIOS Setup see TOSHIBA Hardware Setup Blu-ray Disc™ using 114 button 3D ON/OFF button 116 eco Utility™ 131 eject, optical disc drive 115 Illumination ON/OFF button 116 mute button 116 play/pause button 116 power 50 Shut down 53, 92 start 141 volume control buttons 116 Wireless antenna ON/OFF button 116 buttons media control buttons 116 C Call2Recycle™ battery 137 caring for your computer 100 changing battery 131 character keys 104 charging the battery...
... 135 battery indicator light 126 BIOS Setup see TOSHIBA Hardware Setup Blu-ray Disc™ using 114 button 3D ON/OFF button 116 eco Utility™ 131 eject, optical disc drive 115 Illumination ON/OFF button 116 mute button 116 play/pause button 116 power 50 Shut down 53, 92 start 141 volume control buttons 116 Wireless antenna ON/OFF button 116 buttons media control buttons 116 C Call2Recycle™ battery 137 caring for your computer 100 changing battery 131 character keys 104 charging the battery...
User Guide
Page 241
power plan 213 Sleep mode 214 using to set a power plan 130 volume mute 211 Zoom (Display resolution) 220 zooming in 221 zooming out 221 Hot Key Cards 208 Hot key functions 209 I icon desktop 140 moving to desktop 140 recycle bin 140 safety 40 installation memory module 52 installing a charged battery 133 battery 131 memory modules 52 mouse 88 Instruction Manual for Safety and Comfort 42 internal storage drive recovery 62 K keyboard Alt keys 105 character keys 104 Ctrl keys 105 emulate a full...
power plan 213 Sleep mode 214 using to set a power plan 130 volume mute 211 Zoom (Display resolution) 220 zooming in 221 zooming out 221 Hot Key Cards 208 Hot key functions 209 I icon desktop 140 moving to desktop 140 recycle bin 140 safety 40 installation memory module 52 installing a charged battery 133 battery 131 memory modules 52 mouse 88 Instruction Manual for Safety and Comfort 42 internal storage drive recovery 62 K keyboard Alt keys 105 character keys 104 Ctrl keys 105 emulate a full...
User Guide
Page 244
... Sleep mode 100 Startup menu problem solving 184 supervisor password, deleting 158 supervisor password, set up 157 system indicator lights AC power 46 drive in-use indicator 115 LEDs 47, 48, 50, 95, 97, 100, 125, 126, 145 T taking care of battery 135 taskbar 142 television adjusting display 88 tips for computing 102 Toshiba online resources 120 registering computer Toshiba Web site 51 worldwide offices 206 TOSHIBA Accessibility 171 Toshiba accessories memory 52 TOSHIBA Application Installer...
... Sleep mode 100 Startup menu problem solving 184 supervisor password, deleting 158 supervisor password, set up 157 system indicator lights AC power 46 drive in-use indicator 115 LEDs 47, 48, 50, 95, 97, 100, 125, 126, 145 T taking care of battery 135 taskbar 142 television adjusting display 88 tips for computing 102 Toshiba online resources 120 registering computer Toshiba Web site 51 worldwide offices 206 TOSHIBA Accessibility 171 Toshiba accessories memory 52 TOSHIBA Application Installer...
User Guide
Page 245
... trouble running programs 192 URL address not found 185 USB Sleep and Charge cannot use 203 USB Wakeup function does not work 204 Windows® operating system not working 183 wireless networking 196 turning off computer 90 computer more quickly 93 options 90 turning on power 50 U USB Sleep and Charge cannot use 203 USB Wakeup function does not work 204 USB-compatible printer 88 user password, deleting 159 user password, setting 158 using a microphone 144 computer lock 101 DVDs 113 external display devices 85 Hibernation mode 95 hot key to set a power...
... trouble running programs 192 URL address not found 185 USB Sleep and Charge cannot use 203 USB Wakeup function does not work 204 Windows® operating system not working 183 wireless networking 196 turning off computer 90 computer more quickly 93 options 90 turning on power 50 U USB Sleep and Charge cannot use 203 USB Wakeup function does not work 204 USB-compatible printer 88 user password, deleting 159 user password, setting 158 using a microphone 144 computer lock 101 DVDs 113 external display devices 85 Hibernation mode 95 hot key to set a power...


