User Guide
Page 27
27 Contents Using the computer for the first time 50 Opening the display panel 50 Your computer's features and specifications ....51 Turning on the power 51 Adding memory (optional 52 Installing a memory module 52 Removing a memory ...
27 Contents Using the computer for the first time 50 Opening the display panel 50 Your computer's features and specifications ....51 Turning on the power 51 Adding memory (optional 52 Installing a memory module 52 Removing a memory ...
User Guide
Page 50
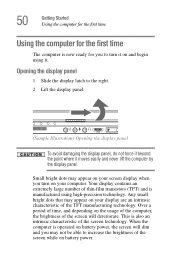
... large number of the screen while on battery power. When the computer is operated on your display are an intrinsic characteristic of the screen technology. Opening the display panel 1 Slide the display latch to increase the brightness of thin-film transistors (TFT) and is also an intrinsic characteristic of the TFT... will dim and you may appear on your computer. Small bright dots may not be able to the right. 2 Lift the display panel. (Sample Illustration) Opening the display panel To avoid damaging the display panel, do not force it beyond the point where it .
... large number of the screen while on battery power. When the computer is operated on your display are an intrinsic characteristic of the screen technology. Opening the display panel 1 Slide the display latch to increase the brightness of thin-film transistors (TFT) and is also an intrinsic characteristic of the TFT... will dim and you may appear on your computer. Small bright dots may not be able to the right. 2 Lift the display panel. (Sample Illustration) Opening the display panel To avoid damaging the display panel, do not force it beyond the point where it .

User Guide
Page 58
..." on page 52 to work. TECHNICAL NOTE: You must have at least one memory module installed for the computer to shut down the computer and open the memory module slot cover. If you need to remove a memory module: 1 Complete steps 1-8 in "Checking total memory" on page 61. Removing a memory module If...
..." on page 52 to work. TECHNICAL NOTE: You must have at least one memory module installed for the computer to shut down the computer and open the memory module slot cover. If you need to remove a memory module: 1 Complete steps 1-8 in "Checking total memory" on page 61. Removing a memory module If...
User Guide
Page 64
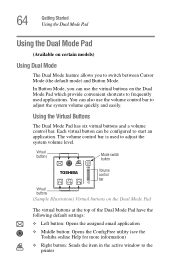
... (the default mode) and Button Mode. Each virtual button can be configured to adjust the system volume level. Virtual buttons Mode switch button TOSHIBA 1 2 3 Volume control bar Virtual buttons (Sample Illustration) Virtual buttons on the Dual Mode Pad The virtual buttons at the top of ...the Dual Mode Pad have the following default settings: ❖ Left button: Opens the assigned email application ❖ Middle button: Opens the ConfigFree utility (see the Toshiba online Help for more information) ❖ Right button: Sends the item in the active window to ...
... (the default mode) and Button Mode. Each virtual button can be configured to adjust the system volume level. Virtual buttons Mode switch button TOSHIBA 1 2 3 Volume control bar Virtual buttons (Sample Illustration) Virtual buttons on the Dual Mode Pad The virtual buttons at the top of ...the Dual Mode Pad have the following default settings: ❖ Left button: Opens the assigned email application ❖ Middle button: Opens the ConfigFree utility (see the Toshiba online Help for more information) ❖ Right button: Sends the item in the active window to ...

User Guide
Page 75
... can continue working from turning off the computer or using . Factors to consider when choosing Standby: ❖ While in which you left it, including all open programs and files you left off the computer. ❖ Since information is being retrieved from the hard disk rather than from memory, restarting from Hibernation...
... can continue working from turning off the computer or using . Factors to consider when choosing Standby: ❖ While in which you left it, including all open programs and files you left off the computer. ❖ Since information is being retrieved from the hard disk rather than from memory, restarting from Hibernation...
User Guide
Page 76
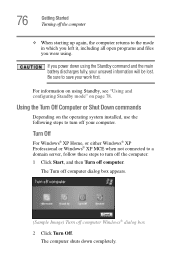
... . 76 Getting Started Turning off the computer ❖ When starting up again, the computer returns to the mode in which you left it, including all open programs and files you power down completely. If you were using the Standby command and the main battery discharges fully, your work first. Be sure...
... . 76 Getting Started Turning off the computer ❖ When starting up again, the computer returns to the mode in which you left it, including all open programs and files you power down completely. If you were using the Standby command and the main battery discharges fully, your work first. Be sure...

User Guide
Page 77
..., click Start, Turn off computer, and then select Hibernate. (Sample Image) Turn off computer Windows® dialog box The computer saves the state of all open programs and files, turns off the display, and then turns off light glows blue. Restarting your computer To start it again by... opening the display panel. The computer shuts down . Getting Started Turning off the computer 77 Shut Down For Windows® XP Professional or Windows® XP ...
..., click Start, Turn off computer, and then select Hibernate. (Sample Image) Turn off computer Windows® dialog box The computer saves the state of all open programs and files, turns off the display, and then turns off light glows blue. Restarting your computer To start it again by... opening the display panel. The computer shuts down . Getting Started Turning off the computer 77 Shut Down For Windows® XP Professional or Windows® XP ...

User Guide
Page 78
... turn off the computer using . 78 Getting Started Turning off the computer Configuring Hibernation mode options You can place the computer into Hibernation mode by opening the display panel.
... turn off the computer using . 78 Getting Started Turning off the computer Configuring Hibernation mode options You can place the computer into Hibernation mode by opening the display panel.

User Guide
Page 79
To use any of these methods, you were using. Starting again from Standby mode To start it into Standby mode by opening the display panel. Closing the display panel After you have turned off light glows blue. You can start up the computer from Standby mode, press .... The on page 112. Once the computer is in Standby mode. Getting Started Turning off the computer 79 The computer saves the status of all open programs and files, turns off light blinks amber indicating the computer is configured, you can also specify an amount of time after which the computer...
To use any of these methods, you were using. Starting again from Standby mode To start it into Standby mode by opening the display panel. Closing the display panel After you have turned off light glows blue. You can start up the computer from Standby mode, press .... The on page 112. Once the computer is in Standby mode. Getting Started Turning off the computer 79 The computer saves the status of all open programs and files, turns off light blinks amber indicating the computer is configured, you can also specify an amount of time after which the computer...

User Guide
Page 80
... section gives tips on page 117. For information about taking care of your computer's battery, see "Taking care of the computer's keyboard, speaker, and other openings. Do not pick up the computer by its display panel or by the back (where the ports are disconnected. Doing so could damage the system...
... section gives tips on page 117. For information about taking care of your computer's battery, see "Taking care of the computer's keyboard, speaker, and other openings. Do not pick up the computer by its display panel or by the back (where the ports are disconnected. Doing so could damage the system...
User Guide
Page 85
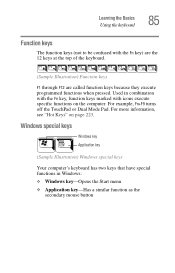
... keyboard. (Sample Illustration) Function keys F1 through F12 are called function keys because they execute programmed functions when pressed. Used in Windows: ❖ Windows key-Opens the Start menu ❖ Application key-Has a similar function as the secondary mouse button For example, Fn+F9 turns off the TouchPad or Dual Mode...
... keyboard. (Sample Illustration) Function keys F1 through F12 are called function keys because they execute programmed functions when pressed. Used in Windows: ❖ Windows key-Opens the Start menu ❖ Application key-Has a similar function as the secondary mouse button For example, Fn+F9 turns off the TouchPad or Dual Mode...

User Guide
Page 86
If you prefer to open the program first, you install a program, the operating system usually puts an icon in the All Programs menu, follow these steps, which use My Computer ... ❖ Use the Run dialog box The next three sections explain how to start a program from the Start menu When you have four options. WordPad opens. The Accessories menu is displayed. 3 Click the program, in this example, WordPad. 86 Learning the Basics Starting a program Starting a program The easiest way to start...
If you prefer to open the program first, you install a program, the operating system usually puts an icon in the All Programs menu, follow these steps, which use My Computer ... ❖ Use the Run dialog box The next three sections explain how to start a program from the Start menu When you have four options. WordPad opens. The Accessories menu is displayed. 3 Click the program, in this example, WordPad. 86 Learning the Basics Starting a program Starting a program The easiest way to start...
User Guide
Page 87
This example opens WordPad using Windows Explorer. 1 Click Start, and then All Programs. 2 Click Accessories. 3 Click Windows Explorer. 4 Click My Computer to expand the window. 5 In the left ... Program Files folder. 7 In the left part of the window, click Windows NT. 8 In the left part of the window, click Accessories. The operating system opens WordPad. Windows® Explorer gives you should know the file name and location of your computer. To use this method, you a view of the program...
This example opens WordPad using Windows Explorer. 1 Click Start, and then All Programs. 2 Click Accessories. 3 Click Windows Explorer. 4 Click My Computer to expand the window. 5 In the left ... Program Files folder. 7 In the left part of the window, click Windows NT. 8 In the left part of the window, click Accessories. The operating system opens WordPad. Windows® Explorer gives you should know the file name and location of your computer. To use this method, you a view of the program...

User Guide
Page 94
94 Learning the Basics Using the optical drive Drive in-use indicator light-Indicates when the drive is in -use . When the disc tray is open, be careful not to release the disc tray when the power is off . Pencil lead can also use a pencil to play audio CDs or DVD ...
94 Learning the Basics Using the optical drive Drive in-use indicator light-Indicates when the drive is in -use . When the disc tray is open, be careful not to release the disc tray when the power is off . Pencil lead can also use a pencil to play audio CDs or DVD ...

User Guide
Page 95
... drive's in-use indicator light is in the drive, the system launches the default music player and begins playing the CD. The drive will not open if the computer's power is off . The Next track button skips to the preceding track on the disc.
... drive's in-use indicator light is in the drive, the system launches the default music player and begins playing the CD. The drive will not open if the computer's power is off . The Next track button skips to the preceding track on the disc.

User Guide
Page 96
96 Learning the Basics Using the optical drive 3 Press the drive's eject button. The disc tray slides partially out of the drive (about 1 inch). 4 Grasp the tray and pull it fully open. (Sample Illustration) Drive tray fully extended 5 Hold the disc by its edges and check that it as described in "Caring for CD or DVD Discs" on page 101. 6 Place the disc carefully in the disc tray, label side up. (Sample Illustration) Positioning the disc in the drive If the disc is dusty, clean it is free of dust.
96 Learning the Basics Using the optical drive 3 Press the drive's eject button. The disc tray slides partially out of the drive (about 1 inch). 4 Grasp the tray and pull it fully open. (Sample Illustration) Drive tray fully extended 5 Hold the disc by its edges and check that it as described in "Caring for CD or DVD Discs" on page 101. 6 Place the disc carefully in the disc tray, label side up. (Sample Illustration) Positioning the disc in the drive If the disc is dusty, clean it is free of dust.

User Guide
Page 97
...CD Insert an audio CD and close Windows Media Player before you insert the disc incorrectly, it clicks into place. To prevent this happens, contact Toshiba support for assistance. 9 Push the disc tray in by pressing gently on the tray. You are ready to use the Windows Media Player program ...to activate Standby or Hibernation modes. You can open it through the Start menu or activate it clicks into place. Learning the Basics Using the optical drive 97 7 Gently press the disc onto ...
...CD Insert an audio CD and close Windows Media Player before you insert the disc incorrectly, it clicks into place. To prevent this happens, contact Toshiba support for assistance. 9 Push the disc tray in by pressing gently on the tray. You are ready to use the Windows Media Player program ...to activate Standby or Hibernation modes. You can open it through the Start menu or activate it clicks into place. Learning the Basics Using the optical drive 97 7 Gently press the disc onto ...
User Guide
Page 99
.... NOTE Due to manufacturing and quality variations in third party optical media (e.g., CD or DVD) or optical media players/ recorders, in your Toshiba computer or optical drive. For example, if it to select and then play the CD. For other computers or optical media recorders. These ...logo, or playback optical media recorded by other types of specific format compatibilities. For details on how to use the software, please refer to open Windows® Media Player and use it is associated with a multi-function drive that allows you to: ❖ Play pre-recorded DVDs &#...
.... NOTE Due to manufacturing and quality variations in third party optical media (e.g., CD or DVD) or optical media players/ recorders, in your Toshiba computer or optical drive. For example, if it to select and then play the CD. For other computers or optical media recorders. These ...logo, or playback optical media recorded by other types of specific format compatibilities. For details on how to use the software, please refer to open Windows® Media Player and use it is associated with a multi-function drive that allows you to: ❖ Play pre-recorded DVDs &#...

User Guide
Page 100
... out of the drive (about 1 inch). Pencil lead can break off inside the computer and damage it. 2 Pull the tray out until it is fully open , remove the disc, and place it in its protective cover. 3 Gently press the tray in to close it . Also, if the disc is still spinning... when you open the disc tray, wait for it to stop spinning before you remove it. 2 Pull the tray out until it is fully open , remove the disc, and place it in its protective cover. 3 Gently press the tray...
... out of the drive (about 1 inch). Pencil lead can break off inside the computer and damage it. 2 Pull the tray out until it is fully open , remove the disc, and place it in its protective cover. 3 Gently press the tray in to close it . Also, if the disc is still spinning... when you open the disc tray, wait for it to stop spinning before you remove it. 2 Pull the tray out until it is fully open , remove the disc, and place it in its protective cover. 3 Gently press the tray...
User Guide
Page 110
... If you do any of these things before the main battery completely runs out of your remaining charge frequently if you left off. Check your open programs and files to do not manage to the hard disk before shutting down. 110 Mobile Computing Monitoring main battery power TECHNICAL NOTE: The computer...
... If you do any of these things before the main battery completely runs out of your remaining charge frequently if you left off. Check your open programs and files to do not manage to the hard disk before shutting down. 110 Mobile Computing Monitoring main battery power TECHNICAL NOTE: The computer...


