
User Guide
Page 58
... Getting Started Adding memory (optional) 14 Replace the memory module slot cover and secure it correctly as described in "Installing a memory module" on page 116. 16 Turn the computer right side up. 17 Reconnect the cables. 18 Restart the computer. You can verify that the computer has recognized it using the screws. 15 Re-insert the main battery. When the operating system has loaded, you need to remove a memory module...
... Getting Started Adding memory (optional) 14 Replace the memory module slot cover and secure it correctly as described in "Installing a memory module" on page 116. 16 Turn the computer right side up. 17 Reconnect the cables. 18 Restart the computer. You can verify that the computer has recognized it using the screws. 15 Re-insert the main battery. When the operating system has loaded, you need to remove a memory module...

User Guide
Page 60
Memory slots Front of the slot. TECHNICAL NOTE: You must have at least one memory module installed for the computer to a 30-degree angle and slide it out of computer (Sample Illustration) Removing the memory module 4 Replace the memory module slot cover and tighten the screws. 5 Re-insert the main battery. For more information on inserting the main battery, see "Inserting a charged battery" on page 116. 6 Turn the computer right side up. 7 Reconnect the cables. 8 Restart the computer. 60 Getting Started Adding memory (optional) 3 Gently lift the memory module to work.
Memory slots Front of the slot. TECHNICAL NOTE: You must have at least one memory module installed for the computer to a 30-degree angle and slide it out of computer (Sample Illustration) Removing the memory module 4 Replace the memory module slot cover and tighten the screws. 5 Re-insert the main battery. For more information on inserting the main battery, see "Inserting a charged battery" on page 116. 6 Turn the computer right side up. 7 Reconnect the cables. 8 Restart the computer. 60 Getting Started Adding memory (optional) 3 Gently lift the memory module to work.

User Guide
Page 67
... (monitor) port on the left side of device you need a larger screen. To do this , refer to the documentation for connecting computers to a live electrical outlet. 3 Turn on certain models) NOTE DVI stands for Digital Visual Interface, and is a standard for your computer for the type of the computer. 2 Connect the device's power cable to digital monitors. Before connecting an external monitor or video projector, configure your operating system and devices.
... (monitor) port on the left side of device you need a larger screen. To do this , refer to the documentation for connecting computers to a live electrical outlet. 3 Turn on certain models) NOTE DVI stands for Digital Visual Interface, and is a standard for your computer for the type of the computer. 2 Connect the device's power cable to digital monitors. Before connecting an external monitor or video projector, configure your operating system and devices.
User Guide
Page 153
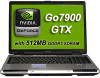
... your user name and enter your password, if any key or touch the pointing device and the Windows® Logon screen will appear. Disabling a user password To cancel the power-on a diskette or media of your choice, or click Cancel to continue without saving the password to a text file. 8 Click OK to a text file on password function: 1 Click Start, All Programs, Toshiba, Utilities, and then TOSHIBA Assist. 153 Toshiba Utilities Setting passwords To unlock your...
... your user name and enter your password, if any key or touch the pointing device and the Windows® Logon screen will appear. Disabling a user password To cancel the power-on a diskette or media of your choice, or click Cancel to continue without saving the password to a text file. 8 Click OK to a text file on password function: 1 Click Start, All Programs, Toshiba, Utilities, and then TOSHIBA Assist. 153 Toshiba Utilities Setting passwords To unlock your...
User Guide
Page 155
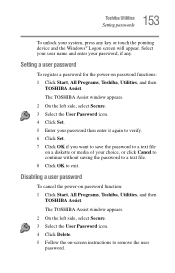
... to set a user-level password in TOSHIBA Assist or in System Setup. The Toshiba Password Utility window appears. The TOSHIBA Assist window appears. 2 On the left side, select Secure. 3 Select the Supervisor Password icon. 4 Click Delete. 5 Follow the on password function: 1 Click Start, All Programs, Toshiba, Utilities, and then TOSHIBA Assist. Deleting a supervisor password To cancel the power-on -screen instructions to remove the supervisor password. 155 Toshiba Utilities Toshiba Password Utility 3 Select the Supervisor Password icon. 4 Click Set. 5 Enter your password then enter...
... to set a user-level password in TOSHIBA Assist or in System Setup. The Toshiba Password Utility window appears. The TOSHIBA Assist window appears. 2 On the left side, select Secure. 3 Select the Supervisor Password icon. 4 Click Delete. 5 Follow the on password function: 1 Click Start, All Programs, Toshiba, Utilities, and then TOSHIBA Assist. Deleting a supervisor password To cancel the power-on -screen instructions to remove the supervisor password. 155 Toshiba Utilities Toshiba Password Utility 3 Select the Supervisor Password icon. 4 Click Set. 5 Enter your password then enter...
User Guide
Page 184
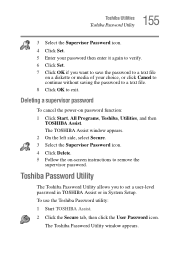
... recent settings that worked) ❖ Directory Services Restore Mode (Windows® domain controllers only) ❖ Debugging Mode ❖ Start Windows® normally ❖ Reboot ❖ Return to fix the problem. Using Startup options to fix problems If the operating system fails to start properly, you may have to change the system in the Startup menu. To do this, use the options in the Startup menu to fix the problem. The Windows® Advanced Options menu displays these problems, use the options in some way such as installing a new...
... recent settings that worked) ❖ Directory Services Restore Mode (Windows® domain controllers only) ❖ Debugging Mode ❖ Start Windows® normally ❖ Reboot ❖ Return to fix the problem. Using Startup options to fix problems If the operating system fails to start properly, you may have to change the system in the Startup menu. To do this, use the options in the Startup menu to fix the problem. The Windows® Advanced Options menu displays these problems, use the options in some way such as installing a new...
User Guide
Page 194
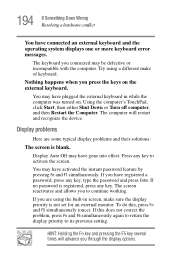
Display problems Here are using a different make sure the display priority is not set for an external monitor. The keyboard you to its previous setting. You may have activated the instant password feature by pressing Fn and F1 simultaneously. If no password is blank. You may have plugged the external keyboard in screen, make of keyboard. The computer will advance you press the keys on . The screen reactivates and allows you...
Display problems Here are using a different make sure the display priority is not set for an external monitor. The keyboard you to its previous setting. You may have activated the instant password feature by pressing Fn and F1 simultaneously. If no password is blank. You may have plugged the external keyboard in screen, make of keyboard. The computer will advance you press the keys on . The screen reactivates and allows you...

User Guide
Page 273
... a power source 46 connection set up 129 control buttons 62 Ctrl keys 84 D desktop creating new icon 123 major features 123 desktop exploration 122 desktop icons 123 Device Manager 189 checking properties 189 disabling a device 189 devices keyboard 69 mouse 70 Disk Defragmenter 198 disk drive corrupted/damaged data files 198 missing files/trouble accessing a disk 197 running slow 198 diskette drive cannot insert a diskette 198 cannot read a diskette 199 connecting 72 external, connecting 72 display...
... a power source 46 connection set up 129 control buttons 62 Ctrl keys 84 D desktop creating new icon 123 major features 123 desktop exploration 122 desktop icons 123 Device Manager 189 checking properties 189 disabling a device 189 devices keyboard 69 mouse 70 Disk Defragmenter 198 disk drive corrupted/damaged data files 198 missing files/trouble accessing a disk 197 running slow 198 diskette drive cannot insert a diskette 198 cannot read a diskette 199 connecting 72 external, connecting 72 display...
User Guide
Page 275
... using 84 Windows special keys 85 keyboard, external 69 L lock computer, using 81 M main battery removing 114 memory adding 52 problem solving 191 removing expansion slot cover 54 memory module inserting 56 installation 52 removing 60 microphone 135 modem connecting to telephone line 127 determining COM port 126 problem solving 205 resetting port to default settings 126 upgrading 126 monitor 67 connecting 67 not working 195 mouse installing 70 serial 70 mouse utility 160 N network accessing 129 Dial-Up Networking Wizard 129 networking wireless 131 O opening the display panel 50 optical drive...
... using 84 Windows special keys 85 keyboard, external 69 L lock computer, using 81 M main battery removing 114 memory adding 52 problem solving 191 removing expansion slot cover 54 memory module inserting 56 installation 52 removing 60 microphone 135 modem connecting to telephone line 127 determining COM port 126 problem solving 205 resetting port to default settings 126 upgrading 126 monitor 67 connecting 67 not working 195 mouse installing 70 serial 70 mouse utility 160 N network accessing 129 Dial-Up Networking Wizard 129 networking wireless 131 O opening the display panel 50 optical drive...
User Guide
Page 276
... Device Manager 189 disabling a device 189 disk drive is slow 198 display is blank 194 external display not working 196 external monitor 195 faulty memory 191 hardware conflict 186, 187 high-pitched noise 201 illegal operation 181 Internet bookmarked site not found 185 Internet connection is slow 185 keyboard not responding 182 missing files/trouble accessing a disk 197 modem not receiving or transmitting 205 no sound 200 non-system disk or disk error 183, 199 PC Card...
... Device Manager 189 disabling a device 189 disk drive is slow 198 display is blank 194 external display not working 196 external monitor 195 faulty memory 191 hardware conflict 186, 187 high-pitched noise 201 illegal operation 181 Internet bookmarked site not found 185 Internet connection is slow 185 keyboard not responding 182 missing files/trouble accessing a disk 197 modem not receiving or transmitting 205 no sound 200 non-system disk or disk error 183, 199 PC Card...
User Manual
Page 2
... damage and/or criminal penalties due to change without approval of copyright owners, you use at the time of copyrights or personal rights. TOSHIBA Satellite P100 / Satellite Pro P100 Series Copyright © 2005 by the copyright laws if you copy (including to transform data formats) or modify these to the use the screen mode switching functions (e.g. However, succeeding computers and manuals are subject to infringements of this...
... damage and/or criminal penalties due to change without approval of copyright owners, you use at the time of copyrights or personal rights. TOSHIBA Satellite P100 / Satellite Pro P100 Series Copyright © 2005 by the copyright laws if you copy (including to transform data formats) or modify these to the use the screen mode switching functions (e.g. However, succeeding computers and manuals are subject to infringements of this...
User Manual
Page 7
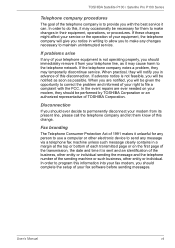
... your telephone line, as possible. Disconnection If you should complete the setup of your equipment, the telephone company will notify you in their equipment, operations, or procedures. User's Manual vii If these changes might affect your service or the operation of your fax software before sending messages. TOSHIBA Satellite P100 / Satellite Pro P100 Series Telephone company procedures The goal of the telephone company is to...
... your telephone line, as possible. Disconnection If you should complete the setup of your equipment, the telephone company will notify you in their equipment, operations, or procedures. User's Manual vii If these changes might affect your service or the operation of your fax software before sending messages. TOSHIBA Satellite P100 / Satellite Pro P100 Series Telephone company procedures The goal of the telephone company is to...

User Manual
Page 33
... checklist 9-2 Analyzing the problem 9-2 Hardware and system checklist 9-3 System start-up 9-4 Self test 9-4 Power 9-4 Keyboard 9-7 LCD panel 9-7 Hard disk drive 9-7 Password 9-8 DVD-ROM&CD-R/RW drive 9-8 DVD Super Multi drive 9-9 Diskette drive 9-11 PC Card 9-11 Memory Card 9-11 Sound system 9-12 Pointing device 9-12 Fingerprint Sensor 9-13 USB 9-14 TV output signal 9-14 Standby/Hibernation 9-15 Real Time Clock 9-15 Memory expansion 9-16 Modem 9-16 LAN 9-17 Wireless LAN 9-17 Bluetooth 9-18 Monitor 9-18 i.LINK (IEEE1394 9-19 User's Manual xxxi
... checklist 9-2 Analyzing the problem 9-2 Hardware and system checklist 9-3 System start-up 9-4 Self test 9-4 Power 9-4 Keyboard 9-7 LCD panel 9-7 Hard disk drive 9-7 Password 9-8 DVD-ROM&CD-R/RW drive 9-8 DVD Super Multi drive 9-9 Diskette drive 9-11 PC Card 9-11 Memory Card 9-11 Sound system 9-12 Pointing device 9-12 Fingerprint Sensor 9-13 USB 9-14 TV output signal 9-14 Standby/Hibernation 9-15 Real Time Clock 9-15 Memory expansion 9-16 Modem 9-16 LAN 9-17 Wireless LAN 9-17 Bluetooth 9-18 Monitor 9-18 i.LINK (IEEE1394 9-19 User's Manual xxxi
User Manual
Page 58
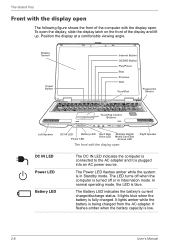
.../DVD Button Play/Pause Stop Previous Next TouchPad Fingerprint Sensor TouchPad Control Buttons Left Speaker DC IN LED Battery LED Hard Disk Drive LED Power LED Multiple Digital Media Card Slot Access LED The front with the display open Right Speaker DC IN LED Power LED Battery LED The DC IN LED indicates the computer is connected to the AC adapter and it is blue. In normal operating mode, the LED is plugged into an AC power source. The Power LED flashes amber while the system is fully charged...
.../DVD Button Play/Pause Stop Previous Next TouchPad Fingerprint Sensor TouchPad Control Buttons Left Speaker DC IN LED Battery LED Hard Disk Drive LED Power LED Multiple Digital Media Card Slot Access LED The front with the display open Right Speaker DC IN LED Power LED Battery LED The DC IN LED indicates the computer is connected to the AC adapter and it is blue. In normal operating mode, the LED is plugged into an AC power source. The Power LED flashes amber while the system is fully charged...
User Manual
Page 72
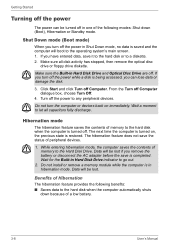
... battery. 3-8 User's Manual Do not turn off the power while a disk is restored. Benefits of memory to the hard disk when the computer automatically shuts down (Boot), Hibernation or Standby mode. Make sure all capacitors fully discharge. Click Start and click Turn off the power to let all disk activity has stopped, then remove the optical disc drive or floppy drive diskette. Make sure the Built-in hibernation mode. Wait a moment to any peripheral devices...
... battery. 3-8 User's Manual Do not turn off the power while a disk is restored. Benefits of memory to the hard disk when the computer automatically shuts down (Boot), Hibernation or Standby mode. Make sure all capacitors fully discharge. Click Start and click Turn off the power to let all disk activity has stopped, then remove the optical disc drive or floppy drive diskette. Make sure the Built-in hibernation mode. Wait a moment to any peripheral devices...
User Manual
Page 132
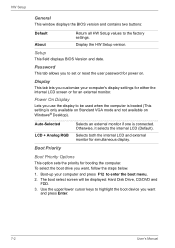
... enter the boot menu. 2. Boot Priority Boot Priority Options This option sets the priority for simultaneous display. Display This tab lets you want and press Enter. 7-2 User's Manual To select the boot drive you customize your computer and press F12 to set or reset the user password for an external monitor. Otherwise, it selects the internal LCD (Default). Boot-up your computer's display settings for either the internal LCD screen or for power on Windows® Desktop). Setup This field displays BIOS Version and date. Power...
... enter the boot menu. 2. Boot Priority Boot Priority Options This option sets the priority for simultaneous display. Display This tab lets you want and press Enter. 7-2 User's Manual To select the boot drive you customize your computer and press F12 to set or reset the user password for an external monitor. Otherwise, it selects the internal LCD (Default). Boot-up your computer's display settings for either the internal LCD screen or for power on Windows® Desktop). Setup This field displays BIOS Version and date. Power...

User Manual
Page 143
... section describes how to install and remove a memory module. ■ Before you install or remove a memory module while the computer is low. After using a memory card, return it to a memory card if the battery power is in the Windows Start menu. If you install or remove a memory module, turn the power on. Optional Devices Memory card care Set the write-protect switch to the lock position, if you hear it click into the slot. 4. Do not touch the metal part or expose it to...
... section describes how to install and remove a memory module. ■ Before you install or remove a memory module while the computer is low. After using a memory card, return it to a memory card if the battery power is in the Windows Start menu. If you install or remove a memory module, turn the power on. Optional Devices Memory card care Set the write-protect switch to the lock position, if you hear it click into the slot. 4. Do not touch the metal part or expose it to...
User Manual
Page 144
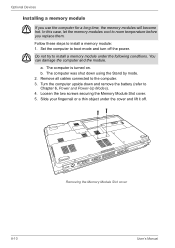
... become hot. Turn the computer upside down using the Stand by mode. 2. In this case, let the memory modules cool to Chapter 6, Power and Power-Up Modes). 4. Loosen the two screws securing the Memory Module Slot cover. 5. Slide your fingernail or a thin object under the following conditions. b. Set the computer to install a memory module: 1. a. Remove all cables connected to install a memory module under the cover and lift it off the power. Removing the Memory Module Slot cover 8-10 User's Manual Optional Devices Installing a memory module If you replace...
... become hot. Turn the computer upside down using the Stand by mode. 2. In this case, let the memory modules cool to Chapter 6, Power and Power-Up Modes). 4. Loosen the two screws securing the Memory Module Slot cover. 5. Slide your fingernail or a thin object under the following conditions. b. Set the computer to install a memory module: 1. a. Remove all cables connected to install a memory module under the cover and lift it off the power. Removing the Memory Module Slot cover 8-10 User's Manual Optional Devices Installing a memory module If you replace...
User Manual
Page 146
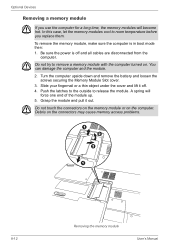
... computer and the module. 2. A spring will become hot. Grasp the module and pull it off and all cables are disconnected from the computer. Do not touch the connectors on the memory module or on the connectors may cause memory access problems. 1 2 3 1 8-12 Removing the memory module User's Manual Do not try to release the module. Debris on the computer. Optional Devices Removing a memory module If you replace them. To remove the memory module, make sure the...
... computer and the module. 2. A spring will become hot. Grasp the module and pull it off and all cables are disconnected from the computer. Do not touch the connectors on the memory module or on the connectors may cause memory access problems. 1 2 3 1 8-12 Removing the memory module User's Manual Do not try to release the module. Debris on the computer. Optional Devices Removing a memory module If you replace them. To remove the memory module, make sure the...
User Manual
Page 164
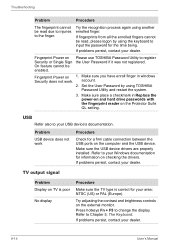
... does not work Procedure Check for your Windows documentation for the time being. USB Refer also to your dealer. 9-14 User's Manual Fingerprint Power on Please use TOSHIBA Password Utility to Chapter 5, The Keyboard. On feature cannot be enabled. Make sure you have enroll finger in Replace the power-on and hard drive passwords with the fingerprint reader on the Protector Suite QL setting. Make sure the USB device drivers are properly installed. Refer to...
... does not work Procedure Check for your Windows documentation for the time being. USB Refer also to your dealer. 9-14 User's Manual Fingerprint Power on Please use TOSHIBA Password Utility to Chapter 5, The Keyboard. On feature cannot be enabled. Make sure you have enroll finger in Replace the power-on and hard drive passwords with the fingerprint reader on the Protector Suite QL setting. Make sure the USB device drivers are properly installed. Refer to...


