

User Manual
Page 29
... for the first time 52 Opening the display panel 52 Your computer's features and specifications ....53 Turning on the power 54 Adding memory (optional 55 Installing a memory module 55 Removing a memory module 61 Using the TouchPad 63 Scrolling with the TouchPad 63 Control buttons 64 Disabling or enabling the TouchPad 64 Turning off...
... for the first time 52 Opening the display panel 52 Your computer's features and specifications ....53 Turning on the power 54 Adding memory (optional 55 Installing a memory module 55 Removing a memory module 61 Using the TouchPad 63 Scrolling with the TouchPad 63 Control buttons 64 Disabling or enabling the TouchPad 64 Turning off...
User Manual
Page 32
... Express Card 141 Removing a PCI Express Card 142 Using the Bridge Media Adapter Slot 143 Inserting memory media 143 Removing memory media 144 Connecting your modem to a telephone line.........144 Connecting to a phone line 145 Chapter 5: Toshiba Utilities 147 Fn-esse 148 Starting Fn-esse 148 Using the keyboard or pointing device to...
... Express Card 141 Removing a PCI Express Card 142 Using the Bridge Media Adapter Slot 143 Inserting memory media 143 Removing memory media 144 Connecting your modem to a telephone line.........144 Connecting to a phone line 145 Chapter 5: Toshiba Utilities 147 Fn-esse 148 Starting Fn-esse 148 Using the keyboard or pointing device to...
User Manual
Page 34
34 Contents Resolving hardware conflicts on your own .....176 Fixing a problem with Device Manager ...........177 Memory problems 179 Power and the batteries 180 Keyboard problems 182 Display problems 183 Disk drive problems 185 DVD-ROM or multi-...habits 201 Data and system configuration backup in Windows® XP 202 If you need further assistance 208 Before you contact Toshiba 208 Contacting Toshiba 209 Other Toshiba Internet Web sites 210 Toshiba's worldwide offices 210 Appendix A: Hot Keys 212 Volume Mute 212 Password security 213 Without a password 213 With a password...
34 Contents Resolving hardware conflicts on your own .....176 Fixing a problem with Device Manager ...........177 Memory problems 179 Power and the batteries 180 Keyboard problems 182 Display problems 183 Disk drive problems 185 DVD-ROM or multi-...habits 201 Data and system configuration backup in Windows® XP 202 If you need further assistance 208 Before you contact Toshiba 208 Contacting Toshiba 209 Other Toshiba Internet Web sites 210 Toshiba's worldwide offices 210 Appendix A: Hot Keys 212 Volume Mute 212 Password security 213 Without a password 213 With a password...
User Manual
Page 45
... reaching the CPU. Do not use it could cause the CPU to run at a lower performance level or cause the computer to , a mouse, keyboard, printer, memory, and PC Cards. To use external power or to charge the battery you can use the computer on surfaces with objects that cools the CPU...
... reaching the CPU. Do not use it could cause the CPU to run at a lower performance level or cause the computer to , a mouse, keyboard, printer, memory, and PC Cards. To use external power or to charge the battery you can use the computer on surfaces with objects that cools the CPU...

User Manual
Page 55
...Setting up your software. You will need a standard Phillips No. 1 screwdriver for a long time, the memory module will become hot. NOTE Before adding external devices or memory, Toshiba recommends setting up your software" on the base of today's popular applications. If you use the computer ... you use a standard Phillips No. 1 screwdriver that came with your system or visit accessories.toshiba.com. Your computer comes with enough memory to increase the computer's memory if you replace it. To avoid damaging the computer's screws, use complex software or process large...
...Setting up your software. You will need a standard Phillips No. 1 screwdriver for a long time, the memory module will become hot. NOTE Before adding external devices or memory, Toshiba recommends setting up your software" on the base of today's popular applications. If you use the computer ... you use a standard Phillips No. 1 screwdriver that came with your system or visit accessories.toshiba.com. Your computer comes with enough memory to increase the computer's memory if you replace it. To avoid damaging the computer's screws, use complex software or process large...

User Manual
Page 56
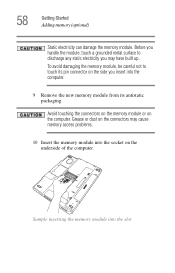
... and turn off (or Shut Down - 56 Getting Started Adding memory (optional) Installing a memory module with the computer's power on , begin at step 1; The computer has two memory module slots - Before you install or remove a memory module while the computer is in Standby or Hibernation mode, data ...remove any cables connected to the computer, including the AC adapter. 4 Remove the battery. otherwise, skip to locate the memory module slot cover. If you install or remove a memory module, turn the computer upside down to step 3. 1 If the computer is on may damage the computer, the module...
... and turn off (or Shut Down - 56 Getting Started Adding memory (optional) Installing a memory module with the computer's power on , begin at step 1; The computer has two memory module slots - Before you install or remove a memory module while the computer is in Standby or Hibernation mode, data ...remove any cables connected to the computer, including the AC adapter. 4 Remove the battery. otherwise, skip to locate the memory module slot cover. If you install or remove a memory module, turn the computer upside down to step 3. 1 If the computer is on may damage the computer, the module...

User Manual
Page 57
Getting Started Adding memory (optional) 57 Memory module slot cover Sample locating the memory module slot cover 6 Using a standard Phillips No. 1 screwdriver, unscrew the screw that you can retrieve them later. Unscrewing the memory module slot cover 7 Remove the memory slot cover. 8 Place the screw and the cover in a safe place so that secures the memory module slot cover.
Getting Started Adding memory (optional) 57 Memory module slot cover Sample locating the memory module slot cover 6 Using a standard Phillips No. 1 screwdriver, unscrew the screw that you can retrieve them later. Unscrewing the memory module slot cover 7 Remove the memory slot cover. 8 Place the screw and the cover in a safe place so that secures the memory module slot cover.
User Manual
Page 58
...built up. 58 Getting Started Adding memory (optional) Static electricity can damage the memory module. Sample inserting the memory module into the computer. 9 Remove the new memory module from its pin connector on the underside of the computer. To avoid damaging the memory module, be careful not to discharge... any static electricity you may cause memory access problems. 10 Insert the memory module into the socket on the side you insert into the slot Avoid touching the connectors on the memory module or on the computer. Before you handle the module, ...
...built up. 58 Getting Started Adding memory (optional) Static electricity can damage the memory module. Sample inserting the memory module into the computer. 9 Remove the new memory module from its pin connector on the underside of the computer. To avoid damaging the memory module, be careful not to discharge... any static electricity you may cause memory access problems. 10 Insert the memory module into the socket on the side you insert into the slot Avoid touching the connectors on the memory module or on the computer. Before you handle the module, ...

User Manual
Page 59
Sample aligning the module into the socket 12 Check that the gold connector bar faces the slot, at a slight angle to the socket. Getting Started Adding memory (optional) 59 11 Hold the memory module by its edges so that the module is inserted completely into the socket and lined up squarely with the socket clips. clip clip Sample inserting the memory module into the socket
Sample aligning the module into the socket 12 Check that the gold connector bar faces the slot, at a slight angle to the socket. Getting Started Adding memory (optional) 59 11 Hold the memory module by its edges so that the module is inserted completely into the socket and lined up squarely with the socket clips. clip clip Sample inserting the memory module into the socket

User Manual
Page 60
... connector until the clips snap into the socket and level when secured in place. The clips on either side of the memory module snap into position. When the operating system has loaded, you can now continue setting up . 17 Reconnect the cables. 18 Restart the computer. ... installed for the computer to work. 60 Getting Started Adding memory (optional) 13 Gently press down on the memory module Do not force the memory module into place when the memory module is properly inserted. 14 Replace the memory module slot cover and tighten the screw. 15 Re-insert the battery. For more ...
... connector until the clips snap into the socket and level when secured in place. The clips on either side of the memory module snap into position. When the operating system has loaded, you can now continue setting up . 17 Reconnect the cables. 18 Restart the computer. ... installed for the computer to work. 60 Getting Started Adding memory (optional) 13 Gently press down on the memory module Do not force the memory module into place when the memory module is properly inserted. 14 Replace the memory module slot cover and tighten the screw. 15 Re-insert the battery. For more ...

User Manual
Page 61
...out of the above cases, the Standby configuration will be saved. In either of the slot. The memory module pops up slightly. 3 Gently lift the memory module to remove a memory module: 1 Complete steps 1-8 in memory will not be lost. The computer could hang up the next time you turn it on and data... in "Installing a memory module" on page 55 to remove a memory module with the computer turned on , perform the following message appears when you turn on the power: Warning: Resume Failure Press Any Key...
...out of the above cases, the Standby configuration will be saved. In either of the slot. The memory module pops up slightly. 3 Gently lift the memory module to remove a memory module: 1 Complete steps 1-8 in memory will not be lost. The computer could hang up the next time you turn it on and data... in "Installing a memory module" on page 55 to remove a memory module with the computer turned on , perform the following message appears when you turn on the power: Warning: Resume Failure Press Any Key...

User Manual
Page 62
...: 1 Click Start, Control Panel, Performance and Maintenance, and then System. 2 The General tab view automatically appears and shows total memory. Checking total memory When you add or remove a memory module, you can check that the computer has recognized the change. If the computer does not recognize the... memory configuration, turn off the computer, remove the memory slot cover, and make sure the memory module is seated properly, as described in step 13 of "Installing a memory module" on page 55. TECHNICAL NOTE: You must have ...
...: 1 Click Start, Control Panel, Performance and Maintenance, and then System. 2 The General tab view automatically appears and shows total memory. Checking total memory When you add or remove a memory module, you can check that the computer has recognized the change. If the computer does not recognize the... memory configuration, turn off the computer, remove the memory slot cover, and make sure the memory module is seated properly, as described in step 13 of "Installing a memory module" on page 55. TECHNICAL NOTE: You must have ...
User Manual
Page 65
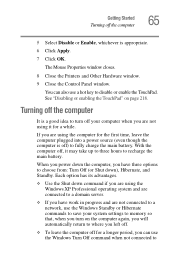
... to where you left off. ❖ To leave the computer off ) to fully charge the main battery. Getting Started Turning off your system settings to memory so that, when you turn off the computer 65 5 Select Disable or Enable, whichever is appropriate. 6 Click Apply. 7 Click OK.
... to where you left off. ❖ To leave the computer off ) to fully charge the main battery. Getting Started Turning off your system settings to memory so that, when you turn off the computer 65 5 Select Disable or Enable, whichever is appropriate. 6 Click Apply. 7 Click OK.

User Manual
Page 76
... at preset intervals. See "Saving your battery runs out of charge while you are working, you will lose all work stays in the computer's temporary memory until you last saved. Chapter 2 Learning the Basics This chapter gives some computing tips and provides important information about basic features. This feature saves your...
... at preset intervals. See "Saving your battery runs out of charge while you are working, you will lose all work stays in the computer's temporary memory until you last saved. Chapter 2 Learning the Basics This chapter gives some computing tips and provides important information about basic features. This feature saves your...
User Manual
Page 99
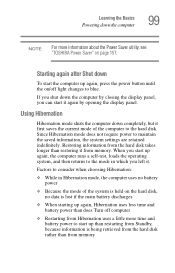
...more time and battery power to start up than restarting from Standby, because information is being retrieved from the hard disk rather than from memory Since Hibernation mode does not require power to the hard disk. Restoring information from the hard disk takes longer than does Turn off ... the display panel. If you left it from Hibernation uses a little more information about the Power Saver utility, see "TOSHIBA Power Saver" on /off computer ❖ Restarting from memory. Starting again after Shut down To start the computer up again, press the power button until the on page 157....
...more time and battery power to start up than restarting from Standby, because information is being retrieved from the hard disk rather than from memory Since Hibernation mode does not require power to the hard disk. Restoring information from the hard disk takes longer than does Turn off ... the display panel. If you left it from Hibernation uses a little more information about the Power Saver utility, see "TOSHIBA Power Saver" on /off computer ❖ Restarting from memory. Starting again after Shut down To start the computer up again, press the power button until the on page 157....
User Manual
Page 101
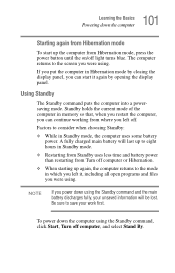
... computer Starting again from Hibernation mode To start up the computer from Turn off computer or Hibernation. ❖ When starting up to eight hours in memory so that, when you restart the computer, you can continue working from where you left it again by closing the display panel, you can start...
... computer Starting again from Hibernation mode To start up the computer from Turn off computer or Hibernation. ❖ When starting up to eight hours in memory so that, when you restart the computer, you can continue working from where you left it again by closing the display panel, you can start...
User Manual
Page 106
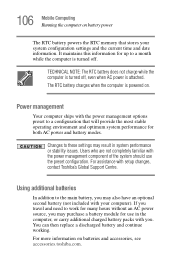
... computer, or carry additional charged battery packs with setup changes, contact Toshiba's Global Support Centre. For more information on batteries and accessories, see accessories.toshiba.com. 106 Mobile Computing Running the computer on battery power The RTC battery powers the RTC memory that will provide the most stable operating environment and optimum system...
... computer, or carry additional charged battery packs with setup changes, contact Toshiba's Global Support Centre. For more information on batteries and accessories, see accessories.toshiba.com. 106 Mobile Computing Running the computer on battery power The RTC battery powers the RTC memory that will provide the most stable operating environment and optimum system...
User Manual
Page 108
... until it maintains this extends battery life and helps ensure accurate monitoring of battery capacity. The RTC battery powers the System Time Clock and BIOS memory used to a month when the computer is powered off. The RTC battery may not start charging immediately under the following error message during startup: BAD...
... until it maintains this extends battery life and helps ensure accurate monitoring of battery capacity. The RTC battery powers the System Time Clock and BIOS memory used to a month when the computer is powered off. The RTC battery may not start charging immediately under the following error message during startup: BAD...

User Manual
Page 143
...™ PRO media, Secure Digital™ (SD™) Cards, SmartMedia™ or xD-Picture Cards. Inserting memory media The following instructions apply to another, use the drag-and-drop feature of Windows. This media can destroy data. To copy data... is equipped with a variety of digital products: digital music players, cellular phones, PDAs, digital cameras, digital video camcorders, etc. Sample inserting memory media When inserting memory media, do not touch the metal contacts. You could expose the storage area to static electricity, which can be used with a Bridge Media ...
...™ PRO media, Secure Digital™ (SD™) Cards, SmartMedia™ or xD-Picture Cards. Inserting memory media The following instructions apply to another, use the drag-and-drop feature of Windows. This media can destroy data. To copy data... is equipped with a variety of digital products: digital music players, cellular phones, PDAs, digital cameras, digital video camcorders, etc. Sample inserting memory media When inserting memory media, do not touch the metal contacts. You could expose the storage area to static electricity, which can be used with a Bridge Media ...

User Manual
Page 144
... larger corporate wide area network (WAN). After the media is stopped, it is being written or read. Sample removing memory media Do not remove memory media while data is safe to a telephone line Removing memory media 1 Right-click the Safely Remove Hardware icon on the System tray. The modem allows you to: ❖...
... larger corporate wide area network (WAN). After the media is stopped, it is being written or read. Sample removing memory media Do not remove memory media while data is safe to a telephone line Removing memory media 1 Right-click the Safely Remove Hardware icon on the System tray. The modem allows you to: ❖...


