
Satellite M30X/M35X Users Guide
Page 29
... with the TouchPad 56 Using the Scroll button 57 Using the Control buttons 57 Disabling or enabling the TouchPad 57 Installing additional memory (optional 58 Removing a memory module 62 Checking total memory 63 Using an external keyboard 63 Using a mouse 63 Connecting a local printer 64 Setting up your printer 65 Connecting an optional...
... with the TouchPad 56 Using the Scroll button 57 Using the Control buttons 57 Disabling or enabling the TouchPad 57 Installing additional memory (optional 58 Removing a memory module 62 Checking total memory 63 Using an external keyboard 63 Using a mouse 63 Connecting a local printer 64 Setting up your printer 65 Connecting an optional...
Satellite M30X/M35X Users Guide
Page 32
... software 147 Inserting a PC Card 147 Removing a PC Card 148 Hot swapping 149 Using the Bridge Media slot 150 Inserting Memory Stick or Memory Stick PRO media 150 Removing Memory Stick or Memory Stick PRO media 151 Inserting an SD™ Card 151 Removing an SD™ Card 152 Inserting an xD-Picture Card...
... software 147 Inserting a PC Card 147 Removing a PC Card 148 Hot swapping 149 Using the Bridge Media slot 150 Inserting Memory Stick or Memory Stick PRO media 150 Removing Memory Stick or Memory Stick PRO media 151 Inserting an SD™ Card 151 Removing an SD™ Card 152 Inserting an xD-Picture Card...
Satellite M30X/M35X Users Guide
Page 33
... can help you 161 Resolving a hardware conflict 161 A plan of action 162 Resolving hardware conflicts on your own .....162 Fixing a problem with Device Manager ...........164 Memory problems 166 Power and the batteries 166 Keyboard problems 168 Display problems 169 Disk drive problems 171 DVD-ROM or multi-function drive problems...173... Card problems 174 Printer problems 178 Modem problems 179 Develop good computing habits 179 If you need further assistance 181 Before you call 181 Contacting Toshiba 182 Other Toshiba Internet Web sites 183 Toshiba's worldwide offices 183
... can help you 161 Resolving a hardware conflict 161 A plan of action 162 Resolving hardware conflicts on your own .....162 Fixing a problem with Device Manager ...........164 Memory problems 166 Power and the batteries 166 Keyboard problems 168 Display problems 169 Disk drive problems 171 DVD-ROM or multi-function drive problems...173... Card problems 174 Printer problems 178 Modem problems 179 Develop good computing habits 179 If you need further assistance 181 Before you call 181 Contacting Toshiba 182 Other Toshiba Internet Web sites 183 Toshiba's worldwide offices 183
Satellite M30X/M35X Users Guide
Page 47
... of the CPU, make sure the air intake on your computer TECHNICAL NOTE: You must attach the AC adapter. See "Connecting to , a mouse, keyboard, printer, memory, and PC cards. Setting up your computer's cooling fan Your computer may be drawn in air by drawing outside air into the computer. To use...
... of the CPU, make sure the air intake on your computer TECHNICAL NOTE: You must attach the AC adapter. See "Connecting to , a mouse, keyboard, printer, memory, and PC cards. Setting up your computer's cooling fan Your computer may be drawn in air by drawing outside air into the computer. To use...

Satellite M30X/M35X Users Guide
Page 49
... rights under this computer?" 7 Enter your name and click Next to complete the process. If you may also want to: ❖ Add more memory (see "Installing additional memory (optional)" on page 58) ❖ Connect a mouse (see "Using a mouse" on page 63) ❖ Connect a local printer (see... "Connecting a local printer" on page 64) ❖ Connect an external diskette drive (see "Connecting an optional external diskette drive" on your desktop or go to the Toshiba...
... rights under this computer?" 7 Enter your name and click Next to complete the process. If you may also want to: ❖ Add more memory (see "Installing additional memory (optional)" on page 58) ❖ Connect a mouse (see "Using a mouse" on page 63) ❖ Connect a local printer (see... "Connecting a local printer" on page 64) ❖ Connect an external diskette drive (see "Connecting an optional external diskette drive" on your desktop or go to the Toshiba...

Satellite M30X/M35X Users Guide
Page 58
.... If this happens, let the modules cool to regularly check the Toshiba Web site at accessories.toshiba.com). Your system may want to enable or disable the TouchPad (see "Hot Keys" on the most of data. If you install or remove a memory module while the computer is in various capacities (to stay current...
.... If this happens, let the modules cool to regularly check the Toshiba Web site at accessories.toshiba.com). Your system may want to enable or disable the TouchPad (see "Hot Keys" on the most of data. If you install or remove a memory module while the computer is in various capacities (to stay current...
Satellite M30X/M35X Users Guide
Page 59
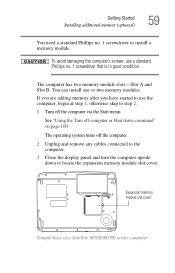
... slots-Slot A and Slot B. The operating system turns off the computer via the Start menu. Expansion memory module slot cover Sample base of a Satellite M30X/M35X series computer If you are adding memory after you have started to use a standard Phillips no . 1 screwdriver to the computer. 3 Close the display panel and turn the computer...
... slots-Slot A and Slot B. The operating system turns off the computer via the Start menu. Expansion memory module slot cover Sample base of a Satellite M30X/M35X series computer If you are adding memory after you have started to use a standard Phillips no . 1 screwdriver to the computer. 3 Close the display panel and turn the computer...

Satellite M30X/M35X Users Guide
Page 60
...Phillips no. 1 screwdriver, unscrew the screw that the gold connector bar faces the slot, fit the module into the computer). 6 Remove the memory module from its antistatic packaging. 7 Holding the memory module by its gold connector bar (on the side you may have built up. Sample removing the expansion module... memory slot cover 5 Put the screw and cover in a safe place so that you can damage the memory module. Static electricity can retrieve them later. Before you handle the module, touch a grounded...
...Phillips no. 1 screwdriver, unscrew the screw that the gold connector bar faces the slot, fit the module into the computer). 6 Remove the memory module from its antistatic packaging. 7 Holding the memory module by its gold connector bar (on the side you may have built up. Sample removing the expansion module... memory slot cover 5 Put the screw and cover in a safe place so that you can damage the memory module. Static electricity can retrieve them later. Before you handle the module, touch a grounded...
Satellite M30X/M35X Users Guide
Page 61
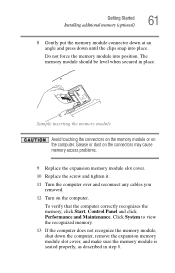
...when secured in step 8. To verify that the computer correctly recognizes the memory, click Start, Control Panel and click Performance and Maintenance. Click System to view the recognized memory. 13 If the computer does not recognize the memory module, shut down until the clips snap into position. Grease or dust... on the connectors may cause memory access problems. 9 Replace the expansion memory module slot cover. 10 Replace the screw and tighten it. 11 Turn the computer over and reconnect any cables you removed. 12 ...
...when secured in step 8. To verify that the computer correctly recognizes the memory, click Start, Control Panel and click Performance and Maintenance. Click System to view the recognized memory. 13 If the computer does not recognize the memory module, shut down until the clips snap into position. Grease or dust... on the connectors may cause memory access problems. 9 Replace the expansion memory module slot cover. 10 Replace the screw and tighten it. 11 Turn the computer over and reconnect any cables you removed. 12 ...
Satellite M30X/M35X Users Guide
Page 62
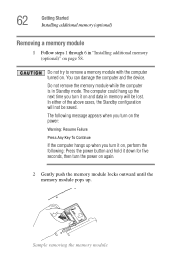
... up the next time you turn it down for five seconds, then turn the power on again. 2 Gently push the memory module locks outward until the memory module pops up when you turn it on, perform the following: Press the power button and hold it on the power...: Warning: Resume Failure Press Any Key To Continue If the computer hangs up . Do not remove the memory module while the computer is in memory will not be lost. Sample removing the memory module 62 Getting Started Installing additional memory (optional) Removing a memory module 1 Follow steps 1 through 6 in "Installing additional...
... up the next time you turn it down for five seconds, then turn the power on again. 2 Gently push the memory module locks outward until the memory module pops up when you turn it on, perform the following: Press the power button and hold it on the power...: Warning: Resume Failure Press Any Key To Continue If the computer hangs up . Do not remove the memory module while the computer is in memory will not be lost. Sample removing the memory module 62 Getting Started Installing additional memory (optional) Removing a memory module 1 Follow steps 1 through 6 in "Installing additional...

Satellite M30X/M35X Users Guide
Page 63
...keyboard 63 3 Gently pull the memory module diagonally to pull it out of "Installing additional memory (optional)" on page 58. Checking total memory When you add or remove memory, you can attach one of the TouchPad, the computer's built-in "Installing additional memory (optional)" on page 58.... If the computer does not recognize the memory configuration, turn off the computer, remove the memory slot cover, and make sure the memory module is seated properly, as described in step 10 of ...
...keyboard 63 3 Gently pull the memory module diagonally to pull it out of "Installing additional memory (optional)" on page 58. Checking total memory When you add or remove memory, you can attach one of the TouchPad, the computer's built-in "Installing additional memory (optional)" on page 58.... If the computer does not recognize the memory configuration, turn off the computer, remove the memory slot cover, and make sure the memory module is seated properly, as described in step 10 of ...
Satellite M30X/M35X Users Guide
Page 73
..., you have work in progress and are not connected to a network, use the Windows® Standby or Hibernate commands to save your system settings to memory so that, when you are not using the computer for a while. If you turn on page 100.
..., you have work in progress and are not connected to a network, use the Windows® Standby or Hibernate commands to save your system settings to memory so that, when you are not using the computer for a while. If you turn on page 100.
Satellite M30X/M35X Users Guide
Page 77
... some computing tips and provides important information about basic features. See "Power management" on . You will lose all unsaved work temporarily stays in the computer's memory until you are working. Your work , if, for details. 77 Computing tips ❖ Save your battery runs out of charge while you save feature which...
... some computing tips and provides important information about basic features. See "Power management" on . You will lose all unsaved work temporarily stays in the computer's memory until you are working. Your work , if, for details. 77 Computing tips ❖ Save your battery runs out of charge while you save feature which...
Satellite M30X/M35X Users Guide
Page 103
...Basics Powering down the computer Using Hibernation Mode The Hibernation command shuts the computer down completely, but it first saves the current state of memory. ❖ When starting up again, the computer runs a self-test, loads the operating system, and then returns to the state ... which you were using. Restoring information from the hard disk takes longer than restarting from Stand by because information is being retrieved from memory. For more information about going into Hibernation mode more quickly, see "Using Hibernation" on page 105. Since Hibernation mode does not ...
...Basics Powering down the computer Using Hibernation Mode The Hibernation command shuts the computer down completely, but it first saves the current state of memory. ❖ When starting up again, the computer runs a self-test, loads the operating system, and then returns to the state ... which you were using. Restoring information from the hard disk takes longer than restarting from Stand by because information is being retrieved from memory. For more information about going into Hibernation mode more quickly, see "Using Hibernation" on page 105. Since Hibernation mode does not ...
Satellite M30X/M35X Users Guide
Page 107
... mode. ❖ When starting up again, the computer returns to consider when choosing Standby: ❖ While in Stand by mode. Factors to the mode in memory so that, when you restart the computer, you can continue working from where you left it, including all open programs and files you do not...
... mode. ❖ When starting up again, the computer returns to consider when choosing Standby: ❖ While in Stand by mode. Factors to the mode in memory so that, when you restart the computer, you can continue working from where you left it, including all open programs and files you do not...
Satellite M30X/M35X Users Guide
Page 108
... appears. 2 Click Stand By. Using Standby Follow these steps to power down the computer using the Stand by mode. The on /off light blinks to memory, turns off light blinks amber, indicating the machine is in Standby mode. The Turn off the display, and enters into a low-power mode. The computer...
... appears. 2 Click Stand By. Using Standby Follow these steps to power down the computer using the Stand by mode. The on /off light blinks to memory, turns off light blinks amber, indicating the machine is in Standby mode. The Turn off the display, and enters into a low-power mode. The computer...

Satellite M30X/M35X Users Guide
Page 115
The RTC battery does not charge while the computer is charging the computer. The RTC battery powers the System Time Clock and BIOS memory used to a month when the computer is powered off even when the AC adapter is turned off . If the RTC battery is fully charged, we ...
The RTC battery does not charge while the computer is charging the computer. The RTC battery powers the System Time Clock and BIOS memory used to a month when the computer is powered off even when the AC adapter is turned off . If the RTC battery is fully charged, we ...
Satellite M30X/M35X Users Guide
Page 122
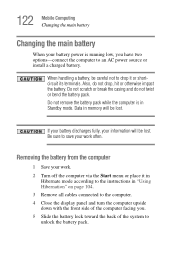
..., be lost . Be sure to save your work . 2 Turn off the computer via the Start menu or place it or shortcircuit its terminals. Data in memory will be careful not to drop it in Hibernate mode according to the instructions in Standby mode. Also, do not twist or bend the battery...
..., be lost . Be sure to save your work . 2 Turn off the computer via the Start menu or place it or shortcircuit its terminals. Data in memory will be careful not to drop it in Hibernate mode according to the instructions in Standby mode. Also, do not twist or bend the battery...
Satellite M30X/M35X Users Guide
Page 147
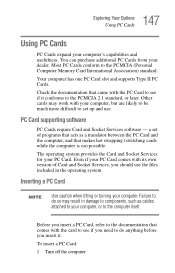
... conform to the PCMCIA 2.1 standard, or later. Other cards may result in the operating system. Before you insert it conforms to the PCMCIA (Personal Computer Memory Card International Association) standard.
... conform to the PCMCIA 2.1 standard, or later. Other cards may result in the operating system. Before you insert it conforms to the PCMCIA (Personal Computer Memory Card International Association) standard.
Satellite M30X/M35X Users Guide
Page 150
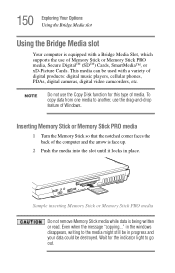
... being written or read. in the windows disappears, writing to another, use the drag-and-drop feature of Windows. NOTE Do not use of Memory Stick or Memory Stick PRO media, Secure DigitalTM (SDTM) Cards, SmartMedia™, or xD-Picture Cards. Even when the message "copying..." To copy data from one media... to the media might still be in place. Wait for this type of media. Sample inserting Memory Stick or Memory Stick PRO media Do not remove Memory Stick media while data is face up. 2 Push the media into the slot until it locks in progress and your data...
... being written or read. in the windows disappears, writing to another, use the drag-and-drop feature of Windows. NOTE Do not use of Memory Stick or Memory Stick PRO media, Secure DigitalTM (SDTM) Cards, SmartMedia™, or xD-Picture Cards. Even when the message "copying..." To copy data from one media... to the media might still be in place. Wait for this type of media. Sample inserting Memory Stick or Memory Stick PRO media Do not remove Memory Stick media while data is face up. 2 Push the media into the slot until it locks in progress and your data...


