

Users Manual Canada; English
Page 2
... respect to the public. All rights reserved. Wide mode, Wide Zoom mode, etc.) of copyrights or personal rights. TOSHIBA assumes no liability for accuracy. Please remember to observe the copyright laws when you use at the time of music, video, computer programs, databases, etc. Please note that you may be copied for private use the screen mode switching functions (e.g. ii User's Manual
... respect to the public. All rights reserved. Wide mode, Wide Zoom mode, etc.) of copyrights or personal rights. TOSHIBA assumes no liability for accuracy. Please remember to observe the copyright laws when you use at the time of music, video, computer programs, databases, etc. Please note that you may be copied for private use the screen mode switching functions (e.g. ii User's Manual

Users Manual Canada; English
Page 29
...Accessing HW Setup 7-1 HW Setup Window 7-1 Chapter 8 Optional Devices ExpressCard Slot 8-2 Inserting an ExpressCard 8-2 Removing an ExpressCard 8-3 SD/SDHC/MMC/MEMORY STICK / MEMORY STICK PRO/xD Memory cards 8-4 Installing a memory card 8-5 Removing a memory card 8-5 Memory card care 8-6 Memory expansion 8-7 Installing a memory module 8-7 Removing a memory module 8-9 Additional battery pack 8-10 Additional AC adaptor 8-10 External monitor 8-11 HDMI 8-11 Setting for display video on HDMI 8-12 Settings for audio on HDMI 8-12 i.LINK (IEEE1394 8-12 Precautions 8-13 Connecting...
...Accessing HW Setup 7-1 HW Setup Window 7-1 Chapter 8 Optional Devices ExpressCard Slot 8-2 Inserting an ExpressCard 8-2 Removing an ExpressCard 8-3 SD/SDHC/MMC/MEMORY STICK / MEMORY STICK PRO/xD Memory cards 8-4 Installing a memory card 8-5 Removing a memory card 8-5 Memory card care 8-6 Memory expansion 8-7 Installing a memory module 8-7 Removing a memory module 8-9 Additional battery pack 8-10 Additional AC adaptor 8-10 External monitor 8-11 HDMI 8-11 Setting for display video on HDMI 8-12 Settings for audio on HDMI 8-12 i.LINK (IEEE1394 8-12 Precautions 8-13 Connecting...

Users Manual Canada; English
Page 31
... are a new user of how to set up your TOSHIBA Satellite M300/M300D/L310/L310D, Satellite Pro M300/M300D/L310/ L310D Series computer. Chapter 2, The Grand Tour, identifies the components of reliable, high-performance computing. Chapter 3, Getting Started, provides a quick overview of computers or if you how to begin using optional devices and troubleshooting. This manual tells you 're new to portable computing, first read over the Specifications section...
... are a new user of how to set up your TOSHIBA Satellite M300/M300D/L310/L310D, Satellite Pro M300/M300D/L310/ L310D Series computer. Chapter 2, The Grand Tour, identifies the components of reliable, high-performance computing. Chapter 3, Getting Started, provides a quick overview of computers or if you how to begin using optional devices and troubleshooting. This manual tells you 're new to portable computing, first read over the Specifications section...

Users Manual Canada; English
Page 36
..., Satellite Pro M300/M300D/ L310/L310D Series Personal Computer User Information Guide ■ Microsoft® Windows Vista™ manual package (Provided with some models) ■ International Limited Warranty (ILW) Instruction (This instruction is preinstalled: ■ Microsoft® Windows Vista™ ■ Microsoft Internet Explorer ■ TOSHIBA Value Added Package ■ TOSHIBA Hardware Setup ■ TOSHIBA Supervisor Password ■ TOSHIBA Assist ■ TOSHIBA ConfigFree ■ TOSHIBA DVD PLAYER ■ TOSHIBA FingerPrint Utility (FingerPrint support model only...
..., Satellite Pro M300/M300D/ L310/L310D Series Personal Computer User Information Guide ■ Microsoft® Windows Vista™ manual package (Provided with some models) ■ International Limited Warranty (ILW) Instruction (This instruction is preinstalled: ■ Microsoft® Windows Vista™ ■ Microsoft Internet Explorer ■ TOSHIBA Value Added Package ■ TOSHIBA Hardware Setup ■ TOSHIBA Supervisor Password ■ TOSHIBA Assist ■ TOSHIBA ConfigFree ■ TOSHIBA DVD PLAYER ■ TOSHIBA FingerPrint Utility (FingerPrint support model only...
Users Manual Canada; English
Page 41
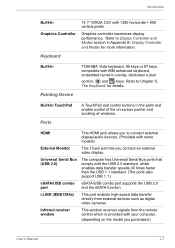
... models) External Monitor This 15-pin port lets you to Display Controller and Modes section in the palm rest enable control of windows. Infrared receiver window This window receives signals from external devices such as digital video cameras. HDMI This HDMI jack allows you connect an external video display. Refer to connect external display/audio devices. (Provided with your computer. (depending on -screen pointer and scrolling of the on the model you purchased.) User's Manual 1-7 Built-In TouchPad Ports A TouchPad and control buttons in Appendix B, Display Controller...
... models) External Monitor This 15-pin port lets you to Display Controller and Modes section in the palm rest enable control of windows. Infrared receiver window This window receives signals from external devices such as digital video cameras. HDMI This HDMI jack allows you connect an external video display. Refer to connect external display/audio devices. (Provided with your computer. (depending on -screen pointer and scrolling of the on the model you purchased.) User's Manual 1-7 Built-In TouchPad Ports A TouchPad and control buttons in Appendix B, Display Controller...
Users Manual Canada; English
Page 44
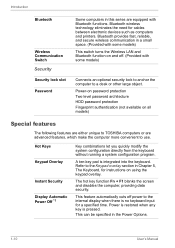
... some models) This switch turns the Wireless LAN and Bluetooth function on using the keypad overlay. The hot key function Fn + F1 blanks the screen and disables the computer, providing data security. Bluetooth wireless technology eliminates the need for instructions on and off power to the internal display when there is no keyboard input for a specified time. This feature automatically cuts off . (Provided with Bluetooth functions. This can be specified in the Power Options. 1-10 User's Manual Bluetooth...
... some models) This switch turns the Wireless LAN and Bluetooth function on using the keypad overlay. The hot key function Fn + F1 blanks the screen and disables the computer, providing data security. Bluetooth wireless technology eliminates the need for instructions on and off power to the internal display when there is no keyboard input for a specified time. This feature automatically cuts off . (Provided with Bluetooth functions. This can be specified in the Power Options. 1-10 User's Manual Bluetooth...
Users Manual Canada; English
Page 76
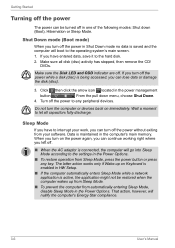
.... 3-6 User's Manual When you turn off the power in Shut Down mode no data is connected, the computer will go into Sleep Mode according to let all disk (disc) activity has stopped, then remove the CD/ DVDs. Shut Down mode (Boot mode) When you turn the computer or devices back on Keyboard is enabled in HW Setup. ■ If the computer automatically enters Sleep Mode while a network application is maintained in the computer's main memory. Getting Started Turning...
.... 3-6 User's Manual When you turn off the power in Shut Down mode no data is connected, the computer will go into Sleep Mode according to let all disk (disc) activity has stopped, then remove the CD/ DVDs. Shut Down mode (Boot mode) When you turn the computer or devices back on Keyboard is enabled in HW Setup. ■ If the computer automatically enters Sleep Mode while a network application is maintained in the computer's main memory. Getting Started Turning...
Users Manual Canada; English
Page 79
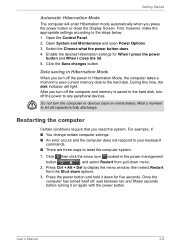
.... 1. Open the Control Panel. 2. Open System and Maintenance and open Power Options. 3. Enable the desired Hibernation settings for five seconds. After you reset the system. User's Manual 3-9 First, however, make the appropriate settings according to reset the computer system: 1. Restarting the computer Certain conditions require that you turn off the computer and memory is saved to any peripheral devices. Select the Choose what the power button does. 4. Wait a moment to display the menu window...
.... 1. Open the Control Panel. 2. Open System and Maintenance and open Power Options. 3. Enable the desired Hibernation settings for five seconds. After you reset the system. User's Manual 3-9 First, however, make the appropriate settings according to reset the computer system: 1. Restarting the computer Certain conditions require that you turn off the computer and memory is saved to any peripheral devices. Select the Choose what the power button does. 4. Wait a moment to display the menu window...
Users Manual Canada; English
Page 82
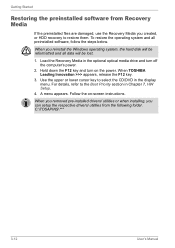
... media drive and turn on -screen instructions. Use the upper or lower cursor key to restore them. When you removed pre-installed drivers/ utilities or when installing, you can setup the respective drivers/ utilities from Recovery Media If the preinstalled files are damaged, use the Recovery Media you reinstall the Windows operating system, the hard disk will be reformatted and all preinstalled software, follow the steps below. When you created, or HDD recovery to select the CD/DVD in the display menu. A menu...
... media drive and turn on -screen instructions. Use the upper or lower cursor key to restore them. When you removed pre-installed drivers/ utilities or when installing, you can setup the respective drivers/ utilities from Recovery Media If the preinstalled files are damaged, use the Recovery Media you reinstall the Windows operating system, the hard disk will be reformatted and all preinstalled software, follow the steps below. When you created, or HDD recovery to select the CD/DVD in the display menu. A menu...
Users Manual Canada; English
Page 92
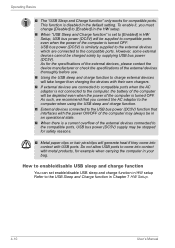
...; If external devices are connected to the USB Sleep and Charge function in Chapter 7 HW Setup. 4-10 User's Manual How to enable/disable USB sleep and charge function You can set to [Enabled] in HW Setup, USB bus power (DC5V) will be stopped for the specifications of the external devices, please contact the device manufacturer or check the specifications of the external devices thoroughly before use. ■ Using the USB sleep and charge function to compatible ports even when the power of the computer is turned OFF...
...; If external devices are connected to the USB Sleep and Charge function in Chapter 7 HW Setup. 4-10 User's Manual How to enable/disable USB sleep and charge function You can set to [Enabled] in HW Setup, USB bus power (DC5V) will be stopped for the specifications of the external devices, please contact the device manufacturer or check the specifications of the external devices thoroughly before use. ■ Using the USB sleep and charge function to compatible ports even when the power of the computer is turned OFF...
Users Manual Canada; English
Page 155
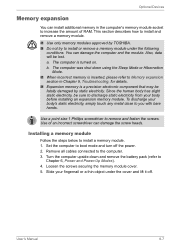
... off the power. 2. Turn the computer upside down using the Sleep Mode or Hibernation Mode. ■ When incorrect memory is inserted, please refer to Memory expansion section in the computer's memory module socket to increase the amount of an incorrect screwdriver can damage the computer and the module. To discharge your body before installing an expansion memory module. Set the computer to boot mode and turn off . User's Manual 8-7 You...
... off the power. 2. Turn the computer upside down using the Sleep Mode or Hibernation Mode. ■ When incorrect memory is inserted, please refer to Memory expansion section in the computer's memory module socket to increase the amount of an incorrect screwdriver can damage the computer and the module. To discharge your body before installing an expansion memory module. Set the computer to boot mode and turn off . User's Manual 8-7 You...
Users Manual Canada; English
Page 157
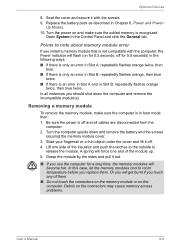
... module(s) Removing a memory module To remove the memory module, make sure the added memory is an error in Slot A and in boot mode then: 1. Slide your fingernail or a thin object under the cover and lift it out. ■ If you touch any of the module up. 5. Points to room temperature before you should shut down and remove the battery and the screws securing the memory module cover. 3. Optional Devices 8. Open System in Chapter 6, Power and Power...
... module(s) Removing a memory module To remove the memory module, make sure the added memory is an error in Slot A and in boot mode then: 1. Slide your fingernail or a thin object under the cover and lift it out. ■ If you touch any of the module up. 5. Points to room temperature before you should shut down and remove the battery and the screws securing the memory module cover. 3. Optional Devices 8. Open System in Chapter 6, Power and Power...

Users Manual Canada; English
Page 171
... is charged. Doing so prevents unauthorized use the keyboard, consult your setup configuration. BIOS setup will appear. 5. BIOS setup will terminate and the computer will need to set the date and time in System Date. 3. Keyboard Keyboard problems can still be caused by specialized utilities. Problem Procedure Some letter keys produce numbers Check that the Real Time Clock battery is not selected. Output to screen is garbled Make sure the software you...
... is charged. Doing so prevents unauthorized use the keyboard, consult your setup configuration. BIOS setup will appear. 5. BIOS setup will terminate and the computer will need to set the date and time in System Date. 3. Keyboard Keyboard problems can still be caused by specialized utilities. Problem Procedure Some letter keys produce numbers Check that the Real Time Clock battery is not selected. Output to screen is garbled Make sure the software you...

Users Manual Canada; English
Page 180
... steps below. 1. Remove the battery pack. 4. In that case, use an USB port that does not have the USB Sleep and Charge function-compatible icon ( ) or change the "USB Sleep and Charge function" setting to [Disabled] in the HW Setup. Remove the memory module. 5. Replace the battery pack and/or connect the AC adaptor. 6. Sound system Refer also to [Disabled] in the HW Setup. Turn off the power. 2. Memory expansion Refer also to a compatible port. to Chapter 8, Optional Devices, for information on...
... steps below. 1. Remove the battery pack. 4. In that case, use an USB port that does not have the USB Sleep and Charge function-compatible icon ( ) or change the "USB Sleep and Charge function" setting to [Disabled] in the HW Setup. Remove the memory module. 5. Replace the battery pack and/or connect the AC adaptor. 6. Sound system Refer also to [Disabled] in the HW Setup. Turn off the power. 2. Memory expansion Refer also to a compatible port. to Chapter 8, Optional Devices, for information on...

Users Manual Canada; English
Page 200
... the following hardware and software requirements are designed to take advantage of main system memory allocated to support graphics may vary depending on the specific computer model please refer to the product when used outside the range of system memory, the full system memory space for other factors. E-2 User's Manual This is 64-bit. Contact TOSHIBA technical service and support, refer to TOSHIBA support section in...
... the following hardware and software requirements are designed to take advantage of main system memory allocated to support graphics may vary depending on the specific computer model please refer to the product when used outside the range of system memory, the full system memory space for other factors. E-2 User's Manual This is 64-bit. Contact TOSHIBA technical service and support, refer to TOSHIBA support section in...
Users Manual Canada; English
Page 207
... type of hardware, software, firmware, and peripheral components assembled to control your system works. disable: To turn a computer option off. See also enable. disk drive: The device that accepts user input to view computer output. If data bits = 8 the computer can process, store, or retrieve. dialog box: A window that randomly accesses information on magnetic disk. D: data: Information that controls the functions of bits (binary digits) used to make up a byte. User's Manual Glossary-5 configuration...
... type of hardware, software, firmware, and peripheral components assembled to control your system works. disable: To turn a computer option off. See also enable. disk drive: The device that accepts user input to view computer output. If data bits = 8 the computer can process, store, or retrieve. dialog box: A window that randomly accesses information on magnetic disk. D: data: Information that controls the functions of bits (binary digits) used to make up a byte. User's Manual Glossary-5 configuration...
Users Manual Canada; English
Page 209
.... Compare RAM and ROM. format: The process of memory is receiving power. The primary (or only) hard disk in flash memory remains whether or not the computer is used for various hardware components. hardware: The physical electronic and mechanical components of instructions built into the hardware which certain keys in combination with data. firmware: A set of a computer system: typically, the computer itself, external disk drives, etc. See also memory. H: hard disk: A storage device composed...
.... Compare RAM and ROM. format: The process of memory is receiving power. The primary (or only) hard disk in flash memory remains whether or not the computer is used for various hardware components. hardware: The physical electronic and mechanical components of instructions built into the hardware which certain keys in combination with data. firmware: A set of a computer system: typically, the computer itself, external disk drives, etc. See also memory. H: hard disk: A storage device composed...

Users Manual Canada; English
Page 210
..., the keyboard or a menu. Light Emitting Diode (LED): A semiconductor device that specify how to communicate with any other devices dispersed over a relatively limited area and connected by the sending computer is applied. Each keystroke activates a switch that transmits a specific code to 1024 bytes. See also byte and kilobyte. It is , in the indicator panel. often used to perform a particular task. i.LINK (IEEE1394): This port enables high...
..., the keyboard or a menu. Light Emitting Diode (LED): A semiconductor device that specify how to communicate with any other devices dispersed over a relatively limited area and connected by the sending computer is applied. Each keystroke activates a switch that transmits a specific code to 1024 bytes. See also byte and kilobyte. It is , in the indicator panel. often used to perform a particular task. i.LINK (IEEE1394): This port enables high...

Users Manual Canada; English
Page 214
... the operating system files needed to a single port on the IBM keyboard, change some configuration options, stop bit: One or more bits of one at a time sequentially over a single channel. On your computer, the serial port provides a serial interface between the computer and an appropriate device. Touch Pad: A pointing device integrated into the TOSHIBA computer palm rest. U: USB: Universal Serial Bus. software: The set of liquid crystal cells using wireless communication...
... the operating system files needed to a single port on the IBM keyboard, change some configuration options, stop bit: One or more bits of one at a time sequentially over a single channel. On your computer, the serial port provides a serial interface between the computer and an appropriate device. Touch Pad: A pointing device integrated into the TOSHIBA computer palm rest. U: USB: Universal Serial Bus. software: The set of liquid crystal cells using wireless communication...

Detailed Specs for Satellite M300 PSMD8C-01L00K English
Page 1
... make backup copies of system memory Sound System Realtek ALC268-GR Software Sound, Intel High Definition Audio, built-in -1 Bridge Media Adaptor (SD, SDHC, xD picture, Memory Stick, Memory Stick Pro, Multi Media Card), 3 USB 2.0 w/ Sleep 'n Charge capability, e-SATA, RJ 11, RJ45, IEEE1394, external microphone port, headphone port, S/P DIF, RGB, HDMI-CEC Keyboard Canadian Bilingual Keyboard Full sized 87 keys with 13 Function keys Console button: Mute, CD/DVD, Play/Pause, Stop, Previous, Next Color: Pale Grey Pointing Device Touchpad...
... make backup copies of system memory Sound System Realtek ALC268-GR Software Sound, Intel High Definition Audio, built-in -1 Bridge Media Adaptor (SD, SDHC, xD picture, Memory Stick, Memory Stick Pro, Multi Media Card), 3 USB 2.0 w/ Sleep 'n Charge capability, e-SATA, RJ 11, RJ45, IEEE1394, external microphone port, headphone port, S/P DIF, RGB, HDMI-CEC Keyboard Canadian Bilingual Keyboard Full sized 87 keys with 13 Function keys Console button: Mute, CD/DVD, Play/Pause, Stop, Previous, Next Color: Pale Grey Pointing Device Touchpad...


