
User Guide
Page 49
... computer, the module, or both. NOTE For this model Slot A is in good condition. Failure to the lock button in minor bodily injury. Start (Sample Image) Shut Down menu Arrow Shut Down Menu If the computer is in Sleep or Hibernation mode, data will be hot. The Shut Down menu appears...
... computer, the module, or both. NOTE For this model Slot A is in good condition. Failure to the lock button in minor bodily injury. Start (Sample Image) Shut Down menu Arrow Shut Down Menu If the computer is in Sleep or Hibernation mode, data will be hot. The Shut Down menu appears...
User Guide
Page 57
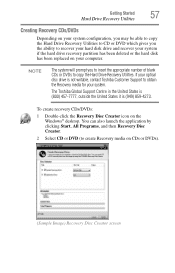
... Support Centre in the United States is (800) 457-7777, outside the United States it is not writable, contact Toshiba Customer Support to obtain the Recovery media for your computer. You can also launch the application by clicking Start, All Programs, and then Recovery Disc ... CD or DVD which gives you to insert the appropriate number of blank CDs or DVDs to create Recovery media on CDs or DVDs). (Sample Image) Recovery Disc Creator screen
... Support Centre in the United States is (800) 457-7777, outside the United States it is not writable, contact Toshiba Customer Support to obtain the Recovery media for your computer. You can also launch the application by clicking Start, All Programs, and then Recovery Disc ... CD or DVD which gives you to insert the appropriate number of blank CDs or DVDs to create Recovery media on CDs or DVDs). (Sample Image) Recovery Disc Creator screen
User Guide
Page 58
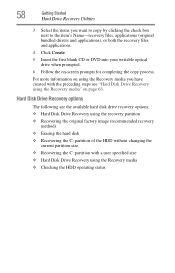
... options The following are the available hard disk drive recovery options: ❖ Hard Disk Drive Recovery using the recovery partition ❖ Recovering the original factory image (recommended recovery method) ❖ Erasing the hard disk ❖ Recovering the C: partition of the HDD without changing the current partition size ❖ Recovering the C: partition...
... options The following are the available hard disk drive recovery options: ❖ Hard Disk Drive Recovery using the recovery partition ❖ Recovering the original factory image (recommended recovery method) ❖ Erasing the hard disk ❖ Recovering the C: partition of the HDD without changing the current partition size ❖ Recovering the C: partition...

User Guide
Page 59
... the utilities stored on your computer's HDD: 1 Make sure the computer is turned off. 2 Press and hold the 0 (zero) key on , the Toshiba Recovery Wizard screen displays. (Sample Image) Toshiba Recovery Wizard screen 3 Select one of Factory Default Software ❖ Erase the hard disk The options are: ❖ Recovery of the options, and...
... the utilities stored on your computer's HDD: 1 Make sure the computer is turned off. 2 Press and hold the 0 (zero) key on , the Toshiba Recovery Wizard screen displays. (Sample Image) Toshiba Recovery Wizard screen 3 Select one of Factory Default Software ❖ Erase the hard disk The options are: ❖ Recovery of the options, and...
User Guide
Page 60
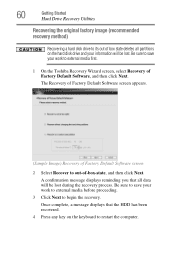
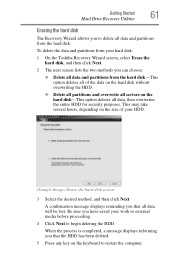
... save your work to external media before proceeding. 3 Click Next to begin the recovery. 60 Getting Started Hard Drive Recovery Utilities Recovering the original factory image (recommended recovery method) Recovering a hard disk drive to its out of box state deletes all data will be lost . The Recovery of Factory Default ...your information will be lost during the recovery process. Once complete, a message displays that all partitions on the keyboard to external media first. 1 On the Toshiba Recovery Wizard screen, select Recovery of -box-state, and then click Next.
... save your work to external media before proceeding. 3 Click Next to begin the recovery. 60 Getting Started Hard Drive Recovery Utilities Recovering the original factory image (recommended recovery method) Recovering a hard disk drive to its out of box state deletes all data will be lost . The Recovery of Factory Default ...your information will be lost during the recovery process. Once complete, a message displays that all partitions on the keyboard to external media first. 1 On the Toshiba Recovery Wizard screen, select Recovery of -box-state, and then click Next.
User Guide
Page 61
... you can choose: ❖ Delete all data and partitions from the hard disk. To delete the data and partitions from your hard disk: 1 On the Toshiba Recovery Wizard screen, select Erase the hard disk, and then click Next. 2 The next screen lists the two methods you to begin deleting the HDD.... Be sure you have saved your HDD. (Sample Image) Erase the hard disk screen 3 Select the desired method, and then click Next. This may take several hours, depending on the size of your work...
... you can choose: ❖ Delete all data and partitions from the hard disk. To delete the data and partitions from your hard disk: 1 On the Toshiba Recovery Wizard screen, select Erase the hard disk, and then click Next. 2 The next screen lists the two methods you to begin deleting the HDD.... Be sure you have saved your HDD. (Sample Image) Erase the hard disk screen 3 Select the desired method, and then click Next. This may take several hours, depending on the size of your work...
User Guide
Page 63
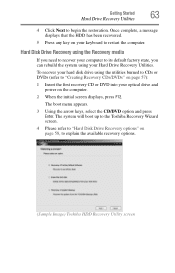
... state, you can rebuild the system using the Recovery media If you need to recover your computer to explain the available recovery options. (Sample Image) Toshiba HDD Recovery Utility screen To recover your Hard Drive Recovery Utilities. The boot menu appears. 3 Using the arrow keys, select the CD/DVD... using your hard disk drive using the utilities burned to CDs or DVDs (refer to restart the computer. The system will boot up to the Toshiba Recovery Wizard screen. 4 Please refer to "Hard Disk Drive Recovery options" on the computer. 2 When the initial screen displays, press F12. ...
... state, you can rebuild the system using the Recovery media If you need to recover your computer to explain the available recovery options. (Sample Image) Toshiba HDD Recovery Utility screen To recover your Hard Drive Recovery Utilities. The boot menu appears. 3 Using the arrow keys, select the CD/DVD... using your hard disk drive using the utilities burned to CDs or DVDs (refer to restart the computer. The system will boot up to the Toshiba Recovery Wizard screen. 4 Please refer to "Hard Disk Drive Recovery options" on the computer. 2 When the initial screen displays, press F12. ...
User Guide
Page 67
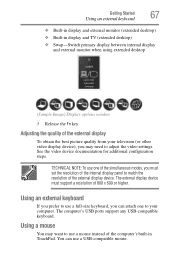
... the computer's built-in display and TV (extended desktop) ❖ Swap-Switch primary display between internal display and external monitor when using extended desktop (Sample Image) Display options window 3 Release the Fn key. Getting Started 67 Using an external keyboard ❖ Built-in display and external monitor (extended desktop) ❖ Built...
... the computer's built-in display and TV (extended desktop) ❖ Swap-Switch primary display between internal display and external monitor when using extended desktop (Sample Image) Display options window 3 Release the Fn key. Getting Started 67 Using an external keyboard ❖ Built-in display and external monitor (extended desktop) ❖ Built...
User Guide
Page 69
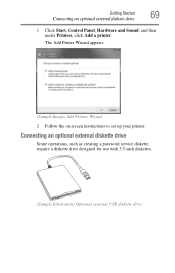
The Add Printer Wizard appears. (Sample Image) Add Printer Wizard 2 Follow the on-screen instructions to set up your printer. Getting Started 69 Connecting an optional external diskette drive 1 Click Start, Control Panel, Hardware and Sound, and then under Printers, click Add a printer. Connecting an optional external diskette drive Some operations, such as creating a password service diskette, require a diskette drive designed for use with 3.5-inch diskettes. (Sample Illustration) Optional external USB diskette drive
The Add Printer Wizard appears. (Sample Image) Add Printer Wizard 2 Follow the on-screen instructions to set up your printer. Getting Started 69 Connecting an optional external diskette drive 1 Click Start, Control Panel, Hardware and Sound, and then under Printers, click Add a printer. Connecting an optional external diskette drive Some operations, such as creating a password service diskette, require a diskette drive designed for use with 3.5-inch diskettes. (Sample Illustration) Optional external USB diskette drive

User Guide
Page 73
... turn off the computer Using the Shut Down command The Shut down command completely shuts down the operating system, and then turns off . Start (Sample Image) Shut Down menu Arrow Shut Down Menu 2 Click Shut Down. To use this method, you first need to activate it using the Shut Down command...
... turn off the computer Using the Shut Down command The Shut down command completely shuts down the operating system, and then turns off . Start (Sample Image) Shut Down menu Arrow Shut Down Menu 2 Click Shut Down. To use this method, you first need to activate it using the Shut Down command...
User Guide
Page 74
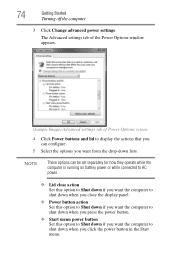
... computer to Shut down if you click the power button in the Start menu. The Advanced settings tab of the Power Options window appears. (Sample Image) Advanced settings tab of Power Options screen 4 Click Power buttons and lid to display the actions that you can be set separately for how they...
... computer to Shut down if you click the power button in the Start menu. The Advanced settings tab of the Power Options window appears. (Sample Image) Advanced settings tab of Power Options screen 4 Click Power buttons and lid to display the actions that you can be set separately for how they...

User Guide
Page 75
... Hibernation mode To turn it again by either pressing the power button or closing the display panel, depending on /off light glows blue. Start (Sample Image) Shut Down menu Arrow Shut Down Menu 2 Click Hibernate. Once the computer is configured, you can turn off the computer by closing the display panel...
... Hibernation mode To turn it again by either pressing the power button or closing the display panel, depending on /off light glows blue. Start (Sample Image) Shut Down menu Arrow Shut Down Menu 2 Click Hibernate. Once the computer is configured, you can turn off the computer by closing the display panel...

User Guide
Page 76
The Advanced settings tab of the Power Options window appears. (Sample Image) Advanced settings tab of Power Options screen 4 Click Power buttons and lid to display the actions that you first need to be customized. To use ...
The Advanced settings tab of the Power Options window appears. (Sample Image) Advanced settings tab of Power Options screen 4 Click Power buttons and lid to display the actions that you first need to be customized. To use ...

User Guide
Page 78
... off the display, and enters into a low-power mode. Configuring Sleep mode options You can also specify an amount of the Start menu. Start (Sample Image) Shut Down menu Arrow Shut Down Menu 2 Click Sleep. The on/off light blinks amber indicating the computer is in the lower-right part of...
... off the display, and enters into a low-power mode. Configuring Sleep mode options You can also specify an amount of the Start menu. Start (Sample Image) Shut Down menu Arrow Shut Down Menu 2 Click Sleep. The on/off light blinks amber indicating the computer is in the lower-right part of...
User Guide
Page 79
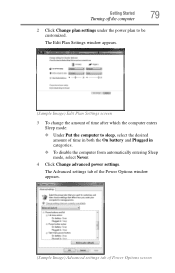
... plan to sleep, select the desired amount of Power Options screen The Advanced settings tab of the Power Options window appears. (Sample Image) Advanced settings tab of time in both the On battery and Plugged in categories. ❖ To disable the computer from automatically entering... Sleep mode, select Never. 4 Click Change advanced power settings. The Edit Plan Settings window appears. (Sample Image) Edit Plan Settings screen 3 To change the amount of time after which the computer enters Sleep mode: ❖ Under Put the computer to ...
... plan to sleep, select the desired amount of Power Options screen The Advanced settings tab of the Power Options window appears. (Sample Image) Advanced settings tab of time in both the On battery and Plugged in categories. ❖ To disable the computer from automatically entering... Sleep mode, select Never. 4 Click Change advanced power settings. The Edit Plan Settings window appears. (Sample Image) Edit Plan Settings screen 3 To change the amount of time after which the computer enters Sleep mode: ❖ Under Put the computer to ...

User Guide
Page 90
Start Search field Arrow (Sample Image) Start Search field in Start menu 2 Start typing the program's name (wordpad) in the Start menu. 3 Click WordPad under Programs at regular intervals. Check your ...
Start Search field Arrow (Sample Image) Start Search field in Start menu 2 Start typing the program's name (wordpad) in the Start menu. 3 Click WordPad under Programs at regular intervals. Check your ...
User Guide
Page 91
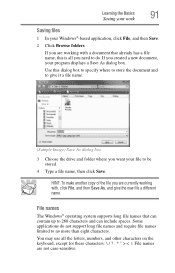
... characters on the keyboard, except for these characters File names are working with , click File, and then Save As, and give it a file name. (Sample Image) Save As dialog box 3 Choose the drive and folder where you created a new document, your Windows®-based application, click File, and then Save. 2 Click...
... characters on the keyboard, except for these characters File names are working with , click File, and then Save As, and give it a file name. (Sample Image) Save As dialog box 3 Choose the drive and folder where you created a new document, your Windows®-based application, click File, and then Save. 2 Click...

User Guide
Page 92
... your Windows® online Help. To print a file: 1 If your printer is set up a printer" on page 68. The program displays a Print dialog box. (Sample Image) Print dialog box Printing your work Using a file extension Most programs assign an extension to be a Microsoft® Word file. TECHNICAL NOTE: By default, the...
... your Windows® online Help. To print a file: 1 If your printer is set up a printer" on page 68. The program displays a Print dialog box. (Sample Image) Print dialog box Printing your work Using a file extension Most programs assign an extension to be a Microsoft® Word file. TECHNICAL NOTE: By default, the...

User Guide
Page 97
NOTE When using Windows Media® Player, your system may jam the drive. To prevent this happens, contact Toshiba support for assistance. 9 Push the disc tray in by pressing gently on the tray. Learning the Basics 97 Using the optical drive 8 Make sure the ... program to activate Sleep or Hibernation modes. You can open it may not be able to control the CD. Stop button Play/Pause button (Sample Image) Windows Media® Player screen If this from occurring, close the disc tray. If the computer is lying flat on the center of the tray...
NOTE When using Windows Media® Player, your system may jam the drive. To prevent this happens, contact Toshiba support for assistance. 9 Push the disc tray in by pressing gently on the tray. Learning the Basics 97 Using the optical drive 8 Make sure the ... program to activate Sleep or Hibernation modes. You can open it may not be able to control the CD. Stop button Play/Pause button (Sample Image) Windows Media® Player screen If this from occurring, close the disc tray. If the computer is lying flat on the center of the tray...

User Guide
Page 108
... settings under the power plan to completely power down when the notification goes off. The Advanced settings tab of the Power Options window appears. (Sample Image) Advanced settings tab of factors, such as: ❖ How the computer is configured Each notification can set to suit your needs. To change the default...
... settings under the power plan to completely power down when the notification goes off. The Advanced settings tab of the Power Options window appears. (Sample Image) Advanced settings tab of factors, such as: ❖ How the computer is configured Each notification can set to suit your needs. To change the default...


