

User Guide
Page 5
... to file a complaint with the best service it can connect to it may cause harm to the telephone network. 5 Installation When you are ready to install or use the modem, call your local telephone company and give you notice, in writing, to allow you to make changes in advance of this disconnection. Type of a standard jack called the USOC RJ11C.
... to file a complaint with the best service it can connect to it may cause harm to the telephone network. 5 Installation When you are ready to install or use the modem, call your local telephone company and give you notice, in writing, to allow you to make changes in advance of this disconnection. Type of a standard jack called the USOC RJ11C.
User Guide
Page 24
... software 55 Registering your computer with Toshiba 55 Setting up other devices 55 Turning off the computer 55 Closing the display panel 56 Chapter 4: Connecting Other External Devices 57 Using external display devices 57 Connecting the display device 58 Directing the display output when you turn on the computer 59 Adjusting the quality of the external display 60 Video limitations 61 Using an external keyboard 61 Making your external keyboard emulate the Fn key...... 62 Using a mouse 62 Connecting a serial mouse 63 Connecting a USB mouse 63 Connecting a PS/2 mouse 63 Using...
... software 55 Registering your computer with Toshiba 55 Setting up other devices 55 Turning off the computer 55 Closing the display panel 56 Chapter 4: Connecting Other External Devices 57 Using external display devices 57 Connecting the display device 58 Directing the display output when you turn on the computer 59 Adjusting the quality of the external display 60 Video limitations 61 Using an external keyboard 61 Making your external keyboard emulate the Fn key...... 62 Using a mouse 62 Connecting a serial mouse 63 Connecting a USB mouse 63 Connecting a PS/2 mouse 63 Using...

User Guide
Page 28
... 166 Starting Fn-esse 166 Using the keyboard or pointing device to assign keys 168 Viewing existing key assignments 169 Changing or removing existing key assignments .. 170 Hotkey utility 170 Toshiba Console 171 Customizing Your Computer 172 Network 172 Security 172 Power Management 173 Slim SelectBay 176 Slim SelectBay™ Service 176 Toshiba Hardware Setup 176 Toshiba Power Saver utility 179 Enabling Hibernation 180 Setting user passwords 180 Using an instant password 181 Setting a user password 181 Disabling a user password 182 Using a supervisor password 183 Setting...
... 166 Starting Fn-esse 166 Using the keyboard or pointing device to assign keys 168 Viewing existing key assignments 169 Changing or removing existing key assignments .. 170 Hotkey utility 170 Toshiba Console 171 Customizing Your Computer 172 Network 172 Security 172 Power Management 173 Slim SelectBay 176 Slim SelectBay™ Service 176 Toshiba Hardware Setup 176 Toshiba Power Saver utility 179 Enabling Hibernation 180 Setting user passwords 180 Using an instant password 181 Setting a user password 181 Disabling a user password 182 Using a supervisor password 183 Setting...

User Guide
Page 37
... HDD bay cover Speaker-Lets you hear stereo sound from a CD or DVD in addition to a LAN via standard Ethernet® network cable. Parallel port-Lets you connect a parallel printer or other serial device. Ether The Network port (RJ45 jack) provides access to system alarms and audible warnings associated with rear panel open Serial port 37 Network port Modem port RGB (monitor) port Parallel port RGB (monitor) port-Lets you connect an external monitor or projector. Finding Your Way Around Making...
... HDD bay cover Speaker-Lets you hear stereo sound from a CD or DVD in addition to a LAN via standard Ethernet® network cable. Parallel port-Lets you connect a parallel printer or other serial device. Ether The Network port (RJ45 jack) provides access to system alarms and audible warnings associated with rear panel open Serial port 37 Network port Modem port RGB (monitor) port Parallel port RGB (monitor) port-Lets you connect an external monitor or projector. Finding Your Way Around Making...

User Guide
Page 58
... purchase a composite video cable. Selecting video cables To connect a device to the video-out port, you'll need to purchase a composite video cable. To connect the device: 1 Connect one end of video. If you're connecting an SVGA monitor, skip to "Connecting an external monitor or projector" on page 58. Connecting to the external video device. Using a poor quality cable may result in port. Refer to the documentation provided with your computer. 58 Connecting Other External Devices Using external display devices Connecting the display device If you...
... purchase a composite video cable. Selecting video cables To connect a device to the video-out port, you'll need to purchase a composite video cable. To connect the device: 1 Connect one end of video. If you're connecting an SVGA monitor, skip to "Connecting an external monitor or projector" on page 58. Connecting to the external video device. Using a poor quality cable may result in port. Refer to the documentation provided with your computer. 58 Connecting Other External Devices Using external display devices Connecting the display device If you...

User Guide
Page 61
... both. Connecting Other External Devices Using an external keyboard 61 Video limitations Keep in Standby mode, you will not be able to use the keyboard when you turn the computer on. If you connect a PS/2 keyboard to the computer while it . ❖ If you use the display hot key (Fn + F5) to change the display output with the computer's power on can attach one to your system is set to 640...
... both. Connecting Other External Devices Using an external keyboard 61 Video limitations Keep in Standby mode, you will not be able to use the keyboard when you turn the computer on. If you connect a PS/2 keyboard to the computer while it . ❖ If you use the display hot key (Fn + F5) to change the display output with the computer's power on can attach one to your system is set to 640...

User Guide
Page 71
... use only compatible memory. Your Satellite M20 computer is inserted, the internal speakers are automatically disabled. If this computer provide various memory configurations. Adding memory HINT: To purchase additional memory modules, see "Recording sounds" on page 145. In the event original memory is recommended that you can attach a microphone: 1 Locate the microphone jack on the front of the computer. 2 Using any necessary adapters, plug the cable from the external audio device into the microphone jack. 3 Turn...
... use only compatible memory. Your Satellite M20 computer is inserted, the internal speakers are automatically disabled. If this computer provide various memory configurations. Adding memory HINT: To purchase additional memory modules, see "Recording sounds" on page 145. In the event original memory is recommended that you can attach a microphone: 1 Locate the microphone jack on the front of the computer. 2 Using any necessary adapters, plug the cable from the external audio device into the microphone jack. 3 Turn...

User Guide
Page 72
... built to order, it should have enough memory to its original configuration, or contact Toshiba's support center at (800) 457-7777 for this procedure. The computer has two memory expansion slots - See "Powering down your current applications. However, if your requirements change, you install or remove a memory module, turn off the computer using the Shut Down command. Before you can install one or two memory modules. 1 Shut down...
... built to order, it should have enough memory to its original configuration, or contact Toshiba's support center at (800) 457-7777 for this procedure. The computer has two memory expansion slots - See "Powering down your current applications. However, if your requirements change, you install or remove a memory module, turn off the computer using the Shut Down command. Before you can install one or two memory modules. 1 Shut down...

User Guide
Page 73
... touch its antistatic packaging. 7 Insert the memory module in the slot and gently press it down . 5 Locate and remove the screws that hold the cover plate in place, and lift the cover off of the memory module bay. Removing the memory module cover Static electricity can damage the memory module. To avoid damaging the memory module, be careful not to secure the module. Connecting Other External Devices Adding memory 73 3 Close the display panel and remove...
... touch its antistatic packaging. 7 Insert the memory module in the slot and gently press it down . 5 Locate and remove the screws that hold the cover plate in place, and lift the cover off of the memory module bay. Removing the memory module cover Static electricity can damage the memory module. To avoid damaging the memory module, be careful not to secure the module. Connecting Other External Devices Adding memory 73 3 Close the display panel and remove...
User Guide
Page 74
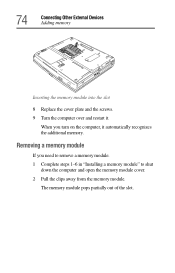
74 Connecting Other External Devices Adding memory Inserting the memory module into the slot 8 Replace the cover plate and the screws. 9 Turn the computer over and restart it automatically recognizes the additional memory. The memory module pops partially out of the slot. When you need to remove a memory module: 1 Complete steps 1-6 in "Installing a memory module" to shut down the computer and open the memory module cover. 2 Pull the clips away from the memory module. Removing a memory module If you turn on the computer, it .
74 Connecting Other External Devices Adding memory Inserting the memory module into the slot 8 Replace the cover plate and the screws. 9 Turn the computer over and restart it automatically recognizes the additional memory. The memory module pops partially out of the slot. When you need to remove a memory module: 1 Complete steps 1-6 in "Installing a memory module" to shut down the computer and open the memory module cover. 2 Pull the clips away from the memory module. Removing a memory module If you turn on the computer, it .
User Guide
Page 97
... created in the program with a .doc extension. Printing your type of the Windows® operating system, the file name must not contain spaces. Using a file extension Most programs assign an extension to install printer software (drivers). Learning the Basics Printing your work Your computer must be no more than one printer or are not case-sensitive and must be connected...
... created in the program with a .doc extension. Printing your type of the Windows® operating system, the file name must not contain spaces. Using a file extension Most programs assign an extension to install printer software (drivers). Learning the Basics Printing your work Your computer must be no more than one printer or are not case-sensitive and must be connected...

User Guide
Page 122
... drains battery power more information, see "Toshiba Power Saver utility" on Batteries option. 4 Click the Details... 122 Mobile Computing What to do when the battery alarm sounds Your Satellite M20 computer can be configured to warn you of a low battery charge condition so you 're working in the Control Panel. What to check the battery's remaining capacity and perform its calculations. For more quickly at least 16 seconds after turning...
... drains battery power more information, see "Toshiba Power Saver utility" on Batteries option. 4 Click the Details... 122 Mobile Computing What to do when the battery alarm sounds Your Satellite M20 computer can be configured to warn you of a low battery charge condition so you 're working in the Control Panel. What to check the battery's remaining capacity and perform its calculations. For more quickly at least 16 seconds after turning...

User Guide
Page 188
... start. ❖ The operating system responds differently from the normal routine. ❖ The screen does not look right. Make sure there is not working Once you change the system in the Startup menu to restart the computer. If pressing any of these problems, use the options in some way such as installing a new program or adding a device. Data stored in the diskette drive. To charge the battery...
... start. ❖ The operating system responds differently from the normal routine. ❖ The screen does not look right. Make sure there is not working Once you change the system in the Startup menu to restart the computer. If pressing any of these problems, use the options in some way such as installing a new program or adding a device. Data stored in the diskette drive. To charge the battery...
User Guide
Page 190
Internet problems My Internet connection is very slow, try later. If accessing a particular site is very slow. A single incorrect letter or missed character, comma instead of Safe mode. My browser can not find the URL address I bookmarked. To access Windows® XP Help and Support: 1 Click Start, then click Help and Support. 190 If Something Goes Wrong The Windows® operating system is constantly changing. A site...
Internet problems My Internet connection is very slow, try later. If accessing a particular site is very slow. A single incorrect letter or missed character, comma instead of Safe mode. My browser can not find the URL address I bookmarked. To access Windows® XP Help and Support: 1 Click Start, then click Help and Support. 190 If Something Goes Wrong The Windows® operating system is constantly changing. A site...
User Guide
Page 198
... you to continue working power outlet. ❖ Check that the monitor's power cable is not set for an external monitor. This opens the Display Properties dialog box. To reduce the amount of this , hold the Fn key and press F5 twice. 198 If Something Goes Wrong Resolving a hardware conflict the Enter key, type the password and press Enter. The built-in screen. Hold the Fn key and press F5...
... you to continue working power outlet. ❖ Check that the monitor's power cable is not set for an external monitor. This opens the Display Properties dialog box. To reduce the amount of this , hold the Fn key and press F5 twice. 198 If Something Goes Wrong Resolving a hardware conflict the Enter key, type the password and press Enter. The built-in screen. Hold the Fn key and press F5...
User Guide
Page 220
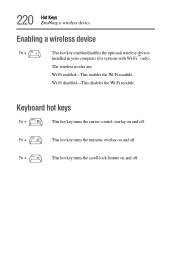
Keyboard hot keys Fn + This hot key turns the cursor control overlay on and off. The wireless modes are: Wi-Fi enabled-This enables the Wi-Fi module. Fn + This hot key turns the numeric overlay on and off . 220 Hot Keys Enabling a wireless device Enabling a wireless device Fn + This hot key enables/disables the optional wireless devices installed in your computer (for systems with Wi-Fi ™only). Fn + This hot key turns the scroll lock feature on and off . Wi-Fi disabled-This disables the Wi-Fi module.
Keyboard hot keys Fn + This hot key turns the cursor control overlay on and off. The wireless modes are: Wi-Fi enabled-This enables the Wi-Fi module. Fn + This hot key turns the numeric overlay on and off . 220 Hot Keys Enabling a wireless device Enabling a wireless device Fn + This hot key enables/disables the optional wireless devices installed in your computer (for systems with Wi-Fi ™only). Fn + This hot key turns the scroll lock feature on and off . Wi-Fi disabled-This disables the Wi-Fi module.
User Guide
Page 231
... represents a function, file, or program. The decentralized, world-wide network of using a pointing device such as the battery save mode. (2) A key or combination of data equal to help improve processing speed. 231 Glossary hot key - (1) A feature in which certain keys in which only every other line of keys that activates a memory resident program. I icon - K keyboard shortcut - Interlaced monitors take two passes to add or remove devices from...
... represents a function, file, or program. The decentralized, world-wide network of using a pointing device such as the battery save mode. (2) A key or combination of data equal to help improve processing speed. 231 Glossary hot key - (1) A feature in which certain keys in which only every other line of keys that activates a memory resident program. I icon - K keyboard shortcut - Interlaced monitors take two passes to add or remove devices from...
User Guide
Page 239
... DVD-ROM/Multifunction drive can't access disc 202 drive tray won't open 202 problems 202 troubleshooting 194 E ergonomics 48 error messages device driver conflict 191 general hardware problem 191 non-system disk or disk error 188, 201 problem with display settings/ current settings not working with hardware 199 program has performed an illegal operation 186 warning resume failure 188 Error-checking 200 Ethernet LAN port 138 expansion memory cover 40 exploring the desktop 131 Export Administration regulation 21 external mouse 62 external device connecting...
... DVD-ROM/Multifunction drive can't access disc 202 drive tray won't open 202 problems 202 troubleshooting 194 E ergonomics 48 error messages device driver conflict 191 general hardware problem 191 non-system disk or disk error 188, 201 problem with display settings/ current settings not working with hardware 199 program has performed an illegal operation 186 warning resume failure 188 Error-checking 200 Ethernet LAN port 138 expansion memory cover 40 exploring the desktop 131 Export Administration regulation 21 external mouse 62 external device connecting...
User Guide
Page 243
... monitor 37 network 37 parallel 37 PS/2 mouse/keyboard 36 RGB 37, 57 serial 37 USB (Universal Serial Bus) 36 video-out 38, 57 video-out, connecting to 58, 160 posture 47 power alarms 122 computer will not start 187 options 130 problem solving 195 taking care of your battery 125 turning on 54 universal power supply 221 power button 42, 54 Power Management 173 running on batteries 174 power mode creating new 175 customizing 175 power...
... monitor 37 network 37 parallel 37 PS/2 mouse/keyboard 36 RGB 37, 57 serial 37 USB (Universal Serial Bus) 36 video-out 38, 57 video-out, connecting to 58, 160 posture 47 power alarms 122 computer will not start 187 options 130 problem solving 195 taking care of your battery 125 turning on 54 universal power supply 221 power button 42, 54 Power Management 173 running on batteries 174 power mode creating new 175 customizing 175 power...

User Guide
Page 244
... normal/flickers 198 scroll button 92 seating 47 security 172 security lock slot 38 selecting a place to work 45 SelectServ 33 serial mouse connecting 63, 150, 152 serial port 37 service options 33 setting up adding memory 71 setting up a connection 138 setting up your computer 50 shut down 56 shutting down more quickly 109 Slim SelectBay docking 176 removing module 77 Slim SelectBay indicator light 43 Slim SelectBay modules 75 Slim SelectBay...
... normal/flickers 198 scroll button 92 seating 47 security 172 security lock slot 38 selecting a place to work 45 SelectServ 33 serial mouse connecting 63, 150, 152 serial port 37 service options 33 setting up adding memory 71 setting up a connection 138 setting up your computer 50 shut down 56 shutting down more quickly 109 Slim SelectBay docking 176 removing module 77 Slim SelectBay indicator light 43 Slim SelectBay modules 75 Slim SelectBay...


