User Guide
Page 30
Contents Introduction 37 This guide 39 Safety icons 40 Other icons used 40 Your computer's features and specifications ....41 Other documentation 41 Service options 41 Chapter 1: Getting Started 42 Selecting a place to work 42 Setting up a work environment 42 Keeping yourself comfortable 43 Precautions 43 Important information on your computer's cooling fan 45 Setting up your computer 45 Connecting to a power source 46 Charging the main battery 48 Using the computer for the first time 49 Opening the display panel 49 30
Contents Introduction 37 This guide 39 Safety icons 40 Other icons used 40 Your computer's features and specifications ....41 Other documentation 41 Service options 41 Chapter 1: Getting Started 42 Selecting a place to work 42 Setting up a work environment 42 Keeping yourself comfortable 43 Precautions 43 Important information on your computer's cooling fan 45 Setting up your computer 45 Connecting to a power source 46 Charging the main battery 48 Using the computer for the first time 49 Opening the display panel 49 30
User Guide
Page 32
... 104 Ctrl, Fn, and Alt keys 105 Function keys 105 Special Windows® keys 105 Overlay keys 106 Starting a program 107 Starting a program from the Start menu.........107 Starting a program from Windows® Explorer 108 Starting a program using the Search programs and files field 109 Saving your work 109 Printing your work 111 Backing up...
... 104 Ctrl, Fn, and Alt keys 105 Function keys 105 Special Windows® keys 105 Overlay keys 106 Starting a program 107 Starting a program from the Start menu.........107 Starting a program from Windows® Explorer 108 Starting a program using the Search programs and files field 109 Saving your work 109 Printing your work 111 Backing up...
User Guide
Page 34
... card reader 144 Inserting memory media 144 Removing memory media 145 Chapter 5: Utilities 146 TOSHIBA Assist 147 Connect 148 Secure 149 Protect & Fix 150 Optimize 151 TOSHIBA Application Installer 152 Setting passwords 153 Using an instant password 153 Using a supervisor password ...154 Using a user password 155 Deleting a user password 156 TOSHIBA Face Recognition Utility 157 TOSHIBA PC Diagnostic Tool Utility 158 Mouse Utility 159 TOSHIBA Hardware Setup 160 TOSHIBA Sleep Utility 162 Starting the TOSHIBA Sleep Utility 162 USB Sleep and Charge 162 Enabling/Disabling USB ...
... card reader 144 Inserting memory media 144 Removing memory media 145 Chapter 5: Utilities 146 TOSHIBA Assist 147 Connect 148 Secure 149 Protect & Fix 150 Optimize 151 TOSHIBA Application Installer 152 Setting passwords 153 Using an instant password 153 Using a supervisor password ...154 Using a user password 155 Deleting a user password 156 TOSHIBA Face Recognition Utility 157 TOSHIBA PC Diagnostic Tool Utility 158 Mouse Utility 159 TOSHIBA Hardware Setup 160 TOSHIBA Sleep Utility 162 Starting the TOSHIBA Sleep Utility 162 USB Sleep and Charge 162 Enabling/Disabling USB ...
User Guide
Page 41
... in this document) ❖ A Quick Start Card ❖ A Resource Guide ❖ It may also contain guides for other programs that may not have all the features and specifications corresponding to all of optional service programs to contact Toshiba, see "If Something Goes Wrong" on ...comes with the following documentation: ❖ An electronic version of the User's Guide (this guide. Below are available at warranty.toshiba.com. Toshiba's standard limited warranty, extended warranty, and service upgrade terms and conditions are examples of some of the many possible icons used ...
... in this document) ❖ A Quick Start Card ❖ A Resource Guide ❖ It may also contain guides for other programs that may not have all the features and specifications corresponding to all of optional service programs to contact Toshiba, see "If Something Goes Wrong" on ...comes with the following documentation: ❖ An electronic version of the User's Guide (this guide. Below are available at warranty.toshiba.com. Toshiba's standard limited warranty, extended warranty, and service upgrade terms and conditions are examples of some of the many possible icons used ...

User Guide
Page 42
... "Provide adequate ventilation" section in order to work environment Place the computer on a hard flat surface that is shipped with your computer. 42 Chapter 1 Getting Started This chapter provides tips for using , such as a printer. Selecting a place to avoid potential hazards that is shipped with your computer, contains important safety information...
... "Provide adequate ventilation" section in order to work environment Place the computer on a hard flat surface that is shipped with your computer. 42 Chapter 1 Getting Started This chapter provides tips for using , such as a printer. Selecting a place to avoid potential hazards that is shipped with your computer, contains important safety information...
User Guide
Page 43
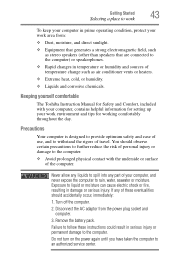
...Avoid prolonged physical contact with your computer, contains helpful information for working comfortably throughout the day. Remove the battery pack. Getting Started 43 Selecting a place to work To keep your computer in prime operating condition, protect your work environment and tips for setting...; Extreme heat, cold, or humidity. ❖ Liquids and corrosive chemicals. Turn off the computer. 2. Keeping yourself comfortable The Toshiba Instruction Manual for Safety and Comfort, included with the underside or surface of personal injury or damage to the computer. If any ...
...Avoid prolonged physical contact with your computer, contains helpful information for working comfortably throughout the day. Remove the battery pack. Getting Started 43 Selecting a place to work To keep your computer in prime operating condition, protect your work environment and tips for setting...; Extreme heat, cold, or humidity. ❖ Liquids and corrosive chemicals. Turn off the computer. 2. Keeping yourself comfortable The Toshiba Instruction Manual for Safety and Comfort, included with the underside or surface of personal injury or damage to the computer. If any ...
User Guide
Page 44
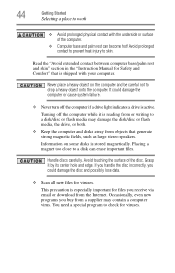
... on the computer and be careful not to drop a heavy object onto the computer. Placing a magnet too close to a disk can become hot! 44 Getting Started Selecting a place to work ❖ Avoid prolonged physical contact with your computer.
... on the computer and be careful not to drop a heavy object onto the computer. Placing a magnet too close to a disk can become hot! 44 Getting Started Selecting a place to work ❖ Avoid prolonged physical contact with your computer.
User Guide
Page 45
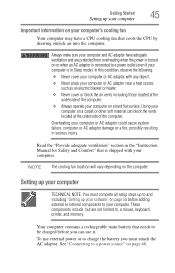
Getting Started 45 Setting up your computer Important information on your computer's cooling fan Your computer may have adequate ventilation and are not limited to, a mouse, keyboard, ...
Getting Started 45 Setting up your computer Important information on your computer's cooling fan Your computer may have adequate ventilation and are not limited to, a mouse, keyboard, ...
User Guide
Page 46
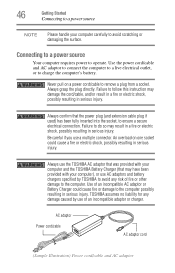
46 Getting Started Connecting to a power source NOTE Please handle your computer), or use AC adaptors and battery chargers specified by TOSHIBA to avoid any damage caused by use of an incompatible AC adaptor or Battery Charger could cause a fire or electric shock, ...computer possibly resulting in serious injury. Always grasp the plug directly. An overload on a power cord/cable to ensure a secure electrical connection. TOSHIBA assumes no liability for any risk of fire or other damage to avoid scratching or damaging the surface. Always use a multiple connector. AC adaptor...
46 Getting Started Connecting to a power source NOTE Please handle your computer), or use AC adaptors and battery chargers specified by TOSHIBA to avoid any damage caused by use of an incompatible AC adaptor or Battery Charger could cause a fire or electric shock, ...computer possibly resulting in serious injury. Always grasp the plug directly. An overload on a power cord/cable to ensure a secure electrical connection. TOSHIBA assumes no liability for any risk of fire or other damage to avoid scratching or damaging the surface. Always use a multiple connector. AC adaptor...
User Guide
Page 47
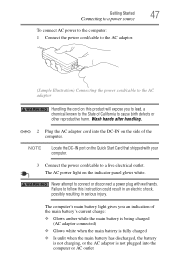
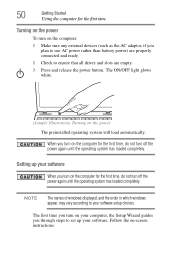
... with your computer. 3 Connect the power cord/cable to a live electrical outlet. NOTE Locate the DC-IN port on the Quick Start Card that shipped with wet hands. Getting Started 47 Connecting to a power source To connect AC power to the computer: 1 Connect the power cord/cable to the AC adaptor. (Sample...
... with your computer. 3 Connect the power cord/cable to a live electrical outlet. NOTE Locate the DC-IN port on the Quick Start Card that shipped with wet hands. Getting Started 47 Connecting to a power source To connect AC power to the computer: 1 Connect the power cord/cable to the AC adaptor. (Sample...
User Guide
Page 48
48 Getting Started Charging the main battery ❖ Flashes amber when the main battery charge is low and it is using the battery to power the computer. NOTE ...
48 Getting Started Charging the main battery ❖ Flashes amber when the main battery charge is low and it is using the battery to power the computer. NOTE ...
User Guide
Page 49
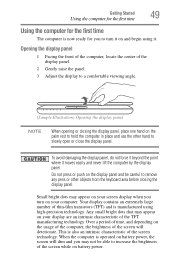
... pens or other hand to slowly open or close the display panel. When the computer is operated on battery power, the screen will deteriorate. Getting Started 49 Using the computer for the first time Using the computer for the first time The computer is now ready for you to turn on...
... pens or other hand to slowly open or close the display panel. When the computer is operated on battery power, the screen will deteriorate. Getting Started 49 Using the computer for the first time Using the computer for the first time The computer is now ready for you to turn on...
User Guide
Page 50
... computer for the first time, do not turn off the power again until the operating system has loaded completely. Setting up your software. 50 Getting Started Using the computer for the first time Turning on the power To turn on your computer, the Setup Wizard guides you through steps to set...
... computer for the first time, do not turn off the power again until the operating system has loaded completely. Setting up your software. 50 Getting Started Using the computer for the first time Turning on the power To turn on your computer, the Setup Wizard guides you through steps to set...
User Guide
Page 51
...computer with Toshiba Registering your computer with Toshiba Product registration is strongly recommended, and allows Toshiba to send you must be completed by either visiting the Toshiba Web site at http://www.register.toshiba.com, or by clicking Start, All Programs, My Toshiba, and then Toshiba Registration. NOTE... printer (see "Connecting a printer" on page 50. Adding optional external devices NOTE Before adding external devices or memory, Toshiba recommends setting up your product. See "Setting up your computer for the first time you may want to your software" on page...
...computer with Toshiba Registering your computer with Toshiba Product registration is strongly recommended, and allows Toshiba to send you must be completed by either visiting the Toshiba Web site at http://www.register.toshiba.com, or by clicking Start, All Programs, My Toshiba, and then Toshiba Registration. NOTE... printer (see "Connecting a printer" on page 50. Adding optional external devices NOTE Before adding external devices or memory, Toshiba recommends setting up your product. See "Setting up your computer for the first time you may want to your software" on page...
User Guide
Page 52
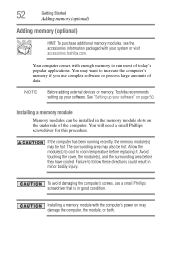
... cover, the module(s), and the surrounding area before replacing it. Installing a memory module with your system or visit accessories.toshiba.com. 52 Getting Started Adding memory (optional) Adding memory (optional) HINT: To purchase additional memory modules, see the accessories information packaged with the.... Your computer comes with enough memory to room temperature before they have cooled. NOTE Before adding external devices or memory, Toshiba recommends setting up your software. You may be hot. If the computer has been running recently, the memory module(s) may...
... cover, the module(s), and the surrounding area before replacing it. Installing a memory module with your system or visit accessories.toshiba.com. 52 Getting Started Adding memory (optional) Adding memory (optional) HINT: To purchase additional memory modules, see the accessories information packaged with the.... Your computer comes with enough memory to room temperature before they have cooled. NOTE Before adding external devices or memory, Toshiba recommends setting up your software. You may be hot. If the computer has been running recently, the memory module(s) may...
User Guide
Page 53
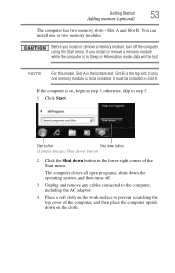
... only one or two memory modules. The computer closes all open programs, shuts down the operating system, and then turns off the computer using the Start menu. If the computer is on the cloth. If you install or remove a memory module, turn off . 3 Unplug and remove any cables connected ...to the computer, including the AC adaptor. 4 Place a soft cloth on the work surface to prevent scratching the top cover of the Start menu. Start button Shut down button (Sample Image) Shut down button 2 Click the Shut down on , begin at step 1; NOTE For this model, Slot A is...
... only one or two memory modules. The computer closes all open programs, shuts down the operating system, and then turns off the computer using the Start menu. If the computer is on the cloth. If you install or remove a memory module, turn off . 3 Unplug and remove any cables connected ...to the computer, including the AC adaptor. 4 Place a soft cloth on the work surface to prevent scratching the top cover of the Start menu. Start button Shut down button (Sample Image) Shut down button 2 Click the Shut down on , begin at step 1; NOTE For this model, Slot A is...
User Guide
Page 54
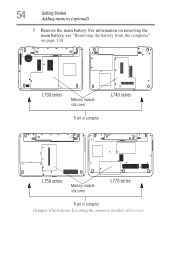
L730 series Memory module slot cover Front of computer L740 series L750 series Memory module slot cover L770 series Front of computer (Sample Illustration) Locating the memory module slot cover 54 Getting Started Adding memory (optional) 5 Remove the main battery. For information on removing the main battery, see "Removing the battery from the computer" on page 130.
L730 series Memory module slot cover Front of computer L740 series L750 series Memory module slot cover L770 series Front of computer (Sample Illustration) Locating the memory module slot cover 54 Getting Started Adding memory (optional) 5 Remove the main battery. For information on removing the main battery, see "Removing the battery from the computer" on page 130.
User Guide
Page 55
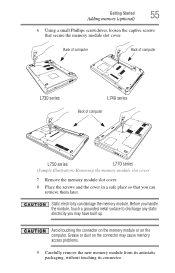
... cover 7 Remove the memory module slot cover. 8 Place the screws and the cover in a safe place so that secure the memory module slot cover. Getting Started 55 Adding memory (optional) 6 Using a small Phillips screwdriver, loosen the captive screws that you may cause memory access problems. 9 Carefully remove the new memory module...
... cover 7 Remove the memory module slot cover. 8 Place the screws and the cover in a safe place so that secure the memory module slot cover. Getting Started 55 Adding memory (optional) 6 Using a small Phillips screwdriver, loosen the captive screws that you may cause memory access problems. 9 Carefully remove the new memory module...
User Guide
Page 56
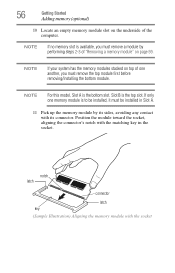
... computer. If only one another, you must remove a module by its sides, avoiding any contact with its connector. Slot B is the bottom slot. 56 Getting Started Adding memory (optional) 10 Locate an empty memory module slot on top of one memory module is available, you must be installed, it must remove...
... computer. If only one another, you must remove a module by its sides, avoiding any contact with its connector. Slot B is the bottom slot. 56 Getting Started Adding memory (optional) 10 Locate an empty memory module slot on top of one memory module is available, you must be installed, it must remove...

User Guide
Page 57
... (Sample Illustration) Pressing down on the top edge of the module to seat the module into the latches at the sides of the module. Getting Started 57 Adding memory (optional) 12 Firmly press the memory module into the memory slot's socket at approximately a 30-degree angle (to the horizontal surface of...
... (Sample Illustration) Pressing down on the top edge of the module to seat the module into the latches at the sides of the module. Getting Started 57 Adding memory (optional) 12 Firmly press the memory module into the memory slot's socket at approximately a 30-degree angle (to the horizontal surface of...


