User Guide
Page 10
... the chemical symbols for lead (Pb), mercury (Hg) and/or cadmium (Cd) will appear below the crossed out wheeled bin symbol on the battery. Restrictions for use of natural resources and the adoption of lead (Pb), mercury (Hg), and/or cadmium (Cd) defined in or recycle your...ë/ Belgique: For private usage outside buildings across public grounds over afstand groter dan 300m is required. Please contact your product, visit www.reuse.toshiba.com. Registration to IBPT/BIPT is intended to mark such products with a crossed-out wheeled bin with a black bar symbol. Voor registratie of...
... the chemical symbols for lead (Pb), mercury (Hg) and/or cadmium (Cd) will appear below the crossed out wheeled bin symbol on the battery. Restrictions for use of natural resources and the adoption of lead (Pb), mercury (Hg), and/or cadmium (Cd) defined in or recycle your...ë/ Belgique: For private usage outside buildings across public grounds over afstand groter dan 300m is required. Please contact your product, visit www.reuse.toshiba.com. Registration to IBPT/BIPT is intended to mark such products with a crossed-out wheeled bin with a black bar symbol. Voor registratie of...
User Guide
Page 19
... 36 Setting up your computer 37 Connecting to a power source 37 Charging the main battery 40 Using the computer for the first time 40 Initial setup 41 Setting up your software 41 Registering your computer with Toshiba 41 To Shut down your computer 42 To Restart your computer 42 To place your...
... 36 Setting up your computer 37 Connecting to a power source 37 Charging the main battery 40 Using the computer for the first time 40 Initial setup 41 Setting up your software 41 Registering your computer with Toshiba 41 To Shut down your computer 42 To Restart your computer 42 To place your...
User Guide
Page 20
... optical disc 82 Playing optical media 82 Recording optical media 83 Removing a disc with the computer on 83 Removing a disc with the computer off 84 Toshiba's online resources 84 Chapter 3: Mobile Computing 85 Toshiba's energy-saver design 85 Running the computer on battery power 85 Battery Notice 86 Power management 87 Charging...
... optical disc 82 Playing optical media 82 Recording optical media 83 Removing a disc with the computer on 83 Removing a disc with the computer off 84 Toshiba's online resources 84 Chapter 3: Mobile Computing 85 Toshiba's energy-saver design 85 Running the computer on battery power 85 Battery Notice 86 Power management 87 Charging...

User Guide
Page 21
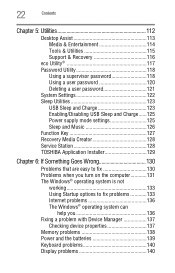
Contents 21 Charging the main battery 87 Charging the RTC battery 88 Monitoring battery power 89 Determining remaining battery power 90 What to do when the main battery runs low .....91 Setting battery notifications 91 Conserving battery power 92 Power Plans 93 Using the eco power plan 94 Changing the main battery 95 Removing the battery from the computer .........96...
Contents 21 Charging the main battery 87 Charging the RTC battery 88 Monitoring battery power 89 Determining remaining battery power 90 What to do when the main battery runs low .....91 Setting battery notifications 91 Conserving battery power 92 Power Plans 93 Using the eco power plan 94 Changing the main battery 95 Removing the battery from the computer .........96...
User Guide
Page 22
.../Disabling USB Sleep and Charge......125 Power supply mode settings 125 Sleep and Music 126 Function Key 127 Recovery Media Creator 128 Service Station 128 TOSHIBA Application Installer 129 Chapter 6: If Something Goes Wrong 130 Problems that are easy to fix 130 Problems when you turn on the computer............131 The... The Windows® operating system can help you 136 Fixing a problem with Device Manager 137 Checking device properties 137 Memory problems 138 Power and the batteries 139 Keyboard problems 140 Display problems 140
.../Disabling USB Sleep and Charge......125 Power supply mode settings 125 Sleep and Music 126 Function Key 127 Recovery Media Creator 128 Service Station 128 TOSHIBA Application Installer 129 Chapter 6: If Something Goes Wrong 130 Problems that are easy to fix 130 Problems when you turn on the computer............131 The... The Windows® operating system can help you 136 Fixing a problem with Device Manager 137 Checking device properties 137 Memory problems 138 Power and the batteries 139 Keyboard problems 140 Display problems 140

User Guide
Page 24
...to a configuration that will provide the most stable operating environment and optimum system performance for both AC power and battery modes. See the "Mobile Computing" section of the Toshiba User's Guide for energy efficiency. Your computer is a partner in the Environmental Protection Agency's (EPA) ENERGY ... default power settings that your work and entertainment can wake the computer from Sleep mode by pressing the power button. With your Toshiba computer, your computer will turn off the display or enter low-power Sleep mode after a specific amount of powerful, portable, ...
...to a configuration that will provide the most stable operating environment and optimum system performance for both AC power and battery modes. See the "Mobile Computing" section of the Toshiba User's Guide for energy efficiency. Your computer is a partner in the Environmental Protection Agency's (EPA) ENERGY ... default power settings that your work and entertainment can wake the computer from Sleep mode by pressing the power button. With your Toshiba computer, your computer will turn off the display or enter low-power Sleep mode after a specific amount of powerful, portable, ...

User Guide
Page 35
..., resulting in damage or serious injury. Turning off the computer. 2. Disconnect the AC adaptor from or writing to rain, water, seawater or moisture. Remove the battery pack, if applicable. Avoid extended contact between the computer base or palm rest and your computer, and never expose the computer to a disk/disc or...
..., resulting in damage or serious injury. Turning off the computer. 2. Disconnect the AC adaptor from or writing to rain, water, seawater or moisture. Remove the battery pack, if applicable. Avoid extended contact between the computer base or palm rest and your computer, and never expose the computer to a disk/disc or...

User Guide
Page 37
... possibly resulting in serious injury. These components include, but are not limited to operate. To use external power or to charge the battery you use it. Never pull on page 37. Failure to follow this instruction may result in a fire or electric shock, possibly ...resulting in serious injury. Your computer contains a rechargeable main battery that the power plug (and extension cable plug if used) has been fully inserted into the socket, to ensure a secure electrical connection. ...
... possibly resulting in serious injury. These components include, but are not limited to operate. To use external power or to charge the battery you use it. Never pull on page 37. Failure to follow this instruction may result in a fire or electric shock, possibly ...resulting in serious injury. Your computer contains a rechargeable main battery that the power plug (and extension cable plug if used) has been fully inserted into the socket, to ensure a secure electrical connection. ...
User Guide
Page 39
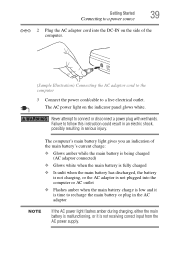
... 39 Connecting to a power source _ + 2 Plug the AC adaptor cord into the computer or AC outlet ❖ Flashes amber when the main battery charge is low and it is not receiving correct input from the AC power supply. Failure to follow this instruction could result in an electric...AC adaptor NOTE If the AC power light flashes amber during charging, either the main battery is malfunctioning, or it is time to recharge the main battery or plug in serious injury. The computer's main battery light gives you an indication of the computer. (Sample Illustration) Connecting the AC ...
... 39 Connecting to a power source _ + 2 Plug the AC adaptor cord into the computer or AC outlet ❖ Flashes amber when the main battery charge is low and it is not receiving correct input from the AC power supply. Failure to follow this instruction could result in an electric...AC adaptor NOTE If the AC power light flashes amber during charging, either the main battery is malfunctioning, or it is time to recharge the main battery or plug in serious injury. The computer's main battery light gives you an indication of the computer. (Sample Illustration) Connecting the AC ...
User Guide
Page 40
...be completely charged and ready to power the computer. Your display contains an extremely large number of thin-film transistors (TFT) and is operated on battery power, the screen will deteriorate. Over a period of time, and depending on the usage of the computer, the brightness of the screen will ...is now ready for the first time The computer is also an intrinsic characteristic of the screen technology. Any small bright dots that , the battery will be careful to remove any pens or other hand to turn on your computer. NOTE When opening or closing the display panel, place one...
...be completely charged and ready to power the computer. Your display contains an extremely large number of thin-film transistors (TFT) and is operated on battery power, the screen will deteriorate. Over a period of time, and depending on the usage of the computer, the brightness of the screen will ...is now ready for the first time The computer is also an intrinsic characteristic of the screen technology. Any small bright dots that , the battery will be careful to remove any pens or other hand to turn on your computer. NOTE When opening or closing the display panel, place one...
User Guide
Page 43
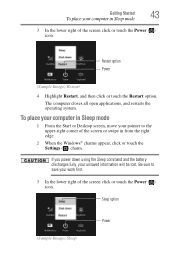
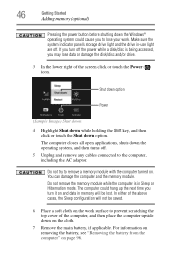
... work first. 3 In the lower right of the screen click or touch the Power ( ) icon. If you power down using the Sleep command and the battery discharges fully, your unsaved information will be lost. Sleep option Power (Sample Image) Sleep Be sure to the upper-right corner of the screen or...
... work first. 3 In the lower right of the screen click or touch the Power ( ) icon. If you power down using the Sleep command and the battery discharges fully, your unsaved information will be lost. Sleep option Power (Sample Image) Sleep Be sure to the upper-right corner of the screen or...
User Guide
Page 46
...disc and/or drive. 3 In the lower right of the screen click or touch the Power ( ) icon. For information on removing the battery, see "Removing the battery from the computer" on page 96. Do not remove the memory module while the computer is in -use light are off the power while...with the computer turned on. 46 Getting Started Adding memory (optional) Pressing the power button before shutting down on the cloth. 7 Remove the main battery, if applicable. Make sure the system indicator panel's storage drive light and the drive in Sleep or Hibernation mode. Do not try to lose your...
...disc and/or drive. 3 In the lower right of the screen click or touch the Power ( ) icon. For information on removing the battery, see "Removing the battery from the computer" on page 96. Do not remove the memory module while the computer is in -use light are off the power while...with the computer turned on. 46 Getting Started Adding memory (optional) Pressing the power button before shutting down on the cloth. 7 Remove the main battery, if applicable. Make sure the system indicator panel's storage drive light and the drive in Sleep or Hibernation mode. Do not try to lose your...
User Guide
Page 49
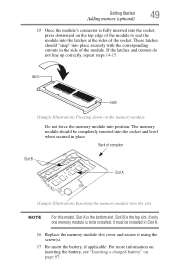
...the socket and level when secured in Slot A. 16 Replace the memory module slot cover and secure it using the screw(s). 17 Re-insert the battery, if applicable. If the latches and cutouts do not line up correctly, repeat steps 14-15. If only one memory module is fully inserted... the module's connector is to seat the module into the latches at the sides of the socket. For more information on inserting the battery, see "Inserting a charged battery" on the top edge of the module to be installed, it must be completely inserted into position. These latches should be installed in...
...the socket and level when secured in Slot A. 16 Replace the memory module slot cover and secure it using the screw(s). 17 Re-insert the battery, if applicable. If the latches and cutouts do not line up correctly, repeat steps 14-15. If only one memory module is fully inserted... the module's connector is to seat the module into the latches at the sides of the socket. For more information on inserting the battery, see "Inserting a charged battery" on the top edge of the module to be installed, it must be completely inserted into position. These latches should be installed in...
User Guide
Page 51
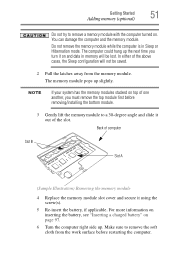
.... 3 Gently lift the memory module to a 30-degree angle and slide it out of the slot. For more information on inserting the battery, see "Inserting a charged battery" on page 97. 6 Turn the computer right side up slightly. Do not remove the memory module while the computer is in memory will...module 4 Replace the memory module slot cover and secure it on . Back of one another, you turn it using the screw(s). 5 Re-insert the battery, if applicable. Getting Started 51 Adding memory (optional) Do not try to remove a memory module with the computer turned on and data in Sleep ...
.... 3 Gently lift the memory module to a 30-degree angle and slide it out of the slot. For more information on inserting the battery, see "Inserting a charged battery" on page 97. 6 Turn the computer right side up slightly. Do not remove the memory module while the computer is in memory will...module 4 Replace the memory module slot cover and secure it on . Back of one another, you turn it using the screw(s). 5 Re-insert the battery, if applicable. Getting Started 51 Adding memory (optional) Do not try to remove a memory module with the computer turned on and data in Sleep ...

User Guide
Page 69
... you can customize your computer's settings NOTE The ( ) + P keys navigate through the options without activating a selection. For more information, see "Taking care of your computer's battery, see "Power Plans" on page 112. Caring for your computer This section gives tips on cleaning and moving your... battery" on page 98. You may need to suit your particular requirements. For information about taking care of your computer. Press ENTER to change. When the ...
... you can customize your computer's settings NOTE The ( ) + P keys navigate through the options without activating a selection. For more information, see "Taking care of your computer's battery, see "Power Plans" on page 112. Caring for your computer This section gives tips on cleaning and moving your... battery" on page 98. You may need to suit your particular requirements. For information about taking care of your computer. Press ENTER to change. When the ...

User Guide
Page 72
... ❖ Save your file to the internal storage drive at preset intervals. If the network you are using goes down and you must restart your battery runs out of charge while you are working, you save feature that can be activated. Your work frequently. This feature saves your work stays in...
... ❖ Save your file to the internal storage drive at preset intervals. If the network you are using goes down and you must restart your battery runs out of charge while you are working, you save feature that can be activated. Your work frequently. This feature saves your work stays in...

User Guide
Page 85
... The computer contains a Lithium-Ion (Li-Ion) battery that enhance its maximum energy efficiency, so that you are away from an AC outlet. You can use it many times. 85 Many of using ... for longer periods while traveling. We recommend you leave these energy-saving features have been preset by Toshiba. Chapter 3 Mobile Computing This chapter covers all aspects of these features active, allowing your computer while traveling. Toshiba's energy-saver design Your computer enters a low-power suspension mode when it is not being used...
... The computer contains a Lithium-Ion (Li-Ion) battery that enhance its maximum energy efficiency, so that you are away from an AC outlet. You can use it many times. 85 Many of using ... for longer periods while traveling. We recommend you leave these energy-saving features have been preset by Toshiba. Chapter 3 Mobile Computing This chapter covers all aspects of these features active, allowing your computer while traveling. Toshiba's energy-saver design Your computer enters a low-power suspension mode when it is not being used...
User Guide
Page 86
... and is helpful to fully discharge the battery periodically. Recharge time varies depending on product model, configuration, applications, power management settings and features utilized, as well as the natural performance variations produced by Toshiba under any individual user. However, for ...comparison purposes only, and does not indicate the battery life that keeps the computer running at the time of individual components. Please see...
... and is helpful to fully discharge the battery periodically. Recharge time varies depending on product model, configuration, applications, power management settings and features utilized, as well as the natural performance variations produced by Toshiba under any individual user. However, for ...comparison purposes only, and does not indicate the battery life that keeps the computer running at the time of individual components. Please see...

User Guide
Page 87
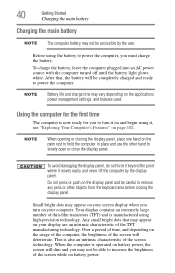
...who are not completely familiar with setup changes, contact Toshiba's Customer Support Center. Always use the preset configuration. NOTE Battery charge time may only charge while the computer is on . Charging the main battery The battery needs to be charged before you can use it to... should use the AC adaptor specified by Toshiba. The battery charges whether the computer is turned on or off. Charging batteries The battery needs to be charged before you can order a Toshiba AC adaptor from Toshiba's Web site at accessories.toshiba.com. Changes to power the computer.
...who are not completely familiar with setup changes, contact Toshiba's Customer Support Center. Always use the preset configuration. NOTE Battery charge time may only charge while the computer is on . Charging the main battery The battery needs to be charged before you can use it to... should use the AC adaptor specified by Toshiba. The battery charges whether the computer is turned on or off. Charging batteries The battery needs to be charged before you can order a Toshiba AC adaptor from Toshiba's Web site at accessories.toshiba.com. Changes to power the computer.
User Guide
Page 88
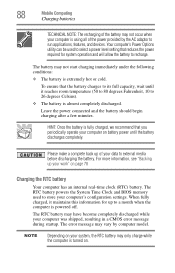
... memory used to select a power level setting that reduces the power required for up your computer is fully charged, we recommend that the battery charges to a month when the computer is extremely hot or cold. For more information, see "Backing up to its full capacity, wait until... the battery discharges completely. Your computer's Power Options utility can be used to run applications, features, and devices. The error message may vary by the...
... memory used to select a power level setting that reduces the power required for up your computer is fully charged, we recommend that the battery charges to a month when the computer is extremely hot or cold. For more information, see "Backing up to its full capacity, wait until... the battery discharges completely. Your computer's Power Options utility can be used to run applications, features, and devices. The error message may vary by the...


