Maintenance Manual
Page 10
... FL Inverter Board 4-44 4.15 LCD Modules ...4-45 Removing the LCD module 4-45 Installing the LCD Module 4-47 4.16 CCD board and MIC 4-48 Removing the CCD and MIC 4-48 Installing the CCD and MIC 4-49 4.17 Speakers...4-50 Removing the Speakers 4-50 Installing the Speakers 4-50 x Satellite L300D/L305D/Satellite Pro L300D/EQUIUM L300D/SATEGO L300D...
... FL Inverter Board 4-44 4.15 LCD Modules ...4-45 Removing the LCD module 4-45 Installing the LCD Module 4-47 4.16 CCD board and MIC 4-48 Removing the CCD and MIC 4-48 Installing the CCD and MIC 4-49 4.17 Speakers...4-50 Removing the Speakers 4-50 Installing the Speakers 4-50 x Satellite L300D/L305D/Satellite Pro L300D/EQUIUM L300D/SATEGO L300D...
Maintenance Manual
Page 54
.... Procedure 2 Test Program Check Insert the diagnostics bootable CD in the test, go to Procedure 2-16 Satellite L300D/L305D/Satellite Pro L300D/EQUIUM L300D/SATEGO L300D Maintenance Manual The computer automatically detects the external monitor even if resume mode is still an error, perform ...Check 2. If there is enabled. Replace it firmly and return to perform the test. Go to the system board and FL inverter...
.... Procedure 2 Test Program Check Insert the diagnostics bootable CD in the test, go to Procedure 2-16 Satellite L300D/L305D/Satellite Pro L300D/EQUIUM L300D/SATEGO L300D Maintenance Manual The computer automatically detects the external monitor even if resume mode is still an error, perform ...Check 2. If there is enabled. Replace it firmly and return to perform the test. Go to the system board and FL inverter...

Maintenance Manual
Page 55
...perform Check 4. If there is still an error, perform Check 9. If there is still an error, perform Check 8. The LCD/FL inverter cable may be faulty. If there is still an error, perform Check 5. The CPU may be faulty. Make sure the LCD/FL cable...a new one following the instructions in Chapter 4. The LCD module may be faulty. Satellite L300D/L305D/Satellite Pro L300D/EQUIUM L300D/SATEGO L300D Maintenance Manual 2-17 The FL inverter board may be faulty. The memory may be defective. FL inverter board System board CPU Check 6 Check 7 Check 8 Check 9 Check 10 LCD/FL...
...perform Check 4. If there is still an error, perform Check 9. If there is still an error, perform Check 8. The LCD/FL inverter cable may be faulty. If there is still an error, perform Check 5. The CPU may be faulty. Make sure the LCD/FL cable...a new one following the instructions in Chapter 4. The LCD module may be faulty. Satellite L300D/L305D/Satellite Pro L300D/EQUIUM L300D/SATEGO L300D Maintenance Manual 2-17 The FL inverter board may be faulty. The memory may be defective. FL inverter board System board CPU Check 6 Check 7 Check 8 Check 9 Check 10 LCD/FL...
Maintenance Manual
Page 132
... Display Mask 4-41 Installing the LCD Display Mask 4-42 4.14 FL Inverter Board ...4-43 Removing the FL Inverter Board 4-43 Installing the FL Inverter Board 4-44 4.15 LCD Modules ...4-45 Removing the LCD module 4-45 Installing the LCD Module 4-47 4.16 CCD board and MIC 4-48 4-iv Satellite L300D/L305D / Satellite Pro L300D/ EQUIUM L300D/ SATEGO L300D Maintenance Manual
... Display Mask 4-41 Installing the LCD Display Mask 4-42 4.14 FL Inverter Board ...4-43 Removing the FL Inverter Board 4-43 Installing the FL Inverter Board 4-44 4.15 LCD Modules ...4-45 Removing the LCD module 4-45 Installing the LCD Module 4-47 4.16 CCD board and MIC 4-48 4-iv Satellite L300D/L305D / Satellite Pro L300D/ EQUIUM L300D/ SATEGO L300D Maintenance Manual
Maintenance Manual
Page 134
... 4-40 Figure 4-23 Installing the CPU 4-41 Figure 4-24 Installing the CPU 4-42 Figure 4-25 Removing the display mask 4-41 Figure 4-26 Removing the FL inverter board 4-43 Figure 4-27 Removing the LCD module and screws 4-46 Figure 4-28 Removing the LCD module 4-46 4-vi Satellite L300D/L305D / Satellite Pro L300D/ EQUIUM L300D/ SATEGO L300D Maintenance Manual
... 4-40 Figure 4-23 Installing the CPU 4-41 Figure 4-24 Installing the CPU 4-42 Figure 4-25 Removing the display mask 4-41 Figure 4-26 Removing the FL inverter board 4-43 Figure 4-27 Removing the LCD module and screws 4-46 Figure 4-28 Removing the LCD module 4-46 4-vi Satellite L300D/L305D / Satellite Pro L300D/ EQUIUM L300D/ SATEGO L300D Maintenance Manual

Maintenance Manual
Page 136
...the display assembly. • For removing the LCD Module: First, remove the display mask and FL inverter board, both of their physical locations. The FRUs shown in the top area of the chart should be...4. 5 MDC Module 4. 6 Wireless LAN Card 4. 12 Display Mask 4. 3 ODD Bay Module 4.7 4. 8 Display Assembly 4. 13 FL Inverter Board Top Cover 4. 16 Speakers 4. 17 Touch Pad and Touch Pad Board 4. 18 USB cable, CRT cable, Power Button Board, AC...Board and MIC 4. 15 LCD Modules System Board LCD Module Satellite L300D/L305D/ Satellite Pro L300D/ EQUIUM L300D/ SATEGO L300D Maintenance Manual 4-1
...the display assembly. • For removing the LCD Module: First, remove the display mask and FL inverter board, both of their physical locations. The FRUs shown in the top area of the chart should be...4. 5 MDC Module 4. 6 Wireless LAN Card 4. 12 Display Mask 4. 3 ODD Bay Module 4.7 4. 8 Display Assembly 4. 13 FL Inverter Board Top Cover 4. 16 Speakers 4. 17 Touch Pad and Touch Pad Board 4. 18 USB cable, CRT cable, Power Button Board, AC...Board and MIC 4. 15 LCD Modules System Board LCD Module Satellite L300D/L305D/ Satellite Pro L300D/ EQUIUM L300D/ SATEGO L300D Maintenance Manual 4-1

Maintenance Manual
Page 137
...you begin to avoid the sharp edges or corners of the components. 4-2 Satellite L300D/L305D/ Satellite Pro L300D/ EQUIUM L300D/ SATEGO L300D Maintenance Manual Batteries other than those differ in the computer is left charged...to remove any metal jewelry or accessories such as the power supply and FL inverter carry high voltages. Never throw the battery packs into a fire. To avoid.... To avoid personal injury, use the genuine batteries or replacement batteries authorized by Toshiba. Always use care to disassembly read the following safety precautions carefully. Do not disassemble...
...you begin to avoid the sharp edges or corners of the components. 4-2 Satellite L300D/L305D/ Satellite Pro L300D/ EQUIUM L300D/ SATEGO L300D Maintenance Manual Batteries other than those differ in the computer is left charged...to remove any metal jewelry or accessories such as the power supply and FL inverter carry high voltages. Never throw the battery packs into a fire. To avoid.... To avoid personal injury, use the genuine batteries or replacement batteries authorized by Toshiba. Always use care to disassembly read the following safety precautions carefully. Do not disassemble...
Maintenance Manual
Page 178
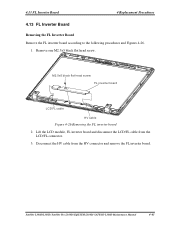
... cable HV cable Figure 4-26 Removing the FL inverter board 2. Disconnect the HV cable from the LCD/FL connector. 3. Lift the LCD module, FL inverter board and disconnect the LCD/FL cable from the HV connector and remove the FL inverter board. Satellite L300D/L305D/ Satellite Pro L300D/ EQUIUM L300D/ SATEGO L300D Maintenance Manual 4-43 Remove one M2.5x5...
... cable HV cable Figure 4-26 Removing the FL inverter board 2. Disconnect the HV cable from the LCD/FL connector. 3. Lift the LCD module, FL inverter board and disconnect the LCD/FL cable from the HV connector and remove the FL inverter board. Satellite L300D/L305D/ Satellite Pro L300D/ EQUIUM L300D/ SATEGO L300D Maintenance Manual 4-43 Remove one M2.5x5...
Maintenance Manual
Page 179
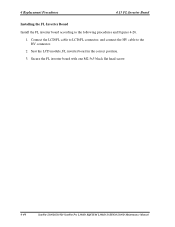
Secure the FL inverter board with one M2.5x5 black flat head screw. 4-44 Satellite L300D/L305D/ Satellite Pro L300D/ EQUIUM L300D/ SATEGO L300D Maintenance Manual Seat the LCD module, FL inverter board in the correct position. 3. Connect the LCD/FL cable to LCD/FL connector, and connect the HV cable to the following procedures and Figures 4-26. 1. 4 Replacement Procedures 4.13 FL Inverter Board Installing the FL Inverter Board Install the FL inverter board according to the HV connector. 2.
Secure the FL inverter board with one M2.5x5 black flat head screw. 4-44 Satellite L300D/L305D/ Satellite Pro L300D/ EQUIUM L300D/ SATEGO L300D Maintenance Manual Seat the LCD module, FL inverter board in the correct position. 3. Connect the LCD/FL cable to LCD/FL connector, and connect the HV cable to the following procedures and Figures 4-26. 1. 4 Replacement Procedures 4.13 FL Inverter Board Installing the FL Inverter Board Install the FL inverter board according to the HV connector. 2.
Maintenance Manual
Page 183
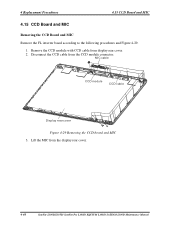
MIC cable CCD module CCD cable Display rear cover Figure 4-29 Removing the CCD board and MIC 3. Lift the MIC from display rear cover. 2. 4 Replacement Procedures 4.15 CCD Board and MIC 4.15 CCD Board and MIC Removing the CCD Board and MIC Remove the FL inverter board according to the following procedures and Figure 4-29. 1. Remove the CCD module with CCD cable from the display rear cover. 4-48 Satellite L300D/L305D/ Satellite Pro L300D/ EQUIUM L300D/ SATEGO L300D Maintenance Manual Disconnect the CCD cable from the CCD module connector.
MIC cable CCD module CCD cable Display rear cover Figure 4-29 Removing the CCD board and MIC 3. Lift the MIC from display rear cover. 2. 4 Replacement Procedures 4.15 CCD Board and MIC 4.15 CCD Board and MIC Removing the CCD Board and MIC Remove the FL inverter board according to the following procedures and Figure 4-29. 1. Remove the CCD module with CCD cable from the display rear cover. 4-48 Satellite L300D/L305D/ Satellite Pro L300D/ EQUIUM L300D/ SATEGO L300D Maintenance Manual Disconnect the CCD cable from the CCD module connector.
Maintenance Manual
Page 184
Satellite L300D/L305D/ Satellite Pro L300D/ EQUIUM L300D/ SATEGO L300D Maintenance Manual 4-49 Connect the CCD module cable to the following procedures and Figure 4-29. 1. 4.15 CCD Board and MIC 4 Replacement Procedures Installing the CCD Board and MIC Install the FL inverter board according to CCD module connector. 2. Seat the CCD module, MIC in the correct position.
Satellite L300D/L305D/ Satellite Pro L300D/ EQUIUM L300D/ SATEGO L300D Maintenance Manual 4-49 Connect the CCD module cable to the following procedures and Figure 4-29. 1. 4.15 CCD Board and MIC 4 Replacement Procedures Installing the CCD Board and MIC Install the FL inverter board according to CCD module connector. 2. Seat the CCD module, MIC in the correct position.

Maintenance Manual
Page 191
... C.13 CN14 Internal MIC Phone Cable Connector (2-Pin)..... C.15 CN16 PCMCIA Slot Module Connector (68-Pin) ........ Error! App-ii Satellite L300D/L305D/Satellite Pro L300D/EQUIUM L300D/SATEGO L300D Maintenance Manual Error! C.11 CN12 Internal Keyboard Cable Connector (34-Pin) ..... C.14 CN15 USB Port2 Board Cable Connector (5-Pin) ... AC-In Cable Connector (4-Pin Error! Bookmark not defined. Error! Bookmark not defined. Error! C.5 CN5 LCD/FL Inverter Cable Connector (40-Pin) ....... Error! Bookmark not defined. Bookmark not defined.
... C.13 CN14 Internal MIC Phone Cable Connector (2-Pin)..... C.15 CN16 PCMCIA Slot Module Connector (68-Pin) ........ Error! App-ii Satellite L300D/L305D/Satellite Pro L300D/EQUIUM L300D/SATEGO L300D Maintenance Manual Error! C.11 CN12 Internal Keyboard Cable Connector (34-Pin) ..... C.14 CN15 USB Port2 Board Cable Connector (5-Pin) ... AC-In Cable Connector (4-Pin Error! Bookmark not defined. Error! Bookmark not defined. Error! C.5 CN5 LCD/FL Inverter Cable Connector (40-Pin) ....... Error! Bookmark not defined. Bookmark not defined.

Maintenance Manual
Page 202
... Pin Assignments (12-Pin) Satellite L300D/L305D/Satellite Pro L300D/EQUIUM L300D/SATEGO L300D Maintenance Manual C-3 Signal Name I /O - 30 N$1055355 - - 32 N$1055355 - - 34 N$1055355 - I 22 LVDS_TXCU- I I 20 LVDS_TXDU1+ I I 18 LVDS_TXDU1- C Pin Assignments 3 DGND 5 DGND 7 DGND 9 DGND 11 - 13 N$1148621 - 4 N$1054331 - - 6 N$1217468 - - 8 VSYNC O - 10 HSYNC O - 12 N$1148618 - - 14 - - I /O Pin No. C.5 CN5 LCD/FL Inverter Cable Connector (40-Pin...
... Pin Assignments (12-Pin) Satellite L300D/L305D/Satellite Pro L300D/EQUIUM L300D/SATEGO L300D Maintenance Manual C-3 Signal Name I /O - 30 N$1055355 - - 32 N$1055355 - - 34 N$1055355 - I 22 LVDS_TXCU- I I 20 LVDS_TXDU1+ I I 18 LVDS_TXDU1- C Pin Assignments 3 DGND 5 DGND 7 DGND 9 DGND 11 - 13 N$1148621 - 4 N$1054331 - - 6 N$1217468 - - 8 VSYNC O - 10 HSYNC O - 12 N$1148618 - - 14 - - I /O Pin No. C.5 CN5 LCD/FL Inverter Cable Connector (40-Pin...


