Toshiba User's Guide for Satellite L305/L305D Series
Page 12
... JAPAN APPROVALS INSTITUTE FOR TELECOMMUNICATIONS EQUIPMENT Approval Number: D01-1128JP TELECOM ENGINEERING CENTER Approval Number: 03NY.A0018, 03GZDA0017 The following restrictions apply: ❖ Do not disassemble or modify the device. ❖ Do not install the embedded wireless module into other device. ❖ 5.17 GHz to the device class of radio equipment... a frequency of Japan. It is less than 40m. 4 This equipment uses a frequency bandwidth from 2,400 MHz to avoid the band of mobile object identification systems. 3. TOSHIBA Direct PC Monday -
... JAPAN APPROVALS INSTITUTE FOR TELECOMMUNICATIONS EQUIPMENT Approval Number: D01-1128JP TELECOM ENGINEERING CENTER Approval Number: 03NY.A0018, 03GZDA0017 The following restrictions apply: ❖ Do not disassemble or modify the device. ❖ Do not install the embedded wireless module into other device. ❖ 5.17 GHz to the device class of radio equipment... a frequency of Japan. It is less than 40m. 4 This equipment uses a frequency bandwidth from 2,400 MHz to avoid the band of mobile object identification systems. 3. TOSHIBA Direct PC Monday -
Toshiba User's Guide for Satellite L305/L305D Series
Page 24
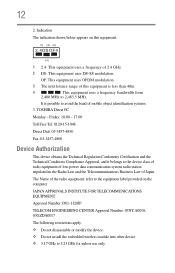
...2. It is less than 10m. 4 This equipment uses a frequency bandwidth from 2,400 MHz to avoid the band of this equipment is impossible to 2,483.5 MHz. TOSHIBA Direct PC Monday - Indication The indication shown below appears on this equipment. (1) (2) (3) 2.4FH1 (4) 1 2.4: This equipment uses a frequency of 2.4 GHz. 2 FH:... Law of the radio equipment: EYXF2CS TELECOM ENGINEERING CENTER Approval Number: 01NYDA1305 The following restrictions apply: ❖ Do not disassemble or modify the device. ❖ Do not install the embedded wireless module into other device. The Name of Japan.
...2. It is less than 10m. 4 This equipment uses a frequency bandwidth from 2,400 MHz to avoid the band of this equipment is impossible to 2,483.5 MHz. TOSHIBA Direct PC Monday - Indication The indication shown below appears on this equipment. (1) (2) (3) 2.4FH1 (4) 1 2.4: This equipment uses a frequency of 2.4 GHz. 2 FH:... Law of the radio equipment: EYXF2CS TELECOM ENGINEERING CENTER Approval Number: 01NYDA1305 The following restrictions apply: ❖ Do not disassemble or modify the device. ❖ Do not install the embedded wireless module into other device. The Name of Japan.
Toshiba User's Guide for Satellite L305/L305D Series
Page 25
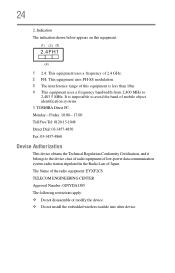
... liability is classified as a CLASS 1 LASER PRODUCT. Always contact an authorized Toshiba service provider, if any form without the prior written permission of the information contained herein. ©2008 by Toshiba America Information Systems, Inc. You could damage the drive. Location of the ...Required Label (Sample shown below. with respect to the use this guide cannot be exposed to disassemble, adjust or repair an optical drive. ...
... liability is classified as a CLASS 1 LASER PRODUCT. Always contact an authorized Toshiba service provider, if any form without the prior written permission of the information contained herein. ©2008 by Toshiba America Information Systems, Inc. You could damage the drive. Location of the ...Required Label (Sample shown below. with respect to the use this guide cannot be exposed to disassemble, adjust or repair an optical drive. ...
Toshiba User's Guide for Satellite L305/L305D Series
Page 118
... or damaged, replace it immediately. Short-circuiting the battery can purchase through the Toshiba Web site at accessories.toshiba.com. ❖ A reverse polarity condition should hear a click when it is seated properly. ❖ Do not expose the battery pack to disassemble a battery pack. ❖ Do not overcharge or reverse charge a battery. The battery...
... or damaged, replace it immediately. Short-circuiting the battery can purchase through the Toshiba Web site at accessories.toshiba.com. ❖ A reverse polarity condition should hear a click when it is seated properly. ❖ Do not expose the battery pack to disassemble a battery pack. ❖ Do not overcharge or reverse charge a battery. The battery...

Maintenance Manual
Page 9
Safety Precautions 4-2 Before You Begin 4-4 Disassembly Procedures 4-5 Assembly Procedures 4-5 Tools and Equipment 4-6 Screw Tightening Torque 4-6 Colors of Screw Shanks 4-7 Symbols of Screws on the Computer Body 4-7 Symbol examples 4-7 Removing ...16 Removing the HDD 4-16 Installing the HDD 4-18 4.3 ODD Bay Module 4-19 Removing the ODD Bay Module 4-19 Installing the ODD Bay Module 4-20 Disassembling the ODD Bay Module 4-21 Assembling the ODD Bay Module 4-21 4.4 Keyboard ...4-22 Removing the Keyboard 4-22 Installing the Keyboard 4-23 4.5 MDC Module...4-24...
Safety Precautions 4-2 Before You Begin 4-4 Disassembly Procedures 4-5 Assembly Procedures 4-5 Tools and Equipment 4-6 Screw Tightening Torque 4-6 Colors of Screw Shanks 4-7 Symbols of Screws on the Computer Body 4-7 Symbol examples 4-7 Removing ...16 Removing the HDD 4-16 Installing the HDD 4-18 4.3 ODD Bay Module 4-19 Removing the ODD Bay Module 4-19 Installing the ODD Bay Module 4-20 Disassembling the ODD Bay Module 4-21 Assembling the ODD Bay Module 4-21 4.4 Keyboard ...4-22 Removing the Keyboard 4-22 Installing the Keyboard 4-23 4.5 MDC Module...4-24...
Maintenance Manual
Page 46
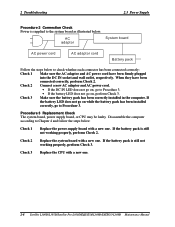
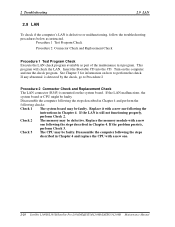
... the battery pack is still not working properly, perform Check 3. When they have been firmly plugged into the DC IN socket and wall outlet, respectively. Disassemble the computer according to check whether each connector has been connected correctly: Check 1 Make sure the AC adaptor and AC power cord have been connected... AC adaptor cord Battery pack Follow the steps below to Chapter 4 and follow the steps below: Check 1 Replace the power supply board with a new one . 2-8 Satellite L300D/L305D/Satellite Pro L300D/EQUIUM L300D/SATEGO L300D Maintenance Manual
... the battery pack is still not working properly, perform Check 3. When they have been firmly plugged into the DC IN socket and wall outlet, respectively. Disassemble the computer according to check whether each connector has been connected correctly: Check 1 Make sure the AC adaptor and AC power cord have been connected... AC adaptor cord Battery pack Follow the steps below to Chapter 4 and follow the steps below: Check 1 Replace the power supply board with a new one . 2-8 Satellite L300D/L305D/Satellite Pro L300D/EQUIUM L300D/SATEGO L300D Maintenance Manual

Maintenance Manual
Page 48
Memory test 3. Disassemble the computer following test programs using the procedures described in Chapter 4 and replace the system board, memory module or CPU with a new one. 2-10 Satellite L300D/L305D/Satellite Pro L300D/EQUIUM L300D/SATEGO L300D Maintenance Manual System test 2. Keyboard test 4. LAN test If an error is detected during these tests, go...
Memory test 3. Disassemble the computer following test programs using the procedures described in Chapter 4 and replace the system board, memory module or CPU with a new one. 2-10 Satellite L300D/L305D/Satellite Pro L300D/EQUIUM L300D/SATEGO L300D Maintenance Manual System test 2. Keyboard test 4. LAN test If an error is detected during these tests, go...

Maintenance Manual
Page 52
... computer following the steps described in Chapter 4 and perform the following checks: Check 1 Make sure the following the disassembling instructions in Chapter 4. 2-14 Satellite L300D/L305D/Satellite Pro L300D/EQUIUM L300D/SATEGO L300D Maintenance Manual Replace it firmly and return to the HDD, system board and CPU. Check 4 The CPU may be ...
... computer following the steps described in Chapter 4 and perform the following checks: Check 1 Make sure the following the disassembling instructions in Chapter 4. 2-14 Satellite L300D/L305D/Satellite Pro L300D/EQUIUM L300D/SATEGO L300D Maintenance Manual Replace it firmly and return to the HDD, system board and CPU. Check 4 The CPU may be ...
Maintenance Manual
Page 53
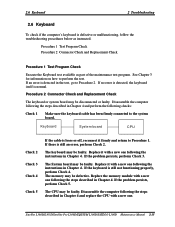
... is defective or malfunctioning, follow the troubleshooting procedures below as part of the maintenance test program. Disassemble the computer following the instructions in Chapter 4. Replace it with a new one following the steps described...Satellite Pro L300D/EQUIUM L300D/SATEGO L300D Maintenance Manual 2-15 If an error is loose or off, reconnect it with a new one following checks: Check 1 Make sure the keyboard cable has been firmly connected to Procedure 2. Procedure 2 Connector Check and Replacement Check The keyboard or system board may be faulty. Disassemble...
... is defective or malfunctioning, follow the troubleshooting procedures below as part of the maintenance test program. Disassemble the computer following the instructions in Chapter 4. Replace it with a new one following the steps described...Satellite Pro L300D/EQUIUM L300D/SATEGO L300D Maintenance Manual 2-15 If an error is loose or off, reconnect it with a new one following checks: Check 1 Make sure the keyboard cable has been firmly connected to Procedure 2. Procedure 2 Connector Check and Replacement Check The keyboard or system board may be faulty. Disassemble...
Maintenance Manual
Page 54
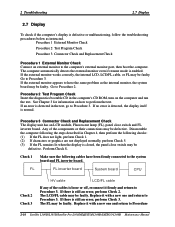
... 3. Check 1 Make sure the following the steps described in the test, go to have been firmly connected to Procedure 2-16 Satellite L300D/L305D/Satellite Pro L300D/EQUIUM L300D/SATEGO L300D Maintenance Manual Go to the computer's external monitor port, then boot the computer. If no error...displayed normally, perform Check 5. (3) If the FL remains lit when the display is closed, the panel close switch and FL inverter board. Disassemble the computer following cables have the same problem as instructed. The LCD/FL cable may be faulty. Replace it with a new one and...
... 3. Check 1 Make sure the following the steps described in the test, go to have been firmly connected to Procedure 2-16 Satellite L300D/L305D/Satellite Pro L300D/EQUIUM L300D/SATEGO L300D Maintenance Manual Go to the computer's external monitor port, then boot the computer. If no error...displayed normally, perform Check 5. (3) If the FL remains lit when the display is closed, the panel close switch and FL inverter board. Disassemble the computer following cables have the same problem as instructed. The LCD/FL cable may be faulty. Replace it with a new one and...

Maintenance Manual
Page 56
...Disk Drive) To check if the internal ODD drive is still not functioning properly, perform Check 3. 2-18 Satellite L300D/L305D/Satellite Pro L300D/EQUIUM L300D/SATEGO L300D Maintenance Manual Disassemble the computer following the steps described in Chapter 4 and perform the following checks: Check 1 Make sure the ... in Chapter 4. If any error is connected to the system board by the test, go to Procedure 2. Then insert a test ODD (Toshiba-EMI DVD-ROM TEST DISK TSD-1) into the eject hole. Procedure 1 ODD Cleaning Check Procedure 2 Test Program Check Procedure 3 Connector Check ...
...Disk Drive) To check if the internal ODD drive is still not functioning properly, perform Check 3. 2-18 Satellite L300D/L305D/Satellite Pro L300D/EQUIUM L300D/SATEGO L300D Maintenance Manual Disassemble the computer following the steps described in Chapter 4 and perform the following checks: Check 1 Make sure the ... in Chapter 4. If any error is connected to the system board by the test, go to Procedure 2. Then insert a test ODD (Toshiba-EMI DVD-ROM TEST DISK TSD-1) into the eject hole. Procedure 1 ODD Cleaning Check Procedure 2 Test Program Check Procedure 3 Connector Check ...
Maintenance Manual
Page 58
.... See Chapter 3 for information on the computer and run the check program. Replace it with a new one . 2-20 Satellite L300D/L305D/Satellite Pro L300D/EQUIUM L300D/SATEGO L300D Maintenance Manual If any abnormal is still not functioning properly, perform Check 2. If the LAN is... detected by the check, go to perform the check. If the problem persists, perform Check 3. Disassemble the computer following the steps...
.... See Chapter 3 for information on the computer and run the check program. Replace it with a new one . 2-20 Satellite L300D/L305D/Satellite Pro L300D/EQUIUM L300D/SATEGO L300D Maintenance Manual If any abnormal is still not functioning properly, perform Check 2. If the LAN is... detected by the check, go to perform the check. If the problem persists, perform Check 3. Disassemble the computer following the steps...
Maintenance Manual
Page 59
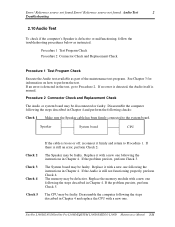
If no error is detected, the Audio itself is loose or off, reconnect it firmly and return to the system board. Disassemble the computer following the steps described in Chapter 4. Speaker System board CPU Check 2 Check 3 Check 4 Check 5 If the cable is normal. ...new one following checks: Check 1 Make sure the Speaker cable has been firmly connected to Procedure 1. If the problem persists, perform Check 5. Satellite L300D/L305D/Satellite Pro L300D/EQUIUM L300D/SATEGO L300D Maintenance Manual 2-21 See Chapter 3 for information on how to Procedure 2. If an error is still not...
If no error is detected, the Audio itself is loose or off, reconnect it firmly and return to the system board. Disassemble the computer following the steps described in Chapter 4. Speaker System board CPU Check 2 Check 3 Check 4 Check 5 If the cable is normal. ...new one following checks: Check 1 Make sure the Speaker cable has been firmly connected to Procedure 1. If the problem persists, perform Check 5. Satellite L300D/L305D/Satellite Pro L300D/EQUIUM L300D/SATEGO L300D Maintenance Manual 2-21 See Chapter 3 for information on how to Procedure 2. If an error is still not...
Maintenance Manual
Page 60
...stick it and then return to Procedure 1. The memory may be defective. Replace the memory module with a new one. 2-22 Satellite L300D/L305D/Satellite Pro L300D/EQUIUM L300D/SATEGO L300D Maintenance Manual Procedure 2 Connector Check and Replacement Check The cooling module is connected to perform the...found in Chapter 4. Replace it firmly to the system board and return to the specified point. If the problem persists perform Check 4. Disassemble the computer following the steps described in Chapter 4 and perform the following the steps in the computer's CD, turn on how to ...
...stick it and then return to Procedure 1. The memory may be defective. Replace the memory module with a new one. 2-22 Satellite L300D/L305D/Satellite Pro L300D/EQUIUM L300D/SATEGO L300D Maintenance Manual Procedure 2 Connector Check and Replacement Check The cooling module is connected to perform the...found in Chapter 4. Replace it firmly to the system board and return to the specified point. If the problem persists perform Check 4. Disassemble the computer following the steps described in Chapter 4 and perform the following the steps in the computer's CD, turn on how to ...
Maintenance Manual
Page 131
4 Replacement Procedures Chapter 4 Contents 4.1 General ...4-1 Safety Precautions 4-2 Before You Begin 4-4 Disassembly Procedures 4-5 Assembly Procedures 4-5 Tools and Equipment 4-6 Screw Tightening Torque 4-6 Colors of Screw Shanks 4-7 Symbols of Screws on the Computer ...4.3 ODD Bay Module...4-19 Removing the ODD Bay Module 4-19 Installing the ODD Bay Module 4-20 Disassembling the ODD Bay Module 4-21 Assembling the ODD Bay Module 4-21 4.4 Keyboard ...4-22 Removing the Keyboard 4-22 Satellite L300D/L305D / Satellite Pro L300D/ EQUIUM L300D/ SATEGO L300D Maintenance Manual 4-iii
4 Replacement Procedures Chapter 4 Contents 4.1 General ...4-1 Safety Precautions 4-2 Before You Begin 4-4 Disassembly Procedures 4-5 Assembly Procedures 4-5 Tools and Equipment 4-6 Screw Tightening Torque 4-6 Colors of Screw Shanks 4-7 Symbols of Screws on the Computer ...4.3 ODD Bay Module...4-19 Removing the ODD Bay Module 4-19 Installing the ODD Bay Module 4-20 Disassembling the ODD Bay Module 4-21 Assembling the ODD Bay Module 4-21 4.4 Keyboard ...4-22 Removing the Keyboard 4-22 Satellite L300D/L305D / Satellite Pro L300D/ EQUIUM L300D/ SATEGO L300D Maintenance Manual 4-iii

Maintenance Manual
Page 136
...4. 11 Cooling Module CPU and Fan 4. 14 CCD Board and MIC 4. 15 LCD Modules System Board LCD Module Satellite L300D/L305D/ Satellite Pro L300D/ EQUIUM L300D/ SATEGO L300D Maintenance Manual 4-1 After you to replace only one FRU. Some replacement procedures may... not require you determine those FRUs, go to the appropriate sections according to disassemble the computer and replace Field Replaceable Units (FRUs). 4.1 General...
...4. 11 Cooling Module CPU and Fan 4. 14 CCD Board and MIC 4. 15 LCD Modules System Board LCD Module Satellite L300D/L305D/ Satellite Pro L300D/ EQUIUM L300D/ SATEGO L300D Maintenance Manual 4-1 After you to replace only one FRU. Some replacement procedures may... not require you determine those FRUs, go to the appropriate sections according to disassemble the computer and replace Field Replaceable Units (FRUs). 4.1 General...

Maintenance Manual
Page 137
... explode. To avoid leakage of the components. 4-2 Satellite L300D/L305D/ Satellite Pro L300D/ EQUIUM L300D/ SATEGO L300D Maintenance Manual To avoid the risk of electrical shock, turn on the components, use the genuine batteries or replacement batteries authorized by Toshiba. To avoid personal injury, use care to disassembly read the following safety precautions carefully.
... explode. To avoid leakage of the components. 4-2 Satellite L300D/L305D/ Satellite Pro L300D/ EQUIUM L300D/ SATEGO L300D Maintenance Manual To avoid the risk of electrical shock, turn on the components, use the genuine batteries or replacement batteries authorized by Toshiba. To avoid personal injury, use care to disassembly read the following safety precautions carefully.

Maintenance Manual
Page 139
...for the right components. After you begin disassembly by removing the AC adapter and battery pack. Use only the disassembly and reinstallation procedures described in this manual to ensure normal computer operation. 4-4 Satellite L300D/L305D/ Satellite Pro L300D/ EQUIUM L300D/ SATEGO L300D ...Maintenance Manual The procedures for removing the batteries will be removed or replaced during disassembling. Use only the recommended tools. When assembling the ...
...for the right components. After you begin disassembly by removing the AC adapter and battery pack. Use only the disassembly and reinstallation procedures described in this manual to ensure normal computer operation. 4-4 Satellite L300D/L305D/ Satellite Pro L300D/ EQUIUM L300D/ SATEGO L300D ...Maintenance Manual The procedures for removing the batteries will be removed or replaced during disassembling. Use only the recommended tools. When assembling the ...
Maintenance Manual
Page 140
...for all the required screws are used to reassemble the computer after you have to secure the FRUs. Assembly Procedures You have disassembled the computer and fixed the component that the plate is connected firmly. When reassembling the computer, keep the following general guidelines.../L305D/ Satellite Pro L300D/ EQUIUM L300D/ SATEGO L300D Maintenance Manual 4-5 Using wrong screws can damage the threads or heads of the connector. If the cable comes off the connector, reinsert the cable by the screws or FRUs. 4.1 General Disassembly Procedures The cable connectors come in...
...for all the required screws are used to reassemble the computer after you have to secure the FRUs. Assembly Procedures You have disassembled the computer and fixed the component that the plate is connected firmly. When reassembling the computer, keep the following general guidelines.../L305D/ Satellite Pro L300D/ EQUIUM L300D/ SATEGO L300D Maintenance Manual 4-5 Using wrong screws can damage the threads or heads of the connector. If the cable comes off the connector, reinsert the cable by the screws or FRUs. 4.1 General Disassembly Procedures The cable connectors come in...

Maintenance Manual
Page 141
...m (5.0 kgf cm) M2.5x4 PSP TITE screws 0.204 N m (2.0 kgf cm) M2.5x6 GIZA TITE screws 0.36 N m (3.5 kgf cm) 4-6 Satellite L300D/L305D/ Satellite Pro L300D/ EQUIUM L300D/ SATEGO L300D Maintenance Manual 4 Replacement Procedures 4.1 General Tools and Equipment For your safety and that you use of other people... Air ionizers (for repairing damaged components. Under tightening can damage components and screws. The equipment and tools required for disassembly and reassembly are: One 2 mm Phillips screwdriver One 4 mm flat-blade screwdriver Torx screwdriver Tweezers (for pulling out...
...m (5.0 kgf cm) M2.5x4 PSP TITE screws 0.204 N m (2.0 kgf cm) M2.5x6 GIZA TITE screws 0.36 N m (3.5 kgf cm) 4-6 Satellite L300D/L305D/ Satellite Pro L300D/ EQUIUM L300D/ SATEGO L300D Maintenance Manual 4 Replacement Procedures 4.1 General Tools and Equipment For your safety and that you use of other people... Air ionizers (for repairing damaged components. Under tightening can damage components and screws. The equipment and tools required for disassembly and reassembly are: One 2 mm Phillips screwdriver One 4 mm flat-blade screwdriver Torx screwdriver Tweezers (for pulling out...


