
User Guide
Page 29
... for the first time 53 Opening the display panel 53 Your computer's features and specifications ....54 Turning on the power 55 Adding memory 56 Installing a memory module 56 Removing a memory module 60 Using the TouchPad 62 Scrolling with the TouchPad 63 Control buttons 63 Disabling or enabling the TouchPad 63 Turning off the...
... for the first time 53 Opening the display panel 53 Your computer's features and specifications ....54 Turning on the power 55 Adding memory 56 Installing a memory module 56 Removing a memory module 60 Using the TouchPad 62 Scrolling with the TouchPad 63 Control buttons 63 Disabling or enabling the TouchPad 63 Turning off the...
User Guide
Page 33
... hardware conflict 160 A plan of action 160 Resolving hardware conflicts on your own .....160 Fixing a problem with Device Manager ...........162 Memory problems 164 Power and the batteries 164 Keyboard problems 166 Display problems 167 Disk drive problems 169 DVD-ROM or multi-function drive ... Modem problems 177 Develop good computing habits 178 If you need further assistance 179 Before you call 179 Contacting Toshiba 180 Other Toshiba Internet Web sites 181 Toshiba's worldwide offices 181 Appendix A: Hot Keys 183 Volume Mute 183 Instant password security 184 Stand By mode 184...
... hardware conflict 160 A plan of action 160 Resolving hardware conflicts on your own .....160 Fixing a problem with Device Manager ...........162 Memory problems 164 Power and the batteries 164 Keyboard problems 166 Display problems 167 Disk drive problems 169 DVD-ROM or multi-function drive ... Modem problems 177 Develop good computing habits 178 If you need further assistance 179 Before you call 179 Contacting Toshiba 180 Other Toshiba Internet Web sites 181 Toshiba's worldwide offices 181 Appendix A: Hot Keys 183 Volume Mute 183 Instant password security 184 Stand By mode 184...

User Guide
Page 47
These components include, but are not limited to : ❖ Add more memory ❖ Connect a mouse ❖ Connect a full-size keyboard ❖ Connect an external monitor ❖ Connect a local printer ❖ Install PC Cards Before adding any of ... setting up to your computer, you can use it. See "Connecting to a power source" on page 48 before you may want to , a mouse, keyboard, printer, memory, and PC cards. Your computer comes with a rechargeable battery pack that must complete all setup steps up your computer.
These components include, but are not limited to : ❖ Add more memory ❖ Connect a mouse ❖ Connect a full-size keyboard ❖ Connect an external monitor ❖ Connect a local printer ❖ Install PC Cards Before adding any of ... setting up to your computer, you can use it. See "Connecting to a power source" on page 48 before you may want to , a mouse, keyboard, printer, memory, and PC cards. Your computer comes with a rechargeable battery pack that must complete all setup steps up your computer.
User Guide
Page 56
..., the module, or both. You will need a standard Phillips no . 1 screwdriver that came with your system or visit accessories.toshiba.com. Your Satellite® L10/L15 computer comes with enough memory to increase the computer's memory if you use a standard Phillips no .1 screwdriver for this procedure. To avoid damaging the computer's screws, use complex software...
..., the module, or both. You will need a standard Phillips no . 1 screwdriver that came with your system or visit accessories.toshiba.com. Your Satellite® L10/L15 computer comes with enough memory to increase the computer's memory if you use a standard Phillips no .1 screwdriver for this procedure. To avoid damaging the computer's screws, use complex software...
User Guide
Page 57
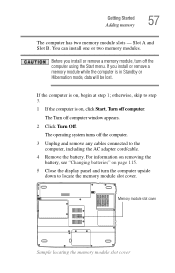
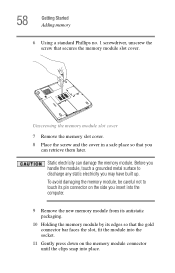
... mode, data will be lost. The operating system turns off the computer using the Start menu. Memory module slot cover Sample locating the memory module slot cover You can install one or two memory modules. If the computer is on, click Start, Turn off computer window appears. 2 Click Turn... Close the display panel and turn off the computer. 3 Unplug and remove any cables connected to locate the memory module slot cover. The Turn off computer. If you install or remove a memory module, turn the computer upside down to the computer, including the AC adapter cord/cable. 4 Remove the ...
... mode, data will be lost. The operating system turns off the computer using the Start menu. Memory module slot cover Sample locating the memory module slot cover You can install one or two memory modules. If the computer is on, click Start, Turn off computer window appears. 2 Click Turn... Close the display panel and turn off the computer. 3 Unplug and remove any cables connected to locate the memory module slot cover. The Turn off computer. If you install or remove a memory module, turn the computer upside down to the computer, including the AC adapter cord/cable. 4 Remove the ...
User Guide
Page 58
...up. Before you handle the module, touch a grounded metal surface to touch its edges so that secures the memory module slot cover. Unscrewing the memory module slot cover 7 Remove the memory slot cover. 8 Place the screw and the cover in a safe place so that you insert into the ...computer. 9 Remove the new memory module from its antistatic packaging. 10 Holding the memory module by its pin connector on the memory module connector until the clips snap into place. 58 Getting Started Adding memory 6 Using a standard Phillips no. 1 screwdriver, unscrew the ...
...up. Before you handle the module, touch a grounded metal surface to touch its edges so that secures the memory module slot cover. Unscrewing the memory module slot cover 7 Remove the memory slot cover. 8 Place the screw and the cover in a safe place so that you insert into the ...computer. 9 Remove the new memory module from its antistatic packaging. 10 Holding the memory module by its pin connector on the memory module connector until the clips snap into place. 58 Getting Started Adding memory 6 Using a standard Phillips no. 1 screwdriver, unscrew the ...
User Guide
Page 59
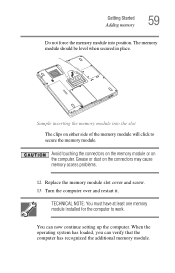
... operating system has loaded, you can now continue setting up the computer. Sample inserting the memory module into position. TECHNICAL NOTE: You must have at least one memory module installed for the computer to secure the memory module. The memory module should be level when secured in place. Avoid touching the connectors on the...
... operating system has loaded, you can now continue setting up the computer. Sample inserting the memory module into position. TECHNICAL NOTE: You must have at least one memory module installed for the computer to secure the memory module. The memory module should be level when secured in place. Avoid touching the connectors on the...
User Guide
Page 60
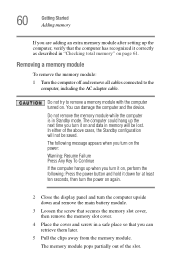
... on, perform the following: Press the power button and hold it down and remove the main battery module. 3 Loosen the screw that secures the memory slot cover, then remove the memory slot cover. 4 Place the cover and screw in a safe place so that the computer has recognized it on and data in... memory will not be lost. Do not try to the computer, including the AC adapter cable. The memory module pops partially out of the above cases, the Standby configuration will be saved. The computer could...
... on, perform the following: Press the power button and hold it down and remove the main battery module. 3 Loosen the screw that secures the memory slot cover, then remove the memory slot cover. 4 Place the cover and screw in a safe place so that the computer has recognized it on and data in... memory will not be lost. Do not try to the computer, including the AC adapter cable. The memory module pops partially out of the above cases, the Standby configuration will be saved. The computer could...
User Guide
Page 61
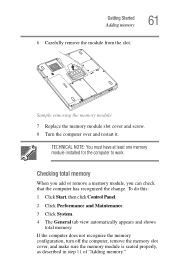
... installed for the computer to work. If the computer does not recognize the memory configuration, turn off the computer, remove the memory slot cover, and make sure the memory module is seated properly, as described in step 11 of "Adding memory." To do this: 1 Click Start, then click Control Panel. 2 Click Performance and Maintenance...
... installed for the computer to work. If the computer does not recognize the memory configuration, turn off the computer, remove the memory slot cover, and make sure the memory module is seated properly, as described in step 11 of "Adding memory." To do this: 1 Click Start, then click Control Panel. 2 Click Performance and Maintenance...

User Guide
Page 65
.... If you have work in progress and are not connected to a network, use the Windows Standby or Hibernate commands to save your system settings to memory so that, when you turn off for a while. Never turn on page 96. For more information, see "Powering down the computer, you are using the...
.... If you have work in progress and are not connected to a network, use the Windows Standby or Hibernate commands to save your system settings to memory so that, when you turn off for a while. Never turn on page 96. For more information, see "Powering down the computer, you are using the...
User Guide
Page 76
... save feature that can be activated. Computing tips ❖ Save your software documentation for further information. See "Saving your work stays in the computer's temporary memory until you last saved. Chapter 2 Learning the Basics This chapter gives some computing tips and provides important information about basic features.
... save feature that can be activated. Computing tips ❖ Save your software documentation for further information. See "Saving your work stays in the computer's temporary memory until you last saved. Chapter 2 Learning the Basics This chapter gives some computing tips and provides important information about basic features.
User Guide
Page 99
... Hibernation mode does not require power to the state in which you can start up again, press and release the power button. Restoring information from memory. Starting again after Turn Off To start the computer up again, the computer runs a self-test, loads the operating system, and then returns to maintain...
... Hibernation mode does not require power to the state in which you can start up again, press and release the power button. Restoring information from memory. Starting again after Turn Off To start the computer up again, the computer runs a self-test, loads the operating system, and then returns to maintain...
User Guide
Page 100
... drop-down the computer Factors when choosing Hibernation mode: ❖ While in Hibernation mode, the computer uses no battery power. ❖ Because the state of memory. ❖ When starting up again, the computer returns to have the computer go into Hibernation mode when you were using. Configuring your computer for Hibernation...
... drop-down the computer Factors when choosing Hibernation mode: ❖ While in Hibernation mode, the computer uses no battery power. ❖ Because the state of memory. ❖ When starting up again, the computer returns to have the computer go into Hibernation mode when you were using. Configuring your computer for Hibernation...
User Guide
Page 102
... information will be lost . Using Standby Mode Standby mode places the computer into a power-saving mode. Standby holds the current state of the computer in memory so that, when you restart the computer, you can continue working from Turn Off or Hibernation mode. ❖ When starting up again, the computer returns...
... information will be lost . Using Standby Mode Standby mode places the computer into a power-saving mode. Standby holds the current state of the computer in memory so that, when you restart the computer, you can continue working from Turn Off or Hibernation mode. ❖ When starting up again, the computer returns...
User Guide
Page 104
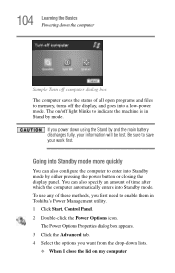
Be sure to enable them in Stand by mode. You can also configure the computer to memory, turns off the display, and goes into a low-power mode. To use any of these methods, you first need to save your information will be ... the Advanced tab. 4 Select the options you power down lists. ❖ When I close the lid on /off light blinks to indicate the machine is in Toshiba's Power Management utility. 1 Click Start, Control Panel. 2 Double-click the Power Options icon. 104 Learning the Basics Powering down the computer Sample Turn off computer...
Be sure to enable them in Stand by mode. You can also configure the computer to memory, turns off the display, and goes into a low-power mode. To use any of these methods, you first need to save your information will be ... the Advanced tab. 4 Select the options you power down lists. ❖ When I close the lid on /off light blinks to indicate the machine is in Toshiba's Power Management utility. 1 Click Start, Control Panel. 2 Double-click the Power Options icon. 104 Learning the Basics Powering down the computer Sample Turn off computer...
User Guide
Page 110
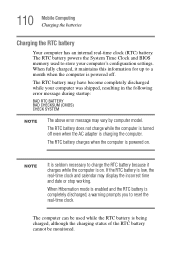
... battery is completely discharged, a warning prompts you to a month when the computer is powered on . The RTC battery powers the System Time Clock and BIOS memory used while the RTC battery is charging the computer. 110 Mobile Computing Charging the batteries Charging the RTC battery Your computer has an internal real...
... battery is completely discharged, a warning prompts you to a month when the computer is powered on . The RTC battery powers the System Time Clock and BIOS memory used while the RTC battery is charging the computer. 110 Mobile Computing Charging the batteries Charging the RTC battery Your computer has an internal real...
User Guide
Page 156
..., press Ctrl, Alt, and Del to restart the If you have a hard disk problem, you are running on page 112. Data stored in the computer's memory has been lost . If your data even when you will not be lost . To charge the battery, leave the computer plugged into the external diskette...
..., press Ctrl, Alt, and Del to restart the If you have a hard disk problem, you are running on page 112. Data stored in the computer's memory has been lost . If your data even when you will not be lost . To charge the battery, leave the computer plugged into the external diskette...
User Guide
Page 160
... Hardware link in the window's left pane. The device most likely to be time-consuming and frustrating. It also needs a direct channel to the computer's memory to the computer's Central Processing Unit (CPU). A device, such as a disk drive or a modem, needs a channel to store information If the system or one of...
... Hardware link in the window's left pane. The device most likely to be time-consuming and frustrating. It also needs a direct channel to the computer's memory to the computer's Central Processing Unit (CPU). A device, such as a disk drive or a modem, needs a channel to store information If the system or one of...
User Guide
Page 161
... instructions about changing settings on the device. Resolving conflicts There are commonly referred to as it interrupts what the processor is called the Direct Memory Access (DMA). Refer to the CPU is doing and requests some of the processor's time. For an older device, remove it from ...the same DMA, the data required by one device overwrites the data required by the device is stored in a specific place or address in memory called an Interrupt Request (IRQ) because it works. The DMA provides a dedicated channel for adapter cards to resolve hardware conflicts: ❖ Get...
... instructions about changing settings on the device. Resolving conflicts There are commonly referred to as it interrupts what the processor is called the Direct Memory Access (DMA). Refer to the CPU is doing and requests some of the processor's time. For an older device, remove it from ...the same DMA, the data required by one device overwrites the data required by the device is stored in a specific place or address in memory called an Interrupt Request (IRQ) because it works. The DMA provides a dedicated channel for adapter cards to resolve hardware conflicts: ❖ Get...
User Guide
Page 164
... Start, then click Turn off the computer automatically. 3 Remove the memory module. 4 Reinstall the memory module, following the instructions in "Adding memory" on page 56, and making sure it is not caused by the memory module. It is worthwhile checking for the computer to be faulty. ...system batteries (main battery and real-time clock (RTC) battery). 164 If Something Goes Wrong Resolving a hardware conflict Memory problems Incorrectly connected or faulty memory modules may be device-related. For example, a faulty AC adapter or power cord/ cable will neither power the computer...
... Start, then click Turn off the computer automatically. 3 Remove the memory module. 4 Reinstall the memory module, following the instructions in "Adding memory" on page 56, and making sure it is not caused by the memory module. It is worthwhile checking for the computer to be faulty. ...system batteries (main battery and real-time clock (RTC) battery). 164 If Something Goes Wrong Resolving a hardware conflict Memory problems Incorrectly connected or faulty memory modules may be device-related. For example, a faulty AC adapter or power cord/ cable will neither power the computer...


