User Guide
Page 67
... system from your work to external media before executing this procedure, or use blank media. 5 Click the Create button in the TOSHIBA Recovery Media Creator utility) to your external media to complete the copy process. Be sure to save the information stored on your computer... device before executing the recovery (see "Backing up your recovery media. All information stored on your DVDs or USB flash drive(s) will know in which order to insert the discs during the process of the required minimum capacity (as specified in the TOSHIBA Recovery Media Creator utility dialog ...
... system from your work to external media before executing this procedure, or use blank media. 5 Click the Create button in the TOSHIBA Recovery Media Creator utility) to your external media to complete the copy process. Be sure to save the information stored on your computer... device before executing the recovery (see "Backing up your recovery media. All information stored on your DVDs or USB flash drive(s) will know in which order to insert the discs during the process of the required minimum capacity (as specified in the TOSHIBA Recovery Media Creator utility dialog ...
User Guide
Page 68
...2 Do one of media you want to recover the original factory image Click Yes to continue. 6 When the Toshiba Recovery Wizard opens and the Selecting a Process screen displays, select Recovery of Factory Default Software and then click Next. 7 Select one of the following options: ❖ Recover to ...the USB Flash option, depending on which type of the following : ❖ If your recovery files are on DVDs, insert the first recovery DVD into your optical disc drive. ❖ If your recovery files are not restored during this process. For more information on these options, see "...
...2 Do one of media you want to recover the original factory image Click Yes to continue. 6 When the Toshiba Recovery Wizard opens and the Selecting a Process screen displays, select Recovery of Factory Default Software and then click Next. 7 Select one of the following options: ❖ Recover to ...the USB Flash option, depending on which type of the following : ❖ If your recovery files are on DVDs, insert the first recovery DVD into your optical disc drive. ❖ If your recovery files are not restored during this process. For more information on these options, see "...
User Guide
Page 70
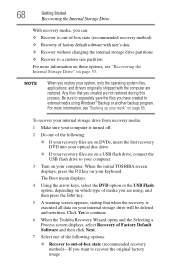
...(Sample Image) Erase the hard disk screen 4 Click Next. Be sure you are using, and then press the Enter key. When the initial TOSHIBA screen displays, press F12. Using the arrow keys, select the DVD or USB Flash option on the Boot menu, depending on the internal storage ...you that all data and then overwrites the entire internal storage drive for security purposes. Insert the first recovery DVD into your optical disc drive or connect the USB flash drive containing your recovery files to external media (see "Backing up your work to your computer. 70 Getting Started Erasing ...
...(Sample Image) Erase the hard disk screen 4 Click Next. Be sure you are using, and then press the Enter key. When the initial TOSHIBA screen displays, press F12. Using the arrow keys, select the DVD or USB Flash option on the Boot menu, depending on the internal storage ...you that all data and then overwrites the entire internal storage drive for security purposes. Insert the first recovery DVD into your optical disc drive or connect the USB flash drive containing your recovery files to external media (see "Backing up your work to your computer. 70 Getting Started Erasing ...
User Guide
Page 146
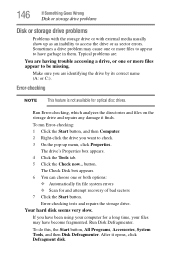
...you are having trouble accessing a drive, or one or both options: ❖ Automatically fix file system errors ❖ Scan for and attempt recovery of bad sectors 7 Click the Start button. Error-checking tests and repairs the storage drive. If you want to check. 3 On the pop... Defragmenter. Your hard disk seems very slow. Error-checking NOTE This feature is not available for a long time, your computer for optical disc drives. Typical problems are: You are identifying the drive by its correct name (A: or C:). Run Error-checking, which analyzes the directories and...
...you are having trouble accessing a drive, or one or both options: ❖ Automatically fix file system errors ❖ Scan for and attempt recovery of bad sectors 7 Click the Start button. Error-checking tests and repairs the storage drive. If you want to check. 3 On the pop... Defragmenter. Your hard disk seems very slow. Error-checking NOTE This feature is not available for a long time, your computer for optical disc drives. Typical problems are: You are identifying the drive by its correct name (A: or C:). Run Error-checking, which analyzes the directories and...
User Guide
Page 147
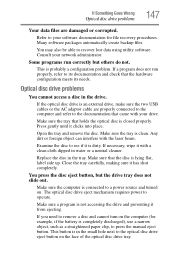
.... You may also be able to operate. This is dirty. Examine the disc to a power source and turned on the computer (for file recovery procedures. Make sure that came with your drive. You press the disc eject button, but others do not. Consult your network administrator. Make sure ...the tray is lying flat, label side up. Open the tray and remove the disc. Replace the disc in the drive....
.... You may also be able to operate. This is dirty. Examine the disc to a power source and turned on the computer (for file recovery procedures. Make sure that came with your drive. You press the disc eject button, but others do not. Consult your network administrator. Make sure ...the tray is lying flat, label side up. Open the tray and remove the disc. Replace the disc in the drive....
User Guide
Page 186
186 Index removing with computer on 89 DVD player troubleshooting 151 DVDs using 86 E eject button optical disc drive 87 eject, optical disc drive 87 enabling touch pad 75, 164 ENERGY STAR® 27 exploring desktop 108 external display device HDMI™ Out port 76 RGB (...safety 30 installation memory module 45 installing a charged battery 103 battery 101 memory modules 45 Instruction Manual for Safety and Comfort 33 internal storage drive recovery 53 K keyboard character keys 83 function keys 83 hot keys 165 special Windows® keys 83 troubleshooting 144 using 82 keys function keys 83 ...
186 Index removing with computer on 89 DVD player troubleshooting 151 DVDs using 86 E eject button optical disc drive 87 eject, optical disc drive 87 enabling touch pad 75, 164 ENERGY STAR® 27 exploring desktop 108 external display device HDMI™ Out port 76 RGB (...safety 30 installation memory module 45 installing a charged battery 103 battery 101 memory modules 45 Instruction Manual for Safety and Comfort 33 internal storage drive recovery 53 K keyboard character keys 83 function keys 83 hot keys 165 special Windows® keys 83 troubleshooting 144 using 82 keys function keys 83 ...
User Guide
Page 188
...94 optimum performance 94 power plans selecting power plan options 100 power saving options 99 precautions safety 37 printer troubleshooting 148 problem solving contacting Toshiba 158 Startup options 139 program, starting 84 program, starting from Start menu 85 projector connecting 77 R real-time clock (RTC) ...state 55 with user's data 57 restoring from recovery media 67 to custom size partition 63 without changing drive partitions 60 recycle bin icon 109 registering computer 44 removing an optical disc with computer on 89 and optical disc with computer off 91 battery from the computer 102...
...94 optimum performance 94 power plans selecting power plan options 100 power saving options 99 precautions safety 37 printer troubleshooting 148 problem solving contacting Toshiba 158 Startup options 139 program, starting 84 program, starting from Start menu 85 projector connecting 77 R real-time clock (RTC) ...state 55 with user's data 57 restoring from recovery media 67 to custom size partition 63 without changing drive partitions 60 recycle bin icon 109 registering computer 44 removing an optical disc with computer on 89 and optical disc with computer off 91 battery from the computer 102...


