User Manual
Page 49
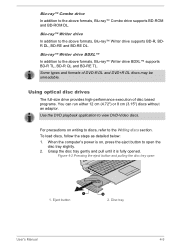
...formats, Blu-ray™ Writer drive BDXL™ supports BD-R TL, BD-R QL and BD-RE TL. For precautions on , press the eject button to open 1 1. Figure 4-2 Pressing the eject button and pulling the disc tray open the disc tray slightly. 2. To load discs, follow the steps as detailed below: 1. Using optical disc drives...pull until it is on writing to discs, refer to the above formats, Blu-ray™ Combo drive supports BD-ROM and BD-ROM DL. Eject button 2 2. Blu-ray™ Writer drive BDXL™ In addition to view DVD-Video discs. Disc tray User's Manual 4-5
...formats, Blu-ray™ Writer drive BDXL™ supports BD-R TL, BD-R QL and BD-RE TL. For precautions on , press the eject button to open 1 1. Figure 4-2 Pressing the eject button and pulling the disc tray open the disc tray slightly. 2. To load discs, follow the steps as detailed below: 1. Using optical disc drives...pull until it is on writing to discs, refer to the above formats, Blu-ray™ Combo drive supports BD-ROM and BD-ROM DL. Eject button 2 2. Blu-ray™ Writer drive BDXL™ In addition to view DVD-Video discs. Disc tray User's Manual 4-5
User Manual
Page 50
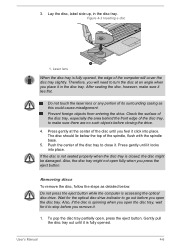
... when you remove it click into place. Also, if the disc is closed, the disc might not open , press the eject button. Gently pull the disc tray out until you press the eject button. To pop the disc tray partially open fully when you feel it . 1. If the disc is not seated properly when... tray, especially the area behind the front edge of the disc until it locks into place. The disc should lie below : Do not press the eject button while the computer is fully opened , the edge of the computer will need to turn the disc at the center of the disc tray, to...
... when you remove it click into place. Also, if the disc is closed, the disc might not open , press the eject button. Gently pull the disc tray out until you press the eject button. To pop the disc tray partially open fully when you feel it . 1. If the disc is not seated properly when... tray, especially the area behind the front edge of the disc until it locks into place. The disc should lie below : Do not press the eject button while the computer is fully opened , the edge of the computer will need to turn the disc at the center of the disc tray, to...
User Manual
Page 51
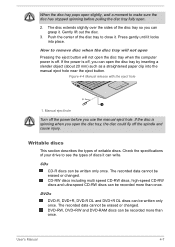
.... Push the center of the disc tray so you can grasp it locks into the manual eject hole near the eject button. Figure 4-4 Manual release with the eject hole Φ1.0mm 1 1. If the disc is off the power before pulling the disc tray fully open the disc tray by inserting a slender object (about ... . Gently lift out the disc. 3. User's Manual 4-7 Check the specifications of your drive to remove disc when the disc tray will not open Pressing the eject button will not open the disc tray, the disc could fly off . DVDs DVD-R, DVD+R, DVD-R DL and DVD+R DL discs can be erased or changed...
.... Push the center of the disc tray so you can grasp it locks into the manual eject hole near the eject button. Figure 4-4 Manual release with the eject hole Φ1.0mm 1 1. If the disc is off the power before pulling the disc tray fully open the disc tray by inserting a slender object (about ... . Gently lift out the disc. 3. User's Manual 4-7 Check the specifications of your drive to remove disc when the disc tray will not open Pressing the eject button will not open the disc tray, the disc could fly off . DVDs DVD-R, DVD+R, DVD-R DL and DVD+R DL discs can be erased or changed...


