
User Guide
Page 45
Getting Started 45 Setting up your software. 1 From the Welcome screen click Next to enter the Setup Wizard. 2 Confirm acceptance of windows displayed, and the order in which windows appear, may restart your software setup choices. ... the surface. The first time you turn on your background and then click Next. 5 Click the appropriate option from the Help Protect Windows Automatically screen. 6 Follow the remaining screen prompts to complete the setup process. 7 Click Start when the Thank You message appears. Setting up your software When you through steps to...
Getting Started 45 Setting up your software. 1 From the Welcome screen click Next to enter the Setup Wizard. 2 Confirm acceptance of windows displayed, and the order in which windows appear, may restart your software setup choices. ... the surface. The first time you turn on your background and then click Next. 5 Click the appropriate option from the Help Protect Windows Automatically screen. 6 Follow the remaining screen prompts to complete the setup process. 7 Click Start when the Thank You message appears. Setting up your software When you through steps to...
User Guide
Page 51
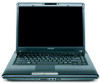
...accommodate all possible configurations for the first time Small bright dots may not be able to ensure that may not have selected all of the screen technology. This information applies to all those features. Your display contains an extremely large number of thin-film transistors (TFT) and is also...AC power rather than battery power) are properly connected and ready. 2 Check to increase the brightness of the many possible icons used on your screen display when you turn on the computer: 1 Make sure any external devices (such as the AC adaptor, if you have all the features ...
...accommodate all possible configurations for the first time Small bright dots may not be able to ensure that may not have selected all of the screen technology. This information applies to all those features. Your display contains an extremely large number of thin-film transistors (TFT) and is also...AC power rather than battery power) are properly connected and ready. 2 Check to increase the brightness of the many possible icons used on your screen display when you turn on the computer: 1 Make sure any external devices (such as the AC adaptor, if you have all the features ...

User Guide
Page 59
.... If so, consult Windows® Help and Support. 2 Pull the latches away from the memory module. Getting Started 59 Adding memory (optional) NOTE The following screen may need to scan your system has the memory modules stacked on the power: If "Start Windows® Normally" is best to press Enter to...
.... If so, consult Windows® Help and Support. 2 Pull the latches away from the memory module. Getting Started 59 Adding memory (optional) NOTE The following screen may need to scan your system has the memory modules stacked on the power: If "Start Windows® Normally" is best to press Enter to...

User Guide
Page 62
... applications), or both the recovery files and applications. 4 Click Create. 5 Insert the first blank DVD into your writable optical drive when prompted. 6 Follow the on-screen prompts for completing the copy process. Hard Disk Drive Recovery options The following are the available hard disk drive recovery options: ❖ Hard Disk Drive...
... applications), or both the recovery files and applications. 4 Click Create. 5 Insert the first blank DVD into your writable optical drive when prompted. 6 Follow the on-screen prompts for completing the copy process. Hard Disk Drive Recovery options The following are the available hard disk drive recovery options: ❖ Hard Disk Drive...
User Guide
Page 63
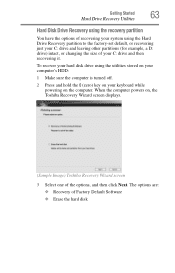
... default, or recovering just your C: drive and leaving other partitions (for example, a D: drive) intact, or changing the size of your keyboard while powering on , the Toshiba Recovery Wizard screen displays. (Sample Image) Toshiba Recovery Wizard screen 3 Select one of Factory Default Software ❖ Erase the hard disk
... default, or recovering just your C: drive and leaving other partitions (for example, a D: drive) intact, or changing the size of your keyboard while powering on , the Toshiba Recovery Wizard screen displays. (Sample Image) Toshiba Recovery Wizard screen 3 Select one of Factory Default Software ❖ Erase the hard disk
User Guide
Page 64
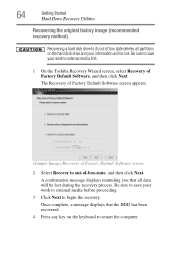
...Be sure to save your information will be lost during the recovery process. The Recovery of Factory Default Software screen appears. (Sample Image) Recovery of Factory Default Software screen 2 Select Recover to out-of Factory Default Software, and then click Next. Be sure to save your work...HDD has been recovered. 4 Press any key on the hard disk drive and your work to external media first. 1 On the Toshiba Recovery Wizard screen, select Recovery of -box-state, and then click Next. 64 Getting Started Hard Drive Recovery Utilities Recovering the original factory image (...
...Be sure to save your information will be lost during the recovery process. The Recovery of Factory Default Software screen appears. (Sample Image) Recovery of Factory Default Software screen 2 Select Recover to out-of Factory Default Software, and then click Next. Be sure to save your work...HDD has been recovered. 4 Press any key on the hard disk drive and your work to external media first. 1 On the Toshiba Recovery Wizard screen, select Recovery of -box-state, and then click Next. 64 Getting Started Hard Drive Recovery Utilities Recovering the original factory image (...
User Guide
Page 65
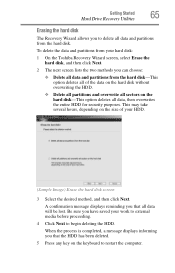
..., a message displays informing you that all data will be lost. To delete the data and partitions from your hard disk: 1 On the Toshiba Recovery Wizard screen, select Erase the hard disk, and then click Next. 2 The next screen lists the two methods you have saved your HDD. (Sample Image) Erase the hard disk...
..., a message displays informing you that all data will be lost. To delete the data and partitions from your hard disk: 1 On the Toshiba Recovery Wizard screen, select Erase the hard disk, and then click Next. 2 The next screen lists the two methods you have saved your HDD. (Sample Image) Erase the hard disk...
User Guide
Page 66
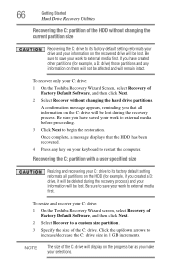
... media before proceeding. 3 Click Next to restart the computer. To resize and recover your C: drive: 1 On the Toshiba Recovery Wizard Screen, select Recovery of the C: drive. To recover only your C: drive: 1 On the Toshiba Recovery Wizard screen, select Recovery of Factory Default Software, and then click Next. 2 Select Recover to a custom size partition. 3 Specify...
... media before proceeding. 3 Click Next to restart the computer. To resize and recover your C: drive: 1 On the Toshiba Recovery Wizard Screen, select Recovery of the C: drive. To recover only your C: drive: 1 On the Toshiba Recovery Wizard screen, select Recovery of Factory Default Software, and then click Next. 2 Select Recover to a custom size partition. 3 Specify...
User Guide
Page 67
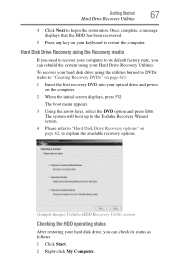
...-click My Computer. To recover your hard disk drive using your computer to begin the restoration. The system will boot up to the Toshiba Recovery Wizard screen. 4 Please refer to "Hard Disk Drive Recovery options" on page 62, to restart the computer. Once complete, a message displays that...the first recovery DVD into your optical drive and power on your keyboard to explain the available recovery options. (Sample Image) Toshiba HDD Recovery Utility screen Checking the HDD operating status After restoring your hard disk drive, you can check its default factory state, you need to...
...-click My Computer. To recover your hard disk drive using your computer to begin the restoration. The system will boot up to the Toshiba Recovery Wizard screen. 4 Please refer to "Hard Disk Drive Recovery options" on page 62, to restart the computer. Once complete, a message displays that...the first recovery DVD into your optical drive and power on your keyboard to explain the available recovery options. (Sample Image) Toshiba HDD Recovery Utility screen Checking the HDD operating status After restoring your hard disk drive, you can check its default factory state, you need to...
User Guide
Page 68
...you would like to move the cursor: ❖ To move the cursor to the top of the page, push your finger forward on -screen prompts to complete the installation process. 68 Getting Started Using the TouchPad™ 3 Select Manage. 4 Click Disk Management. 5 Highlight the ... the page, slide your finger across the TouchPad in the preferred direction. Installing drivers and applications (Available on certain models) The Toshiba Application Installer (available on certain models) allows you to reinstall the drivers and applications that were originally bundled with the stroke of the...
...you would like to move the cursor: ❖ To move the cursor to the top of the page, push your finger forward on -screen prompts to complete the installation process. 68 Getting Started Using the TouchPad™ 3 Select Manage. 4 Click Disk Management. 5 Highlight the ... the page, slide your finger across the TouchPad in the preferred direction. Installing drivers and applications (Available on certain models) The Toshiba Application Installer (available on certain models) allows you to reinstall the drivers and applications that were originally bundled with the stroke of the...

User Guide
Page 70
... of system HDMI™ Out port* *Available on the external device. NOTE In the future you first need a larger screen. Your computer will automatically detect the external display device and activate a screen with the monitor to see if you can easily attach an external monitor or projector to your computer if you...
... of system HDMI™ Out port* *Available on the external device. NOTE In the future you first need a larger screen. Your computer will automatically detect the external display device and activate a screen with the monitor to see if you can easily attach an external monitor or projector to your computer if you...

User Guide
Page 71
... press F5 repeatedly, pausing between each press, until the setting you to: ❖ Use the TV remote control to output the computer screen onto the TV screen. ❖ Use the TV remote control to launch, operate and close applications on your computer. ❖ Turn on the TV when ...display output settings is a standard in display and TV (or other external video device) simultaneously For more detailed HDMI-CEC information, visit pcsupport.toshiba.com. Directing the display output when you turn on the computer Once you have connected an external display device, you can allow you want...
... press F5 repeatedly, pausing between each press, until the setting you to: ❖ Use the TV remote control to output the computer screen onto the TV screen. ❖ Use the TV remote control to launch, operate and close applications on your computer. ❖ Turn on the TV when ...display output settings is a standard in display and TV (or other external video device) simultaneously For more detailed HDMI-CEC information, visit pcsupport.toshiba.com. Directing the display output when you turn on the computer Once you have connected an external display device, you can allow you want...

User Guide
Page 74
... Getting Started Connecting an optional external diskette drive Setting up your printer. The Add Printer Wizard appears. (Sample Image) Add Printer Wizard 2 Follow the on-screen instructions to your printer installation guide for use with 3.5-inch diskettes. (Sample Illustration) Optional external USB diskette drive
... Getting Started Connecting an optional external diskette drive Setting up your printer. The Add Printer Wizard appears. (Sample Image) Add Printer Wizard 2 Follow the on-screen instructions to your printer installation guide for use with 3.5-inch diskettes. (Sample Illustration) Optional external USB diskette drive

User Guide
Page 79
... the computer 3 Click Change advanced power settings. The Advanced settings tab of the Power Options window appears. (Sample Image) Advanced settings tab of Power Options screen 4 Click Power buttons and lid to shut down lists. NOTE These options can be set separately for how they operate while the computer is running...
... the computer 3 Click Change advanced power settings. The Advanced settings tab of the Power Options window appears. (Sample Image) Advanced settings tab of Power Options screen 4 Click Power buttons and lid to shut down lists. NOTE These options can be set separately for how they operate while the computer is running...

User Guide
Page 81
... feature. 1 Click Start, Control Panel, System and Maintenance, and then Power Options. Getting Started 81 Turning off the computer To use any of Power Options screen 4 Click Power buttons and lid to display the actions that you can be customized.
... feature. 1 Click Start, Control Panel, System and Maintenance, and then Power Options. Getting Started 81 Turning off the computer To use any of Power Options screen 4 Click Power buttons and lid to display the actions that you can be customized.

User Guide
Page 82
... go into Hibernation mode by opening the display panel. Using and configuring Sleep mode To turn off the computer using . The computer returns to the screen(s) you were using the Sleep command: 1 Click Start, and then click the arrow next to go into Hibernation mode when you press the power button...
... go into Hibernation mode by opening the display panel. Using and configuring Sleep mode To turn off the computer using . The computer returns to the screen(s) you were using the Sleep command: 1 Click Start, and then click the arrow next to go into Hibernation mode when you press the power button...

User Guide
Page 83
... the status of time after which the computer automatically goes into a low-power mode. The Edit Plan Settings window appears. (Sample Image) Edit Plan Settings screen 3 To change the amount of time after which the computer enters Sleep mode: ❖ Under Put the computer to sleep, select the desired amount of...
... the status of time after which the computer automatically goes into a low-power mode. The Edit Plan Settings window appears. (Sample Image) Edit Plan Settings screen 3 To change the amount of time after which the computer enters Sleep mode: ❖ Under Put the computer to sleep, select the desired amount of...

User Guide
Page 84
... go into Sleep mode when you want . The Advanced settings tab of the Power Options window appears. (Sample Image) Advanced settings tab of Power Options screen 5 Click Power buttons and lid to display the actions that you can be set separately for the options you want the computer to Sleep if...
... go into Sleep mode when you want . The Advanced settings tab of the Power Options window appears. (Sample Image) Advanced settings tab of Power Options screen 5 Click Power buttons and lid to display the actions that you can be set separately for the options you want the computer to Sleep if...

User Guide
Page 85
... place it again by either pressing the power button or closing the display panel, depending on the Sleep options set. The computer returns to the screen(s) you were using. Never spray cleaner directly onto the computer and/or display.
... place it again by either pressing the power button or closing the display panel, depending on the Sleep options set. The computer returns to the screen(s) you were using. Never spray cleaner directly onto the computer and/or display.

User Guide
Page 112
.... The Advanced settings tab of the Power Options window appears. (Sample Image) Advanced settings tab of time you can increase the length of Power Options screen 4 Click Battery to display the battery options. 5 Configure the alarm settings to recharge the battery. By using the computer depends on again ❖ Use the...
.... The Advanced settings tab of the Power Options window appears. (Sample Image) Advanced settings tab of time you can increase the length of Power Options screen 4 Click Battery to display the battery options. 5 Configure the alarm settings to recharge the battery. By using the computer depends on again ❖ Use the...


