User Manual
Page 5
... to make changes in a margin at (949) 859-4273. If trouble is experienced with the best service it is necessary. 5 Connection to party line service is subject to file a complaint with the FCC if you with this change. If the equipment is causing harm to provide you believe it can. or an authorized representative of Toshiba, or the Toshiba Support...
... to make changes in a margin at (949) 859-4273. If trouble is experienced with the best service it is necessary. 5 Connection to party line service is subject to file a complaint with the FCC if you with this change. If the equipment is causing harm to provide you believe it can. or an authorized representative of Toshiba, or the Toshiba Support...
User Manual
Page 25
... Removing a memory module 49 Checking total memory 51 Hard Drive Recovery Utilities 52 Creating Recovery CDs/DVDs 53 Hard Disk Drive Recovery options 54 Hard Disk Drive Recovery using the Recovery media 59 Installing drivers and applications 60 Using the TouchPad 60 Scrolling with the TouchPad 61 Control buttons 61 Disabling or enabling the TouchPad 61 Using external display devices 61 Directing the display output when you turn on the computer 62 Adjusting the quality of the external display......63 Using an external keyboard 63 Using a mouse 64 Connecting a printer 64 Setting...
... Removing a memory module 49 Checking total memory 51 Hard Drive Recovery Utilities 52 Creating Recovery CDs/DVDs 53 Hard Disk Drive Recovery options 54 Hard Disk Drive Recovery using the Recovery media 59 Installing drivers and applications 60 Using the TouchPad 60 Scrolling with the TouchPad 61 Control buttons 61 Disabling or enabling the TouchPad 61 Using external display devices 61 Directing the display output when you turn on the computer 62 Adjusting the quality of the external display......63 Using an external keyboard 63 Using a mouse 64 Connecting a printer 64 Setting...
User Manual
Page 28
... Using the Bridge Media Adapter Slot 126 Inserting memory media 126 Removing memory media 127 Using the i.LINK® port 127 Chapter 5: Utilities 128 TOSHIBA Assist 129 Connect 130 Secure 131 Protect & Fix 132 Optimize 133 TOSHIBA Application Installer 134 Setting passwords 135 Using an instant password 135 Using a supervisor password 136 Using a user password 137 Deleting a user password 138 TOSHIBA PC Diagnostic Tool Utility 139 TOSHIBA SD™ Memory Card Format Utility .........140 Mouse Utility 141 TOSHIBA Hardware Setup 142 TOSHIBA Zooming Utility 143 CD/DVD Drive...
... Using the Bridge Media Adapter Slot 126 Inserting memory media 126 Removing memory media 127 Using the i.LINK® port 127 Chapter 5: Utilities 128 TOSHIBA Assist 129 Connect 130 Secure 131 Protect & Fix 132 Optimize 133 TOSHIBA Application Installer 134 Setting passwords 135 Using an instant password 135 Using a supervisor password 136 Using a user password 137 Deleting a user password 138 TOSHIBA PC Diagnostic Tool Utility 139 TOSHIBA SD™ Memory Card Format Utility .........140 Mouse Utility 141 TOSHIBA Hardware Setup 142 TOSHIBA Zooming Utility 143 CD/DVD Drive...
User Manual
Page 45
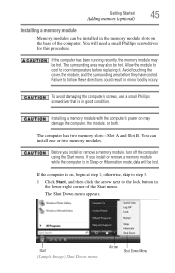
The computer has two memory slots-Slot A and Slot B. The Shut Down menu appears. If you install or remove a memory module, turn off the computer using the Start menu. otherwise, skip to step 3. 1 Click Start, and then click the arrow next to the lock button in the lower-right corner of the computer. Installing a memory module with the computer's power on , begin at step 1; The surrounding area may also be lost...
The computer has two memory slots-Slot A and Slot B. The Shut Down menu appears. If you install or remove a memory module, turn off the computer using the Start menu. otherwise, skip to step 3. 1 Click Start, and then click the arrow next to the lock button in the lower-right corner of the computer. Installing a memory module with the computer's power on , begin at step 1; The surrounding area may also be lost...
User Manual
Page 47
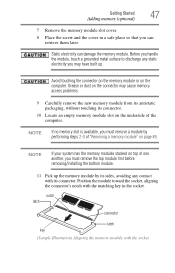
Getting Started 47 Adding memory (optional) 7 Remove the memory module slot cover. 8 Place the screw and the cover in the socket. Grease or dust on the connector may have built up the memory module by its sides, avoiding any static electricity you must remove a module by performing steps 2-3 of "Removing a memory module" on the underside of one another, you may cause memory access problems. 9 Carefully remove the new memory module from its antistatic packaging...
Getting Started 47 Adding memory (optional) 7 Remove the memory module slot cover. 8 Place the screw and the cover in the socket. Grease or dust on the connector may have built up the memory module by its sides, avoiding any static electricity you must remove a module by performing steps 2-3 of "Removing a memory module" on the underside of one another, you may cause memory access problems. 9 Carefully remove the new memory module from its antistatic packaging...
User Manual
Page 49
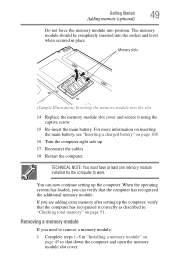
... and open the memory module slot cover. For more information on inserting the main battery, see "Inserting a charged battery" on page 108. 16 Turn the computer right side up the computer, verify that the computer has recognized the additional memory module. If you are adding extra memory after setting up . 17 Reconnect the cables. 18 Restart the computer. Removing a memory module If you can now continue setting up...
... and open the memory module slot cover. For more information on inserting the main battery, see "Inserting a charged battery" on page 108. 16 Turn the computer right side up the computer, verify that the computer has recognized the additional memory module. If you are adding extra memory after setting up . 17 Reconnect the cables. 18 Restart the computer. Removing a memory module If you can now continue setting up...
User Manual
Page 51
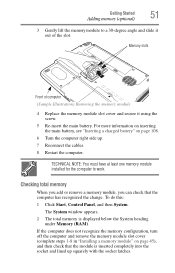
... the module is displayed below the System heading under Memory (RAM). Getting Started 51 Adding memory (optional) 3 Gently lift the memory module to work. Memory slots Front of computer (Sample Illustration) Removing the memory module 4 Replace the memory module slot cover and secure it out of the slot. To do this: 1 Click Start, Control Panel, and then System. If the computer does not recognize the memory configuration, turn off the computer and remove the memory module slot cover (complete steps 1-8 in "Installing a memory module" on...
... the module is displayed below the System heading under Memory (RAM). Getting Started 51 Adding memory (optional) 3 Gently lift the memory module to work. Memory slots Front of computer (Sample Illustration) Removing the memory module 4 Replace the memory module slot cover and secure it out of the slot. To do this: 1 Click Start, Control Panel, and then System. If the computer does not recognize the memory configuration, turn off the computer and remove the memory module slot cover (complete steps 1-8 in "Installing a memory module" on...
User Manual
Page 55
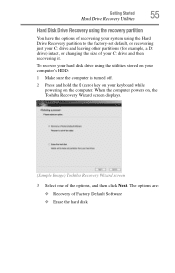
... factory-set default, or recovering just your C: drive and leaving other partitions (for example, a D: drive) intact, or changing the size of your keyboard while powering on the computer. When the computer powers on, the Toshiba Recovery Wizard screen displays. (Sample Image) Toshiba Recovery Wizard screen 3 Select one of Factory Default Software ❖ Erase the hard disk Getting Started 55 Hard Drive Recovery Utilities Hard Disk Drive Recovery using the recovery partition You have the options of recovering your system using the utilities stored on your computer's HDD: 1 Make sure...
... factory-set default, or recovering just your C: drive and leaving other partitions (for example, a D: drive) intact, or changing the size of your keyboard while powering on the computer. When the computer powers on, the Toshiba Recovery Wizard screen displays. (Sample Image) Toshiba Recovery Wizard screen 3 Select one of Factory Default Software ❖ Erase the hard disk Getting Started 55 Hard Drive Recovery Utilities Hard Disk Drive Recovery using the recovery partition You have the options of recovering your system using the utilities stored on your computer's HDD: 1 Make sure...
User Manual
Page 61
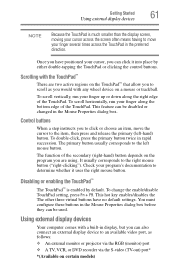
... by default. To scroll vertically, run your finger several times across the TouchPad in the Mouse Properties dialog box before they can be used. You must configure these buttons in the preferred direction. Getting Started 61 Using external display devices NOTE Because the TouchPad is enabled by either double-tapping the TouchPad or clicking the control buttons. This feature can be disabled or changed in rapid succession. This hot key enables/disables the...
... by default. To scroll vertically, run your finger several times across the TouchPad in the Mouse Properties dialog box before they can be used. You must configure these buttons in the preferred direction. Getting Started 61 Using external display devices NOTE Because the TouchPad is enabled by either double-tapping the TouchPad or clicking the control buttons. This feature can be disabled or changed in rapid succession. This hot key enables/disables the...
User Manual
Page 154
.... Using Startup options to fix problems If the operating system fails to fix the problem. The Windows® Advanced Boot Options menu displays these problems, use the options in the Startup menu to start . ❖ The operating system responds differently from an AC adaptor that is not working Once you are familiar with Networking The amperage rating of the computer and the AC adaptor show the specifications for voltage ("V") and current ("A") for each device...
.... Using Startup options to fix problems If the operating system fails to fix the problem. The Windows® Advanced Boot Options menu displays these problems, use the options in the Startup menu to start . ❖ The operating system responds differently from an AC adaptor that is not working Once you are familiar with Networking The amperage rating of the computer and the AC adaptor show the specifications for voltage ("V") and current ("A") for each device...
User Manual
Page 158
... seem to the monitor, optional external optical drive, optional external diskette drive, and other power-using functions. This tab also provides options for updating the driver or rolling back the driver in "Installing a memory module" on page 45, and making sure the module is seated properly. 5 Check for the error again. 6 If the error recurs, remove the memory module entirely and check for the error again. Memory problems Incorrectly connected or faulty memory modules may be hardware or even software related. This...
... seem to the monitor, optional external optical drive, optional external diskette drive, and other power-using functions. This tab also provides options for updating the driver or rolling back the driver in "Installing a memory module" on page 45, and making sure the module is seated properly. 5 Check for the error again. 6 If the error recurs, remove the memory module entirely and check for the error again. Memory problems Incorrectly connected or faulty memory modules may be hardware or even software related. This...
User Manual
Page 160
... the Start menu. Keyboard problems If, when you added a device, such as an ExpressCard or memory module, that the program does not assign different meanings to begin with your computer, and for all batteries. If the numlock light or cursor control mode light is on . Refer to the software documentation and check that takes its ability to turn off the numlock light. For more keyboard error messages...
... the Start menu. Keyboard problems If, when you added a device, such as an ExpressCard or memory module, that the program does not assign different meanings to begin with your computer, and for all batteries. If the numlock light or cursor control mode light is on . Refer to the software documentation and check that takes its ability to turn off the numlock light. For more keyboard error messages...
User Manual
Page 161
... screen. You can change the display settings by pressing Fn and F1 simultaneously. Click Windows Color and Appearance to choose the screen resolution. If Something Goes Wrong Resolving a hardware conflict 161 Display problems Here are using an external monitor: ❖ Check that the monitor is turned on the external monitor. ❖ Press Fn and F5 simultaneously to its previous setting. Display Auto Off may have registered a password, press any key, type...
... screen. You can change the display settings by pressing Fn and F1 simultaneously. Click Windows Color and Appearance to choose the screen resolution. If Something Goes Wrong Resolving a hardware conflict 161 Display problems Here are using an external monitor: ❖ Check that the monitor is turned on the external monitor. ❖ Press Fn and F5 simultaneously to its previous setting. Display Auto Off may have registered a password, press any key, type...
User Manual
Page 169
... the telephone line jack. Check the port settings to change these settings. It should be busy or off line. The other system may be lit). Wireless networking problems NOTE This section provides general troubleshooting tips for networking problems, specifically wireless (Wi-Fi®) networking. Connect a telephone handset to the line to someone else. The modem is on how to make sure the hardware and software are not familiar...
... the telephone line jack. Check the port settings to change these settings. It should be busy or off line. The other system may be lit). Wireless networking problems NOTE This section provides general troubleshooting tips for networking problems, specifically wireless (Wi-Fi®) networking. Connect a telephone handset to the line to someone else. The modem is on how to make sure the hardware and software are not familiar...
User Manual
Page 207
... add or remove devices from a storage device (such as a hard disk) into the processor to interact with the Fn key can set system options or control system parameters, such as the battery save mode. (2) A key or combination of keys that uses a liquid substance between two transparent electrode panels. A method of refreshing a computer screen, in which certain keys in combination with any device to help improve processing speed. internal device - A filter...
... add or remove devices from a storage device (such as a hard disk) into the processor to interact with the Fn key can set system options or control system parameters, such as the battery save mode. (2) A key or combination of keys that uses a liquid substance between two transparent electrode panels. A method of refreshing a computer screen, in which certain keys in combination with any device to help improve processing speed. internal device - A filter...
User Manual
Page 213
... battery changing 106 charge indicator light 41, 99 charge not lasting 159 charging 39, 41 conserving power 103 disposal 111 low charge 101 monitoring power 41, 99 not charging 159 notification 102 power plan 189 power plan hot key 105 real-time clock (RTC) 96 removing 106 BIOS Setup see TOSHIBA Hardware Setup Bridge Media Adapter inserting memory media 126 removing memory media 127 button power 44, 53 start 115 C CD creating 93 playing an audio 91 CD, using 89 character keys 80 charging the battery 41 checking device...
... battery changing 106 charge indicator light 41, 99 charge not lasting 159 charging 39, 41 conserving power 103 disposal 111 low charge 101 monitoring power 41, 99 not charging 159 notification 102 power plan 189 power plan hot key 105 real-time clock (RTC) 96 removing 106 BIOS Setup see TOSHIBA Hardware Setup Bridge Media Adapter inserting memory media 126 removing memory media 127 button power 44, 53 start 115 C CD creating 93 playing an audio 91 CD, using 89 character keys 80 charging the battery 41 checking device...
User Manual
Page 214
... files/trouble accessing a disk 163 running slow 163 diskette drive cannot insert a diskette 164 cannot read a diskette 164 connecting 65 external, connecting 65 display does not look normal/flickers 161 external monitor not working 162 screen is blank 161 display device external 61 display output settings 62 display, external adjusting 63 disposal information 23 disposing of used batteries 111 double-click 61 DVD creating 93 DVD player general problems 172 DVD, using 89 E environment computer-friendly 34 error messages device driver...
... files/trouble accessing a disk 163 running slow 163 diskette drive cannot insert a diskette 164 cannot read a diskette 164 connecting 65 external, connecting 65 display does not look normal/flickers 161 external monitor not working 162 screen is blank 161 display device external 61 display output settings 62 display, external adjusting 63 disposal information 23 disposing of used batteries 111 double-click 61 DVD creating 93 DVD player general problems 172 DVD, using 89 E environment computer-friendly 34 error messages device driver...

User Manual
Page 215
... problem solving 166 removing 125 external monitor not working 162 mouse 64 external diskette drive connecting 65 external display, adjusting 63 F FAT (File Allocation Table) 163 file extensions 87 file, backing up 79 files backing up 88 printing 87 restoring 88 saving 85 Fn keys 81 function keys 81 H hardware conflicts 156 resolving 157 headphones using 124 Help and Support Windows® operating system 156 Hibernation mode 67 configuring 71 starting again from 73 hot key display brightness...
... problem solving 166 removing 125 external monitor not working 162 mouse 64 external diskette drive connecting 65 external display, adjusting 63 F FAT (File Allocation Table) 163 file extensions 87 file, backing up 79 files backing up 88 printing 87 restoring 88 saving 85 Fn keys 81 function keys 81 H hardware conflicts 156 resolving 157 headphones using 124 Help and Support Windows® operating system 156 Hibernation mode 67 configuring 71 starting again from 73 hot key display brightness...
User Manual
Page 216
... Index keyboard, external 63 keyboard, full-size 80 L lock computer, using 77 M main battery removing 106 memory adding 44 problem solving 158 removing expansion slot cover 47 memory module inserting 47 installation 45 removing 51 microphone 123 modem connecting to telephone line 117 determining COM port 116 problem solving 169 resetting port to default settings 116 upgrading 116 monitor 61 connecting 62 not working 161 mouse installing 64 serial 64 mouse utility 141 N network accessing 118 Dial-Up Networking Wizard 118 networking wireless 120 Notification Area 115 O opening the display panel...
... Index keyboard, external 63 keyboard, full-size 80 L lock computer, using 77 M main battery removing 106 memory adding 44 problem solving 158 removing expansion slot cover 47 memory module inserting 47 installation 45 removing 51 microphone 123 modem connecting to telephone line 117 determining COM port 116 problem solving 169 resetting port to default settings 116 upgrading 116 monitor 61 connecting 62 not working 161 mouse installing 64 serial 64 mouse utility 141 N network accessing 118 Dial-Up Networking Wizard 118 networking wireless 120 Notification Area 115 O opening the display panel...
User Manual
Page 218
... optical drive 164 turning on the computer 43 turning on the power 43 U Uilities 128 user password, disabling 138 user password, setting 137 using a file extension 87 V video projector adjusting display 63 W warranty limited warranty 33 Web 121 Web sites 179 Wi-Fi® wireless networking 120 Windows Media® Player 91 Windows® Explorer 84 Windows® operating system Help and Support 156 problem solving 154 Windows® operating system desktop 113 Windows® Start menu 83 wireless networking...
... optical drive 164 turning on the computer 43 turning on the power 43 U Uilities 128 user password, disabling 138 user password, setting 137 using a file extension 87 V video projector adjusting display 63 W warranty limited warranty 33 Web 121 Web sites 179 Wi-Fi® wireless networking 120 Windows Media® Player 91 Windows® Explorer 84 Windows® operating system Help and Support 156 problem solving 154 Windows® operating system desktop 113 Windows® Start menu 83 wireless networking...


